Searching for a compatible and high-quality kitchen tool sometimes can be incredibly difficult, as you encounter thousands of local and international brands, each with several product models. Are you obsessed with searching too many websites? In this detailed article, we will consider the top best hand blender you can find in the market.
What is a hand blender?
A handheld blender also called an immersion blender or stick blender, is a kitchen tool that can free you from having an expensive and huge food processor. A brilliant hand blender is more affordable than countertop blenders and is less involved when it comes to cleaning. You can wash your hand blender in your sink or via your dishwasher.
What to consider before buying a hand blender?
The most important element for purchasing a new product is your budget; while a handheld blender is reasonably inexpensive, the other one can be luxurious and bank-breaking. The next parameter can be your family size; if you are alone or just a college student, it is better to save your cash and try a small-sized handheld blender. However, you have to look for products with more capacity if you are a member of a large family, especially with one or two babies.
Guaranteed products usually have better durability in the following years, as you can use your official guarantee card if you face any problem with your hand blender. If you have a dishwashing machine at your home, we recommend buying a hand blender with dishwasher-safe attachments.
You may be interested in Top card tables, read more.
10 best hand blenders to use
Here, we have listed the top best immersion blender purchasable on online markets:
-
KitchenAid Cordless Hand Blender 5KHBBV53
More [easyazon_link identifier=”B08F2SS6T2″ locale=”US” tag=”inos03-20″]Buy[/easyazon_link] -
Mueller Ultra-Stick 500 Watt 9-Speed Immersion Multi-Purpose Hand BlenderBest overall
More [easyazon_link identifier=”B075X1KPLZ” locale=”US” tag=”inos03-20″]Buy[/easyazon_link] -
KOIOS 800W 4-in-1 Multifunctional Hand Immersion Blender, 12 Speed
More [easyazon_link identifier=”B07DHM7K8J” locale=”US” tag=”inos03-20″]Buy[/easyazon_link] -
Chefman Immersion Blender 300-Watt Turbo 12 Speed Stick Hand Blender
More [easyazon_link identifier=”B07DJQ3RJN” locale=”US” tag=”inos03-20″]Buy[/easyazon_link] -
Bosch MSM2610BGB CleverMixx Hand BlenderBest expensive
-
Hamilton Beach 59765 Immersion Hand Blender with Blending Wand
More [easyazon_link identifier=”B003NQE8B0″ locale=”US” tag=”inos03-20″]Buy[/easyazon_link] -
Braun MultiQuick 5 Immersion Hand Blender Patented Technology
More [easyazon_link identifier=”B01EA5ZI2U” locale=”US” tag=”inos03-20″]Buy[/easyazon_link] -
Breville BSB510XL Control Grip Immersion Blender, Stainless Steel
More [easyazon_link identifier=”B004RF7QJW” locale=”US” tag=”inos03-20″]Buy[/easyazon_link] -
Vitamix Immersion Blender, Stainless Steel, 18 inches
More [easyazon_link identifier=”B08DDJMBZM” locale=”US” tag=”inos03-20″]Buy[/easyazon_link] -
BELLA 10-Speed Immersion Blender with Attachments, 350 WattBest price
More [easyazon_link identifier=”B07PGB7BX9″ locale=”US” tag=”inos03-20″]Buy[/easyazon_link]
1. KitchenAid Cordless Hand Blender 5KHBBV53
Considered the best hand blender, this product is the new cordless KitchenAid hand blender introduced by the company. It comes with a 700 ml blending cup and a pan guard, which can be placed perfectly over the blades to prevent them from damaging your cookware. With this product, you can make a silky, clump-free batter in less than a minute and pure a tin of chickpeas in just twenty seconds. The only disadvantage of this product is that its control is a little bit difficult for the user.
Details
- Weight: 1.1 Kg
- Variable speed: Yes
- Battery cell type: Lithium-Ion
- Length of electrical supply cord (cm): 153
- Stainless steel blades: Yes
- Pulse action: No
- Charger output voltage: 220-240
- Bell Blades Speed RPM (min-max): 100-2300
- Guarantee: 2 years
- Rating on the market: 95/100
- Price: 124 pounds
[easyazon_image align=”none” height=”500″ identifier=”B08F2SS6T2″ locale=”US” src=”https://m.media-amazon.com/images/I/41yiki33+KL._SL500_.jpg” tag=”inos03-20″ width=”500″]
[easyazon_infoblock align=”none” identifier=”B08F2SS6T2″ locale=”US” tag=”inos03-20″]
2. Mueller Ultra-Stick 500 Watt 9-Speed Immersion Multi-Purpose Hand Blender
This hand blender is designed and engineered to outstand and outperform the competition. Comfortable and easy to use, makes all your mixing and blending tasks way easier than before. The Mueller Ultra-Stick 9-Speed hand blender is one countertop appliance with limitless options and versatility. The arm reaches perfectly into deeper pots while blending. This model allows you to blend, puree, and crush with ease. 9 speeds provide control for food, such as smoothies, soups, or baby food. Both the blending arm and whisk twist off for quick and easy cleanup. This product is a real game-changer. You can make anything from salsas, shakes, and smoothies, all the way to baby food, and so on.
Pros
- non-slip and comfortable grip with the ergonomic design
- the full copper motor that can withstand everyday use
- Removable blending arm with fixed blade locks into the motor body for easy operation
Cons
- dull blades after a long-term use
[easyazon_image align=”none” height=”500″ identifier=”B075X1KPLZ” locale=”US” src=”https://m.media-amazon.com/images/I/51NT233YM9L._SL500_.jpg” tag=”inos03-20″ width=”500″]
[easyazon_infoblock align=”none” identifier=”B075X1KPLZ” locale=”US” tag=”inos03-20″]
3. KOIOS 800W 4-in-1 Multifunctional Hand Immersion Blender, 12 Speed
If you have never heard of this brand you should know that it is a well-built product. Powerful, smooth, and much quieter than Braun immersion blenders. The pieces attach and detach easily, The blender cup is a good size, and the chopper attachment has a proper size for easy use. It is equipped with a high-torque power hand blender shaft and a powerful 800W motor. It also comes with a 600ml mixing beaker, a whisk attachment, a 500ml chopper attachment, and 5 feet power cord. Quick and easy clean as it simply rinses under warm tap water or top-rack dishwasher.
Pros
- Quiet motor
- Dishwasher safe parts make it simple to clean
- Excellent quality
Cons
- Gets warm during use
- Thin iron layer
[easyazon_image align=”none” height=”500″ identifier=”B07DHM7K8J” locale=”US” src=”https://m.media-amazon.com/images/I/41MGRpFqcZL._SL500_.jpg” tag=”inos03-20″ width=”500″]
[easyazon_infoblock align=”none” identifier=”B07DHM7K8J” locale=”US” tag=”inos03-20″]
4. Chefman Immersion Blender 300-Watt Turbo 12 Speed Stick Hand Blender
You can do all your mixing needs effortlessly by utilizing the Chefman 12-Speed Turbo Immersion Blender. Outfitted with a strong 300-Watt super calm engine, this blender rapidly purees soups, mixes players, smoothies, and sauces, condenses leafy foods and greens, blends child equations, and that’s just the beginning. So you can make delightful manifestations like a flash. Make your dishes as smooth as our silk-contact feel; the blender’s interesting sharp edge gives incredibly smooth and in any event, mixing, while its defensive sharp edge monitor forestalls splattering.
With a smooth stick plan, it effectively ventures into blending bowls, huge cooking pots, and pitchers so you can mix a variety of things helpfully and bother-free. The lightweight plan, simple to-hold handle, and 12-speed control make this a definitive device for an assortment of mixing needs. Heat-safe plastic cutting-edge watch is delicate on pots so you can stress less over scratching it and spotlight on making scrumptiously mixed dishes. Sharp edge confines with only a curve, and separable parts are dishwasher safe, making this stick blender as simple to spotless for what it’s worth utilizing.
Pros
- Build quality
- Easy utilizing
Cons
- short lifespan
[easyazon_image align=”none” height=”500″ identifier=”B07DJQ3RJN” locale=”US” src=”https://m.media-amazon.com/images/I/41HPphyDUcL._SL500_.jpg” tag=”inos03-20″ width=”500″]
[easyazon_infoblock align=”none” identifier=”B07DJQ3RJN” locale=”US” tag=”inos03-20″]
5. Bosch MSM2610BGB CleverMixx Hand Blender

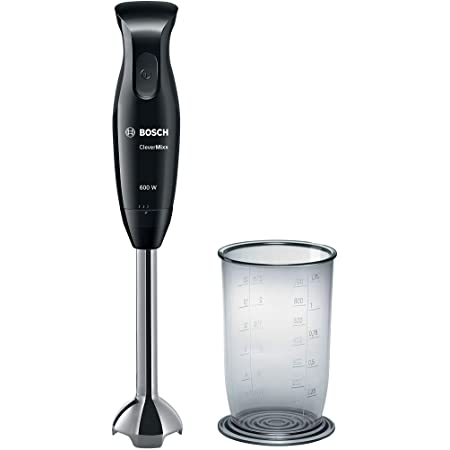
For Bosch fans, this is a fantastic powerful product that beats even the most challenging ingredients, acing every test we put it through. You can find plenty of space around the blades, making them a breeze to clean. The ergonomic handle can fit perfectly and comfortably in your hand. Note that all plastics that are in contact with food are BPA-free.
Details
- Weight: 1 Kg
- Material: Plastic
- Power: 600 Watts
- Voltage: 240 volts
- Variable speeds: none
- Included accessories: 700ml blending jar
- Dishwasher-safe attachments: Yes
- Guarantee: 2 years
- Rating on the market: 96/100
- Price: 34 pounds
6. Hamilton Beach 59765 Immersion Hand Blender with Blending Wand
This product comes with 3 attachments including a blending wand, whisk attachment, and 3-cup chopping bowl attachment with stainless steel blades. The Dishwashing is safe for easy cleanup. It can blend, mix, whip, puree, and chop with one 2-speed kitchen multi-tool. Chop right in the bowl and there is no need for another bowl conveniently chop right into the included 3-cup bowl. 225-watt motor is powerful enough for all your deeds: mixing, and cutting.
Pros
- One tool for multiple duties
- Chops with the least splashes
- Dishwasher safe parts
Cons
- Low blade quality
[easyazon_image align=”none” height=”500″ identifier=”B003NQE8B0″ locale=”US” src=”https://m.media-amazon.com/images/I/51FLgVa5AjL._SL500_.jpg” tag=”inos03-20″ width=”500″]
[easyazon_infoblock align=”none” identifier=”B003NQE8B0″ locale=”US” tag=”inos03-20″]
7. Braun MultiQuick 5 Immersion Hand Blender Patented Technology
This model Braun provides maximum blending control. Its VarioSpeed technology provides a fast, one-handed operation so you can select among 21 distinct speeds to achieve consistently perfect blending.
This outstanding product brings about maximum blending control and multiple food prep possibilities.
The VarioSpeed technology is a fast, one-handed operative so you can select among 21 distinct speeds to achieve consistently perfect blending. TurboBoost speed setting provides an extra burst of power exactly when you need it. Unique bell-shaped blending shaft and ultra-hard stainless steel blades, draw food inward and reduces suction to produce finer, smoother purées and soups every time.
Pros
- Soft grip handle offers comfort
- Supreme added power with the turbo boost mode
- Durable stainless steel blades
Cons
- The handle gets hot
[easyazon_image align=”none” height=”500″ identifier=”B01EA5ZI2U” locale=”US” src=”https://m.media-amazon.com/images/I/41vFxH5H63L._SL500_.jpg” tag=”inos03-20″ width=”500″]
[easyazon_infoblock align=”none” identifier=”B01EA5ZI2U” locale=”US” tag=”inos03-20″]
8. Breville BSB510XL Control Grip Immersion Blender, Stainless Steel
The Breville Control Grip is an immersion blender with a long shaft that’s ideal for blending ingredients in large pots and dutch ovens. It can hot blend, and it comes with lots of accessories, including a whisk attachment and a food processor attachment. It doesn’t have a very versatile performance, as it fails to crush ice and struggles to make almond butter. However, if you’re looking for an immersion blender for making soups, it can be a solid choice.
Pros
- Dishwashing is safe
- easy to clean
Cons
- Fails to crush ice and rice
[easyazon_image align=”none” height=”500″ identifier=”B004RF7QJW” locale=”US” src=”https://m.media-amazon.com/images/I/41uktrDC7lL._SL500_.jpg” tag=”inos03-20″ width=”369″]
[easyazon_infoblock align=”none” identifier=”B004RF7QJW” locale=”US” tag=”inos03-20″]
9. Vitamix Immersion Blender, Stainless Steel, 18 inches
Vitamix is most known for making high-powered, pro-level blenders. It is equipped with a 5-variable speed motor, LED light display, and Ergonomic Handle Design. The scratch-resistance blade guard prevents scratching and marring favorite pots and pans. The Vitamix Immersion Blender has an easy twist lock assembly. The powerful motor makes every blending task faster.
Pros
- Stainless Steel Body
- High quality
- Powerful
Cons
- pricey
[easyazon_image align=”none” height=”500″ identifier=”B08DDJMBZM” locale=”US” src=”https://m.media-amazon.com/images/I/21g-kYUP9qL._SL500_.jpg” tag=”inos03-20″ width=”375″]
[easyazon_infoblock align=”none” identifier=”B08DDJMBZM” locale=”US” tag=”inos03-20″]
10. BELLA 10-Speed Immersion Blender with Attachments, 350 Watt
This product is featured a powerful 350-watt motor, variable speed control an 8-inch blending shaft. BELLA 10-Speed Immersion Blende is Ideal for smaller kitchens. This handheld mixer is great for making soups, smoothies, and meringues and Includes a cup chopper bowl, cup beaker, whisk attachment, extra-long cord, and dishwasher safe stainless steel blade system and attachments. The stainless steel blade effortlessly blends soups and sauces to the perfect consistency.
Pros
- Easy to clean
- Works smoothly
- High power
Cons
- Blade durability
[easyazon_image align=”none” height=”500″ identifier=”B07PGB7BX9″ locale=”US” src=”https://m.media-amazon.com/images/I/51u6ZieLpWL._SL500_.jpg” tag=”inos03-20″ width=”500″]
[easyazon_infoblock align=”none” identifier=”B07PGB7BX9″ locale=”US” tag=”inos03-20″]
Summary
Thank you for reading. To decide what you want to buy, prefer to consider a high-quality product rather than a low-priced product that can waste your time fixing it frequently. Furthermore, check for the included accessories when trying to buy an immersion blender; they will be useful in one day!!!