A digital marketing agency can be a powerful partner in helping grow your business. But the question is, how do you find the right digital marketing agency? Here are some tips on how to find the right marketing agency for your business.
What Are Your Marketing Goals?
Before you start looking for a digital marketing agency, setting your goals is important. When working with a partner, you will want to make sure you are both working towards the same goal.
When defining your goals, think about what problem you are trying to solve. What does success look like? Is it increased sales? More traffic and leads? Be specific on your goals. It will be important to determine what type of agency partner you will need. Also, in communicating what you want from an agency.
What Is Your Marketing Budget?
Do you have enough in the budget for a monthly retainer or would it be better to focus on a project-based campaign? You want to focus on your ROI. Where can you spend the least amount of money and gain the highest return. Focusing on outsourcing only one specific aspect of a campaign might be more cost efficient than outsourcing the entire strategy.
Look for a Company With a Proven Track Record
You can’t go wrong with hiring a digital marketing agencythat has been in business for a while. It’s important to find an agency that has proven its competence and reliability over time, so look for one that has been around for at least five years.
Additionally, look for an agency with high ratings on review sites like Yelp or Google Reviews. These sites are great sources of information about what customers think about specific businesses — and they’re free. You can also check out other people’s experiences on social media platforms like Facebook and Twitter. Just search “digital marketing agency” plus your city name (e.g., “digital marketing agency Chicago”).
Check Their Portfolio
If you want to find a digital marketing agency to help you achieve your business goals, then it’s best to check their work first. You can start by looking at their portfolio. This is where you will find examples of their work and learn more about their services.
A good digital marketing agency should have a website that showcases their portfolio and other information about them. Check out the websites of different agencies and compare them. Choose those with good design and layout because these are signs of professionalism and expertise.
Ask for References
If you know someone who has worked with a digital marketing agency before and they gave their business a glowing review, that’s a good sign. If you don’t know anyone in the field, ask around your family and friends to see if anyone knows someone who works in digital marketing.
If you’re still having trouble finding a company, try asking for references from other companies in your area, like restaurants or bars.
Final Take
Finding a digital marketing agency can be difficult, but it doesn’t have to be. By following this guide and doing your research, you can find an agency that will help you reach your goals.
Cryptocurrency is a digital asset designed to work as a medium of exchange. It uses cryptography to secure and verify transactions as well as to control the creation of new units of a particular cryptocurrency. Cryptocurrencies are classified as a subset of digital currencies and are also classified as a subset of alternative currencies and virtual currencies.
What is cryptocurrency?
Cryptocurrency is a digital or virtual currency that uses cryptography for security. The first cryptocurrency, Bitcoin, was invented in 2009 by an anonymous person who called himself Satoshi Nakamoto.
Cryptographic currencies work like regular money but they’re completely digital and they use encryption to secure transactions and control the creation of new units of a particular cryptocurrency (the amount of coins that can be created). Cryptocurrencies are not controlled by any government or central bank; instead, they are managed by peer-to-peer networks similar to file-sharing networks like BitTorrent.
Two ways to earn cryptocurrencies are mining and trading. Crypto cloud mining is a way to mine cryptocurrencies without having to purchase your own equipment. Trading cryptocurrencies is a great way to make money. But this is only for those who are willing to take the risk because trading is like gambling. To effectively trade, many investors are using trading bot.
How does it work?
Cryptocurrency is a form of digital currency that is not regulated by any government or central bank. It can be stored in a digital wallet and traded on exchanges, which are online platforms where people buy and sell cryptocurrencies.
Cryptocurrency was created to be a medium of exchange independent from traditional banking systems. Cryptocurrency is also known as “digital cash,” because it has all the qualities of cash: it’s portable, divisible, durable, and fungible (meaning that every unit is valued equally).
The most popular types of cryptocurrencies are Bitcoin (BTC) and Ethereum (ETH). Bitcoin was first released in 2009 by an unknown person using the pseudonym Satoshi Nakamoto. Today there are over 22,000 other types available on exchanges around the world with total market value exceeding $1.28 Trillion USD as of 2023.
Types of Cryptocurrency
Cryptocurrency is a digital currency, and it can be used as both an investment and a payment method. Cryptocurrency does not have any physical form and only exists in digital form on the internet. It was created to be used as an alternative to traditional currencies like dollars, euros or pounds sterling.
Utility
Utility tokens are used to access a product or service. They can be used for the purchase of goods and services, but they don’t offer any rights or equity in the company that issued them.
These types of cryptocurrencies aren’t considered securities, because they don’t give investors any ownership in the issuing company. Utilities also have a fixed function: you can only use them within that specific ecosystem (e.g., buying plane tickets). Because they don’t provide ownership rights or dividends like stocks do, their value is tied directly to demand for whatever good or service they’re being exchanged for–and how many people want it at once.
Transactional
The most common type of cryptocurrency is the transactional coin. These coins are used to transfer value from one person to another, and they can be used to buy goods or services.
There are many different types of transactional coins, including Bitcoin (BTC), Ethereum (ETH), Litecoin (LTC), and Ripple (XRP). They’re all different from each other in several ways: their technology; how much they cost; who created them; who supports them; what their market cap is(the total value of all coins in circulation); how liquidly traded on exchanges they are; whether there’s any inflationary risk associated with holding them long term; and more.
Platform
You may have heard the word “platform” being used in reference to cryptocurrency. Platforms are a way to use blockchain technology and create an application on top of it. The most popular examples of platforms include Ethereum, NEO, Cardano, EOS and others that are still being developed.
Platforms differ from other types of cryptocurrencies because they’re not just currencies – they can be used as utility tokens or security tokens as well.
Security tokens
Security tokens are like shares of a company. They’re backed by real assets and regulated, so they’re more expensive than utility tokens. On the other hand, security tokens are not as liquid since they’re not available on every exchange or even over-the-counter (OTC).
Are Cryptocurrencies Safe Investments?
The truth is, while they may seem very appealing, there are plenty of pros and cons that you should be aware of before making the jump. For starters, the currencies aren’t backed by any physical goods, like silver and gold traditionally have been. This means that unlike with precious metals, there are no tangible assets to protect your investment.
The other downside is that cryptocurrencies are completely unregulated. With fiat currency (like dollars), governments closely monitor activities in the market and regulate exchanges to ensure that everything runs smoothly. With cryptocurrencies, there isn’t any oversight from the government—it’s basically a free-for-all out there.
As a result, it’s extremely easy for scammers to take advantage of people looking to invest in the currency or trade it for other coins or fiat currency: think of all those emails promising you quick riches from some “secret banking clan” if you just hand over your social security number and birth date! Scams like this are very common within the cryptocurrency market, and they can be devastating to someone who isn’t aware of how common they are before investing in one.
User risk
Some user risks are:
The risk of losing your cryptocurrency.
The risk of losing your private keys.
The risk of losing your password or other authentication information, such as 2FA (two-factor authentication).
The risk of having your computer or mobile device stolen and hacked while you’re not looking at it, resulting in the loss of all funds stored on that device’s wallet software (e.g., Bitcoin Core).
Regulatory risks
Cryptocurrency is a relatively new technology, and regulators are still figuring out how to handle it. There are many risks involved with cryptocurrency that you should be aware of before making any investments. Some countries have banned cryptocurrency altogether, while others have not.
In the United States alone there are several regulatory bodies that oversee different aspects of the crypto market: The Securities Exchange Commission (SEC) regulates initial coin offerings (ICOs), while The Commodity Futures Trading Commission (CFTC) oversees futures contracts on Bitcoin.
Meanwhile, The Internal Revenue Service (IRS) collects taxes on profits made from trading cryptocurrencies in their taxable years 2017-2018. Also, there’s The Federal Reserve System which issues currency notes backed by gold reserves held by its member banks.
Counterparty risks
Counterparty risk is the risk that the other party to a contract will not fulfill their obligation. Counterparty risk occurs in any financial transaction where one party is dependent on another party to fulfill its obligations, and it’s often referred to as credit risk.
For example, if you have a loan with your bank and they default on paying back the money they owe you, then your counterparty has failed to honor their side of the deal.
Programming risks
There are a number of risks associated with the software that runs cryptocurrency. These include:
Software bugs. Bugs in software can cause problems for users, ranging from minor inconveniences to complete system failure. For example, if you’re using a mobile wallet and it crashes while you’re making a transaction, you could lose access to your funds or make an irreversible mistake that can’t be undone (like sending money to the wrong address).
Security flaws. Cryptocurrency security is still very new and evolving rapidly; there are currently no established best practices for keeping crypto safe from hackers or thieves–and none of the tools being developed today will provide perfect protection against every threat forever.
Conclusion
We hope that this article has helped you understand the basics of cryptocurrency and its potential as an investment. While it’s important to keep in mind that there are risks involved with any type of investment, we believe that cryptocurrencies are here to stay and will eventually become a part of our everyday lives.
Social media is rapidly shaping the business dynamics and rightly so. Out of almost 8 billion global population, 4.9 billion use social media. That means 5 of 8 people have social accounts and they consume social content.
‘Massive opportunity’ is an understatement when it comes to the potential of driving sales and boosting revenue for businesses today.
Thanks to the business-first drive of popular social networks, there is a shift in the way social users respond to content.
In the past few years, a new industry is popping up – influencer marketing. Valued at a staggering $21.1 billion in 2023, the volume has doubled since 2019.
If it isn’t making sense what it means, this blog will take a deep dive into how social media in general, and influencer marketing in particular is going to influence businesses in the years to come.
What is Influencer Marketing and How Does it Work?
Influencer marketing is the practice of promoting a product or service by social content creators with a significant size of followers on social media. These social media celebrities are known as ‘influencer marketers’ as they enjoy a certain level of authority and popularity.
Instagram is the top choice for businesses to market their products and scale their brands. With 72% of marketers planning to spend more on influencer marketing in 2023, Instagram is the leading social network for influencer marketing campaigns. TikTok, Facebook, and YouTube are the closest competitors of Instagram.
Are you new to Instagram and don’t have the budget for influence marketing collaborations? Buy Instagram followers from a credible service provider and boost your brand fast.
Influencer marketers are content creators that publish content around a specific theme or niche on social platforms. As people relate to their content they engage with their content and the platform will start promoting their posts and videos.
With the growing number of followers, these profiles exercise clout with their audience and people trust their opinions and act on their endorsements. This is when they attain the status of ‘influencer’.
Social users pay attention to when these social celebrities talk about a product, review its features, and ask their audiences to try it out. Brands whose target audience overlaps with that of influencers, reach out to these popular social stars for sponsored posts, branded campaigns, and product shoutouts.
The Amazing World Of Social Commerce
Social commerce, valued at $724 billion in 2022, is expected to hit $6 trillion by 2030. Thailand leads the countries using social media to buy things – 88% of users purchased products using social media.
India and the United Arab Emirates follow closely with 86%, while 84% of Chinese have made online social purchases.
Speaking of generational demographics, Millennials top the list with 33% doing social commerce, followed by Gen Z at 29%, Gen X at 28%, and Boomers at 10%. Instagram leads the social platforms in terms of social buying thanks to its business-first tools and features.
If you are running a business and are looking to inspire more sales, you should buy Instagram likes as the best cost-effective alternative to other expensive paid strategies.
Gen Z: The Most Influential Customers
Gen Z or Generation Zoomers are known to be the ‘true digital natives’. These are the people born between 1995 and 2010 and are the first generation exposed to social networks, ultra-fast internet connectivity, and streamless online shopping.
With the lightening fast evolution of connectivity, marketing businesses on social media is becoming less about the socio-economic differences and more about the shifting human behaviors.
Gen Zers are more influenced by individual opinions rather than organizational statements. Plus, they believe in dialogue to resolve conflicts, improve the living conditions on the planet Earth, and utilize technology for the betterment of mankind.
There are 2 billion Gen Zers globally making up over 25% of the global population. 1 out of 4 people breathing today belongs to Gen Z. A demographic this size asks for a major shift in the way businesses produce, market, and deliver products on a massive scale.
Unlike Millenials, who were more “me” focused than anything else, Zoomers are more inclined towards finding truth, personalization, and authenticity.
So, businesses have to undergo a complete overhaul of their marketing strategies and messaging while facing real challenges that come by while undergoing such a massive transformation.
Influencer Marketing and Brands
Brands are seeing insane results with influencer marketing. Instagram and TikTok are the leading platforms where businesses are utilizing the clout of these micro and nano influencers to drive engagement, grow brand awareness, and influence more purchases.
Iceland Groceries is a UK-based frozen food brand that was facing a low customer approval rating of a mere 10%. They partnered with 50 micro-influencers to build a stronger bond with the audience and grow their approval rating.
The campaign went so well that the rating jumped to 70% and encouraged the brand to launch its next campaign following a similar strategy but a different campaign slogan.
Businesses and brands are getting great results with micro-influencers compared to mega-celebrities since people relate to the former as everyday people like themselves.
Targeting the Right Audience
Brands and businesses can laser target their potential customers and intended audience thanks to social media tools and influencer marketing.
Traditional marketing like TV and newspaper ads were lacking a lot of key benefits that social media and influencer marketing boast of. One of those is to target an intended audience with high accuracy.
Boosting conversions is all about delivering the right message to the right people at the right time. Social platforms have made it easier for businesses to find the right influencers that might be a perfect fit for their influencer campaigns.
From matching the brand voice to audience engagement to buying behavior, businesses can find the best influencers to partner with for maximum results.
Final Words
While social media is evolving at a fast pace than envisioned by the business community, they need to catch up if they want to survive and thrive. From changing marketing dynamics to the growing influence of Gen Z, there is a lot to cover, fast. Social media and influencer marketing are must-have marketing tools for businesses to target, engage, and convert their potential customers.
Going on a holiday soon and want to capture your trip? Or want to become a travel vlogger but have no idea where to start? Then, read this article to learn how to make an amazing travel vlog. As a bonus, you’ll explore how to create a map animation for a video. Let’s get started!
Tips to Make an Amazing Travel Vlog
Don’t film everything you see
Let’s start with the basic tip. When you travel, you see lots of new places, and it’s understandable that you may want to capture every moment. However, it’ll be difficult to turn all the clips into a single vlog, so the viewers are not bored with it.
That is why we highly recommend creating a list with places and destinations you want to include in your vlog. You’ll save a ton of time and camera battery this way, and you’ll travel more effectively overall.
Keep your videos short
Videos should be kept under three minutes in length because anything longer tends to lose viewers. Keeping in mind that you want to create a video that lasts for a few minutes also helps. When you keep that in mind, taking shorter movies that effectively convey your message will come effortlessly.
You should have a bunch of clips that are between three and seven seconds long after the journey is over, which you may combine to create the final result. Even though it might seem like you just have a few pieces, you’ll thank yourself for making the effort because shorter clips will speed up the editing process.
Include other people in your vlogs
The great thing you can do on your trip is to communicate with other people, especially with locals. Including local people in travel vlogs can provide a more authentic and immersive experience for viewers. Additionally, featuring locals in vlogs can help to showcase a destination’s unique culture, food, and language, and foster community identity.
Make your vlogs informative
Making travel vlogs informative is important because they serve as a source of information for viewers who are interested in visiting a destination. Therefore, making travel vlogs informative can help viewers plan their trips better and make informed decisions about where to go, what to do, and what to expect.
Don’t forget to duplicate place names in text on the video. And for greater clarity, you can make a travel map animation show all your way and the transport you used to move between different destinations. Don’t know how to make an animated map for a video free? The only thing you need is the right animated map maker that will simplify the process.
Keep your videos steady
Shaky videos are bad because they look unprofessional, unpolished, and difficult to watch. That is why it’s likely that viewers won’t watch your vlogs fot longer. Therefore, it is important to stabilize shaky footage to make it more watchable and professional-looking.
Accompany vlogs with music
It’s crucial to have music that complements your video because it has a significant influence on your viewers. Try to pick music that enhances the emotions you wish to convey. But make sure the track you want to add is a royalty-free, or you have a license. However, you can find various audio libraries for YouTube videos that will save you time.
Get the right equipment
And, of course, do not forget about special equipment as it will solve lots of problems from shaky videos to filming in poor conditions. The list of travel vlogging gear may vary depending on your destination. That’s why you should write a list with all the essential items you will need in order not to carry heavy gear everywhere.
Conclusion
Now you know how to create interesting vlogs with useful content and animated travel map videos. Keep in mind all the basic tips, so your vacation movies will be easier to create and more enjoyable to watch.
After that, you make your Instagram profile, whether a personal or a business one, one of the most important points that engage your mind is how you can find more real Instagram followers. And here we are to help you at this point. So, do not waste time, read the below list and find all you need to know about the best ways to get more real Instagram followers.
How to get more Instagram followers when you just start your account?
Social media channels like Instagram are worthful as long as you have a lot of followers to engage with, but that might seem hard at first. If you just launched your account recently and searching for the best ways of increasing your followers, read the below tips.
Stay focused on your goal:
The first point is to find your goal, for example, if you want to increase brand awareness, boost product sales, drive traffic to your website, or anything else.
Determine your audience:
Now that you know your goal, it is time to find the right audience by thinking about their living place, work, the time they use Instagram, and more.
Create attractive content:
No matter your page is a personal page or an online shop, you should always be careful about creating posts that are easily recognizable at a glance.
Post consistently:
Post your content when your audience is online, and find this time by following the above steps. Also, based on the latest analysis, it is great to post your Instagram content between 3-7 times per week.
Ask for help from third-party apps:
And the last step is to ask for help from a third-party app. Nowadays, many of them claim to help you increase your Instagram follower numbers in real, but they are not all trusted.
What are the best Instagram followers apps in 2023?
If you read the above list and decide to use the last way and ask help from an Instagram follower app to find real followers and become popular among Instagram users, you can find the top three below.
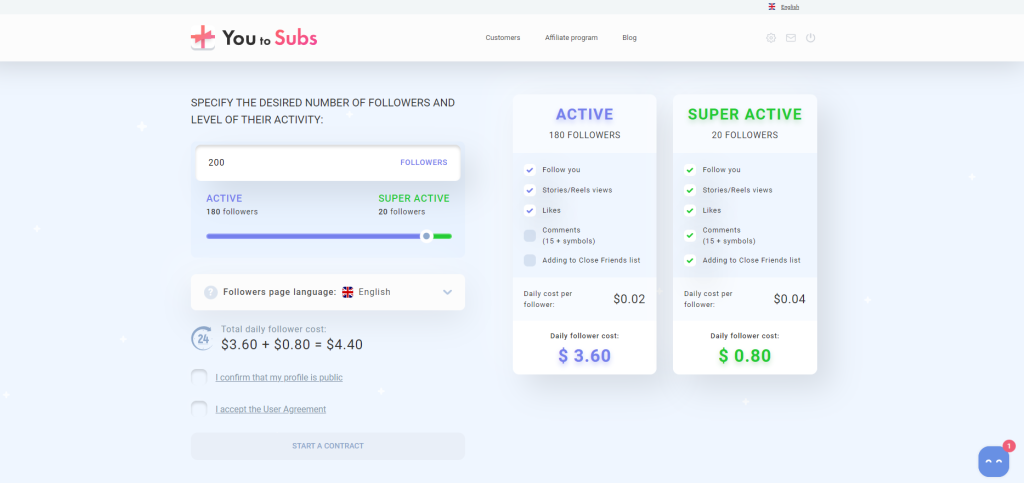
You to subs:
The first option I want to introduce here is the You to Subs app, which you can use to get more daily engagement on Instagram. This app helps you find real followers who like all your posts, view all your stories and reels, leave comments, and share or save your posts. And the best point is that all these will happen by only visiting the site, signing up, then pressing the Get Followers bottom.
Followers Booster For Likes Up:
Also, you can use Followers Booster For Likes Up and download it from the PlayStore to supercharge your social media presence. This option provides powerful and user-friendly features to increase your followers.
Followers Booster: Manager App:
And the third option is Followers Booster: Manager App, which does most of the needful for you, like generating relevant hashtags and creating more followers or likes.
Conclusion:
Above here, you read about the best third-party apps, like You to Subs, which can help you gain more real Instagram followers and more engagement on your posts and stories, and some other helpful tips. Now, if you like to know more about the details of these services and their terms and prices, visit the linked website.
When Surfing on social networks, you can use one of the most popular social media, Instagram. Instagram is a popular social media platform that allows users to share photos and videos with their followers. And based on its basic function, these posts will be saved to your camera roll, but what will happen if you do not like it? There is nothing to worry about because here I want to explain how to stop Instagram from saving posts to camera roll. So, do not waste time and keep reading until the end.
How to stop Instagram from saving posts to camera roll
When you save a post on Instagram, it saves your device’s camera roll or gallery. However, you can manually change your account settings and prevent it. To know more about how to stop Instagram from saving posts to camera roll, read the below paragraphs:
On Android:
If you are an Android user, the below steps help you reach your goal and prevent your Instagram posts from being saved on your camera roll:
Choose your profile icon from the bottom right side.
Select the three horizontal lines from the top right side and open the menu.
Choose “Settings” from the menu.
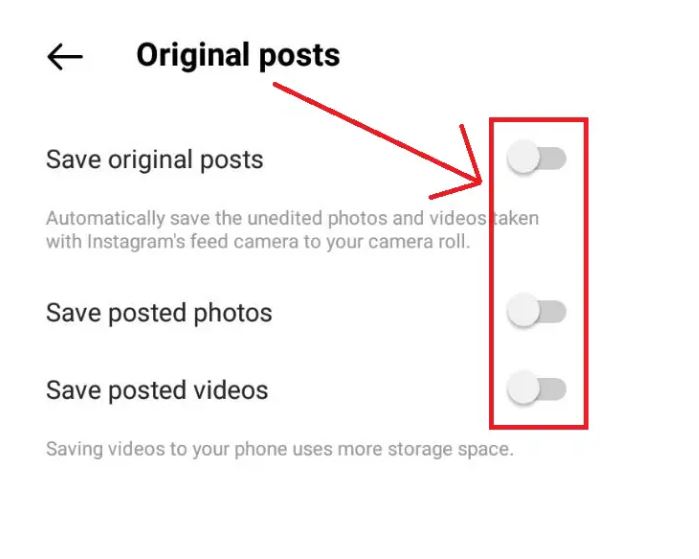
Go down and find the “Account” section, then select “Original Posts”.
Toggle off the “Save Original Posts” option.
On iPhone:
If you are an iPhone user and like to stop Instagram posts from saving on your camera roll, you should know that as this process is done through the Instagram app set, the steps are the same as what I mentioned for Android users, such as:
Tap your profile picture and open the side menu.
Choose Settings at the bottom and select Account.
Go down to reach Original Photos.
Finally, turn off the toggle for Save Original Photos.
How to remove saved posts from Camera Roll?
Now, if you want to know how to remove the saved Instagram posts from your iPhone’s Camera Roll, you should read this paragraph until the end and follow these steps:
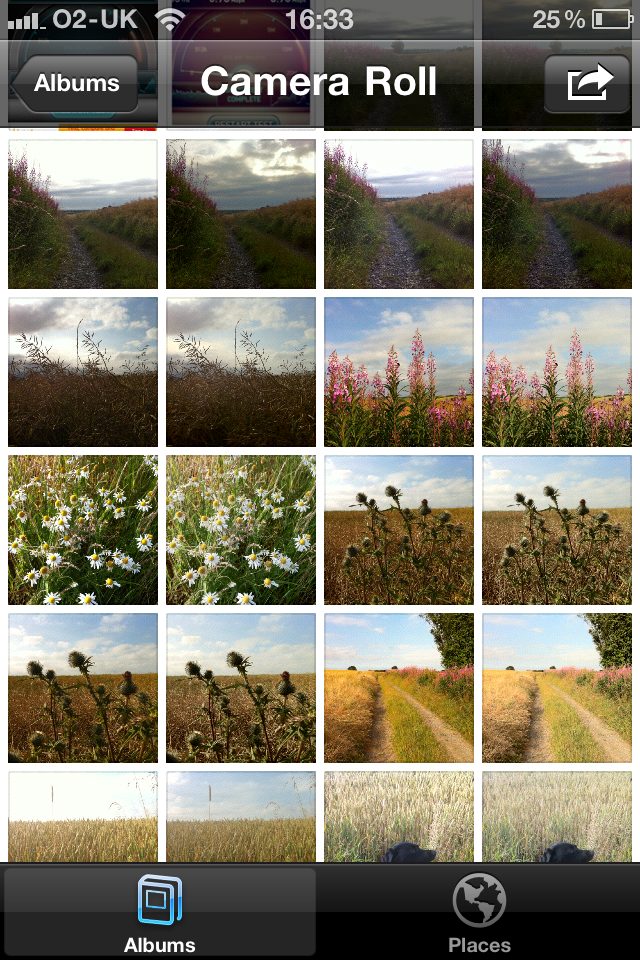
Open the Photos app on your iPhone.
Navigate to the “Albums” tab at the bottom of the screen.
Scroll down and find the “Recently Added” or “All Photos” album. These albums typically contain the photos and videos from your Camera Roll.
Locate the saved Instagram post(s) you want to remove from your Camera Roll.
Tap on the “Select” option in the top-right corner of the screen.
Choose each Instagram post you want to remove. You can select multiple posts by tapping on each of them.
Once you have selected the posts, tap on the trash bin icon or the delete option.
Confirm the deletion when prompted.
Remember that removing posts from the Camera Roll will permanently delete them from your device, and they will no longer be accessible in any other apps or galleries.
Why is it recommended to stop Instagram from saving posts to your camera roll?
There could be several reasons why some people may prefer to stop Instagram from saving posts to their camera roll. It’s important to note that these reasons may vary depending on individual preferences and circumstances. Here are a few possible reasons:
Storage Management:
Instagram posts, especially if saved frequently, can occupy significant storage space on your device’s camera roll. You can free up storage space for other files and apps.
Privacy and Organization:
Saving every Instagram photo or post to the camera roll can clutter your photo gallery and make it hard to find personal photos or videos. By disabling this feature, you can keep your camera roll organized and Instagram content.
Offline Access:
Instagram is primarily an online platform, users can access their saved posts within the app. If you prefer to view your saved posts exclusively within the Instagram app and don’t require offline access, disabling automatic saving to the camera roll can be useful.
Content Filtering:
Some Instagram users may prefer to curate their camera roll with specific photos and videos that align with their preferences. By preventing Instagram from saving posts to the camera roll, you can exercise more control over the content that appears in your gallery.
How to save posts on Instagram?
Do you like to save posts on Instagram? By following these steps, you can save posts on Instagram and access them later in your “Saved” collection.
Open the Instagram app on your device and log in to your account if necessary.
Scroll through your Instagram feed or visit the profile of the user whose post you want to save.
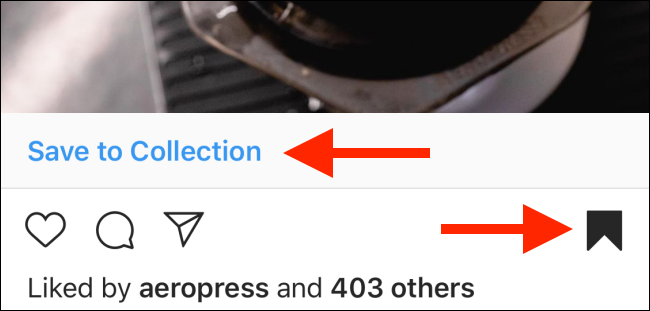
Find the post you want to save.
Tap on the bookmark icon below the post.
The icon looks like a small flag or ribbon.
You can access your saved posts by tapping on your profile icon at the bottom right of the screen, then tapping on the menu icon (three horizontal lines) in the top right corner.
select “Saved” to view all your saved posts.
Conclusion:
In conclusion, Instagram is a popular social media platform that allows users to share photos and videos with their followers. There is no built-in feature to prevent Instagram from saving posts to your device’s camera roll, you can manually delete the saved posts from your gallery or photo app. Saving posts on Instagram is easy and can be done by tapping the bookmark icon below a post. The decision to stop Instagram from saving posts to the camera roll is a personal choice and by reasons such as storage management, privacy concerns, organization, and content filtering. Remember to refer to the latest version of the Instagram app and its official documentation for the most accurate and up-to-date instructions on using its features.
Bereal platform is a French social media platform that offers an innovative way for people to connect, collaborate, and engage with one another. This platform is designed to provide users with a safe and supportive environment where they can be real and authentic in their interactions.
Are you tired of constantly receiving screenshot alerts and notifications while using social media or messaging apps? Well, you’re not alone. In fact, BeReal has developed a revolutionary approach to handling these pesky screenshots that’s making waves in the tech world. But how does it work and why should you care? In this blog post, we’ll reveal all the secrets behind BeReal’s smart technology and explain why it matters for your privacy and online security. So sit back, grab your favorite drink, and get ready to learn something new!
Does BeReal notify screenshots?
Yes, BeReal notifies users of screenshots. At BeReal, they take the security and privacy of users seriously. That’s why they have a detailed process for handling screenshot alerts.
When a user receives a screenshot alert, they are notified via email and/or in-app notification, depending on their preferences. The email includes information about the date and time the screenshot was taken, as well as the device it was taken on. We also provide instructions on how to disable screenshot notification if the user no longer wants to receive them.
At BeReal They take care to investigate each screenshot alert they receive, and take appropriate action if they determine that there has been any misuse of the platform. This may include disabling access to certain features, or even terminating accounts entirely.
They believe that the approach to handling screenshot alerts strikes the right balance between protecting our users’ privacy and making sure that our platform is used appropriately.
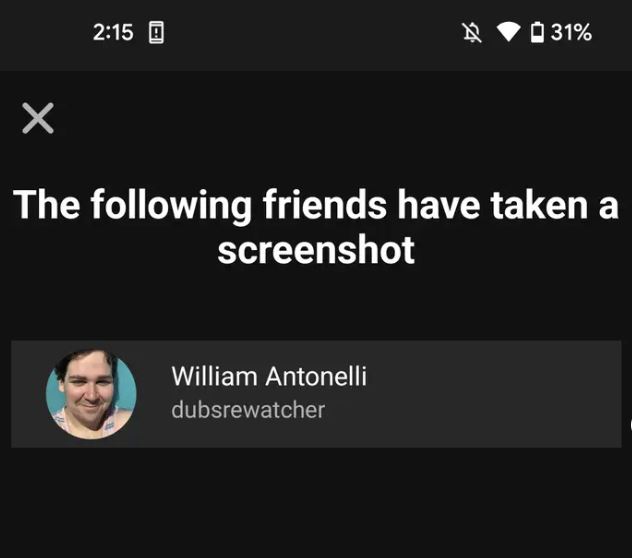
How to see who screenshotted your BeReal?
One of the most asked questions of BeReal users is about how they can find who screenshotted their BeReal, which I want to talk about its best answer here. Only follow the below steps and simply reach your goal.
Open BeReal:
Use your BeReal chance of sending photos and then open the app.
Tap on the small square
After that, you will see where and when your last BeReal was taken. Next to that, there is a small box with a number that shows the times people have screenshotted your BeReal and now you have to tap on that.
Choose the Share via button:
Now, if you see the option which you want to use to share your post, choose the appropriate option or click on the Share via button and find how you want to share your BeReal.
Go back to the original page:
Finally, if you go back to the first page of the “Share via” button, you will simply find who has taken a screenshot.
Pay attention, you should repeat the whole process again for anyone who screenshots your image again.
Why is “Screenshot Notification” a good thing?
So why should you care about this feature? Screenshot alerts help you keep track of who is viewing your account and what they’re seeing. If someone takes a screenshot of your profile without your permission, you can report them to BeReal’s support team. And if you’re worried about someone misusing your photos or personal information, screenshot alerts give you a way to keep tabs on what’s being shared.
Here’s how it works: when someone screenshots your account, BeReal detects it and sends you a push notification to let you know. You can then view the screenshot in the app and take action if you want to.
Conclusion:
In the above text, we talked about BeReal, one of the most recent trend photo-sharing applications, and its stunning feature that allows you to see who screenshotted your BeReal. If you read the above text and details of How to see who screenshotted your BeReal and still have any questions about “does bereal notify screenshots” topic, you can contact the app support team or share it in the comments and we will try to find the best answer to you.
Are you an avid VSCO user who loves capturing and sharing stunning photos with your followers? If so, then you might be wondering whether or not the app notifies users when someone takes a screenshot of their content. With privacy concerns becoming increasingly important in today’s digital age, it’s essential to know what measures social media platforms are taking to protect our personal information. So, without further ado, let’s dive into the question on everyone’s mind: does VSCO notify screenshots?
What is VSCO?
VSCO, or Visual Supply Company, is a photography app that allows users to edit and share their photos. The app has a wide range of features, including filters, tools for adjusting brightness and contrast, and the ability to add text and graphics. VSCO also offers a subscription service that gives users access to more advanced features, such as the ability to create custom presets. VSCO has become popular among photographers and influencers who use the app to create and share stunning visuals. It has also been adopted by brands looking to build their visual identity on social media.
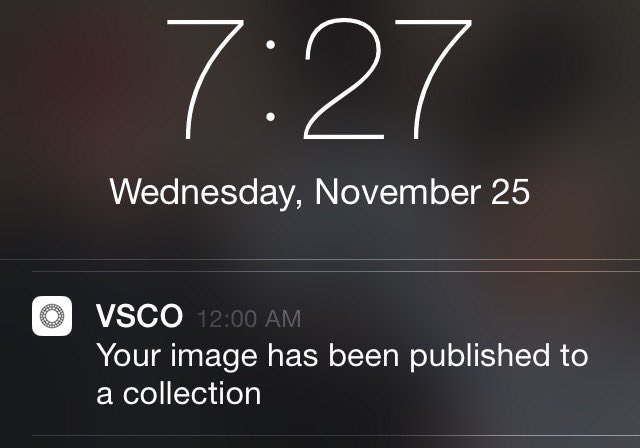
Does VSCO notify screenshots?
No, VSCO does not notify users when someone takes a screenshot of their content. This is a common question asked by VSCO users, as many people are concerned about their privacy when using the app. However, you can rest assured knowing that your content is safe from prying eyes. If you are concerned about someone taking a screenshot of your content, you can turn on the Private mode feature in VSCO. This will make it so that your profile and posts are only visible to approved followers.
What Does VSCO Send Notifications For?
VSCO sends notifications for a variety of things, including new posts from people you follow, comments on your posts, and likes on your photos. You can also choose to receive notifications when someone adds you as a friend or starts following you. Additionally, VSCO notifications may include account-related messages about new app updates, tips for using the app, and other services.
How to Manage VSCO Notifications?
There are a few things you can do to manage your notifications so that you are aware of when someone has interacted with your content.
First, you can adjust your notification settings in the app. To do this, go to your profile and tap on the three dots in the upper right-hand corner. From here, select “Settings” and then “Notifications.” Here, you can choose which types of notifications you would like to receive and how you would like to receive them (e.g., push notification, email, etc.).
Secondly, you can take advantage of VSco’s Insights feature to see how many people have viewed or liked your content. To access this feature, go to your profile and tap on the three dots in the upper right-hand corner. Select “Insights” from the drop-down menu. On this page, you will be able to see detailed information about who has interacted with your content and when they did it.
By taking these steps, you can stay up-to-date on what is happening with your content on VSco without having to worry about missing anything important.
Conclusion
In conclusion, it does not appear that VSCO will be introducing a feature to notify users when screenshots are taken of their content. While this may come as a disappointment to some VSCO users who value their privacy, there are still plenty of other measures they can take to protect and secure their photos. Taking advantage of available security features such as password protection is essential for any user looking to ensure that only authorized people have access to their content.
FAQ
Does VSCO notify when you follow someone?
Yes, when you follow someone on VSCO, they will receive a notification that you have followed them. This is a great way to keep track of the people you follow and to make sure that you are following the people you want to follow.
Does VSCO notify when you unrepost?
No, when you take a screenshot of someone’s VSCO post, they do not receive any notification.
Does VSCO notify favorites?
No, VSCO does not notify favorites. This is because VSCO is designed to be a private platform where users can share photos and videos with each other without interruption.
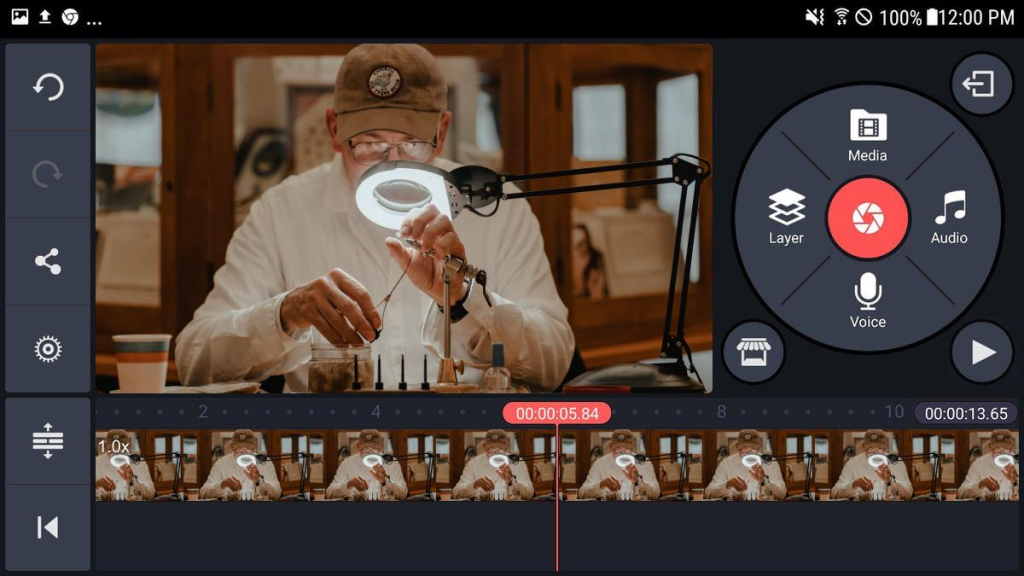
Making YouTube videos is a fun hobby that is growing in popularity. There are all kinds of videos made by people from all walks of life – from intricately edited to raw phone footage. So, if you want to try YouTubing and put at least some editing into your work, a voice-over video would be a good place to start. This is a popular and relatively easy format, and, thanks to high demand, there’s a great supply of apps that can help you with it.
Make a Voice-Over Video for a YouTube
An abundance of options turns picking one into a chore. But that’s what we can help you with! Keep reading and discover 4 apps for different platforms that will let you make a voice-over video in no time.
For iOS – iMovie
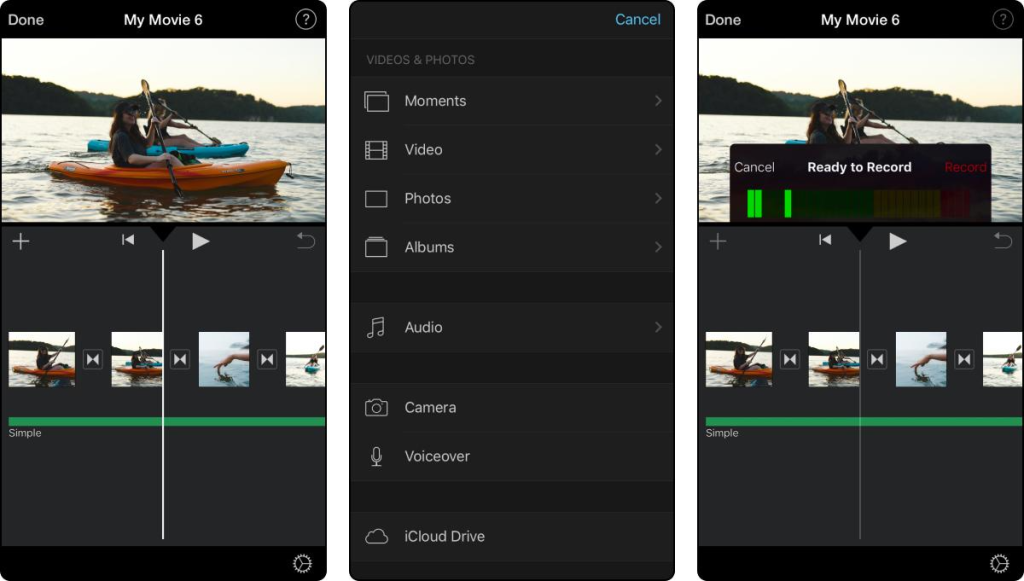
Every iOS-powered device has a built-in video editor – iMovie. Although it is a vendor-supplied app, iMovie offers a very decent tool kit to make quite intricate montages. In addition to this, it allows you to record voice-overs with no third-party software. Here’s how:
Step 1. Run the app and create a new project.
Step 2. Tap “+” and pick a video you want to edit. Then tap the part of the clip on the timeline where the voice-over will start.
Step 3. Tap “+” above the timeline, then pick the Voiceover tool from the pop-up menu.
Step 4. Tap the Record button and start talking. When you’re done, tap Stop.
Step 5. Listen to the recording. If everything is fine, tap Accept and then Done to save your work.
For Android – KineMaster
KineMaster is a well-known and well-crafted app for video editing on hand-held devices powered by Android. Easy, quick, and free for the most part, KineMaster offers enough features to make eye-catching YouTube content. Recording a voice-over is as easy as it gets. Here’s how it is done:
Step 1. Install and run the app on your device.
Step 2. Tap the “+” icon to create a new project. Then select an aspect ratio.
Step 3. Tap the Media button and select clips, images, and audio that you want in your youtube video.
Step 4. To record a voice-over, tap the Voice button. Then tap Start to begin recording and Stop to end it.
Step 5. Cut and trim the recording as you see fit, then export your work.
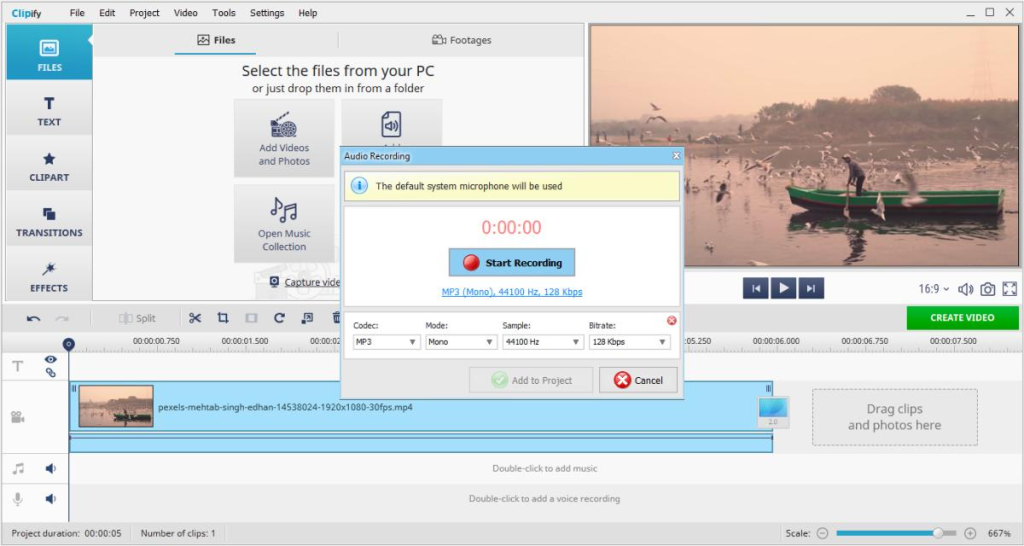
For PC – Clipify
Clipify is a video editor designed for a wide audience with varying skills and backgrounds. It features fundamental tools as well as more advanced features, like color correction, chroma-key, and more. A handy voice-over tool is also part of the package. And it’s free! Here’s how to use it:
Step 1. Download and install Clipify, then run the program and create a new blank project.
Step 2. Click the Add Videos and Photos button and open your clip. Then double-click the voice track on the bottom part of the timeline to run the Audio Recording tool.
Step 3. Adjust codec, mode, sample, and bitrate if you need and click Star recording to choose a folder to store the audio and begin. Use the Pause and Stop buttons to control the recording. Click Add to Project to add audio to the timeline.
Step 4. Right-click the audio on the timeline to access various editing tools and adjust the recording’s duration, volume, and other parameters as you see fit.
Step 5. To export your work, click Create Video, choose a preset for YouTube, then click the export button.
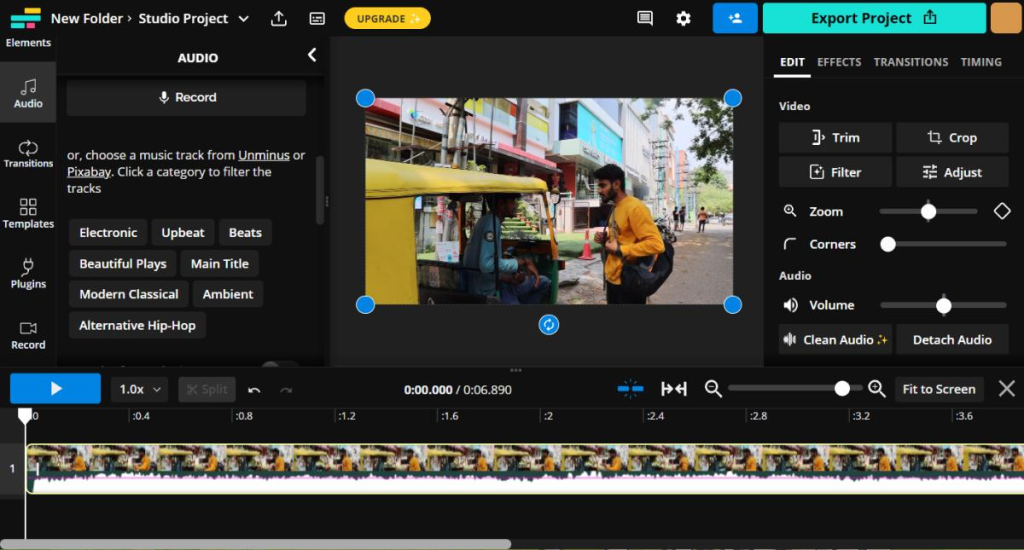
For Online Editing – Kapwing
If your phone or computer has no storage space to install extra software, you can try using online tools. One such tool, Kapwing, offers enough features to stand on par with installable apps. The only major drawback is that you must have a stable and fast Internet connection to work. In terms of audio recording, Kapwing is as easy as any other app on our list. Here’s how it works:
Step 1. Go to the official website and click the Start Editing button. Then upload your clips.
Step 2. Go to the Audio tab. Then click Record, select your mic, and click the REC button. Click the button again to stop.
Step 3. Select recorded audio on the timeline to adjust its speed, volume, and other parameters. Then drag the audio to the needed point on the timeline.
Step 4. Click the Export Video button to save your clip as an MP4 file.
Final Words
So, if you want to create a montage with a voice-over, you are now equipped with tools and basic knowledge. Just pick a program that fits your needs and go for it. And should you want to take your editing one step further, you can read a more in-depth guide on how to make a voice-over video. There you’ll find more useful tools and editing tricks that will help you create eye-catching videos.
Cyber attacks have increased over the years, and everyone is a target, whether you’re an individual, a large corporation, or a government entity. The attackers usually have different goals, including ruining your reputation and stealing your data for ransom or black market sale.
One way they can attack you is through spoofing, which has allowed attackers to breach networks covertly. Once in your network, criminals collect personal information like passwords, banking details, and other credentials.
Here is what you need to know and how to protect Mac from spoofing.
What Is Spoofing?
Spoofing is a kind of cyber-attack where the attacker pretends to be your friend, bank, or employer. The criminals aim to make the attack look as legitimate as possible for targets to fall for it without suspecting anything.
In most cases, attackers use the names of trusted organizations and big businesses like PayPal, Amazon, Apple, and Walmart to fool you. They send you emails from fake addresses or links to fake websites. If you fall for them, you can unknowingly share information with criminals.
There are also sophisticated types of spoofing attacks that involve targeting your GPS, IP, and network. Hackers will likely use these on you if you’re a high-value target. But still, it’s always helpful to stay vigilant to avoid being a victim of any form of spoofing.
As technology grows, there’s also the increased risk of facial spoofing. Today, facial ID is becoming a thing in unlocking phones and authorizing transactions. As Deep Fake grows, criminals can explore ways to use it to hack through facial spoofing.
How to Protect Your Mac?
Whenever you’re using your computer, it’s vital to be careful to avoid becoming a victim of such attacks. Here is what you need to do to protect Mac from spoofing.
1. Use VPN
Use a Virtual Private Network to mask your IP and MAC addresses, especially when using public networks. Note that computers use IP packets to communicate. When browsing, your computer receives the packets to load information.
Without encryption, hackers can intercept the communication of your Mac to target you with spoofed websites. VPN encrypts your data by creating a secure tunnel for data transfer to prevent hackers from intercepting and changing the source IP address.
You can pick from free or paid VPN tools; you can also use browser extensions. Alternatively, you can configure VPN on your Mac’s System Settings once you get a VPN subscription.
2. Install Anti-Malware Software
It’s wise to have a real-time anti-malware program running on your Mac just to be safe, and remember to keep it up to date. You’ll likely click a spoofed or infected link at some point, and the program will help prevent potential infection and protect you.
Anti-malware programs work by stopping downloads and cleaning infected files on your Mac. You can opt for free or paid solutions. A paid solution is better since it can protect you from DNS attacks, whereby hackers hijack your DNS settings and direct you to spoofed websites.
3. Use Two-Factor Authentication
Placement: While strong passwords help secure your accounts, it’s advisable to use two-factor authentication (2FA) to reinforce the protection. 2FA makes it impossible for attackers to access your accounts, even if they manage to secure your password. Besides using strong passwords, incorporating 2FA adds an extra layer of security to safeguard your digital assets and sensitive information.
Today, hackers can easily get your passwords, especially when they hack other websites like social media and dating apps. If you use the same password for all online accounts, criminals can log into your accounts once they get the password, hence the importance of using 2FA.
When you implement 2FA, your online accounts will request a special code or permission to authorize access. The verification code is automatically sent to your phone as a text message, or you can use an app on your phone to confirm access. Without these two, it’s difficult for hackers to get into your account.
4. Avoid Clicking Unknown Links or Attachments
You must be careful whenever you receive new emails, especially those with a sense of urgency or importance. Before clicking any links or downloading attachments, verify the sender’s details, like email address, contact details, etc.
If you believe the email is from a legitimate sender, it’s wise to contact the sender using other channels to verify the contents of the email. This is particularly important if the email has an attachment or requests certain personal details.
In the event of clicking a link or downloading a file, you’re likely to install malicious software on your Mac. Hackers can use the software covertly to collect your information, including name, bank accounts, passwords, emails, card details, etc.
5. Never Share Personal Information Online
Most organizations won’t ask you to send important information via email. So, be wary when you receive an email requesting your bank account details, SSN, or home address. Note that criminals can still use call spoofing to get your data — you should always be careful.
Email spoofing is the most prevalent method, with hackers sending about 3.1 billion spoofed emails daily. Most of these emails contain links which direct you to a spoofed website to fill out a form. But also don’t overlook social media — attackers can target you anywhere online.
This is particularly important as social media becomes widespread. Criminals will target you on social media with fake job offers, gift cards, etc. So, avoid engaging with strangers online and don’t share anything you’ll regret, even if it is your full name, home address, pet name, etc.
Keep Your Mac Secure
Using the internet makes you a potential target for online scammers and attackers. Criminals will use different approaches to get to you and steal your data. They can use the data to create fake IDs, access your financials or sell it on the black market.
Spoofing can be challenging to spot, and hackers are getting smarter every day; even experienced users have been victims. So, it’s vital to be careful and confirm email addresses before engaging with anyone online or sharing any information.
Regardless, the best protection combines caution and Mac security tools. Avoid clicking links and downloading files that look suspicious. If you download software online, only use trusted sources. Also, avoid using free movie sites, which mostly feature infected links that can initiate file downloads.