How to Add Roles in Discord and Manage Them (2024 Updated)

A lot of people like Discord because it lets them make groups, talk to their friends, and improve their game experiences. You can add jobs to your server, which is one of the main things that makes Discord flexible and useful. In Discord, roles are groups that can be changed to control how a user looks and what rights they have on a server. This guide will show you how to add roles in Discord and go over the different customization choices that are available.

What are Discord Roles?

Discord roles are groups that you can give to people on your server to control their look and rights. These roles help server owners run their communities well by letting them control what material members can see and what actions they can take on the server. You can change many things about Discord roles, such as the colour of role members’ names, their access to channels and rights, and how connected apps and integrations affect certain roles.

How to Add Roles in Discord?

Adding roles to your Discord server is a straightforward process. To get started, follow these steps:

  • Open Discord and select the server where you want to add roles.
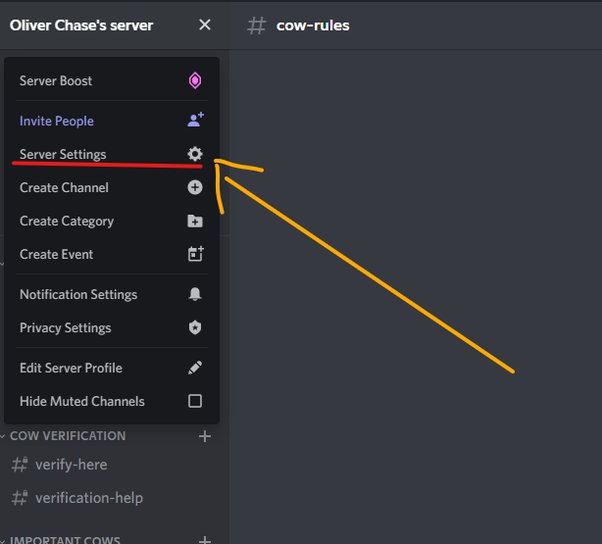
  • Click on the server’s name in the top-left corner to access the server menu.
  • From the server menu, choose “Server Settings.”
How to Add Roles in Discord
  • In the Server Settings menu, select “Roles.”
  • Click the “Create Role” button to add a new role.

Customizing and Managing Discord Roles

You can change the way a job works for you after you’ve made it. There are a lot of ways to change jobs in Discord, so you can make them fit the needs of your server. Let’s look at the different Discord settings you can change for jobs.

Display Settings for Roles

In the “Display” tab of the role settings, you can modify how the role appears to other members. Here are the available customization options:

  • Role Color: Choose a color for the names of members assigned to this role. The selected color will be displayed in channel messages and the online users list.
  • Role Icon: If your server is boosted to Level 2, you can assign an icon to the role, which will appear next to the names of members with that role.
  • Display Role Members Separately: Toggle this option to separate members with this role into their own category in the online users list.
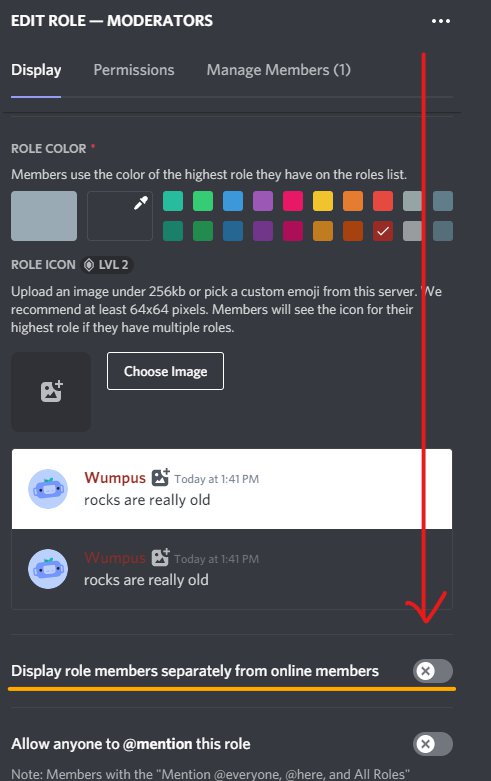
  • Allow Anyone to @Mention this Role: Enable this setting to allow users to tag this role in messages using the @ symbol. This will notify all members with the role.
  • View Server as Role: This feature allows you to see your Discord server from the perspective of a specific role, ensuring that the role has the desired access to channels and features.

Role Permissions in Discord

The “Permissions” tab in the role settings is where you can define the actions and abilities that members with this role can perform. Discord categorizes role permissions into several categories:

  • General Server Permissions: Determine the role’s ability to manage channels, roles, emoji, stickers, or the server itself.
  • Membership Permissions: Control whether role members can manage other members, change their nicknames, create invites, or ban users.
  • Text Channel Permissions: Define the role’s permissions for sending messages, adding reactions, starting threads, and mentioning other members in text channels.
  • Voice Channel Permissions: Specify what role members can do in voice channels, such as joining, speaking, using video, and enabling the Priority Speaker setting for better audio clarity.
  • Stage Channel Permissions: For stage channels, which are dedicated spaces for specific discussions, you can grant or restrict role members’ ability to request to speak in these channels.
  • Events Permissions: This section allows role members to create, edit, and cancel events within the server.
  • Advanced Permissions: The “Administrator” button grants a role all available permissions, overriding any channel-specific permissions. Use this with caution.

You can change how members of your Discord server interact with each other and what they are responsible for by changing their job permissions.

Managing Members within Roles

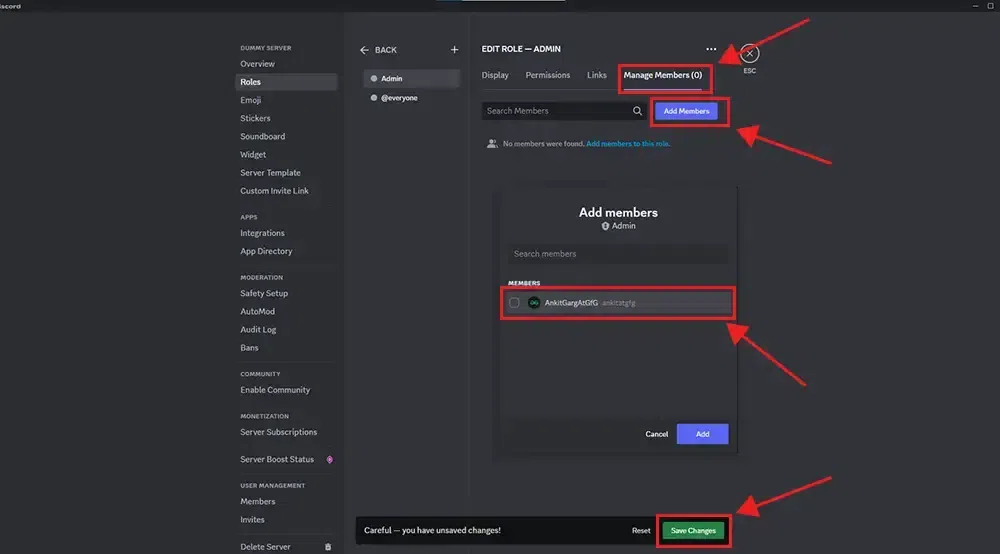
The “Manage Members” tab in the role settings allows you to view and manage members assigned to a specific role. Clicking on a role name will display the members assigned to that role. From there, you can modify their settings and add or remove members as needed.

How to Make Admins in Discord?

Admins are very important for running a Discord group. They have a lot of permissions that let them do different administrative jobs. Here are the steps you need to take to authorise someone:

  • Access the Server Settings menu in Discord.
  • Navigate to the Roles section and find the role you want to grant admin access to.
  • Click on the role and select “Edit” to modify its settings.
  • In the Permissions tab, scroll down to the Advanced Permissions section.
  • Toggle the Administrator switch to grant admin powers to the role.

Be careful giving admin rights to other people, and make sure that only people you trust can use them.

Also Read: How to Report Someone on Discord: Easy Steps

In Closing

Adding roles in Discord is a great way to manage your server and give each person of your community a unique experience. Learning how to add roles, change their settings, and come up with creative solutions can help increase interest, make communication easier, and keep the server running smoothly. Roles in Discord let you make your server exactly how you want it, whether you’re setting up separate lines for each role, using reaction roles, or giving admin rights. Play around with the different roles to get the most out of your Discord group.

FAQs

  • How many roles can I have on my Discord server?

Discord allows a maximum of 250 different roles on a server.

  • Can bots have their own roles?

Bots typically have their own role when added to a server, allowing you to customize their appearance and permissions.

  • Can admins kick the owner of a Discord server?

No, admins cannot kick the owner of a Discord server. Similarly, admins cannot kick other admins.

  • What can admins do on Discord?

Admins, or users with the Administrator role, have access to all server elements and can make changes equivalent to those made by the server owner.

  • Can I change the name of a server as an admin?

A: Generally, only the server owner has the power to change the name of a Discord server unless they grant that permission to an admin.

Learn How to Do Spoilers on Discord On 2024

Discord has become the perfect place for gamers and communities to join and talk to each other, like a symphony of connections and conversations. It has a lot of different features and a lot of ways to customize them, which gives its customers a trip that is truly unique. Join us as we travel to find out why we need to learn how to do spoilers on Discord, the art of hiding text and images, the many benefits of doing so, and a look at how servers are made, where spoilers play in the creative field.

How to Do Spoilers on Discord

Spoilers on Discord can be done in two ways: to hide text messages and to hide images. Let’s explore how to do both.

How to Do Spoilers on Discord to Hide Text Messages

To hide text messages using spoilers on Discord, follow these steps:

  • Start your message with two vertical bars (||)
  • Type your message after the vertical bars
  • End your message with two more vertical bars (||)

For example, if you want to hide the message “I have a surprise for you!”, you would type ||I have a surprise for you!||. Once you send the message, it will appear as a spoiler, and your friends will have to click on it to reveal the hidden text.

How to Do Spoilers on Discord to Hide Images?

To hide images using spoilers on Discord, follow these steps:

  • Click on the “+” icon in the text input field to open the media picker.
  • Select the image you want to send.
  • Before sending the image, click on the “Spoiler” button located at the bottom of the media picker.

By following these steps, the image will be sent as a spoiler, and your friends will have to click on it to view the image.

Why Use Spoilers on Discord?

The tapestry of Discord is like a complicated web. It is a place where gamers and groups can connect with each other. It combines three channels—voice, image, and text—and adds many extras that make the pilgrim’s experience more interesting. A hidden artist, the spoiler, comes out of this tapestry. It’s a messenger of surprise, a partner in suspense, and a spark that makes conversation more interesting.

Benefits of Using Spoilers on Discord

Using spoilers on Discord offers several benefits:

  • Preserve surprises

Spoilers allow you to keep surprises hidden until the right moment, creating a sense of anticipation and excitement.

  • Engage your friends

By using spoiler tags on Discord, you can turn conversations into interactive experiences, where your friends have to actively participate to reveal hidden information.

  • Create suspense

Spoilers can add a layer of suspense to your conversations, making them more intriguing and captivating.

  • Encourage exploration

When your friends see a spoiler, they are more likely to click on it and explore the hidden content, encouraging engagement and interaction. Spoilers can be a powerful tool to enhance your conversations on Discord and make them more enjoyable for everyone involved.

Popular Discord Servers that Use Spoilers Creatively

There are several Discord servers that use spoilers creatively to engage their members. Here are a few popular examples:

  • The Mystery Club

This server is dedicated to solving mysteries, and spoilers are used to reveal clues and hints to members. It creates an immersive experience where members have to work together to unravel the mysteries.

  • Game Night Central

This server organizes game nights and uses spoilers to hide game-related information, such as the chosen game, rules, and prizes. It adds an element of surprise and anticipation to the game nights.

  • Bookworms Unite

In this server, spoilers are used to discuss books without revealing important plot points. It allows members to engage in meaningful conversations about their favorite books while respecting each other’s reading experiences.

These are just a few examples of how spoilers can be used creatively on Discord. Explore different servers and see how they incorporate spoilers into their communities.

Also Read: “How to Transfer Ownership on Discord

In the end

Learning how to do spoilers on Discord can be fun and exciting to use. Whether you want to keep secrets, create suspense, or engage your friends in a guessing game, spoilers can add an element of surprise to your conversations. By following the steps mentioned in this article, you can easily do spoilers on Discord to hide text messages and images. So go ahead and start using spoilers to keep your friends guessing and make your Discord experience even more enjoyable.

How to stream Netflix on Discord? (Fix errors)

Many Netflix fans are wondering if they can stream it on different devices and apps. As a community-gathering platform, Discord is one of the candidates for streaming Netflix in its context.

But can you stream Netflix on Discord? In this text, I am here to show you how to stream Netflix on Discord on different devices (desktop and mobile) and also how to stream Netflix on Discord without a black screen.

Can you stream Netflix on Discord?

The answer is definitely yes. With streaming Netflix on Discord, you and your friend can enjoy and watch the common media if you are an ocean far from each other. Discord allows users to showcase their gaming skills or share what they are doing with their friends, and also it offers many more features.

In the following section, you will see how to stream Netflix on Discord with your device in your home. 

Would you like to know about appearing offline on Discord?

How to stream Netflix on Discord mobile?

I have to declare that you cannot stream Netflix on Discord on an Android device is impossible. However, it doesn’t mean that you can never use Discord on your Android phone; you can always use your Discord app to make voice and video calls. The story is the same for iPhone or iPad users, and they are limited only to voice and video calls. But the good news is that they will have perfect quality sound and almost no lag.

How to stream Netflix on Discord desktop?

According to what we said above, you only can stream Netflix on Discord with your Windows (your desktop or laptop). To stream Netflix on Discord with your device, follow these steps;

  1. First, open your web browser on your desktop and navigate to the Netflix website.
  2. At the same time, open Discord and make sure it is connected to a server.
  3. Next, click on the “Add it” button and select the tab in your browser with an active streaming service. After selecting Netflix, click on “Add Game.”
  4. Now, click on the “screen” icon in the lower-left corner of the screen.
  5. In the “Screen Share” pop-up, choose the browser tab you want to stream.
  6. Adjust the streaming settings and click on the “Go Live” button to start streaming Netflix.
  7. Finally, go back to Netflix and share the content you want.

How to stream Netflix on Discord without a black screen?

Do you have streamed your Netflix content on Discord? Then you may have also experienced a black background on your screen. To see how to stream Netflix on Discord without a black screen, you can follow these steps;

  1. Before starting the process, make sure you have the latest Discord app on your computer.
  2. Turn off your hardware acceleration settings and also all unnecessary programs while streaming.
  3. Next, you need to clear the cache on the Discord app.
  4. If none of these methods solve your problem, you may need to reinstall your Discord.

Why can’t I stream Netflix on Discord?

In some cases, Discord users cannot use their Discord account to stream Netflix. The most common answer to the question “why can’t I stream Netflix on Discord?” is that Discord often needs administrative access to your computer. Note that if your computer drivers are not functioning, you are not allowed to use almost any feature of Discord on your device.

Summary 

Thank you for reading this post. Can you stream Netflix on Discord? Yes and no. In general, there is no positive answer to the question “how to stream Netflix on Discord mobile.” Why is that? Because you are not able to stream Netflix on Discord with your Android device, Discord does not allow any iPhone user to stream or screen-share his/her gaming activities through the device. But that is not the end; you can enjoy Netflix on your Discord on your desktop or laptop with no problem.


If you need more information, you can visit Discord’s official website and ask your questions from the support team.

Home » Discord

How to appear offline on Discord? (Be Invisible)

Discord is created full of interest and excitement. You can stream games, chat with friends, and boost your knowledge with the help of this environment. However, some people decide not to be recognized online, so they do not have to answer their friends’ requests every time.


In this post, we will see what the status types for Discord users are and how to appear offline to one person on Discord.

Read about “How to fix discord javascript error.

About Discord Status Types


In general, Discord offers four types of statuses for users:


  •  Online


This is the default status in Discord, and if you set the status as “Online,” it is indicated by a green dot next to your avatar. The Online status lets other people know that you are available for chat.


  •  Idle


The status “Idle” means that you were not online for a while. When the Idle status is activated, it shows as a yellow dot next to your avatar. Discord automatically sets the Idle status when you haven’t been active on the app for a while.


  •  Do not Disturb


This status (DnD) lets other users know that you are not available for chat and shouldn’t be disturbed. You can see this status is activated when there is a red circle next to your avatar.


  •  Invisible


With “Invisible” status, you will appear offline on Discord, and nobody can recognize that you are available. You still have access to all Discord features while you are “Invisible.”


There is also a “Custom status,” Discord allows you to set a custom display message for each of the four status types or for a particular period of time in certain conditions.


Note that although all of these statuses can be set manually, “Online” and “Idle” as server-controlled statuses, while “Do not Disturb” and “Invisible” are user-activated.


How to appear offline on Discord on desktop


To see how to appear offline on Discord using the Desktop version, follow these steps:


  •  Open your Discord app or visit Discord’s website. Sign in to your account if it is necessary.


  •  Click on your profile picture at the bottom-left corner of the screen.


  •  A pop-up menu for status options will open. Select the “Invisible” status option from it.


  •  As a result, a gray circular icon under your user’s profile icon indicates that you are invisible.


How to appear offline on Discord on mobile


If you use Discord on your phone, let’s see how to appear offline on Discord via your mobile device. Follow these steps;


  •  Open your Discord app on your phone.


  •  Click on the hamburger menu in the top-left corner of the screen.


  •  Next, click on your profile picture in the bottom-right corner to open the “User Settings” tab.


  •  Here, tap on “Online” next to the “Set Status” option.


  •  Select “Invisible” from the menu that pops from the bottom of the screen.


  •  Finally, your photo profile will show a gray circle indicating the offline mode.


Summary


Thank you for reading this post. In general, you can manually set all four statuses on Discord. However, they can also be changed automatically by servers in certain situations. If you need more information, you can visit Discord’s website and ask your questions.

Home » Discord

How to fix “discord javascript error”?

Discord is one of the unique environments where people can make groups and share their ideas and experiences. Like all human-made applications, Discord also can be associated with several bugs and errors, which can put its users into trouble.

In this complete post, we will talk about “javascript error Discord,” what causes this error to happen, and how we can fix it quickly.

Do you want to know how to make a discord poll? read here.

What is the “discord javascript error”?

Many people have encountered this Discord fatal javascript error while they were trying to install Discord on their desktop devices. However, we don’t actually know the root reason for this phenomenon until now.

There are some theories about a javascript error that occurred in the primary process discord; for example, Discord or its settings may have gone corrupt because of bad installation, or Discord runs with administrator permissions, and you should remove this option to let the application work properly.

What Causes the “discord javascript error”?

As mentioned earlier, there is no well-known reason for “fatal javascript error Discord.” But we can summarize all possible answers into these four reasons here;

  • Discord corruption because of lousy installation or damaged downloaded package.
  • Ceased Quality Windows Audio Video Experience service.
  • Discord stores temporary data on your PC or laptop to work efficiently. And damage to these files can break the function of the application on your device.
  • Discord is running with administrator settings.

How to fix the Discord JavaScript Error?


After we know what makes Discord a fatal javascript error, now let’s see how we can get rid of it with no mistakes. We have collected available solutions into seven categories down here:

Remove the Discord process from your Task Manager

The easiest way to solve the Discord javascript error is to remove the Discord process from Task Manager. This method is straightforward, so we have put it at the beginning.

To remove Discord from Task Manager, right-click on the “Taskbar” tab, choose “Task Manager,” click on the “process” tab, select “Discord,” and finally, click on the “End task” button.

Run Discord without Administrator permissions

Many users have reported Discord never functions as an administrator, though it is the preferred option on the system. If you want to change settings to get rid of the administrator option, follow these steps;

  • Start with right-clicking on the Discord app and selecting “properties.”
  • In the properties window, go to the Shortcut tab and then click on the “Advanced” option.
  • As a result, a “Run as administrator” option appears on the screen. Make sure you uncheck it and click on the “Ok” button.
  • Repeat the above step in the Compatibility tab as well. Never forget to click on the “Ok” button to save the changes.
  • You have successfully changed the settings on your Discord.

Delete your Discord files from “%appdata%” and “%localappdata%” on the device

If you want to reset Discord settings, you need to delete the Discord files and folders in AppData and LocalAppData. To solve the “fatal Discord javascript error” issue on your device, follow these steps;

  • First, open the Run Dialog box by pressing “Windows key + R”
  • Now, type in “%appdata%” and click on the “OK” button. Your AppData folder will be opened for you.
  • Now, you need to delete the Discord folder in the AppData folder. As mentioned earlier, you need to end the task in Task Manager first to do this process. If you have already turned off the Discord process in Task Manager, it would be easy for you to delete the app.
  • Click on the search button next to the Start button and type “Run” or press “windows key + R.”
  • As the Run dialog box appears on the screen, you have to write “%localappdata%” and press “Enter.”
  • A folder will pop up on your screen. Here, you need to navigate to the Discord folder, right-click on it and move on to delete the folder.
  • As a result, no folder must remain for being deleted. Finally, restart your device and see whether you still know the Discord JavaScript error.

Change some of the settings options in the Windows Audio Video Experience service

The Quality Windows Audio Video Experience service is one of the essential services for Discord. If a simple bug appears in this program, the whole Discord system will be ceased functioning.

To change some settings on the Quality Windows Audio Video Experience service, follow these steps;

  • First, press the “Windows + R key” to open the run dialog box.
  • Next, type in “services.MSC.” and click on the “Enter” key. As a result, you will have the Services toolbox opened up the very next second.
  • Navigate to “Quality Windows Audio Video Experience” and open the program by right-clicking. A menu will appear, and you have to select “Properties.”
  • If the Service is already running, you need to click on the “Stop” button given in the middle of the window. If it is not, you have to click on the “Start” button to rerun the Service.
  • In the properties window, check for the option under the “Startup type” menu and set it to “Automatic” rather than “Manual.”
  • If you click on the “Start” button, you may encounter this error:

“Windows could not start the Service on the local computer.

Error 1079: The account specified for this service differs from the account settings for other services running in the same process.”

If you want to solve the problem, in the Service’s properties window, open the “Log on” tab and click on “Browse.”

  • Next, you can see an entry box with the writing “enter the object name to select” where you have to write your account’s name. Click on the “Check Names” button.
  • Click on the “Ok” button, and type in your password.
  • Congratulations! You have successfully made the changes to the Service.

Whitelist Discord installation files

Many people are using antiviruses to protect their PC from harmful software. However, sometimes these protectors prevent some Discord files from running correctly, and therefore, you need to put Discord in your whitelist.

Whitelisting is done differently in any antivirus software, and there are several antivirus software available. Most of the methods are almost the same, so we use Avast antivirus as an example. To do that, follow these steps;

  • First, right-click on the Avast icon to open up Avast. A list will appear, so you need to select “open Avast user interface.”
  • After the user interface appears on your screen, you have to click on the “Protection” tab.
  • You can see an option called “Virus chest” on the right side of the screen. Clicking on this option will show all the blocked and quarantined files by the antivirus.
  • Here, you need to select all Discord folders. After that, bring your cursor to the files to see the “three dots” option.
  • Next, click on those three dots and opt for “restore and add an exception” on the appearing list. You need to repeat this method for all Discord folders.
  • Finally, once you have whitelisted the files, try reinstalling Discord.

Uninstall and reinstall the Discord application on your device

If none of these methods make the problem “fatal Discord javascript error” cleared, maybe you need to unstill the whole program and reinstall it again. Follow these steps to uninstall and reinstall Discord;

  • Open “Start Menu” on your Windows, and click on the “Search” option to find “Control Panel.”
  • Click on the “uninstall the program” option in the control panel.
  • You can see different applications on the list. Find the Discord icon, click on it and choose “uninstall.”
  • After successful uninstallation, right-click on the Start menu and select” run.”
  • Now, type in “%appdata%” in the box and click on “run.”
  • Delete the Discord folder as it appears.
  • type in “%localappdata%” in “run” and delete all Discord folders.
  • Finally, you need to visit Discord’s official website and download Discord again.

Also Read: “How to Add Roles in Discord

Summary

Thank you for reading. In most cases, “fatal Discord javascript error” is not an issue to be worried about, and you can solve it with the six solutions explained above. However, if you still are wrestling with this problem, you can visit Discord’s official website and get more information about the error.

Home » Discord

How to make a discord poll? (What are poll bots)

In modern society, polls and elections are two tools to gauge public opinion on various topics and matters. Polls, especially online polls, are also suitable for understanding the psychographics or demographics of your target audience.

If you are a streamer on Discord, you can use Discord polls to keep the community engaged and give your followers a way to make their views known. In this post, we will show how to make a Discord poll on Discord, what is a Poll Bot Discord, and how we can use them. You may also want to know how to build a Discord bot.

What is a Discord poll?

As mentioned earlier, polls are a powerful tool to find out the trending favorites of your audience at a specific time. With a Discord poll, you will get the majority of preferences of your users for many subjects, including a new video game or just a new technique to win.

In the following words, we will see how we can create a Discord poll with or without a Discord poll bot (both methods will be explained).

You may interested in streaming Netflix on Discord.

How to make a poll on Discord?

You can create a Discord poll; you can start the process with empty hands or with the help of a Discord poll bot. For the first method, you can use emoji reactions. An emoji reaction poll lets people answer your question by clicking a particular emoji, which corresponds to a different answer.

This method is preferred when you want an easier way to make polls and not invite bots to your pages. To do that, follow these steps;

  • First, open your Discord.
  • Now, click on your server’s icon on the panel on the left side of the Discord window. If you have created the server or have permission to manage it, you will be able to create an emoji reaction poll.
  • If you want to dedicate a specific channel for your polls, click on the “+” icon next to the “TEXT CHANNELS” heading, enter a name for the channel, and click on the “Create Channel” button.
  • Now, you need to set up permissions for your channels. To do that, click on the gear icon next to the channel’s name, and select the “Permissions” tab.
  • Select “@everyone” under the “ROLE/MEMBERS” heading on the right side of the screen. After that, click on the green “✓” icon to the right of the “Read Message History” heading and the red “X” icon for the remaining options. Click on the “Save Changes” button to save the process.
  • To create your poll, type the question into the channel’s text box and press the “Enter” or “Return” button.
  • To add reaction emojis to your poll, hover your mouse over the question and click on the smiley face. Next, click on one of the emojis you want to use as a reaction. Note that each emoji icon can correspond with a specific answer.
  • Here, you need to explain poll elements to the channel. This can be done by “Click [emoji 1] to vote yes, click [emoji 2] to vote no,” or something like that.
  • Now, you can tell your audience to vote in the poll you have created.
  • Finally, after a certain amount of time (which is mentioned by yourself), the emoji with the highest number of voters will be the winning answer.

What is a discord poll bot?

As you know, Discord is not just a simple voice application, you can use extensive customization features, and even they allow developers to create “bots” to perform a range of tasks within the app. A Discord poll bot is an automation tool that fascinates the process of making polls on Discord, with more features.

How to Use a Discord Poll Bot

In the second method of creating polls on Discord, you can use a Discord poll bot. Here, we use Easy Poll Bot as an example since it has a very easy setup. Remember that you need to be a server manager or administrator to add a bot. Follow these steps;

  • Select a server and click on the “Continue” button.
  • Now, you need to review the permissions and requirements of Easy Poll Bot and after that, click on “Authorize.”
  • By default, only server members who are server administrators or managers can create and close polls. However, if you create a role called “PollCreator,” Easy Bot will also allow those members the same full access to poll creation. Click on the “Join Easy Poll Discord Bot” button to open the welcome screen.
  • Next, open a channel in which you want to create the poll in it. Suppose you are going to get a quick list of Easy Poll’s main commands; type “/easypoll” in the channel.
  • You can use “/poll” so you can close the poll whenever you want, or “timepoll” if you are going to specify the poll’s length. After you press “Tab,” you will be asked to enter the poll’s question.
  • Enter your question in the box and press “tab” on the screen.
  • If you have a timed poll, enter the length of time. Easy Poll Bot follows the format 7d (7 days), 3h (3 hours), or 2m (2 minutes). You can use any numbers you want.
  • Enter the answers to your question. You can choose the “Multiple Choice” option. If you want to allow, people to select more than one answer, type “true” and press “Tab.”
  • Now press the “Enter” or “Return” button to make the poll live. Any member in your channel can answer the question and choose the preferred answer(s).
  • Finally, close the poll and view the results. If you created a timed poll, the poll would automatically close after the time period. If it is not, type “/closepoll” and press the “Enter”  or “Return” button to finish the poll.

What are the Best Discord Poll Bots?

Now, we have collected the five best Discord Poll Bots for our business. Note that the characteristics of these bots are almost the same, with some variations. Here we go;

  • Poll Bot Plus

Poll Bot Plus provides a quick and easy-to-use interface for creating attractive and beautiful polls that are entirely customizable. This bot has many additional features that users can use for Discord polls.

  • Raid Helper Bot

This is one of the best bots for creating outstanding Discord polls. Raid Helper Bot contains many other valuable features, including time zones, reminders, archiving, and multiple language support. Therefore, it can be considered the best Discord bot you can find in the Discord community.

  • Asena Bot

In the third position, there is a stable and fast Discord bot with new generation technologies involved that makes the bot perfect for creating polls. More after, Asena Bot supports multiple languages, so it is recommended for international corporations.

  • Easy Poll Bot

This brilliant Discord bot is primarily known for its easy and user-friendly interface to create fantastic custom and creative polls. Easy Poll Bot also has a “customer reaction” feature where the audience can send their comments on the poll. The good news about this bot is that Easy Poll Bot is totally free.

  • Mr. Poll Bot

Although it is not famous on Discord, Mr. Poll Bot is one of the recommended bots for creating exciting Discord polls. Mr. Poll Bot is mainly a suggestion bot, but many discord server admins have not yet recognized its polling feature.

Summary

Thank you for reading. No matter if you use emojis or Discord poll bots to create your polls, your question’s content will delineate the percentage of participation in your server. If you need your audience’s ideas quickly, why not stand up and just make some polls on your Discord?

Home » Discord

How to make Discord bots? (On PC and mobile)

Do you love Discord? So many other people are. As a beautiful streaming platform, this is a place to amaze your audience, and there are many patches you can add to your server and make it more bright.

We will show what a Discord bot, a Discord bots creator is, and how to make Discord bots both with your phone and PC.

Also, read about “How to make a discord poll?“.

What are Discord bots, and how do they work?

If you are a Discord user, you should know bots are valuable artificial intelligence that automatically performs several valuable tasks on your server. With this patch, you can welcome new members, add music to your server, and moderate discussion.

What is a Discord bots maker?

Developing a new Discord bot needs expertise and a lot of money. An alternative way is to hire a Discord bots maker. There are many Discord bots makers which you can use for your server, and we have introduced the three most popular Discord bots maker here:

Discord Bot Maker on Steam

Steam is a powerful bot development tool that can boost your audience’s experience on your server. You can use Steam on your PC, and with this software, you will have the power and control to create bots that can do almost anything you want. Steam costs only 10 dollars.

Discord Bot creator on BotGhost

BotGhost is another tool that you can rely on it. As statistics say, around 280 thousand bots have been developed using BotGhost, and this definitely means that the platform is decent and has all the features that you need. You can use BotGhost’s additional modules to create more advanced Discord bots.

Bot Designer Discord

If you are a newbie in Discord bot development, you can use Bot Designer Discord. However, this doesn’t mean that it has no new features for professionals. You can use Javascript for custom coding your Discord bot. Furthermore, Bot Designer Discord has the ability to host your server, too.

How to make Discord bots on PC?

How to create a Discord bot on a PC? You just need to follow these steps;

  • First, download Node.js and Discord on your computer, and create a Discord account. Once both applications have been installed on your device, restart your PC and move on to the next step.
  • Now, create your bot. To do it, you need to access the applications tab in Discord in order to get an authorization token for the bot. with this token, Discord recognizes your code and adds it to the bot when in servers.
  • Get your authorization token. Note that this token is unique to your bot; thus, don’t give the code to strangers. Not unless you have decided to let them change the bot’s settings.
  • Next, send your bot to the servers. You can start the process by finding the applications “General Information” tab and copying your “Client ID” to the blank space.
  • The next step is to create a new folder for your bot on your computer. You need to open a notepad and type;

{

“token”:” YOUR BOT’S TOKEN.”

}

After that, save the file as “Auth.json.” It must contain a. JSON file and not a .TXT file. Your bot will not work if you use it. JSON. Now, open a new file and type in the following information;

{

“name”: “Legendary bot”,

“version”: “1.0.0”,

“description”: “Jeffrey the Bot”,

“main”: “bot.js”,

“author”: “Your Name”,

“dependencies”: {}

}

You can replace any information you feel fits in this section; the BOT’s name should be.

  • Open your text editor and make your bot’s file. To get the most out of your bot at this level, you will need to have an understanding of JavaScript. Now open your notepad and define your bot’s code.
  • Next, open your computer’s “command prompt” and navigate to your Discord bot folder. The easiest way of doing this process is by right-clicking a blank area within the bot’s folder while holding the shift. After that, click on the “open” button in the command prompt. You can also press the Windows key + R, type CMD in the field, and click enter alternatively.
  • Use the command prompt to install your bot’s dependencies. In the command prompt, which is next to the discord bot folder pathway, type in “npm install discord.io Winston – save.” As a result, the necessary files will be automatically installed.
  • Finally, run your bot on the command prompt. If everything is okay, you can enjoy your Discord bot on your server.

How to make Discord bots on mobile?

You can also use your phone device to make Discord bots or add them to your server.

To add a Discord bot via mobile device, follow these steps:

  • First, open the top.gg website on your browser.
  • As you enter the website, you can find the lists of top-rated and top-trending bots and also search for specific bots.
  • After choosing your desired bot on the lists, click on the “View” option on the screen and click on the “Invite” button.
  • Now go to your Discord account. If prompted, enter your credentials and log into your account. On the next move, continue the process of selecting the server and granting permission in the browser.
  • Open your Discord app, select the server in the left side panel of your screen, and tap on the server name at the top section.
  • Next, click on the “Settings” option to open the server settings and then select the “Roles” option.
  • Click on the “+” button below to create a new role for your bots. You need to give the function a name and turn on all the permissions you want the bot to access except administrator and manage server ones.
  • Finally, go back and select the “Members” option to open the Member’s list. As a result, select your bot and choose the role to assign the bot to that role.

How to make Discord bots online?

If you are somehow obsessed with coding and trying to find an easier way, you can make your Discord bots online and without exertion. As mentioned before, you can try Discord bots development tools like BotGhost; and here, we will teach you how to use another great website to create your bots, which is Zapier.

Follow these steps to use Zapier’s tools to make your Discord bot, based on its official website;

  • Let’s imagine you want to inform everybody about today’s weather. You can start by building a Zap and then choose the “Weather by Zapier” option as the trigger app.
  • Now select the “Will It Rain Today?” option as the trigger, then click on the “Save and Continue” button.
  • In this case, you will be asked for your longitude and latitude and whether you would like to use Celsius or Fahrenheit.
  • Next, click on the “Continue” button, and go to your Discord.
  • Choose the “Send Channel Message” button and click on “Save + Continue.”
  • You need to connect your Discord server with Zapier now.
  • To set up your template, select which channel the post should go to, then customize your message.
  • You can pull in information from the trigger step by clicking the fields button. By clicking on the button, a dropdown menu will appear. You are also allowed to enable text to speech, change the bot’s name, and give the bot a custom icon. Click on the “Continue” button.
  • Now, you can test your bot on your Discord server. To do that, click on the “Send Test to Discord” icon, and you should see a success message on your screen.
  • If you see the message, then you have successfully created your bot!!!

This is an example of creating a simple Discord bot using Zapier on the internet, and of course, there are so many other platforms that can help you develop unique bots for your channel.


Summary

Thank you for reading this text. As you see, we explained why we need Discord bots, what is a Discord bots creator, and how to make Discord bots on your phone or PC. In general, it seems like duck soup, and I hope you will learn quickly to do it. So, let’s go and make some bots!!!

How to Choose the Best Discord Server Name?

You might be here to find a funny or cool and weird discord name. First, I want to state that discord enables you and your friends to send messages to each other. Each people group is named a “server” in its field. If you know Slack, it is a more formal version of it.

Finally, selecting a name for the Discord server should not be hard. Look at the ideas in the below list, and combine your creativity with them.

  • Add Your Server’s Point

All servers are usually around a special subject, as a certain game, aesthetic, or fun. For instance, if you work on a server regarding crocheting, you can add it to your title. Or, you might have a server to generate a population around video editing, then you can mention it in your title.

  • Aesthetic Fonts

It could be a good idea to try using modern and aesthetic fonts to make your Discord server’s title. It is so popular among servers owners with attractive lettering and a group of possible text forms. To make these, go above the Vaporwave Generator by LingoJam, figure in your server’s title, and it will display different cool text fonts ready to copy and paste.

  • Galactic Ideas

Getting influence from space might be another way to make a cool discord name. You could choose simple names from space, such as stars or planets, and add them to build your server name. Or use universal words such as “Aurealis” or also astronomical phenomena as names could serve great. This method also goes well with kaomoji and aesthetic theme fonts. 

  • Append “Community” at the End

The next bend could include combining the word “community” at the last of the name. It will inspire other accounts to meet your server as they will directly understand that you are a fan of making positive energy in your server.

Also, you can use this way for your already taken names and help it stand out from other similar servers and boost new members.

  • Add Kaomoji to the Name

You could add some adorable kaomoji to your server’s name. You can choose from cute polar bears to hearts and sparkles and add all kinds of kaomoji.

You can check out the available range at Cute Kaomoji for high appealing kaomoji concepts that you can attach to your server’s name.

  • Add Numbers for a Stylistic Touch

Attaching a number may seem cliché as many of us use numbers in our emails, but you can make a stylistic touch to a server name by using this. “Pink31” would be a model, where the 31 makes a nifty ending to your server name. 

  • Add “Café” to the End

Did you ever think of adding the word “café” to your lo-fi and beautiful title? In my opinion, it is the best recommendation for servers, which boost chatting among members and want them to know each other better.

  • Attach “World” or “Land” to the End of the Title

General Discord server titles often combine the terms “Land” or “World” to their server names, for instance, “Galaxy Land” or “Aesthetic World.” I suggest you brainstorm with this main theme in your mind. If you imagine a name that you think will work, try to append the “World” to the end of that and see how it sounds great.

  • Collect Names From Nature

You could gain influence from nature too! For instance, if you want to generate an artistic server, you could concatenate nurture names such as Stone, Hills, Walls, or Gems. Then mix them with some of your favorite words to make a cool title. For instance, “Blue Hills Dome” might work for any of you. 

  • Add Some Emoji

Did you ever try to add some emoji to your server’s title? A lot of gaming servers and societies have emoji added to their title. You could decide to add cute clouds, for instance, or some lovely herbs too. There is no restriction for choosing the emojis, just you have to consider which emoji best matches your server’s aesthetic.

Some of the best discord name examples:

  • Bridge Fibers
  • Passion Digital
  • Strange Bird Media
  • Quantum Branding Agency
  • Under The Hood
  • Creative Ideas
  • ServerMania Data Centre
  • Famous Skyliners
  • Energetic Humming
  • Rise Hosting
  • Very Friendly
  • Borne Digital
  • PulseHost
  • Great To Live
  • Alone Yet Cool
  • Reliable Networks
  • Bluestorm iGaming
  • Last Hopefuls
  • Unlawfulness
  • Junior’s World
  • Angels Of World
  • Curse Yourself

Conclusion

If you need to find a great discord server name and do not know how to make it, read the above text. Here, we explained the best ways of generating discord names with creative ideas.

How to Make Some Discord Emotes?

Have you ever been on Discord? While I recommend you to be if you are not still, I can introduce it as a place for gamers to talk, chat, and share content. After that, it has bloomed into one of the most valuable community-based social media motors on the internet.

Section of what performs Discord as a great site for societies to grow in the field of control that society guides can hold above their servers. So various features of a Discord server can be changed and customized that private servers start to consider more like the gathering sites of the past, all grouped in one area.

One fun and easy technique to recognize your Discord server from different areas is to enable your users to send custom server emojis in their chats.  

How to make Discord emoji?

  • Can anyone add custom emojis?
  • The best way to make an emoji from any picture
  • Adding your emoji to a Discord server

Here, you can read about each of these questions and learn more about Discord emojis. 

Can Anyone Add Custom Emojis?

One of the principal ideas Discord provides server administrators to customize and manage their servers is establishing positions for its members. Discord caps the whole amount of characters at 250, considerably more than most servers want, and every position has various rights, facilities, and duties.

One of these various privileges that you can use for all positions is emoji management. If you are a server administer, you can continue to the Roles part of your server frames, choose one of your server’s functions, and go down to see the Manage Emojis tag. As the emoji management privilege is available for all positions, all members can enter the emoji administrator by their Server Settings tab.

The Best Way to Make an Emoji from Any Picture

You can apply any picture you like to make a custom Discord emoji. Utilize the photo you have taken, a Google Image Search picture, transparent PNG imagesor animated GIFs. Also, you may want to upload a short clip of the video and turn it into a GIF. The best way is to use the dropdown in the Export button.

Dimensions:

 As discord emojis are too tiny, when you want to upload your file, it will resize to 32×32 pixels. The best features ratio is 128×128 pixelsso change your image size before uploading to Discord. An extra technical term is that emoji files can not be larger than 256KB in size. 

As you go into Kapwing’s Studio, upload your picture, photo, or GIF. On exportation, you can download your media with the right size.

Alternatively, you can apply the Custom Size key to access any pixel rate for the cover dimensions.

Take the Custom Size tool in Kapwing to change the emoji canvas size.

Some Discord emotes act properly as transparent PNG images, so they seem more like real emojis – practicing the Discord emoji template, take the Erase tool to exclude sectors with a Magic Wand, and move up the points with a specific eraser.

Suddenly, get the framework transparent in the Kapwing Studio to save your Discord emoji as a PNG.

Another choice is to attach text overlays to your custom emoji. Just tick Text and customize some points like font, size, position, style, color, and animation. After that, you have to choose Export Image and Download to take the emoji to your system.

Adding Your Emoji to a Discord Server

If your position permits you to control the server’s emojis, you need less than a minute to upload your emoji. Begin by ticking the sign next to the server title and choosing Server Settings. Once you do not recognize this choice, it indicates your role will not permit you to add emojis.

Server settings

Into your server settings, move to the Emoji tab and take the purple Upload Emoji icon. Then choose the emoji file you performed. Now you add your custom Discord emoji to the server’s emoji bank.

Also Read: Spoilers on Discord

Conclusion:

As a Discord user, like all other periods, you need to use different emojis. Here, in this blog post, I talked about users who can add custom emojis, the best way to make and add them to a discord server.

Exit mobile version