How to Install OptiFine in Minecraft (The Ultimate Guide in 2024)

Minecraft is a popular sandbox game that allows players to create and explore virtual worlds. However, some players may experience lag or want to enhance the graphics and performance of the game. That’s where OptiFine comes in. OptiFine is a Minecraft mod that allows you to customize settings, increase performance, use shaders packs, and improve the graphics of Minecraft. In this ultimate guide, we will walk you through the process of how to install optiFine in Minecraft.

How to Install OptiFine in Minecraft

OptiFine is a popular optimization mod that enhances the game’s graphics, adds new features, and improves overall performance. Follow this step-by-step guide to install OptiFine in Minecraft and increase your gaming experience.

Downloading OptiFine

Before installing OptiFine, it’s important to ensure that your system meets the minimum requirements. OptiFine is compatible with Java-based Minecraft versions. You will need to have Java installed on your computer. If you don’t have Java, you can easily download and install it from the official Java website.

To download OptiFine, you can visit the official OptiFine website (URL). On the website, you will find a list of available versions of OptiFine. Choose the version that is compatible with your Minecraft version. If you can’t find the version you need, there is an option to view all versions. Once you have selected the desired version, click on the download button.

Installing OptiFine

Once you have downloaded the OptiFine file, it’s time to install it. The installation process may vary depending on your operating system. Follow the steps below for your specific operating system:

Windows

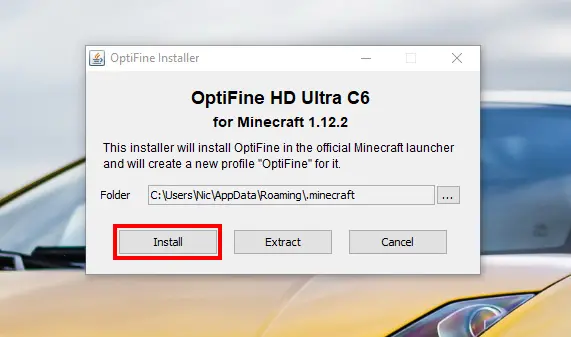
  • Locate the downloaded OptiFine file on your computer.
  • Right-click on the file and select “Open with” and then “Java (TM) Platform SE Binary”.
  • A window will appear displaying the path to the Minecraft folder. Make sure Minecraft is installed before proceeding.
  • Click on the “Install” button to begin the installation process.
  • Once the installation is complete, you will see a confirmation message. Click “OK” to close the window.

Mac

  • Find the downloaded OptiFine file on your computer.
  • Control-click on the file and select “Open with” and then “Java (TM) Platform SE Binary”.
  • A popup window will appear displaying the path to the Minecraft folder. Ensure that Minecraft is installed before proceeding.
  • Click on the “Install” button to start the installation process.
  • After the installation is finished, you will see a confirmation message. Click “OK” to close the window.

Launching OptiFine in Minecraft

Now that OptiFine is installed, you can launch it in Minecraft. Follow the steps below to launch OptiFine:

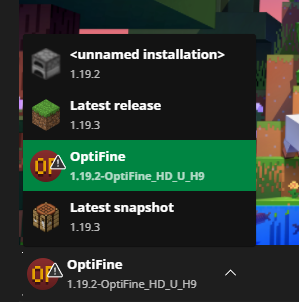
  • Open the Minecraft Launcher on your desktop.
  • To the left of the “PLAY” button, you will see the latest version available. If the OptiFine version is listed, click on it to run the installation.
  • If the downloaded version is not listed, click on “Installations” at the top of the launcher.
  • In the installations menu, you will see your OptiFine installer listed. Select it and click “Play” to launch OptiFine.
  • Minecraft will open with OptiFine, and you can now enjoy the enhanced graphics and performance.

Enhancing Gameplay with OptiFine

OptiFine offers a range of features that can enhance your gameplay experience. Here are some of the key features and how to access them:

  • Increasing FPS: To increase the frame rate per second, navigate to Options > Video Settings. Adjust the settings according to your preferences, such as reducing render distance or disabling fancy graphics.
  • Shader Packs: OptiFine allows you to use shader packs to enhance the lighting and visual effects in Minecraft. To install a shader pack, download it from a trusted source and place it in the Shaders folder within the Minecraft directory. Then, in Minecraft, go to Options > Video Settings > Shaders and select the desired shader pack.
  • Customizing Textures and Animation Effects: OptiFine allows you to customize textures and animation effects in Minecraft. Navigate to Options > Video Settings to access the customization options. You can change details such as water animation, flame animation, rain animation, and more.
  • Zoom Feature: OptiFine includes a zoom feature that allows you to zoom in on objects. Press the default key “C” to activate the zoom feature. You can also customize the zoom key by going to Options > Controls.

Updating OptiFine

To update OptiFine to the latest version, you can simply download the latest version from the official OptiFine website and install it following the same steps outlined in the installation section. It is not necessary to uninstall the previous version before installing the latest one.

In Closing

OptiFine is a powerful mod that can make your Minecraft experience much better by making graphics and speed better. It’s easy to install OptiFine and use its features if you follow the steps in this guide. OptiFine gives you many ways to improve your games, such as increasing frames per second (FPS), using shader packs, or changing textures and animation effects. Install OptiFine and take your Minecraft experience to the next level.

How to Open Bios Windows 11? (In Asus, Dell, Lenovo, HP and Acer Laptops)

Do you want to get to your Windows 11 PC’s BIOS or UEFI firmware? You must enter the BIOS in order to make changes to your motherboard, CPU, or boot devices. We will look at a lot of different ways on how to open BIOS Windows 11. We’ll talk about well-known laptop names like Acer, Dell, HP, Lenovo, and Asus. Okay, let’s begin.

What is BIOS?

Before we get into the steps, let’s understand what BIOS is. BIOS, which stands for “Basic Input/Output System,” is a very simple tool that manages and syncs all the hardware on your PC. It controls things like the CPU, RAM, storage drives, and other tools and is like the firmware for your motherboard. BIOS is sometimes called Unified Extensible Firmware Interface (UEFI) BIOS on new systems.

Why Do You Need to Access the BIOS in Windows 11?

Accessing the BIOS in Windows 11 can be useful for several reasons. Here are some common scenarios where you might need to enter the BIOS:

  • Overclocking: If you want to push your GPU or RAM to their limits for better performance, accessing the BIOS is necessary to enable overclocking features.
  • Virtual Machines: If you plan to run virtual machines on your PC using software like VMware or VirtualBox, you may need to activate Intel Virtualization Technology (VT-x) or AMD-V in the BIOS.
  • Changing Boot Order: When installing a new operating system or booting from a USB or CD/DVD-ROM, you may need to change the boot order in the BIOS to prioritize the desired device.
  • Hardware Configuration: The BIOS provides access to various hardware settings, allowing you to configure parameters such as date and time, fan speed, and power management.
  • Security Settings: If you want to add an extra layer of security to your Windows 11 PC, you can set a master password in the BIOS to restrict unauthorized access.

How to Open BIOS in Asus Laptops Running Windows 11

To access the BIOS on an Asus laptop running Windows 11, follow these steps:

  • Start by shutting down your laptop completely.
  • Press the power button to turn on your laptop.
  • As soon as the Asus logo appears, press the F2 key repeatedly until you enter the BIOS setup utility.

If the F2 key doesn’t work for your specific Asus laptop model, you can try using the Del key instead. Refer to your laptop’s user manual or Asus support website for the exact key to access the BIOS.

How to Open BIOS Windows 11 in Dell Laptops?

If you own a Dell laptop and want to access the BIOS in Windows 11, follow these steps:

  • Shut down your Dell laptop completely.
  • Press the power button to turn on your laptop.
  • When the Dell logo appears, press either the F12 or F2 key repeatedly until you enter the BIOS setup.

If neither of these keys works for your Dell laptop, consult the user manual or Dell’s support website for the correct key combination to enter the BIOS.

How to Open BIOS Windows 11 in HP Laptops?

To access the BIOS on an HP laptop running Windows 11, follow these steps:

  • Power off your HP laptop.
  • Press the power button to turn on your laptop.
  • Immediately start pressing the Esc key repeatedly until the startup menu appears.
  • Press the F10 key to enter the BIOS setup.

If the Esc key doesn’t work for your HP laptop, try using the F10 or F2 key instead. Check the user manual or HP’s support website for the correct key for your specific model.

How to Open BIOS Windows 11 in Lenovo Laptops?

Accessing the BIOS on a Lenovo laptop running Windows 11 can be done using the following steps:

  • Shut down your Lenovo laptop completely.
  • Press the power button to turn on your laptop.
  • When the Lenovo logo appears, press either the Fn + F2 or F2 key repeatedly until you enter the BIOS setup.
  • If the Fn + F2 or F2 key combination doesn’t work, consult the user manual or Lenovo’s support website for the correct key sequence to access the BIOS.

How to Open BIOS Windows 11 in Acer Laptops?

To access the BIOS on an Acer laptop running Windows 11, follow these steps:

  • Power off your Acer laptop.
  • Press the power button to turn on your laptop.
  • As soon as the Acer logo appears, press either the F2 or Delete key repeatedly until you enter the BIOS setup.
  • If neither the F2 nor Delete key works for your Acer laptop, refer to the user manual or Acer’s support website for the correct key combination to access the BIOS.

Now that we have covered the methods for popular laptop brands, let’s explore a general method to access the BIOS in Windows 11.

How to Open BIOS in Windows 11: General Method?

If you are unable to access the BIOS using the methods specific to your laptop brand, you can try the general method outlined below:

  • Shut down your Windows 11 PC completely.
  • Press the power button to turn on your PC.
  • Look for a message or logo displayed during the boot process that indicates the key to press to enter the BIOS (e.g., “Press F2 to enter BIOS”).
  • Press the key several times until the BIOS setup tool shows up.

If you don’t see any indication of the key to enter the BIOS, you can try pressing the F2, F10, Delete, or Esc key repeatedly during the boot process. Keep in mind that the exact key may vary depending on your motherboard or PC manufacturer.

In Closing

You need to be able to get to the BIOS in Windows 11 in order to make significant changes to your PC’s hardware setup and settings. It’s important to know how to get into the BIOS if you have an Asus, Dell, HP, Lenovo, or Acer laptop or a PC that was built just for you. Following the instructions in this guide will make it easy for you to get into the BIOS on your Windows 11 PC and make the changes you need.

Remember to look at the user manual for your laptop or the manufacturer’s support website for specific directions on how to use your device. Now that you know how to get into the BIOS, you can easily go through the firmware settings and make the most of Windows 11.

Best Ways to Fix SSD Not Showing Up in Windows 11

SSD is becoming more and more common because it works faster and is more reliable than regular hard drives. But one problem that a lot of people have is that the SSD doesn’t show up in Windows 11. This can be annoying because it keeps people from getting to their files and making the most of their SSD. This guide will look at the best ways to fix SSD not showing up in Windows 11 and give you great instructions on how to fix the problem.

How to Fix “SSD Not Showing Up” Error?

Before we talk about how to fix the problem, it’s important to know why the SSD might not be showing up in Windows 11. By finding the problem’s root cause, you can successfully deal with it and put in place the right solution. Here are a few common reasons:

  • Bad links between hardware: It is possible that the SSD is not properly connected to the motherboard or power source of your computer. The SSD might not be found if the wires are too loose or the connectors are broken.
  • Free disk space: The SSD might not show up in Windows 11 if it hasn’t been set up or divided up. Before the operating system can see unallocated drive space, it has to be formatted and given a name.
  • Assigning drive letters: Windows gives storage devices drive letters so that they can talk to each other. If the SSD doesn’t have a drive letter or has drive letters that don’t match, it might not show up in File Explorer or Disk Management.
  • Misconfigured BIOS settings: The SSD might not be recognized because the BIOS settings are not set up properly. This might happen if the SATA mode is set to IDE instead of AHCI, which might make the drive not work with other devices.
  • Out of date SSD drivers: Windows 11 might not be able to find an SSD if the drivers are out of date or don’t work with the SSD. It is very important to keep your SSD drivers up to date for the best speed and compatibility.

Now that we know what might be causing the SSD not showing up problem in Windows 11, let’s look at how to fix it.

Solution 1: Check Hardware Connections

The first step in troubleshooting the SSD not showing up issue is to ensure that the hardware connections are secure. Follow these steps to check the hardware connections:

  • Power off your computer and unplug the power cord
  • Find the SSD when you open the case of your computer.
  • Check the SATA data cable and power cable connections. Make sure they are securely connected to the SSD and the motherboard.
  • If possible, try using a different SATA cable and power cable to rule out any cable-related issues.
  • Close the computer case, plug in the power cord, and power on your computer.
  • Check if the SSD is now detected in Windows 11.

By verifying the hardware connections, you can eliminate any potential issues caused by loose cables or faulty connectors.

Solution 2: Initialize the SSD

If the SSD is new or has not been initialized, Windows 11 may not recognize it. Initializing the SSD will prepare it for use and allow Windows to detect it. Follow these steps to initialize the SSD:

  • Press the Windows key + R to open the Run dialog box.
  • Type “diskmgmt.msc” and press Enter to open the Disk Management utility.
  • In Disk Management, locate the SSD that is not showing up.
  • If the SSD appears as unallocated space, right-click on it and select “Initialize Disk.”
  • Select the appropriate disk initialization style (MBR or GPT) and click OK.
  • Right-click on the unallocated space and select “New Simple Volume.”
  • Follow the on-screen instructions to create a new partition on the SSD.

Once the initialization and partitioning process is complete, check if the SSD is now detected in Windows 11.

Initializing the SSD will prepare it for use by creating a partition and formatting it with a file system. This allows Windows to recognize and assign a drive letter to the SSD.

Solution 3: Assign or Change Drive Letter

If the SSD is not assigned a drive letter or has conflicting drive letters, it may not show up in File Explorer or Disk Management. Follow these steps to assign or change the drive letter:

  • Open Disk Management by pressing the Windows key + R, typing “diskmgmt.msc”, and pressing Enter.
  • Locate the SSD that is not showing up.
  • Right-click on the SSD’s partition and select “Change Drive Letter and Paths.”
  • If no drive letter is assigned, click “Add” and select a drive letter from the dropdown menu.
  • If a drive letter is already assigned but there is a conflict, click “Change” and select a different drive letter.
  • Click OK and check if the SSD is now visible in File Explorer.

Assigning or changing the drive letter ensures that Windows recognizes and communicates with the SSD properly.

Solution 4: Check BIOS Settings

Misconfigured BIOS settings can prevent Windows 11 from detecting the SSD. By adjusting the SATA mode, you can resolve compatibility issues and allow the SSD to be recognized. Here’s how to check the BIOS settings:

  • Restart your computer and enter the BIOS setup by pressing the designated key (e.g., Del, F2, or F10) during startup.
  • Navigate to the Storage or SATA Configuration section in the BIOS settings.
  • Locate the SATA Mode or SATA Configuration option and change it to AHCI.
  • Save the changes and exit the BIOS setup.
  • Once your computer restarts, check if the SSD is now detected in Windows 11.

Changing the SATA mode to AHCI ensures proper communication between the SSD and the operating system.

Solution 5: Update SSD Drivers

Outdated or incompatible SSD drivers can prevent Windows 11 from detecting the SSD. It’s important to keep your SSD drivers up to date to ensure optimal performance and compatibility. Here are the steps to update the SSD drivers:

  • Press the Windows key + X and select “Device Manager” from the menu.
  • Expand the “Disk drives” category to view the SSD.
  • Right-click on the SSD and select “Update driver.”
  • Choose the option to search automatically for updated driver software.
  • Windows will search for the latest driver for your SSD and install it if available.
  • Once the driver update is complete, restart your computer and check if the SSD is now recognized in Windows 11.

Updating the SSD drivers ensures that you have the latest software to support optimal performance and compatibility with Windows 11.

Solution 6: Seek Professional Help

If none of these work to fix the problem where the SSD doesn’t show up in Windows 11, it could mean there is a bigger issue. In this situation, it is best to get help from computer techs or people who specialize in data recovery. They know how to figure out what’s wrong and have the right tools to fix any hardware or software problems that might be stopping the SSD from being seen.

Professional data recovery services can also help get data back from SSDs that can’t be accessed or are destroyed. If your info is important and can’t be lost, you might want to get help from a professional.

In Summary

Having trouble with your SSD not showing up in Windows 11 can be annoying, but if you follow the right steps to fix the issue, you can get back to using your SSD. You can fix this problem and make sure your SSD works properly by checking the hardware connections, initializing the SSD, giving or changing the drive letter, checking the BIOS settings, updating the SSD drivers, or getting help from a professional.

To keep your SSD drivers and operating system from becoming incompatible, make sure to keep them both up to date. By following these steps, you can easily fix the problem where the SSD is not showing up in Windows 11.

How to Turn On WiFi on LG TV? (Quick Tips to Solve Problems)

Are you struggling to connect your LG smart TV to WiFi? Don’t worry, setting up a WiFi connection on your LG TV is usually a straightforward process.  This guide has everything you need to know on how to turn on WiFi on LG TV, fix common WiFi connection problems, and look at other ways to connect to the internet.

How to Turn On WiFi on LG TV?

Although LG smart TVs have a lot of features and can stream content, you need to connect them to the internet to get the most out of them. If your LG TV is connected to WiFi, you can watch your favorite shows, browse the web, and use different apps. This step-by-step guide will help you whether you are setting up a new TV or having trouble connecting it.

To turn on WiFi on your LG TV, Here are some easy steps:

  • Press the Home button on your LG remote to access the home menu.
  • Navigate to the Settings option on the top right of the screen.
  • Select Network from the settings menu.
  • Choose Wi-Fi Connection to access the wireless network settings.
  • A list of available networks will appear. Select your home network.
  • Enter the password for your WiFi network if prompted.
  • Finally, select Connect to establish a connection to your WiFi network.

If you did these things, your LG TV should now be able to connect to the internet through WiFi. Your LG smart TV lets you watch videos and use a number of online services without any problems.

How to Fix Common WiFi Connection Problems?

Sometimes, when you try to connect your LG TV to WiFi, you might have trouble. Why these problems happen and how to fix them:

Update your TV’s location

LG TVs often face connectivity issues when the location is set to “Set Automatically.” To fix this, manually update the location of your TV:

  • Go to All settings > General > Location > LG Service Country.
  • Select a random country on the list (not your actual country).
  • The TV will reset.
  • Go back to the location settings and select your actual country.
  • After the TV resets again, open the location settings and select Set Automaticall.
  • You will be prompted to set up your WiFi connection, and after logging in, your internet should be working again.

“WiFi is turned off” message

If you receive a “WiFi is turned off” message on your LG TV, it could be due to a crimped WiFi cable inside the TV. To fix the problem, do these things:

  • Place the TV face down on a flat surface.
  • Remove the back cover of the TV.
  • Look at the flat silver wires that come from the WiFi module at the base. If they are bent or folded over, straighten them out carefully.
  • Replace the back cover of the TV and try reconnecting to WiFi.

WiFi connection drops in and out

If your LG TV keeps losing the WiFi connection, try the following tips:

  • Move your wireless router closer to your TV for a stronger signal.
  • Consider using an Ethernet cable for a more stable connection.
  • Remove any nearby devices that could interfere with the WiFi signal, such as baby monitors or cordless phones.
  • Check if any external hard drives connected to the TV’s USB port are causing interference.
  • If these steps don’t fix the problem, you should call your internet service provider for more help.

Turn off Quick Start

The “Quick Start” feature on some LG TVs can sometimes cause connectivity issues. Follow these steps to turn it off:

  • Go to the Settings menu and select All Settings.
  • Choose General from the options.
  • Scroll down to the Quick Start option and turn it Off.
  • Make sure your TV is not plugged in and turn it off.
  • Press the power button on your TV for 30 seconds.
  • Plug the TV back in and turn it on. Try reconnecting to the WiFi network.

Your network doesn’t appear in the list

If your WiFi network doesn’t appear in the list of available networks on your LG TV, try the following:

  • Check that your WiFi router is turned on.
  • Ensure that the router is near the TV without any obstacles like walls in between.
  • Unplug both the TV and router, wait for 30 seconds, then plug them back in
  • Both devices should restart, and your network should appear in the list.

Software updates

Outdated software on your LG TV can sometimes cause WiFi connectivity issues. Check for software updates using the following steps:

  • Press the Settings menu on your remote.
  • Select All settings.
  • Choose General.
  • Select About this TV
  • Select Check for Updates.
  • If your TV requires an update, connect it to the WiFi using an Ethernet cable to download the updates.

Unable to join with an incorrect password

Double-check that you have entered the correct password for your WiFi network. Passwords are case-sensitive, so ensure you enter both uppercase and lowercase letters correctly. You can also choose the “show password” option to verify what you are typing. If the issue persists, contact your internet service provider for assistance.

In Closing

Connecting your LG TV to WiFi opens up a world of possibilities, including seamless streaming and access to a diverse choice of online entertainment. By following the steps in this tutorial, you can simply enable WiFi on your LG TV and troubleshoot typical connectivity issues. Remember to keep your TV’s software up to date, and if WiFi fails, consider alternative methods of connecting.

How to Turn off Vanish Mode on Instagram (Complete Guide)

Instagram added a feature called “Vanish Mode” that lets users send messages, photos, and videos that disappear in their chats. This feature provides an extra layer of privacy and ensures that your conversations remain temporary. We will explore how to turn off Vanish Mode on Instagram and provide a detailed understanding of what Vanish Mode is and how it works. We’ve got you covered whether you want to get back in charge of your disappearing messages or are just interested in this tool.

Why Using Vanish Mode is a Good Idea?

There are several benefits to using Vanish Mode on Instagram:

  • Enhanced Privacy: Vanish Mode ensures that your messages vanish without a trace, providing an added level of privacy for sensitive conversations.
  • Reduced Clutter: With Vanish Mode, your chat threads stay clean as messages are automatically deleted after being viewed, reducing message overload.
  • Playful and Casual Chats: Vanish Mode adds a fun and fleeting vibe to your conversations, making it perfect for casual chats with friends.

How to Turn off Vanish Mode on Instagram

If you want to disable Vanish Mode and keep your messages visible, you can easily turn it off using the following methods:

  • To turn off Vanish Mode for all your chats, follow these steps:
  • Open the Instagram app on your device.
  • Tap the Messenger or DM icon to access your direct messages.
  • Tap the three-dot menu icon in the top right corner.
  • Select “Settings” from the menu.
  • In the Settings menu, choose “Privacy” or “Privacy and Security”.
  • Look for the option related to Vanish Mode and toggle it off.
  • Once Vanish Mode is disabled in your chat settings, your messages will no longer disappear after being viewed.

How to Turn off Vanish Mode for Individual Chats

If you only want to turn off Vanish Mode for specific chats, you can do so by following these steps:

  • Open the Instagram app on your device.
  • Tap the Messenger or DM icon to access your direct messages.
  • Select the chat for which you want to disable Vanish Mode.
  • Look for the Vanish Mode toggle switch within the chat settings.
  • Toggle the switch off to disable Vanish Mode for that specific chat.

Things to Think About When You Use Vanish Mode

While Vanish Mode can be a useful feature, there are a few things to keep in mind when using it:

Discretion and Privacy

Vanish Mode on Instagram gives you extra privacy by making sure that your messages are erased after they have been read. This can be helpful for private talks that you don’t want to be saved forever. Still, keep in mind that photos can be taken even when Vanish Mode is turned off. Be careful when sharing private information.

Limitations of Vanish Mode

It’s worth noting that Vanish Mode is only available for one-on-one chats and does not work in group chats. Additionally, messages sent in Vanish Mode cannot be recovered once they’ve disappeared, so be mindful of this when using the feature.

FAQ

  • Can Vanish Mode messages be recovered?

No, messages sent in Vanish Mode cannot be recovered once they’ve disappeared. This is because the purpose of Vanish Mode is to provide temporary and ephemeral conversations.

  • Can screenshots be taken in Vanish Mode?

While Vanish Mode is designed to prevent screenshots, it’s important to note that some devices or third-party apps may still allow users to take screenshots. To ensure maximum privacy, it’s recommended to avoid sharing sensitive or intimate content in Vanish Mode chats.

  • Can you see when someone turns off/turns on Vanish Mode on Instagram?

No, when someone turns off/on Vanish Mode in a chat, the other person will not receive a notification or any indication that Vanish Mode has been enabled/disabled.

  • Can you save chats in Vanish Mode?

No, chats sent in Vanish Mode are designed to disappear after being viewed. They cannot be saved, copied, or forwarded by either participant in the conversation.

Final Thoughts

Vanish Mode on Instagram is a unique way to talk to your friends in private for a short time. Adding an extra layer of privacy makes sure that your texts disappear after being read. However, it’s important to know what this feature can’t do and what risks it might pose. If you follow this guide, it will be easy to turn on or off Instagram’s “Vanish Mode” and control which messages disappear. Keep in mind that photos can still be taken in Vanish Mode, so be careful when sharing private information.

How to Make a Reel on Facebook (Ultimate 2024 Guide)

Facebook has also added a new feature called Reels that lets users make and share short videos on the site. Reels on apps like TikTok and Instagram are becoming more and more popular. Facebook has now joined the trend to give its users a fun and interesting way to express themselves. We will show you how to make a reel on Facebook, from making the video to sharing it with your friends and fans.

Facebook Reels: A Beginner’s Guide

Facebook Reels are short videos that are typically between 15 and 60 seconds in length. They are designed to be creative and entertaining, allowing users to showcase their talents, share funny moments, or simply express themselves in a concise and engaging format. Like TikTok and Instagram Reels, Facebook Reels can be improved with music, effects, filters, and text overlays to make them look better and be more interesting to watch.

How to Make a Reel on Facebook?

The following straightforward actions are required in order to create a Facebook Reel:

Launch the Facebook App

Start by opening the Facebook app on your mobile device. Ensure that you have the latest version of the app installed to access the Reels feature.

Access the Reels Tab

Once you are on the Facebook app, locate the camera icon in the top-left corner of your screen and tap on it. This will take you to the Facebook camera interface. Next, tap on the Reels option, which is located at the bottom of the screen. This will switch your camera mode to Reels.

Choose Your Content

Now that you are in the Reels mode, you can choose whether to capture new footage or select videos and photos from your camera roll. If you choose to capture new footage, you can use the various tools and features available to enhance your video.

Record and Edit Your Reel

When you are ready to start recording your Reel, tap on the Record button. You can record multiple short clips to create a seamless and engaging video. While recording, you can experiment with different effects, filters, and audio options to make your Reel more visually appealing and entertaining.

Add the Finishing Touches

Once you have finished recording your Reel, you can further enhance it by adding text overlays, stickers, or additional audio. You can also adjust the speed of your video or apply filters to give it a unique look. Take your time to explore the editing options available and make your Reel truly stand out.

Share Your Reel

After you have perfected your Reel, it’s time to share it with your friends and followers. Tap on the Next button to proceed to the sharing options. Here, you can add a caption, tag friends, and choose the audience who can view your Reel. You can select from options such as Public, Friends, Friends except…, or Only me, depending on your preferences.

Post Your Reel

Once you have customized the sharing settings, tap on the Share Reel button to post your video. Your Reel will now be visible on your Facebook feed and can be enjoyed by your friends and followers.

The Best Ways to Make Facebook Reels

Now that you know how to make a Reel on Facebook, let’s explore some best practices to make your videos more engaging and increase their reach:

Be Authentic and Creative

When creating a Facebook Reel, it’s important to let your authentic self shine through. Be creative and showcase your unique talents, skills, or interests. Think outside the box and experiment with different ideas to create captivating and original content.

Keep it Short and Sweet

Facebook Reels are designed to be short and concise, so make sure to keep your videos within the recommended time frame of 15 to 60 seconds. This allows viewers to consume your content quickly and increases the chances of them watching it in its entirety.

Use Captivating Visuals and Effects

To grab the attention of your audience, incorporate visually appealing elements into your Reels. Experiment with filters, effects, and transitions to make your videos more dynamic and engaging. This will help your content stand out and leave a lasting impression on viewers.

Choose the Right Music

Music can greatly enhance the mood and impact of your Reel. Facebook provides a library of licensed songs that you can choose from to add background music to your videos. Select a track that complements the theme or message of your Reel to create a more immersive and enjoyable viewing experience.

Optimize Your Captions and Descriptions

When posting your Reels on Facebook, take the time to craft compelling captions and descriptions. Use relevant hashtags to increase the discoverability of your content and ensure that your captions provide context or add value to the video. This will encourage viewers to engage with your Reel and leave comments or likes.

Engage with Your Audience

Building a community around your Reels is essential for long-term success. Respond to comments, engage with your viewers, and consider collaborating with other creators to expand your reach. Encourage viewers to share your Reels with their friends and engage in meaningful conversations around your content.

Analyze and Iterate

Pay attention to the performance of your Reels and analyze the engagement metrics, such as views, likes, comments, and shares. This data will help you understand what resonates with your audience and allow you to iterate and improve your content over time. Experiment with different styles, themes, and formats to find the ones that generate the most positive response.

Also Read: How to Unlink Facebook from Instagram? (Fastest Methods)

In Summary

The Facebook Reels feature is fun because it lets users make and share short videos that keep people interested. You can start making interesting Reels on Facebook by following this guide. To build a strong community around your products, remember to be real, try out different features, and interact with your audience.

How to Delete a Repost on TikTok (Step-By-Step)

TikTok, the popular social media platform, offers users the ability to repost videos, allowing them to share content with their followers. However, there may be instances where you want to delete a repost. Whether it was an accidental repost or you simply changed your mind, this guide will show you how to delete a repost on TikTok with the best way possible.

What is TikTok Repost and How Do You Use It?

When you repost a video on TikTok, it appears in your followers’ feeds as if it’s your own content. However, it’s important to note that deleting a repost does not remove the original video from the platform. It only removes your repost of that particular video.

You need to know how to share a video on TikTok before you can delete one. Reposting can be a good way to share information and interact with your audience. To share a video again, tap on the share icon, which is generally a right arrow. Here’s the next step: In the “Share To” box, choose “Repost.” Next, the video will be reposted to your profile, and it will appear in your followers’ feeds.

Reasons to Delete a Repost on TikTok

There could be several reasons why you might want to delete a repost on TikTok. Here are a few common scenarios:

  • Changing your mind: Sometimes, you may repost a video and later decide that you no longer want it on your profile.
  • Copyright concerns: If you reposted a video without giving proper credit to the original creator, you may receive a copyright warning and choose to delete the repost.
  • Accidental repost: The repost button on TikTok is located close to other sharing options, making it easy to tap unintentionally.
  • Disassociation: If you no longer want to endorse someone or a brand, deleting reposts associated with them can be a way to disassociate yourself.

How to Delete a Repost on TikTok?

Once you have located the reposted video, follow these steps to remove it from your account:

  • Open the video by tapping on it.
  • On the right side of the video, you will see a share icon (usually represented by a right-arrow). Tap on it.
  • In the “Share To” menu that appears, look for the option labeled “Remove Repost” and tap on it.
  • You should see a confirmation message at the top of the screen indicating that the repost has been successfully deleted.

Additional Methods to Find and Delete Reposts

If the reposted video doesn’t immediately appear in your profile or if you are having trouble finding it, here are a few additional methods you can try:

Method 1: Watch History

TikTok allows you to track your watch history for up to seven days. You can use this feature to find the reposted video you want to delete. Follow these steps:

  • Tap on your profile icon at the bottom of the screen.
  • Look for the three dots at the top corner of your screen and tap on them.
  • Select “Settings and Privacy” from the menu.
  • Choose “Comment and Watch History.”
  • Tap on “Watch History” to access the videos you have watched.
  • Look for the target video in your watch history.
  • Once you find it, follow the steps mentioned earlier to delete the repost.

Method 2: Ask a TikTok Friend

If you are still having trouble finding the reposted video, you can ask a TikTok friend to message the video to you if it’s in their feed. This way, you can easily locate the video and delete it from your account.

How to Turn Off TikTok Repost?

If you have had negative experiences with the repost feature or simply want to avoid accidentally reposting videos in the future, you can turn off the repost button. Here’s how:

  • Tap on your profile icon at the bottom of the screen.
  • Look for the three stacked lines at the top right and tap on them.
  • Select “Settings and Privacy” from the menu.
  • Choose “Notifications.”
  • Toggle off the option for video repost.
  • The repost button will no longer be visible on TikTok.
  • You can turn on the repost button again by following the same steps and toggling the option back on.

Also Read: Download TikTok Video Without Posting: On Android and iPhone)

Final Words

Deleting a repost on TikTok is a simple process that can be done in a few easy steps. Whether you accidentally reposted a video or simply changed your mind, following the instructions outlined in this guide will help you successfully remove the repost from your account. Remember to always give credit to the original creators and consider the reasons why you want to delete a repost. With these tips, you can effectively manage your TikTok feed and ensure a positive user experience.

How to Replace AirTag Battery [Step-By-Step]

Do you use an Apple AirTag? If so, you might be thinking about how to get a new battery when the old one dies. While Apple says that an AirTag’s battery should last about a year, it’s always smart to be safe than sorry. Today, we will show you how to replace AirTag battery in a quick way. This guide is simple to follow, no matter how tech-savvy you are or how new you are to it.

Why AirTag Batteries Need to be Changed?

Before we talk about how to replace the battery in AirTag, let’s talk about why it’s important to do so. The charge in your AirTag will run out on its own over time. You may notice that Bluetooth and UWB signal ranges get shorter as the battery level drops, and the Find My app’s precision finding feature may stop giving you correct distance information.

You may also get messages and alerts through the Find My app when your battery is low. It is suggested that you change the battery in your AirTag once a year to get the best performance and avoid any problems.

How to Replace AirTag Battery

If you want to safely change the battery in your AirTag, follow these steps:

Materials Needed

To replace the battery in your AirTag, you’ll need a few materials. Gather the following items before you begin:

  • A new CR2032 coin cell battery: This standard 3V lithium battery is commonly used in watches, remotes, and other small electronic devices. Make sure that you purchase an authentic battery from a reputable retailer.
  • A non-conductive pry tool: You’ll need a thin plastic pry bar or portable tool to safely open the AirTag casing. Avoid using metal tools, as they can damage the components.
  • A soft lint-free cloth: This will be used to clean the AirTag and remove any fingerprints or smudges on the surface.
  • Disposable gloves (optional): If you prefer, you can wear disposable gloves when handling used batteries to avoid skin exposure to battery acid.

Prepare the AirTag

Once you have these materials ready, we can proceed with the battery replacement process but before you begin the battery replacement process, remove the AirTag from any accessories it’s attached to, such as a keychain or luggage tag. This will give you direct access to the device.

Open the AirTag Casing

  • Locate the thin seam running along the edge of the AirTag casing. This seam is where you’ll pry open the casing.
  • Take your non-conductive pry tool and gently insert it into the seam gap. Slowly twist the tool to widen the gap.

Continue prying all the way around the perimeter of the AirTag until the plastic casing pops open. Be cautious not to use excessive force or bend the AirTag excessively.

Remove the Old Battery

Once the AirTag casing is open, you’ll see the old CR2032 battery inside. Gently lift the battery out of the holder, taking care not to damage any internal components. There are two options you can try if you come across a CR2032 battery that is treated in bitterant and might not work with AirTags:

  • Option 1: Look for a brand of battery known to be compatible with AirTags. Check the packaging for compatibility information.
  • Option 2: If you already have a bitterant-coated battery, you can slightly scratch off the coating using a sandpaper sheet. Ensure that the battery contacts are not damaged during this process.

Insert the New Battery

  • Check that the new battery you have is a CR2032 and that the positive side (marked “+”) is facing up.
  • Using disposable gloves (optional), carefully place the new battery into the holder, ensuring that it is firmly seated.
  • Double-check that the battery is properly aligned and securely in place. You should hear a click or chirping sound, indicating that the battery is recognized.

Reseal the AirTag

  • Align the front and back pieces of the AirTag casing.
  • Firmly press the casing shut with your hands, ensuring that it clicks back into place. Take care not to apply excessive force or damage the plastic casing.
  • Once the AirTag is resealed, reattach it to its accessory or item.

Test and Verify

  • Open the Find My app on your Apple device and check that the AirTag appears connected with a good battery level.
  • Navigate to the “Items” tab in the Find My app, select your AirTag, and look at the battery level indicator. If it shows a healthy battery level, the replacement was successful.

Final Words

You may easily and quickly replace the battery in your AirTag so that your item tag continues to function properly. You can save yourself the trouble of dealing with a dead battery by keeping an eye on the level and replacing it annually. With the correct equipment, care, and following our guide, you can simply learn how to change AirTag battery and continue to track your assets. Do the right thing when you throw away old batteries and keep them out of children’s reach.

How to Appear Offline on Xbox One/Series X/S in 2024

When you play games online, sometimes you just want to play by yourself, without friends or party invites getting in the way. Xbox has a tool that lets you look like you’re not online, so you can play games without anyone bothering you. This guide will show you how to appear offline on Xbox One, Xbox Series X, or Xbox Series S.

Why You Need to Appear Offline on Xbox One/Series X/S?

Before we get into the details of how to appear offline on Xbox, let’s explore why this feature is essential for many gamers. Appearing offline offers several benefits:

  • Privacy: Appearing offline allows you to maintain your privacy by concealing your online status from friends and other players.
  • Solo Gaming: Sometimes, you just want to enjoy a single-player game without any distractions or interruptions. Appearing offline ensures that you can focus on your gaming experience without any distractions.
  • Avoiding Invites: Appearing offline prevents you from receiving party chat or game invites, giving you the freedom to choose when and with whom you want to play.

Now that you understand the importance of appearing offline, let’s explore the step-by-step process for Xbox One, Xbox Series X, and Xbox Series S.

How to Appear Offline on Xbox One/Series X/S?

It has two ways, which we will talk about one at a time.

Method 1: Xbox Console

Xbox One
  • To appear offline on the Xbox One, follow these simple steps:
  • Sign into your Xbox account on the console.
  • Press the Home button twice or access the online/shortcuts panel.
  • Select the User Icon from the pop-up menu.
  • Choose “Shortcuts” and then “My Profile.”
  • Among the options presented, select “Appear Offline.
Xbox Series X/S

If you’re using an Xbox Series X or Xbox Series S, follow these steps to appear offline:

  • Access the Home Screen on your console.
  • Press the up arrow on the Xbox controller’s D-Pad to highlight your profile at the top of the page.
  • Select your Profile Picture.
  • Scroll down to find the “Appear Online” option.
  • Choose “Appear Offline” from the three available options (Appear Online, Appear Offline, and Do Not Disturb).
  • Exit the profile page to activate the offline status.

Method 2: Xbox Mobile App

If you prefer to manage your online status on the go, you can use the Xbox mobile app. Here’s how to appear offline on the mobile app:

  • Download and launch the Xbox mobile app on your smartphone.
  • Log in with the same credentials you use on your Xbox console.
  • Tap on your Profile Picture located at the bottom right side of the screen.
  • Select “Appear Offline” under the Profile Picture and Name.
  • Your Xbox status will change to “Offline.”

Who Can See Your Online Status? (Change It)

In addition to appearing offline, Xbox offers customization options for your online status. This allows you to control who can see your online presence and provides further privacy measures. Here’s how to customize your online status on Xbox One/Series X/S:

  • Press the Xbox button on your controller to open the quick menu.
  • Navigate to your profile, indicated by your gamer picture, and select it.
  • Click on “My Profile” to access your profile information.
  • On the right-hand side of the screen, you’ll see three options: Appear Offline, Customize Profile, and Privacy Settings.
  • Choose “Customize Profile” to access further customization options.

From here, you can adjust settings such as who can see your online status, what others can see on your profile, and your game/app history.

Additional Important Tips and Tricks

At this point, you undoubtedly have a decent understanding of the process of appearing offline on Xbox; however, it would be beneficial to acquire other recommendations.

  • Setting the Xbox to Offline vs. Appearing Offline: It’s important to know the difference between these two options. Friends won’t be able to tell that you’re online if you make it look like you’re not, but you can still play games and connect to Xbox services. However, if you set the Xbox to offline, it will no longer link to any Xbox services. Choose the right choice based on how private and useful you want it to be.
  • Privacy for Online Status: You can change your private settings to further control who can see that you are online. Go to Profile & System > Settings > Account > Privacy & online safety > Xbox Live privacy on your Xbox. Here, you can choose which people, including friends, can see if you’re online.
  • Making the Change Between Online and Offline: Just follow the steps above and choose the right choice based on your current preference if you want to change between looking online and offline.

In Closing

You now have the ability to take charge of your online presence on Xbox One, Xbox Series X, and Xbox Series S thanks to the guidelines and suggestions that are provided here. You can choose when you wish to socialize with your pals and enjoy uninterrupted gaming sessions. Don’t forget that if you appear offline, you will have the flexibility to play games on your own terms.

How to Add Grammarly to Google Docs (Step-By-Step)

Google Docs is a well-known word processor that lets users work together and save time. Google Docs does have a built-in spelling and grammar checker, but it might not catch all of your mistakes and make your work better overall. This is where Grammarly comes in handy. Grammarly is the best way to improve your writing in Google Docs because it has a strong AI writing assistant and full grammar and spell-checking features. We will show you how to add Grammarly to Google Docs in this post.

First Things First: Download Google Chrome

Make sure you have Google Chrome on your computer before we start walking you through how to add Grammarly to Google Docs. If you want to use Grammarly with Google Docs, you should use Google Chrome. In case you don’t already have Google Chrome, you can get it from the Google Chrome page for free.

How to Add Grammarly to Google Docs in Google Chrome

Once you have Google Chrome installed, follow these steps to add Grammarly to Google Docs:

  • Open Google Chrome and go to the Chrome Web Store.
  • In the search bar, type “Grammarly” and press Enter.
  • Click on the “Grammarly for Chrome” extension from the search results.
  • On the extension page, click the “Add to Chrome” button.
  • A dialog box will appear asking for confirmation to add the extension. Click “Add extension” to proceed.
  • Once the extension is installed, a new tab will open, prompting you to sign in or create a Grammarly account. Sign in with your existing account or create a new one.
  • After signing in, Grammarly will be accessible in your Chrome browser.

How to Enable Grammarly on Google Docs

To enable Grammarly in Google Docs, follow these simple steps:

  • Open Google Docs in your Google Chrome browser.
  • You can either start a new document or access an existing one.
  • In the toolbar at the top of the Google Docs interface, click on the “Extensions” option.
  • From the drop-down menu, select “Grammarly for Chrome”.
  • The Grammarly icon will appear in the bottom-right corner of the page.
  • Click on the Grammarly icon and toggle the “Check for writing suggestions on Google Docs” switch to enable Grammarly in Google Docs.

Now Grammarly is enabled and ready to help you enhance your writing in Google Docs. It’s time to explore how to use Grammarly effectively within Google Docs.

How to Use Grammarly in Google Docs

Grammarly offers various features to improve your writing in Google Docs. To get the most out of Grammarly, follow these steps:

  • While typing in Google Docs, Grammarly will underline words and phrases with red or blue lines to indicate potential errors or suggestions.
  • Hover over the underlined text to see Grammarly’s suggestion or correction. You can either accept the suggestion by clicking on it or dismiss it if you don’t agree.
  • Grammarly also displays an icon in the lower-right corner of the Google Docs interface. The icon provides an overview of the writing issues detected by Grammarly.
  • To access a more detailed list of suggestions, click on the Grammarly icon in the lower-right corner. This will open the Grammarly sidebar, where you can review and accept or reject specific suggestions.
  • Grammarly allows you to set goals for your writing, such as audience, formality, domain, and intent. Open the Grammarly sidebar and click on the target icon to modify these goals.

You can use Grammarly’s powerful writing help while working on your Google Docs projects if you follow these steps. But before we end, let’s answer some of the most common questions about how to add Grammarly to Google Docs.

In Summary

We showed you how to add Grammarly to Google Docs in this guide. You can get the most out of Grammarly’s spelling and spell-check features in Google Docs by following these steps. Make sure you add the Grammarly app to Google Chrome, turn on Grammarly in Google Docs, and use Grammarly’s features to improve your writing. When you use Grammarly, you can be sure that your papers are free of mistakes and of the highest standard.

FAQs

  • How Do I Connect Grammarly to Google Docs?

To connect Grammarly to Google Docs, you need to install the Grammarly extension for Google Chrome. After installing the extension, open Google Docs, click on the Extensions option in the toolbar, and select Grammarly for Chrome from the drop-down menu. Grammarly will then be enabled in Google Docs.

  • How Do You Fix Grammarly Not Working In Google Docs?
  1. If Grammarly is not working in Google Docs, there are a few troubleshooting steps you can try:
  2. Ensure that you have the Grammarly extension installed and enabled in Google Chrome.
  3. Check your internet connection to ensure it is stable.
  4. If you’re still experiencing issues, try logging out of Grammarly and logging back in or reinstalling the Grammarly extension.
  5. If the problem persists, you can reach out to Grammarly support for further assistance.
Exit mobile version