How to Clean a Mouse Pad (Different Kinds of Mouse Pads)

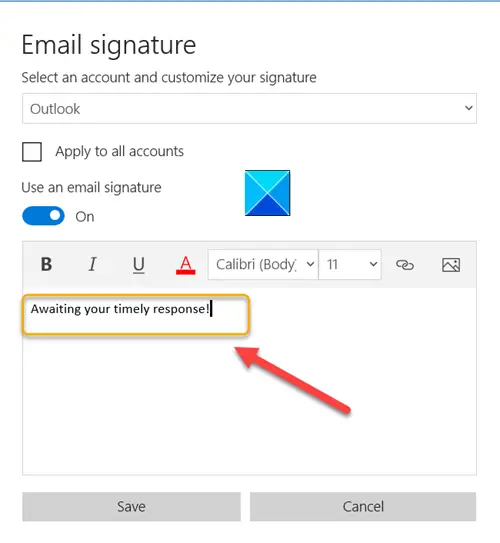
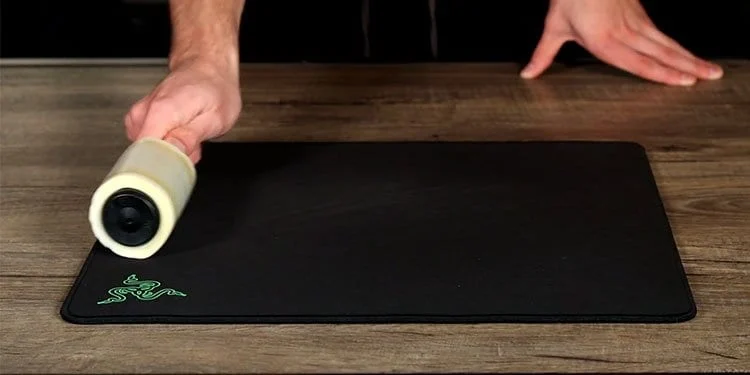
As an important piece of equipment for computer users, a mouse pad is used all the time and can quickly get dirty from our hands. Regularly cleaning your mouse pad not only keeps it looking good, but it also makes sure it works at its best. In this detailed guide, we’ll talk about the different kinds of mouse pads and show you how to clean a mouse pad in the best way possible.

How to Clean Different Kinds of Mouse Pads?

Mouse pads come in various materials, including fabric, hard-surface, leather, plastic, and metal. Each type requires specific cleaning methods to ensure proper maintenance.

Fabric Mouse Pads

Fabric mouse pads are commonly used and require a bit more effort to clean compared to other types. The fabric’s porous nature makes it prone to stains and debris buildup.

To clean a fabric mouse pad, follow these steps:

  • Fill a small tub or your kitchen sink with warm water.
  • Add a small amount of mild dish soap or shampoo to the water.
  • Submerge the mouse pad in the soapy water and let it soak for a few minutes.
  • Gently scrub the surface of the mouse pad using a soft brush to remove stains and debris. Avoid scrubbing too hard to prevent damage.
  • Rinse the mouse pad thoroughly under clean water until all soap residue is removed.
  • Shake off any excess water and lay the mouse pad flat on a towel to air dry. Ensure it is completely dry before using it again.

Hard-Surface Mouse Pads

Hard-surface mouse pads, made from materials like plastic or metal, are easier to clean due to their non-porous nature.

To clean a hard-surface mouse pad, follow these steps:

  • Spray a mild screen cleaner or rubbing alcohol onto a microfiber cloth.
  • Wipe the surface of the mouse pad thoroughly, applying gentle pressure where necessary.
  • For added disinfection, you can also use disinfectant wipes on the surface of the mouse pad.
  • Use a dry towel to wipe away any excess moisture.
  • Allow the mouse pad to air dry completely before using it again.

Leather Mouse Pads

Leather mouse pads require special care to prevent damage to the material. Avoid using water or harsh cleaning agents on leather mouse pads.

To clean a leather mouse pad, follow these steps:

  • Use a clean, dry cloth to wipe off any dust or debris from the surface of the mouse pad.
  • Apply a small amount of leather cleaner to a microfiber cloth.
  • Gently wipe the mouse pad with the cloth, taking care not to saturate the leather.
  • Follow the manufacturer’s instructions for drying time.
  • Once dry, buff the leather with a clean, dry cloth to restore its shine.

How Often Should You Clean Your Mouse Pad?

Cleaning your mouse pad on a regular basis is important to keep it clean and working well. You should clean your mouse pad once a month just to keep it in good shape. But first, you should know how to clean a mouse pad. If you spill something on it or see spots, you should clean it right away to keep the damage from getting worse.

The Best Cleaning Products for Mouse Pads

When it comes to cleaning your mouse pad, using gentle cleaning agents is key to avoiding damage. Here are some recommended cleaning products based on the type of mouse pad:

  • Fabric Mouse Pads: Mild dish soap or shampoo
  • Hard-Surface Mouse Pads: Screen cleaner or rubbing alcohol
  • Leather Mouse Pads: Leather cleaner (specifically designed for leather)
  • Ensure you have the necessary cleaning supplies on hand before beginning the cleaning process.

What Should I Do to Clean the Mouse Pad in the Best Way?

In addition to regular cleaning, here are some tips to help maintain a clean mouse pad:

  • Before you use the computer, wash your hands to keep grease and dirt from getting on the mouse pad.
  • Don’t eat or drink near your computer to keep the mouse pad from getting dirty.
  • Between cleanings, use a hand cleaner or compressed air to get rid of dust and other things that are on the mouse pad.
  • You might want to put a cover or mat over your mouse pad to keep it from coming into direct touch with oils and dirt.
  • If your mouse pad needs to be maintained in a certain way, follow the manufacturer’s directions.

Also Read: The Top 10 Gaming Laptops for Ultimate Performance and Immersion

In Closing

A clean mouse pad not only looks nice, but it’s also necessary to keep your mouse working at its best. Understanding the type of mouse pad you have and using the right cleaning methods will help you keep the surface clean and in good shape for your mouse. Remember to clean your mouse pad often, but be careful. Also, make sure you dry it the right way to keep it from getting damaged. If you follow these steps, your mouse pad will always be clean and smooth when you use your computer.

How to Cancel Starz Subscription on Various Platforms (2024 Guide)

If you’re looking to cancel your Starz subscription, you’ve come to the right place. In this guide, we’ll walk you through the steps of how to cancel Starz subscription on various platforms and devices. Whether you subscribed through Amazon, the Starz website, Hulu, Roku, or your mobile device, we’ve got you covered.

How to Cancel Starz Subscription on Various Platforms?

There are different ways to cancel a Starz subscription, based on how you signed up in the first place. You can follow these general steps:

How to Cancel Starz on Amazon

To cancel your Starz subscription on Amazon, follow these simple steps:

  • Log in to your Amazon account.
  • Go to the top right and select “Accounts and Lists.”
  • Get to the “Memberships and Subscriptions” part and then find “Prime Video Channels.”
  • Locate the Starz channel and click on “Cancel.”
  • To confirm the cancellation, follow the on-screen instructions.

Cancelling Through the Amazon App

If you prefer to use the Amazon app to cancel your Starz subscription, here’s what you need to do:

  • Launch the Amazon mobile app.
  • Tap the icon with a person’s silhouette (located between the shopping cart and house icons).
  • Tap on “Your Account.”
  • Choose the subscription you want to cancel (Starz).
  • Tap on “Manage Membership.”
  • Click “End Membership” to finalise the termination.

How to Cancel Starz on the Starz Website

If you subscribed to Starz directly through their website, follow these steps to cancel your subscription:

  • Go to the Starz website and log in to your account.
  • To access your profile, locate your profile picture in the top right corner and click on it.
  • Choose “Settings” from the drop-down menu.
  • In the “Billing Plan and Information” section, click on “Cancel Subscription.”
  • Follow the on-screen instructions and click on “Submit” to confirm the cancellation.

How to Cancel Starz on Hulu

If you subscribed to Starz through Hulu, here’s how you can cancel your subscription:

  • Open your web browser and go to the Hulu add-on settings page.
  • Find the Starz channel in the list of add-ons.
  • Deselect the box next to Starz to remove it from your subscription.
  • Click on “Review Changes” and confirm your cancellation.

How to Cancel Starz on Roku

To cancel your Starz subscription on a Roku device, follow these steps:

  • From the Roku Home menu, choose the Starz app.
  • Grab the remote and hit the Options button.
  • Choose “Manage Subscription” and then “Cancel Subscription.”

How to Cancel Starz on iPhone or iPad

If you have the Starz app on your iPhone or iPad, here’s how you can cancel your subscription:

  • Open the App Store on your device.
  • Go to your profile and choose “Subscriptions.”
  • In the active subscriptions section, find Starz and click on “Cancel Subscription.”
  • Follow the steps and confirm your cancellation.

How to Cancel Starz on Android

If you’re using an Android device, follow these instructions to cancel your Starz subscription:

  • Open the Starz app on your Android phone.
  • Please log in to your account if you are not already logged in.
  • Choose “More” from the menu that appears in the bottom right corner.
  • Pick “Settings” and then “Account Management.”
  • In the “My Subscription” section, tap on “Cancel Subscription.”

This will open the browser version of Starz. Follow the on-screen instructions and click on “Submit” to confirm the cancellation.

What Are the Best Alternatives to Starz?

If you’re looking for alternative streaming services similar to Starz, consider these options:

  • HBO Go: Offers a wide range of premium content, including original series and movies.
  • Epix: Provides on-demand content, offline downloads, and original documentaries, series, and movies.

How to Delete Your Starz Account?

If you want to completely delete your Starz account, you will need to contact Starz customer support directly. They will guide you through the account deletion process and ensure that all personal information is removed from their systems.

FAQs

  • Can I Pause My Starz Subscription Instead of Cancelling?

Unfortunately, Starz does not offer the option to pause your subscription. You can only cancel your subscription and resubscribe at a later date if you wish to use the service again.

  • Will I Get a Refund if I Cancel Starz?

When you cancel your Starz subscription, you will not receive a refund for any unused portion of your subscription. However, you will have access to Starz until the end of your current billing cycle.

  • Is It Difficult to Cancel Starz?

While the cancellation process for Starz is generally straightforward, some common issues may arise. These include:

Charges on your credit card after cancellation: It’s important to check your billing statements after canceling to ensure that you are not charged for any additional periods.

Difficulty contacting customer support: If you encounter issues with cancellation or have questions, reaching Starz customer support may take time. Consider using alternative methods such as email or social media to get in touch.

In Closing

Canceling your Starz subscription is a simple process that can be done through various platforms and devices. Whether you subscribed through Amazon, the Starz website, Hulu, Roku, or your mobile device, following the steps outlined in this guide will help you cancel your subscription with ease. Remember to check for any potential issues, such as charges after cancellation, and explore alternative streaming services for your entertainment needs.

How to Transfer Ownership on Discord Server [Desktop and Mobile]

In the past few years, Discord, a famous voice and text chat platform, has become very popular. It gives people an easy way to talk to each other, share thoughts, and do different things. As the owner of a Discord server, it’s your job to keep the server and its users running smoothly. But there may come a time when you want to give someone else ownership. This complete guide will show you how to transfer ownership on Discord account on both desktop computers and mobile phones.

Ownership Transfer on Discord: How Does It Work?

You should know what will happen when you change your Discord title before you start the move process. The person who owns the computer needs to follow the rules, make important decisions, and make sure everything works well. This is what you give someone when you give them ownership. You should choose a person you can trust to run the server and its groups well.

How to Transfer Ownership on Discord Server on Desktop

Transferring ownership of Discord is a straightforward process. Follow these steps to transfer ownership on a Discord server using a desktop device:

  • Open Discord App and Select the Server

To begin, open the Discord app on your desktop and log in to your account. Once logged in, navigate to the server for which you want to transfer ownership. Click on the server name to access its options panel.

  • Access Server Settings

In the options panel, select “Server Settings” from the drop-down menu. This will take you to the server settings page.

  • Navigate to the Members Tab

Within the server settings, locate the “Members” tab under the “User Management” section in the left sidebar. Click on it to access the list of server members.

  • Select the Member and Open Options

Scroll through the member list and find the individual whom you want to transfer ownership to. Once you’ve identified the member, click on the three dots next to their name to open the individual options.

  • Choose “Transfer Ownership”

From the options menu, select “Transfer Ownership.” A confirmation prompt will appear, ensuring that you want to proceed with the transfer.

  • Confirm the Transfer

Read the confirmation prompt carefully, acknowledging that the ownership will be transferred to the selected member. Once you are certain about the transfer, click on the appropriate button to confirm and complete the process.

How to Transfer Ownership on Discord Server on Mobile

If you prefer to use Discord on your mobile device, the process of transferring ownership is equally simple. Follow these steps to transfer ownership on Discord using a mobile device:

  • Open Discord Mobile App

Begin by opening the Discord application on your mobile device. Locate the Discord icon and tap on it to launch the app.

  • Select the Server and Access Options

Once the app is open, navigate to the server for which you want to transfer ownership. Tap on the three dots located next to the server name to access the options menu.

  • Go to Server Settings

From the options menu, select “Server Settings” to access the server settings page.

  • Access the Members Tab

Within the server settings, locate and tap on the “Members” tab. This will display the list of server members.

  • Choose the Member and Open Options

Scroll through the member list and find the individual to whom you want to transfer ownership. Tap on the member’s name to open their options.

  • Transfer Ownership

Within the member’s options, select “Transfer Ownership.” A confirmation prompt will appear, ensuring that you want to proceed with the transfer.

  • Confirm the Transfer

Carefully review the confirmation prompt, acknowledging that ownership will be transferred to the selected member. Once you are certain about the transfer, tap on the appropriate button to confirm and complete the process.

Important Things to Think About When Transferring Ownership

When transferring ownership on Discord, there are a few important considerations to keep in mind:

  • Trust and Reliability

Choose a member whom you trust and who demonstrates reliability in managing the server. Ensure that they have a clear understanding of the server’s rules and responsibilities associated with ownership.

  • Communication with Members

Before transferring ownership, communicate with your server members to inform them of the upcoming change. This will help maintain transparency and prevent any confusion or concerns.

  • Ownership Limitations

Keep in mind that Discord servers can only have up to four owners. Additionally, at least one owner must always be present. If the server becomes ownerless, it may be deleted after a period of time.

  • Leaving the Server

Transferring ownership does not automatically remove you from the server. If you wish to step away entirely, you must manually leave the server following the appropriate steps.

In Summary

There you have it! That’s all you need to know on how to transfer ownership on Discord, and it should be easy to perform it. Remember to pick someone you can trust who can run the server and its community well. Talk to the people on your server as well to make sure the transfer goes smoothly. If you follow these steps, you can give someone else ownership of your Discord server and their duties, letting the server grow.

How to Add Roles in Discord and Manage Them (2024 Updated)

A lot of people like Discord because it lets them make groups, talk to their friends, and improve their game experiences. You can add jobs to your server, which is one of the main things that makes Discord flexible and useful. In Discord, roles are groups that can be changed to control how a user looks and what rights they have on a server. This guide will show you how to add roles in Discord and go over the different customization choices that are available.

What are Discord Roles?

Discord roles are groups that you can give to people on your server to control their look and rights. These roles help server owners run their communities well by letting them control what material members can see and what actions they can take on the server. You can change many things about Discord roles, such as the colour of role members’ names, their access to channels and rights, and how connected apps and integrations affect certain roles.

How to Add Roles in Discord?

Adding roles to your Discord server is a straightforward process. To get started, follow these steps:

  • Open Discord and select the server where you want to add roles.
  • Click on the server’s name in the top-left corner to access the server menu.
  • From the server menu, choose “Server Settings.”
  • In the Server Settings menu, select “Roles.”
  • Click the “Create Role” button to add a new role.

Customizing and Managing Discord Roles

You can change the way a job works for you after you’ve made it. There are a lot of ways to change jobs in Discord, so you can make them fit the needs of your server. Let’s look at the different Discord settings you can change for jobs.

Display Settings for Roles

In the “Display” tab of the role settings, you can modify how the role appears to other members. Here are the available customization options:

  • Role Color: Choose a color for the names of members assigned to this role. The selected color will be displayed in channel messages and the online users list.
  • Role Icon: If your server is boosted to Level 2, you can assign an icon to the role, which will appear next to the names of members with that role.
  • Display Role Members Separately: Toggle this option to separate members with this role into their own category in the online users list.
  • Allow Anyone to @Mention this Role: Enable this setting to allow users to tag this role in messages using the @ symbol. This will notify all members with the role.
  • View Server as Role: This feature allows you to see your Discord server from the perspective of a specific role, ensuring that the role has the desired access to channels and features.

Role Permissions in Discord

The “Permissions” tab in the role settings is where you can define the actions and abilities that members with this role can perform. Discord categorizes role permissions into several categories:

  • General Server Permissions: Determine the role’s ability to manage channels, roles, emoji, stickers, or the server itself.
  • Membership Permissions: Control whether role members can manage other members, change their nicknames, create invites, or ban users.
  • Text Channel Permissions: Define the role’s permissions for sending messages, adding reactions, starting threads, and mentioning other members in text channels.
  • Voice Channel Permissions: Specify what role members can do in voice channels, such as joining, speaking, using video, and enabling the Priority Speaker setting for better audio clarity.
  • Stage Channel Permissions: For stage channels, which are dedicated spaces for specific discussions, you can grant or restrict role members’ ability to request to speak in these channels.
  • Events Permissions: This section allows role members to create, edit, and cancel events within the server.
  • Advanced Permissions: The “Administrator” button grants a role all available permissions, overriding any channel-specific permissions. Use this with caution.

You can change how members of your Discord server interact with each other and what they are responsible for by changing their job permissions.

Managing Members within Roles

The “Manage Members” tab in the role settings allows you to view and manage members assigned to a specific role. Clicking on a role name will display the members assigned to that role. From there, you can modify their settings and add or remove members as needed.

How to Make Admins in Discord?

Admins are very important for running a Discord group. They have a lot of permissions that let them do different administrative jobs. Here are the steps you need to take to authorise someone:

  • Access the Server Settings menu in Discord.
  • Navigate to the Roles section and find the role you want to grant admin access to.
  • Click on the role and select “Edit” to modify its settings.
  • In the Permissions tab, scroll down to the Advanced Permissions section.
  • Toggle the Administrator switch to grant admin powers to the role.

Be careful giving admin rights to other people, and make sure that only people you trust can use them.

Also Read: How to Report Someone on Discord: Easy Steps

In Closing

Adding roles in Discord is a great way to manage your server and give each person of your community a unique experience. Learning how to add roles, change their settings, and come up with creative solutions can help increase interest, make communication easier, and keep the server running smoothly. Roles in Discord let you make your server exactly how you want it, whether you’re setting up separate lines for each role, using reaction roles, or giving admin rights. Play around with the different roles to get the most out of your Discord group.

FAQs

  • How many roles can I have on my Discord server?

Discord allows a maximum of 250 different roles on a server.

  • Can bots have their own roles?

Bots typically have their own role when added to a server, allowing you to customize their appearance and permissions.

  • Can admins kick the owner of a Discord server?

No, admins cannot kick the owner of a Discord server. Similarly, admins cannot kick other admins.

  • What can admins do on Discord?

Admins, or users with the Administrator role, have access to all server elements and can make changes equivalent to those made by the server owner.

  • Can I change the name of a server as an admin?

A: Generally, only the server owner has the power to change the name of a Discord server unless they grant that permission to an admin.

How Do I Stop Microsoft Teams from Showing Away After 5 Minutes (Solved)

Microsoft Teams is an excellent tool for working together that lets teams that are spread out easily do their jobs. Users often get annoyed, though, because Microsoft Teams keeps showing them as “Away” even when they are actually using the platform. This can cause misunderstandings and make it take longer to respond. How do I stop Microsoft Teams from showing away after 5 minutes? This article will answer that question and make sure that your presence is correctly shown.

How Do I Stop Microsoft Teams from Showing Away After 5 Minutes?

Why does Microsoft Teams show you as “Away” even when you’re using the platform? Let’s find out before we get to the answers. This problem might be caused by a number of things, such as inactivity, incorrect state settings, or issues connecting to the network. By taking care of these core issues, we can find good ways to stop Teams from showing you as “Away.” Let’s take a closer look:

Manual Reset of Your Status

One simple solution to override the automatic “Away” status is to manually reset your status to “Active” on Microsoft Teams. This will keep your status as active until you manually change it to “Away” or “Offline.” The steps to do this vary slightly depending on your device.

On Windows or Mac:

  • Launch the Microsoft Teams application.
  • Click on your profile picture at the top right corner of the screen.
  • Select the “Availability” option from the drop-down menu.
  • Choose “Available” from the options provided.

On Android or iOS:

  • Open the Microsoft Teams app on your mobile device.
  • Tap on your profile picture or initials in the top-left corner.
  • Select the “Offline” option or the option below your account name.
  • From the drop-down menu, choose “Available.”

By manually resetting your status, you can ensure that Microsoft Teams accurately reflects your presence and prevents it from automatically changing to “Away.”

Check for App Updates

Sometimes, the issue of Microsoft Teams showing you as “Away” can be due to a glitch or an app-related problem. To resolve this, it’s important to check for updates and ensure that you have the latest version of the Teams app installed on your device.

On Windows or Mac:

  • Press the Windows key on your keyboard and type “Microsoft Teams.”
  • Open the application and click on the three-dot icon next to your profile picture.
  • Select “Check for updates” from the drop-down menu.

On Android or iOS:

  • Go to the Google Play Store or App Store on your mobile device.
  • Search for “Microsoft Teams” and check if there are any available updates.
  • If updates are available, click on the “Update” button.
  • Updating the Teams app on your device can often resolve any issues related to the “Away” status.

Set a Status Message

Another workaround to ensure that your availability is communicated to your team members is by setting a status message on Microsoft Teams. This message will be displayed when others message or mention you, even if your status shows as “Away.” Setting a status message is easy and can be done on both desktop and mobile devices.

On Windows or Mac:

  • Launch the Microsoft Teams application.
  • Click on your profile picture at the top-right corner of the screen.
  • Select “Set status message” from the drop-down menu.
  • In the modal that appears, type your status message in the text section.
  • Tick the box next to “Show when people message me.”
  • Click “Done” to save your status message.

On Android or iOS:

  • Open the Microsoft Teams app on your mobile device.
  • Tap on your profile picture or first-name alphabet icon in the top-left corner.
  • From the left pane, tap on “Set status message.”
  • On the next screen, type your status message in the text section.
  • Toggle the switch next to “Show when people message me.”
  • Tap the tick mark in the top-right corner to save your status message.

Use Third-Party Apps to Keep Your System Active

You can use third-party apps or utilities to stop Microsoft Teams from going into an idle or inactive state if the other options don’t work for you. These apps can keep your machine running, which means that your Teams status stays live as well. For Windows, Move Mouse and Jiggler are two apps that you might want to try.

These apps will keep your computer open and running, so Teams won’t be able to mark you as “Away.” Keep in mind that Microsoft and other software companies do not officially support these apps. Be careful when you use them and make sure they work with your system.

Also Read: FIX: Microsoft store error code 0x80131500

In Closing

Microsoft Teams is a great way to work together from afar, but it can be annoying when it says “Away” when you’re actually using it. In this article, there are methods that will stop Teams from showing you as “Away” after 5 minutes and make sure that your presence is shown correctly. These steps will help you stay connected and busy in your Teams environment. You can use them to reset your status by hand, check for app updates, set a status message, or use third-party apps to keep your system active. Make sure to fix any problems and let your team know when you’re available clearly so there are no mistakes.

FAQs

  • Can screen sharing or active meetings prevent the “Away” status?

Yes, actively participating in screen sharing or meetings can often prevent your status from changing to “Away,” even if there is no other computer activity. This is because Teams recognizes your active engagement with the platform.

  • Can my organization enforce or override my status settings?

Depending on your organization’s policies, administrators may have the ability to enforce certain status settings. It’s advisable to check with your IT department or Teams administrators for specific guidelines.

How to Change iPhone Name [Complete Guide]

There are many great ways to make your iPhone unique and easy to find. One of them is to change its name. If you want to protect your privacy, you should learn how to change iPhone name. This guide will show you how to make it stand out from the crowd or just add a personal touch.

Why You Need to Change iPhone Name?

You may choose to rebrand your iPhone for a variety of reasons. Here are a few:

  • Privacy: By changing your iPhone name, you can prevent your real name from appearing when using AirDrop or connecting to a WiFi network, helping to protect your privacy.
  • Differentiate Devices: If you own multiple Apple devices, changing the name of your iPhone can help you easily distinguish it from other devices.
  • Personalization: Giving your iPhone a custom name adds a personal touch and makes it uniquely yours.

How to Change iPhone Name?

Now, let’s get into the process of changing your iPhone name.

Step 1: Access the Settings

  • To change your iPhone name, start by accessing the Settings on your device. Follow these steps:
  • From your iPhone’s home screen, select the “Settings” app.
  • Scroll down and tap on “General” to access the general settings.

Step 2: Navigate to the About Section

In the General settings, you’ll find the “About” section. This is where you can view and modify various details about your iPhone. To change the name, follow these steps:

  • Tap on “About” to enter the About section.
  • Look for the “Name” option at the top of the screen.

Step 3: Change the iPhone Name

Once you’ve reached the Name section, you can now proceed to change the name of your iPhone. Follow these steps:

  • Select your iPhone by tapping on its present name.
  • Use the on-screen keyboard to enter a new name for your device.
  • Press “Done” to save the changes.

Step 4: Confirming the Name Change

You can use AirDrop or check accessible WiFi connections to validate that your iPhone’s name has been successfully updated. Here’s how it works:

  • Turn on AirDrop or WiFi Hotspot on your iPhone.
  • On another device, such as a laptop, navigate to the WiFi settings or AirDrop.
  • Look for your iPhone’s new name in the list of available devices or connections.

What Can You Do to Keep Your Phone in Private?

In addition to changing the name on your iPhone, you can also make it more unique and private by exploring other personalization choices. Take a look at these suggestions:

  • Change Bluetooth Accessory Names: If you use Bluetooth accessories like AirPods, you can change their names in the settings to make them easily distinguishable.
  • Customize AirDrop Name: To prevent unknown individuals from seeing your real name when using AirDrop, consider changing your AirDrop name.
  • Keep iCloud Name as Your Own: While you can change your iCloud name, it’s recommended to keep it as your own name for easier identification in case your device is lost or stolen.

In Closing

Knowing how to change your iPhone name is an easy and effective way to make it stand out and be easy to find. You can easily change the name on your iPhone by following the steps in this complete guide. This is useful for privacy reasons or just because you want to. Also, look into other ways to customize and protect your gadget to make it more private and unique. Now it’s your turn to give your iPhone a name that reflects your individuality and style.

FAQs

  • What happens when I change my iPhone name?

Changing your iPhone name only affects the device’s display name and does not impact any other settings or functionality.

  • How do I rename my iPhone hotspot?

To rename your iPhone hotspot, follow the same steps mentioned earlier to change the iPhone name. This will also update the hotspot name.

  • How many times can I change my iPhone name?

There is no limit to the number of times you can change your iPhone name. Feel free to modify it as often as you desire.

  • Why has my iPhone been renamed automatically?

If you see your iPhone’s name changing to “name(1)” or “name(2)”, it’s likely because there is another device with the same name trying to connect to a WiFi network. The system automatically appends a number to differentiate between the devices.

How to Upload YouTube Shorts [2024 Guide]

It’s very important to get and keep your audience’s attention. In 2023 and 2024, the rise of short-form video apps like TikTok and Instagram Reels has changed how companies and content creators talk to their public. YouTube, which is one of the biggest video-sharing sites in the world, couldn’t keep up, so YouTube Shorts was created. We will talk about everything you need to know about YouTube Shorts in this detailed guide, such as how to upload YouTube shorts and how they can help your brand’s digital marketing.

What are YouTube Shorts?

YouTube added a feature called “YouTube Shorts” that lets users make and watch vertical, short videos right on YouTube. You can think of them as short video snacks that get your attention right away. Similar to movie trailers but shorter, these Shorts are meant to be fun, catchy, and interesting. One of the best things about YouTube Shorts is how short they are.

Most of the time, they last between 15 and 60 seconds, which is perfect for keeping people’s attention in this world where time is short. YouTube Shorts are a fun and interesting way for both content creators and viewers to share short videos, like a funny skit, a dancing routine, a quick tip, or a look into someone’s day.

How to Upload YouTube Shorts

Now that we’ve defined YouTube Shorts, let’s walk through the process of generating and uploading your own Shorts. YouTube has made it simple for everyone to join, whether they are using a PC or a mobile phone.

Creating and Uploading YouTube Shorts Using a PC or Mac

If you have an intriguing video concept that you want to create from your computer, follow these steps:

  • Prepare Your Short-Form Video: Create or edit a video that meets the YouTube Shorts criteria of being 60 seconds or less in duration and optimized for vertical viewing.
  • Access YouTube Studio: Log in to your YouTube account and navigate to YouTube Studio using your web browser.
  • Upload Your Short Video: Click on the “Create” button in YouTube Studio and select “Upload Videos.” You can either drag and drop the video file or choose it from a location on your computer.
  • Add Details and Optimization: Fill in the title, description, tags, thumbnails, and other necessary details for your Short video.
  • Add Video Elements: Enhance your Short by adding subtitles, music, or other elements that enhance its visual appeal.
  • Fix Issues If Any: Ensure your video meets YouTube’s community guidelines and copyright policies.
  • Choose the Visibility Settings: Decide whether to make your video private, unlisted, or public, and choose whether to publish it right away or save it for later.
  • View Your Saved Video: From your profile, you can view your YouTube Shorts by clicking on “Shorts” from the “Content” tab.

Creating and Uploading YouTube Shorts Using a Mobile Phone

If you prefer using a mobile phone to create and upload your YouTube Shorts, here’s what you need to do:

  • Access YouTube App: Open the YouTube app on your Android or iPhone device.
  • Create a Short: Tap the ‘+’ button to start creating a new video and select “Create a Short.”
  • Record or Upload a Video: Use the Shorts camera to record a new video or upload an existing video from your device’s gallery.
  • Enhance and Edit: Use the available editing tools within the Shorts camera to enhance your video by adding sound, adjusting playback speed, adding a voice-over, including text, or applying filters.
  • Add Details: Provide details for your YouTube Short to help optimize its searchability and discoverability.
  • Upload Your Short: Once you’re satisfied with your Short, add a title, caption, and choose the visibility settings. Then, upload your Short to YouTube.
  • View Your Uploaded Shorts: You can view your uploaded Shorts by clicking on “Your videos” in your profile.

That’s it! You’ve successfully created and uploaded YouTube Shorts using your mobile phone.

The Best Ways to Make YouTube Shorts

To maximize the impact of your YouTube Shorts and increase their visibility, here are some best practices to keep in mind:

  • Keep it Short and Interesting: Aim for short, interesting material that gets people’s attention right away. Start with an interesting hook or opening to get people interested in watching the whole Short.
  • Use the Vertical Format: Optimize your Shorts for the ideal aspect ratio of 9:16, which fits perfectly on mobile devices and aligns with how users naturally hold their phones.
  • Create Catchy Thumbnails: Design visually appealing and intriguing thumbnails that accurately represent the content of your Short. Thumbnails play a crucial role in attracting viewers and enticing them to click.
  • Include Engaging Visuals and Effects: Use visually appealing elements such as animations, text overlays, filters, and creative effects to capture viewers’ attention and make your Short stand out.
  • Utilize Trends: Stay updated with current trends and challenges on YouTube and social media platforms. By aligning your content with popular topics and trends, you increase the likelihood of your Shorts being noticed and shared.
  • Optimize Titles and Descriptions: Craft compelling titles and descriptions that accurately represent your Short and enhance its visibility in search results and recommendations. Use relevant keywords and social media hashtags to improve indexing and categorization.
  • Include a Clear Call-to-Action (CTA): Prompt viewers to take specific actions such as liking, commenting, sharing, subscribing, or visiting related content. A clear CTA encourages audience interaction and fosters a sense of community engagement.
  • Maintain Consistency and Frequency: Upload Shorts regularly to maintain a consistent presence on the platform. Consistency helps increase visibility and build anticipation among viewers.
  • Interact with Your Audience: Respond to comments and actively engage with your audience. Acknowledge and appreciate viewer feedback to foster a sense of inclusivity and encourage further engagement.
  • Monitor Analytics: Use YouTube analytics to gain insights into the performance and audience reception of your Shorts. Analyze metrics such as views, watch time, audience retention, likes, comments, and shares to understand how your Shorts resonate with viewers.

In Closing

YouTube Shorts allow companies and content creators to engage their audience with short, visually appealing videos. Create and upload Shorts using YouTube’s mobile app or YouTube Studio on a PC. YouTube Shorts’ prominent presence on the platform can boost visibility, interaction, and audience growth. You may boost your YouTube profile and Shorts’ impact by following best practices and trends. Waiting for what? Now learn how to upload YouTube Shorts to engage your audience and boost your digital marketing strategy.

How to Change Signature in Outlook (On Windows, Mac, Mobile)

Outlook is a popular email client that has many useful tools that can help you send and receive emails better. You can make and change your email signature, which is one of these benefits. Email labels are like digital business cards because they give people important information about you or your company. Not only do they show professionalism, but they also help people remember your name and build trust. In this guide, we will explore the process of how to change signature in Outlook, regardless of the platform you are using. You can easily change your email signature in Outlook by accessing the signature editor and making the desired modifications. The specific steps may vary depending on the platform you are using (web, Windows, Mac, or mobile).

How to Change Signature in Outlook on the Web

Outlook on the Web, also known as Outlook Web App (OWA), allows you to access your emails, calendars, and contacts from any web browser. Changing your email signature in Outlook on the web is a straightforward process. Follow these step-by-step instructions to update your signature:

  • Sign in to Outlook on the web

To begin, open your preferred web browser and navigate to the Outlook website. Sign in to your Outlook account using your credentials.

  • Access the Settings menu

Once you are signed in, locate the settings menu. In the top-right corner of the Outlook interface, you will find a gear icon. Click on the gear icon to open the settings menu.

  • Navigate to the email signature settings

Within the settings menu, scroll down and click on the “View all Outlook settings” option. This will open a new window with a comprehensive list of settings for Outlook on the web.

  • Modify your email signature

In the settings window, navigate to the “Mail” section. Within this section, click on the “Compose and reply” option. Here, you will find the settings related to composing and replying to emails, including the option to edit your email signature.

  • Customize your signature

There is a text tool under “Email signature” that you can use to make and change your email signature. You can change the font, size, and style of the text in your signature by using the formatting choices. You can also add pictures, links, and other things to your name to make it more unique.

  • Save your changes

Once you have finished customizing your email signature, click on the “Save” button to save your changes. Your new signature will now be applied to all outgoing emails from Outlook on the web.

How to Change Email Signature in Outlook on Windows

Outlook provides a powerful desktop application for Windows users, allowing them to manage their emails efficiently. If you are using Outlook on Windows and want to change your email signature, follow these detailed instructions:

  • Open Outlook and access the options menu

Launch the Outlook application on your Windows computer. Once the application is open, click on the “File” tab located in the top-left corner of the Outlook interface. This will open a dropdown menu.

  • Navigate to the signature settings

In the dropdown menu, click on the “Options” tab to access the Outlook options. This will open a new window with various settings for customizing your Outlook experience. Within this window, click on the “Mail” tab to view the email-related settings.

  • Edit your email signature

In the “Mail” tab, you will find a section titled “Create or modify signatures for messages.” Click on the “Signatures” button within this section to open the signature editor.

  • Customize your signature

The signature editor will display all the existing email signatures you have created. To change your email signature, select the signature you want to modify and click on the “Edit” button. This will open a text editor where you can make changes to your signature text and format.

  • Improve your signature with additional elements

In the signature editor, you can add various elements to your signature, such as images, hyperlinks, or logo. Use the formatting options provided to adjust the appearance of your signature. You can also create multiple signatures for different purposes, such as personal and professional emails.

  • Apply your changes

Once you have made the desired changes to your email signature, click on the “OK” button to save your changes. Your new signature will now be automatically added to your outgoing emails from Outlook on Windows.

How to Change Email Signature in Outlook on Mac

Outlook is also available for Mac users, providing a seamless email experience for Apple enthusiasts. If you are using Outlook on a Mac and want to edit your email signature, follow these simple steps:

  • Launch Outlook and open the preferences menu

Start by opening the Outlook application on your Mac computer. Once the application is open, click on the “Outlook” menu located in the top-left corner of the screen. From the dropdown menu, select the “Preferences” option.

  • Access the signature settings

In the preferences menu, you will find a list of settings categories. Click on the “Email” category to view the email-related settings. Within the email settings, click on the “Signatures” option to open the signature editor.

  • Edit your email signature

The signature editor will display all the existing email signatures you have created. To modify your email signature, select the signature you want to edit from the list. This will open a text editor where you can make changes to your signature text and format.

  • Customize your signature

Use the formatting options provided in the text editor to customize your email signature. You can adjust the font, size, and style of your signature text. Additionally, you can insert images, hyperlinks, or other elements to enhance your signature.

  • Save your changes

Once you have finished editing your email signature, click on the red close button in the top-left corner of the signature editor to save your changes. Your new signature will now be applied to all outgoing emails from Outlook on your Mac.

How to Change Email Signature in Outlook on Mobile Devices

Outlook provides mobile applications for both Android and iOS devices, allowing you to access your emails on the go. If you are using Outlook on your mobile device and want to change your email signature, follow these instructions:

  • Open the Outlook app

Start up the Outlook app on your iPhone, iPad, or Android. Find the app icon on your home screen or in the app drawer. To open the app, tap on it.

  • Access the settings menu

Press the menu button in the upper left part of the screen once the app is open. This will open a sidebar or dropdown menu, depending on your device.

  • Navigate to the signature settings

In the menu, look for the settings option. A gear or cog icon is often used to show this. To get to the settings menu, tap on the settings button.

  • Modify your email signature

Within the settings menu, scroll down to find the “Signature” option. Tap on it to open the signature editor.

  • Customize your signature

In the signature editor, you can type or edit your email signature using the on-screen keyboard. Use the formatting options provided to adjust the appearance of your signature text. You can also add images or links if desired.

  • Save your changes

Once you have finished editing your email signature, tap on the back arrow or the save icon to save your changes. Your new signature will now be applied to all outgoing emails from Outlook on your mobile device.

In Closing

Email addresses are an important part of being professional, getting important information across, and adding a personal touch to your emails in this digital age. The steps for changing your name are the same whether you are using Outlook on the web, Windows, a Mac, or a mobile device. By following this guide and using the best techniques for making signatures that work, you can make a signature that shows who you are, promotes your brand, and makes a good impression on the people who receive it.

How to Name a Group Chat on iPhone or iPad in Latest iOS Versions

Are you tired of having multiple group chats on your iPhone with generic names that make it difficult to find the right one? Well, you’re in luck! In this guide, we will walk you through the process of how to name a group chat on iPhone, Mac or iPad, allowing you to easily identify and locate the right conversation whenever you need it. Whether you’re an iPhone user or an iPad and Mac user, we’ve got you covered. So, let’s learn how to do it in your group chats.

How to Name a Group Chat on iPhone, iPad and Mac

This isn’t a tough task to do! Here’s how to give an iPhone group chat a name:

  • Step 1: Open your Messages app

To start naming a group chat on your iPhone, open the Messages app from your home screen.

  • Step 2: Select the group chat

Next, select the group chat that you want to name. This can be an existing group chat or a new one that you want to create.

  • Step 3: Tap the group icons

In the group chat, tap the group icons located at the top of the conversation. This will open the options menu for the group chat.

  • Step 4: Change the group name

Within the options menu, tap on “Change Name and Photo” to proceed with changing the group name.

  • Step 5: Save the new group name

Type in the new name for the group chat and tap “Done” to save the changes. Congratulations, you have successfully named a group chat on your iPhone!

How to Rename a Group Chat on iPhone

To rename a group chat on iPhone, you can take the following steps:

  • Step 1: Open your Messages app

Launch the Messages app on your iPhone to begin renaming a group chat.

  • Step 2: Select the group chat

Choose the group chat that you want to rename from your list of conversations.

  • Step 3: Tap the group icons

Within the group chat, tap the group icons located at the top of the screen. This will open the options menu for the group chat.

  • Step 4: Change the group name

Tap on “Change Name and Photo” within the options menu to proceed with renaming the group chat.

  • Step 5: Save the new group name

Enter the new name for the group chat and tap “Done” to save the changes. Your group chat now has a new name!

How to Add Someone to a Group Chat on iPhone

Here’s how to add someone to an iPhone group chat:

  • Step 1: Open your Messages app

Open the Messages app on your iPhone to initiate the process of adding someone to a group chat.

  • Step 2: Select the group chat

Choose the group chat to which you want to add new members from your list of conversations.

  • Step 3: Tap the group icons

Within the group chat, tap the group icons located at the top of the screen. This will open the options menu for the group chat.

  • Step 4: Add new members

Tap on the option that mentions the number of participants in the group chat (e.g., “3 People”). This will allow you to add new contacts to the group.

  • Step 5: Save the changes

Select the contacts that you want to add to the group chat and tap “Done” to save the changes. The new members will now be part of the group chat!

In Closing

If you make your iPhone, iPad, or Mac group chats more unique, it may be easier to find and join the right conversation. By following these steps, it will be easy to give your group chats names, and even add new people. Make sure that everyone in the group chat is using iMessage so that you can get the most out of naming your talks. So go ahead and give your group chats a name that makes them stand out. This will make chatting on your Apple devices better.

FAQs

  • How do I leave a group chat on iPhone?

To leave a group chat on your iPhone, open the group chat, tap the group icons at the top, and select “Leave this Conversation.” Please note that you cannot leave a group chat with only three participants or if any member is using an Android phone.

  • Why can’t I name a group text on iPhone?

You can only name a group text on iPhone if all participants in the group chat are using iMessage. If any member is using an Android phone or is not signed into iMessage, the group text will use MMS messages instead, and you will only be able to change the name for yourself.

  • What is the maximum number of participants in a group text on iPhone?

The maximum number of participants in a group text on iPhone can vary depending on several factors, including your carrier. We recommend checking the size limits of group chats set by your carrier.

How to Install M.2 on PC in 2024 (All You Need to Know)

Are you trying to get your computer to work better? Putting in an M.2 SSD is one of the best ways to get faster speeds and better general performance. Following this detailed guide, we will show you how to install M.2 on PC. After reading this piece, you’ll know how to improve your system and be ready to enjoy the benefits of lightning-fast storage.

How to Install M.2 on PC?

The speed of your PC can be greatly improved by adding an M.2 SSD. Faster storage speeds are great for everyone, whether you’re a gamer, a content maker, or just a power user. Please read this guide carefully as it contains detailed directions on how to install an M.2 SSD. This will make sure that your upgrade goes smoothly.

Learning About M.2 SSDs

It’s important to know what an M.2 SSD is and how it’s different from other storage choices before you start the installation process. The M.2 slot on your motherboard lets you add an M.2 SSD, which is a small and thin solid-state drive. The read and write speeds of these drives are faster than those of regular hard drives and even SATA SSDs.

There are different shapes for M.2 SSDs, such as M.2 2242, M.2 2260, and M.2 2280. The numbers show the size of the drive. The width is 22 mm and the length is 42 mm. M.2 2280 is the most popular form factor, and most modern motherboards can handle it.

Make Sure It Is Compatible

Before buying an M.2 SSD, you need to make sure that your PC can handle this type of storage. Some processors, especially older ones, don’t work with M.2 SSDs. You’ll need to find the M.2 hole on your motherboard to see if it works. In most motherboards, the M.2 slot is next to the CPU or PCIe spaces.

It is a thin, horizontal slot. Check the instructions that came with your motherboard to find out exactly where the M.2 slot is and what its requirements are. Also, check to see if your motherboard supports either the PCIe or SATA link for M.2 SSDs. This will affect the drive you choose.

How to Pick the Best M.2 SSD

It’s time to pick the right M.2 SSD for your machine once you know it will work. M.2 SSDs come in both PCIe and SATA versions, with PCIe having faster speeds. When choosing an SSD, you should think about your wants and your budget.

You should pick a capacity that fits your storing needs, but keep in mind that bigger capacities usually cost more. Lastly, choose the right port (SATA or PCIe) based on the specs of your motherboard.

Getting ready for installation

Before you begin the installation process, gather all the necessary tools and materials. You’ll need a compatible M.2 SSD, a screwdriver, and an anti-static wrist strap (optional but recommended). It’s also a good idea to back up your data to ensure it’s safe during the installation process.

Opening Your Computer Case

To access the internal components of your PC, you’ll need to open the PC case. Before doing so, power off your computer and unplug the power cord. If you’re using a laptop, remove the battery as well. This step is crucial to prevent any electrical damage or accidents during the installation process.

How to Find the M.2 Slot

With the PC case open, it’s time to locate the M.2 slot on your motherboard. The location of the M.2 slot may vary depending on the motherboard model, but it’s typically found near the CPU or PCIe slots. Consult your motherboard’s manual or documentation to find the exact location of the M.2 slot.

Look for a horizontal slot with a keying notch on one end. The M.2 slot may be labeled as “PCIe” or “SATA,” or both. Take note of the label, as it will determine the type of M.2 SSD you can install. For example, if the slot is labeled “PCIe,” you’ll need to purchase a PCIe M.2 SSD.

Installing the M.2 SSD

Now that you’ve located the M.2 slot, it’s time to install the M.2 SSD. Begin by removing any protective covers or shields from the M.2 slot. Place the SSD at a 30-degree angle and align the notches on the SSD with the keying notch on the M.2 slot. Gently insert the SSD into the slot, applying firm but gentle pressure until it is fully seated.

Putting the SSD in its place

To secure the M.2 SSD in place, locate the mounting screw that came with your motherboard or SSD. Insert the screw into the designated mounting hole near the SSD and tighten it until it is snug. Be careful not to overtighten the screw, as it may damage the SSD or the motherboard.

If your motherboard includes a heatsink for the M.2 slot, follow the manufacturer’s instructions to install it over the SSD. The heatsink helps dissipate heat generated by the SSD, ensuring optimal performance and longevity.

Closing the PC Case

Now that the M.2 SSD is safely in place, the PC case can be closed. Put the side panel back on and lock it with the screws or latches you took off earlier. Make sure that all of the connections are tight and that no cords are blocking the panel. Connect the power cord again and, if necessary, put the battery back into your laptop once the side panel is safely in place. Turn on your computer and move on to the next step to make sure your system can see the M.2 SSD.

Configuring BIOS Settings

After powering on your computer, enter the BIOS or UEFI settings. The key to access the BIOS may vary depending on your motherboard manufacturer, but commonly used keys include Del, F2, or F10. Consult your motherboard’s manual or documentation for the specific key to access the BIOS.

Once in the BIOS settings, navigate to the storage or boot options. Look for an option related to M.2 devices or NVMe drives. Enable the M.2 slot or set the storage mode to recognize the M.2 SSD. Save and exit the BIOS settings to apply the changes.

Checking to See if SSD Works

Once your computer starts up, you should make sure that the M.2 SSD is found by the system. To get to the Disk Drives section, open the Device Manager in your working system. Check to see if your M.2 SSD is mentioned as a valid storage device. Some other ways to check the health and performance of your M.2 SSD are to use disk control tools or benchmarking software. This will help you figure out how well the SSD is working and whether it needs any more tweaks or changes.

In Closing

Feel good about yourself now that you know how to install M.2 on PC. You should back up your data and change the settings on your SSD often to keep it running well and your data safe. M.2 SSDs will continue to be a big part of making computers better as technology gets better. Have fun with your new M.2 SSD, and learn more about how faster and better storage can help you.

Exit mobile version