Mapping a network drive is now an important skill for Windows users to have because of the growing need for easy teamwork and file sharing in today’s connected world. When you map a network drive, you can view shared files and folders on a network as if they were stored on your computer. This works with Windows 10 and the newest version of Windows 11. This complete guide will show you how to map a network drive in Windows step by step and give you helpful hints and testing methods to make sure everything goes smoothly.
What is a Network Drive?
To fully understand how to map a network drive, it is first necessary to know what a network drive is. A network drive is basically a virtual drive that lets you get to shared files and folders on other computers or sites in your network. When you map a network drive, you make a direct link to shared resources. This lets you view, open, edit, and save files as if they were on your own computer.
Benefits of Mapping a Network Drive
Mapping a network drive offers several advantages, especially in a collaborative environment where multiple users need to access and work on shared files simultaneously. Here are some key benefits of mapping a network drive:
- Seamless File Access: By mapping a network drive, you can access shared files and folders with just a few clicks, eliminating the need to navigate through network paths manually.
- Increased Productivity: Having quick access to shared resources enhances productivity by reducing the time spent searching for files or waiting for network transfers.
- Ease of Collaboration: Mapping a network drive makes it convenient for team members to access and work on the same set of files, fostering collaboration and streamlining workflows.
- Centralized File Management: With a mapped network drive, you can organize and manage shared files centrally, ensuring consistency and easy maintenance.
- Offline Access: Some network drive mapping methods allow you to access files even when you’re not connected to the network, enabling you to work remotely or on the go.
- Enhanced Data Security: By mapping a network drive, you can take advantage of the security measures implemented on the network, such as user authentication and access control, to protect sensitive data.
How to Map a Network Drive in Windows 10
Mapping a network drive in Windows 10 is a straightforward process that can be done using the File Explorer. Here’s a step-by-step guide on how to map a network drive in Windows 10:
- Open File Explorer by clicking on the folder icon in the taskbar or by pressing Win + E on your keyboard.
- In File Explorer, click on This PC in the left-hand navigation pane.
- In the Computer tab of the ribbon menu, click on the Map network drive button.
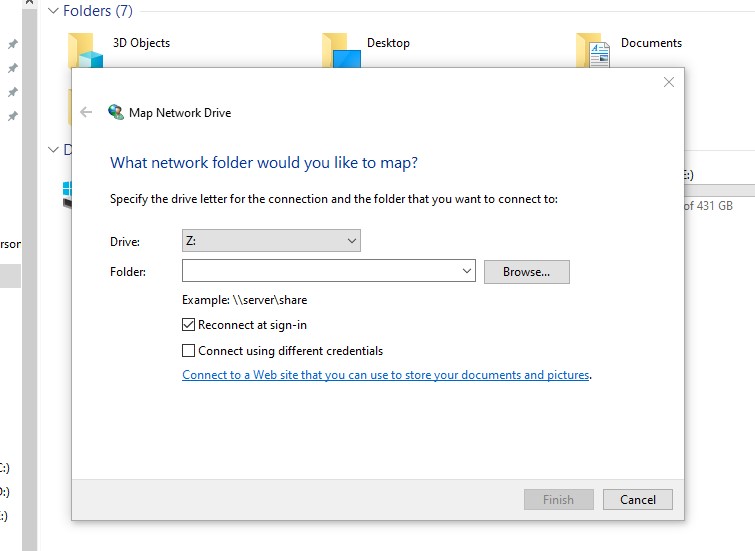
- The Map Network Drive window will appear. Choose an available drive letter from the dropdown menu next to the Drive field.


To select the network folder you want to map, you have two options:
- Browse: Click on the Browse button to navigate to the network folder manually.
- Type the network path: Enter the network path directly in the Folder field. The network path should start with \\ followed by the name of the computer or server and the shared folder name.
- If you want the network drive to be reconnected automatically every time you sign in to your computer, check the Reconnect at sign-in option.
- If the network folder requires specific credentials to access, check the Connect using the different credentials option. This will prompt you to enter the username and password for authentication.
- Once you have configured the necessary options, click on the Finish button.

How to Map a Network Drive in Windows 11
Mapping a network drive in Windows 11 follows a similar process to Windows 10, with a few minor differences. Here’s how you can map a network drive in Windows 11:
- Open File Explorer by clicking on the folder icon in the taskbar or by pressing Win + E on your keyboard.
- In File Explorer, click on This PC in the left-hand navigation pane.
- In the Computer tab of the ribbon menu, click on the Map network drive button.
- The Map Network Drive window will appear. Choose an available drive letter from the dropdown menu next to the Drive field.
To select the network folder, you want to map, you have two options:
- Browse: Click on the Browse button to navigate to the network folder manually.
- Type the network path: Enter the network path directly in the Folder field. The network path should start with \\ followed by the name of the computer or server and the shared folder name.
- If you want the network drive to be reconnected automatically every time you sign in to your computer, check the Reconnect at sign-in option.
- If the network folder requires specific credentials to access, check the Connect using different credentials option. This will prompt you to enter the username and password for authentication.
- Once you have configured the necessary options, click on the Finish button.
Just like in Windows 10, the mapped network drive will now appear in the File Explorer under the This PC section in Windows 11. You can access the shared files and folders with ease.
In Summary
You can easily get to shared files and folders on a network if you know how to map a network drive in Windows 10 and 11. You can make sure that the network drive mapping goes smoothly by following the step-by-step steps in this guide and using the troubleshooting tips and best practices. So map those network drives, and then you can easily share files and work together on them.


![How to Delete Wallpaper on iPhone: iOS 16 and iOS 17 [The Complete Guide]](https://inosocial.com/wp-content/uploads/2023/12/How-to-Delete-Wallpaper-on-iPhone-2.webp)


![How to Destroy a Hard Drive [The Best Ways Explained]](https://inosocial.com/wp-content/uploads/2023/11/How-to-Destroy-a-Hard-Drive.jpg)