
Cloud storage is an important tool for both people and businesses in this digital age. OneDrive is Microsoft’s cloud storage service that lets users store files and keep them in sync on all of their devices. But there are times when you might want to turn off OneDrive sharing. This complete guide will show you different ways on how to stop OneDrive from syncing on different devices and operating systems, whether you’re having slow sync speeds, choosing the wrong files to sync, or just want to stop automatic syncing.
Why Should I Stop Syncing OneDrive?
OneDrive offers a convenient way to backup and sync your files, including photos, documents, videos, and more. However, there are several reasons why you may need to disable OneDrive syncing:
- Slow Syncing Speeds: OneDrive may sometimes sync files at a sluggish pace, making it seem like the process will never finish.
- Incorrect File Selection: You may have mistakenly chosen the wrong items to sync to OneDrive, and you want to rectify this.
- Unwanted Automatic Syncing: OneDrive might automatically sync files that you do not want to be synced.
- If you find yourself facing any of these situations, it’s crucial to know how to turn off OneDrive syncing to regain control over your files.
How to Stop OneDrive from Syncing
These steps will show you how to stop OneDrive from syncing. You can use these solutions on PCs, laptops, notebooks, tablets, cell phones, and other devices. They can also be used on different operating systems, such as Windows, Linux, Mac, Android, and iOS.
Method 1: Pause OneDrive Syncing
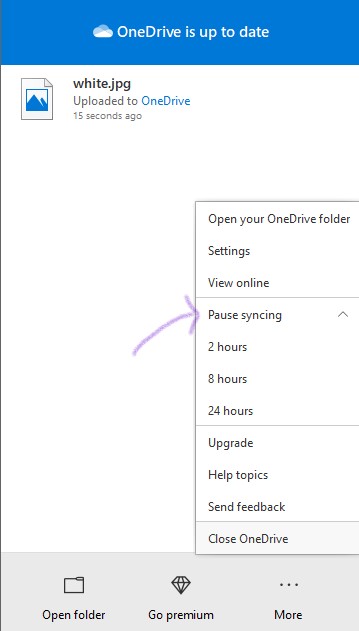
If you want to temporarily suspend OneDrive’s syncing process, you can utilize the built-in Pause feature. Follow these steps:
- Click on the OneDrive taskbar icon.
- In the pop-up window, click “More (three dots).”
- Select “Pause syncing.”
- Choose the duration for which you want to pause the process: 2 hours, 8 hours, or 24 hours.

Method 2: Quit OneDrive Syncing
If you want to stop OneDrive from syncing altogether, you can choose to quit the application. Here’s how:
- Right-click on the OneDrive taskbar icon.
- Select “Quit OneDrive” from the menu that appears.
Method 3: Unlink Your Computer from OneDrive
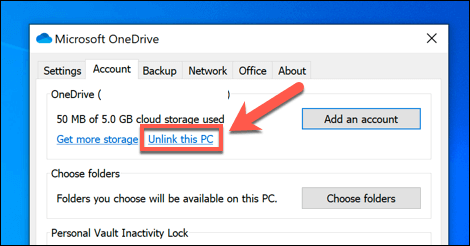
If you want to sever the connection between your computer and OneDrive, you can unlink your PC from your OneDrive account. Follow these steps:
- Right-click on the OneDrive taskbar icon.
- Click “Settings” in the pop-up window.
- In the Account tab, click “Unlink this PC.”
- Confirm the action and unlink the account from your computer.

Method 4: Disable Network Connection
To stop OneDrive from syncing in a roundabout way, turn off the network connection on your computer. Cutting off the network connection stops any jobs that need to be done to transfer files. In order to do this, you can:
- Disconnecting your computer from the internet.
- Disabling Wi-Fi and cellular data on your mobile device.
- Enabling “Airplane Mode” on your phone or tablet.
Method 5: Change Auto Sync Settings
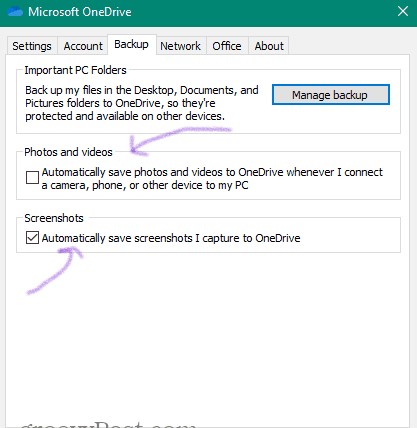
OneDrive’s automatic sync settings may be the cause of unwanted syncing. Adjusting these settings can help you regain control over the syncing process. Follow these steps:
- Click on the OneDrive taskbar icon.
- Click “Settings” in the pop-up window.
In the Auto Save tab, uncheck the options for automatically saving photos, videos, and screenshots to OneDrive.

Method 6: Remove Source Files in OneDrive Folder
To prevent specific files or folders from being synced to OneDrive, you can remove them from the local OneDrive folder. By doing so, you effectively block them from syncing. Here’s how:
- Open Windows Explorer and locate the OneDrive folder.
- Alternatively, click on the OneDrive taskbar icon and select “Open folder.”
- Remove the files you do not want to sync from the OneDrive folder.
Method 7: Uninstall OneDrive
If none of the previous methods solve your syncing issues, you can uninstall OneDrive from your computer. Uninstalling OneDrive does not delete any files from your OneDrive cloud storage. To uninstall OneDrive:
- Open the Control Panel from the Start menu.
- Go to “Uninstall a program.”
- Locate OneDrive and select “Uninstall.”
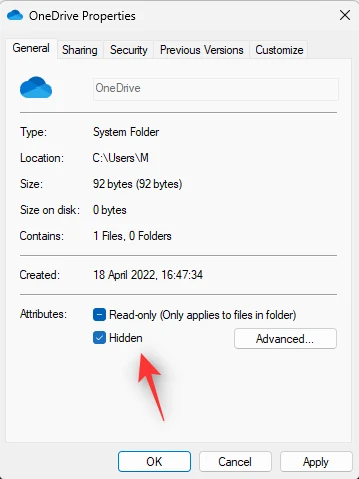
Method 8: Hide OneDrive
In cases where OneDrive is built into Windows and cannot be uninstalled, you can hide it to prevent syncing. Follow these steps:
- Right-click on the OneDrive icon in the Windows file explorer.
- Select “Properties.
- In the General tab of the OneDrive Properties window, check the box for “Hidden.”
- Click “OK” to save the changes.
- Finally, quit OneDrive from the system tray icon to stop it from syncing.

Method 9: Disable OneDrive Auto Start
Prevent OneDrive from automatically starting when you sign in to Windows by following these steps:
- Open the OneDrive settings window.
- In the Settings tab, uncheck the option for starting OneDrive automatically.
- Save the changes.
Method 10: Use the OneDrive Troubleshooter
If you’re experiencing persistent syncing issues, you can use the OneDrive Troubleshooter to diagnose and resolve the problem. Running the troubleshooter might provide solutions to common OneDrive syncing errors.
In Closing
If OneDrive is syncing slowly, choosing the wrong files, or automatically sharing things you don’t want it to, you need to stop it. You can get back control of your files and choose when and what to sync by following the steps in this guide. If you keep having problems with sync, you might want to use a reliable option like CBackup to make sure that your files are backed up and synchronized without any problems. With the tips and tricks in this complete guide, you can take care of your cloud storage experience and enjoy easy syncing and backup.