How to Unblock Someone on Snapchat? ( + Reconnecting with Them)

Snapchat has grown to be one of the most popular social media tools for interacting with friends and keeping up with each other’s lives. However, misunderstandings or conflicts can sometimes lead to Snapchat blocking. When you block someone on Snapchat, you can no longer send or receive messages, read each other’s stories, or see each other’s snaps. But what if you want to restart the relationship? In this article, we will look at how to unblock someone on Snapchat and offer advice on reconnecting and rekindling friendships.

How to Unblock Someone on Snapchat

Why should you unblock someone on Snapchat?

You may wish to unblock someone on Snapchat for a variety of reasons. Perhaps you had a disagreement with a close friend and now regret blocking them. Perhaps you’ve discovered that the problem that caused the blocking was a misunderstanding, and you’d like to clarify the air.

Perhaps you miss the connection you had with that person and wish to reestablish the friendship. Unblocking someone on Snapchat, for whatever reason, can be a step toward repairing relationships and cultivating a healthy social media presence.

How to Unblock Someone on Snapchat

In another step of how to unblock someone on Snapchat, unblocking someone on Snapchat is a straightforward process that can be completed in a few simple steps. Here’s how you unblock someone on Snapchat step by step.

  • How to Unblock Someone on Snapchat desktop?

If you want to unblock someone on Snapchat using the desktop version of the app, you can do so by following these steps:

  1. Open the Snapchat app.
  2. Click on your profile icon or your Bitmoji at the top of the screen.
  3. Open “Settings” by clicking on the wheel icon.
  4. Go to the “Blocked” list of contacts and tap “X” next to your contact’s name to unblock them1.
  • How to Unblock Someone on Snapchat on your phone? (Andriod and iPhone)

If you want to unblock someone on Snapchat using your Android or iPhone, you can do so by following these steps:

  1. Open the Snapchat app on your phone.
  2. Tap on your Bitmoji icon or username in the top left corner of the screen.
  3. Now tap on the Settings icon (cog-wheel) in the top right corner of the screen.
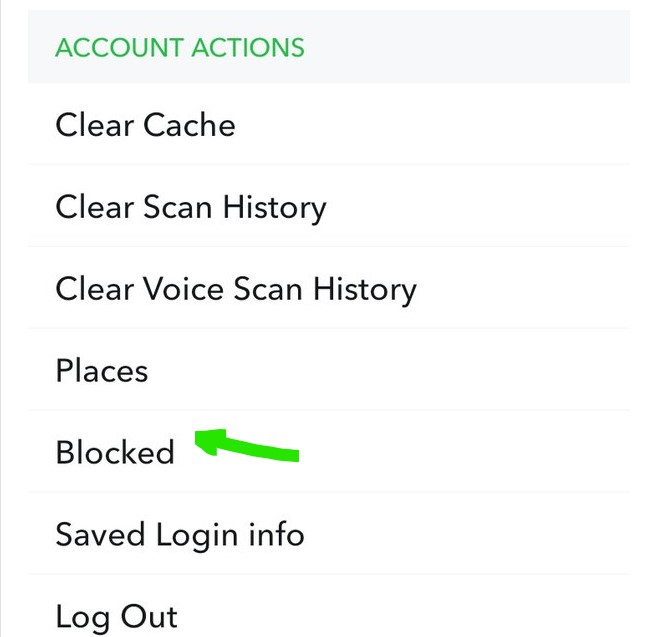
  4. Scroll down and select ‘Blocked’ from the ‘Account Actions’ section.
  5. Click on the cross symbol next to the name of the user you want to unblock.

Once you’ve unblocked someone on Snapchat, they will be able to send you Snaps and Chats again. They will also be able to view your Stories and Charms. If you ever change your mind, you can always block them again.

After you follow these procedures, the person you unblocked will be able to send you snaps, messages, and read your stories once more. Remember that they will not be able to see any snaps or texts you sent while they were blocked.

How to Reconnect with Someone on Snapchat After Unblocking Them

Now that you’ve successfully unblocked someone on Snapchat, consider how you may reconnect and reestablish your friendship. Here are some pointers to assist you get through this:

  • Begin with a kind greeting

Send a pleasant message to the person after you’ve unblocked them to break the ice. Maintain a casual tone and avoid bringing up any previous disagreements or conflicts. “Hey, it’s been a while!” is all it takes. “How have you been?” can go a long way toward demonstrating that you are willing to restore the friendship.

  • Be understanding and compassionate

It is critical to approach the dialogue with empathy and understanding. Keep in mind that the person you unblocked may have reservations or fears about reconnecting with you. Allow them to express themselves and actively listen to what they have to say. Recognize any pain or misconceptions from the past and tell them that you are ready to move forward.

  • Plan a face-to-face meeting

If the person you unlocked is willing, propose meeting in person to catch up. Face-to-face contacts can frequently help to rebuild trust and enhance the bond. Choose a setting that is neutral and comfortable for both of you. Use this chance to have an open and honest discussion about what happened and how to proceed.

Remember that repairing a friendship takes time and effort on the part of both sides. Be patient, empathetic, and willing to work through any problems that may emerge. Also, if you’re having trouble adding someone on Snapchat, don’t miss out on this article Snapchat Search: How to Find and Add Someone in 2023?

Avoiding Common Mistakes When Unblocking Someone on Snapchat

While unblocking someone on Snapchat can be a positive step toward reuniting, there are a few common blunders to avoid to guarantee a smooth transition. Here are a few to remember:

  • Hastening the process

Allow time for both yourself and the person you unblocked to adjust and comprehend the situation. Rushing into a talk or expecting rapid results might strain the connection. Slow down and let the connection develop naturally.

  • Bringing up previous conflicts

It’s important to avoid bringing up prior arguments or concerns right away when reuniting with someone after unblocking them. Looking forward and focusing on the positive qualities of the friendship can assist in building a more inviting and inclusive environment.

  • Boundaries are not being respected

It’s critical to respect the unblocked person’s boundaries and level of comfort. Respect their preferences if they express a want for space or suggest that they are not ready to fully reconnect. Pushing too hard or neglecting their boundaries can endanger the relationship.

By avoiding these typical blunders, you can improve your chances of successfully mending the friendship and keeping a good Snapchat connection.

What to do if the Person You Unblock is not Interested in Reconnecting?

Despite your best efforts, the individual you unblock may be unwilling to reconnect and this is the matter of how to unblock someone on Snapchat issue. While this is disappointing, it is critical to respect their decision and manage the situation with grace. In this case, you can do the following steps:

  • Accept their choice

Recognize that everyone has the freedom to pick who they want in their life. If the person you unblocked displays an unwillingness to reconnect, accept their decision without attempting to persuade them otherwise. Respect their boundaries and provide them with the space they require.

  • Reflect on the experience

Use this moment to reflect on and learn from the event. Think about what caused the blocking, what you could have done differently, and how you can enhance future connections. Use this time for personal development and reflection.

Instead of concentrating on the circumstance, redirect your attention to other ties in your life. Make new relationships, strengthen current friendships, and devote time to activities that offer you delight. By cultivating additional relationships, you can build a supporting network that will assist you in moving forward.

Keep in mind that not every relationship is meant to be revived. Accept this fact and direct your attention toward positive and healthy friendships.

In conclusion

Now that you know how to unblock Someone on Snapchat, you understand Unblocking someone on Snapchat and rekindling friendships takes time, patience, understanding, and work. You can boost your chances of successfully reconnecting with someone by following the steps mentioned in this article and being aware of frequent pitfalls. Remember that not every relationship can be saved, and that’s okay. Maintain healthy Snapchat interactions and cultivate connections that provide optimism and joy into your life.

FAQ
  • Why can’t I unblock someone on snapchat?

If you’re wondering why you can’t unblock someone on Snapchat, it’s likely because that person has blocked you. When someone blocks you on Snapchat, they disappear from your contact list and you’re no longer able to see their Stories or send them Snaps. If you try to add a person who has blocked you, you’ll receive a message saying “Couldn’t add friend. They may have blocked you.”

There are a few other potential reasons why you might not be able to unblock someone on Snapchat. It’s possible that the person’s account has been deactivated or deleted. Or, if you’ve been blocking and unblocking each other repeatedly, Snapchat may have locked both of your accounts temporarily. In this case, you’ll need to wait 24 hours before trying to unblock the person again.

  • I unblock someone on snapchat and can’t find them

If you’ve unblocked someone on Snapchat and can’t find them, don’t worry! There are a few possible reasons for this.

First, it’s possible that the person you unblocked hasn’t added you back yet. If this is the case, you’ll need to wait until they do so before you’ll be able to see their snaps and messages again.

Another possibility is that the person you unblocked has changed their username since you last had them blocked. If this is the case, simply search for their new username in Snapchat’s search bar and you should be able to find them.

It’s possible that the person you unblocked has deleted their Snapchat account entirely. If this is the case, there’s unfortunately nothing you can do to find them again on Snapchat.

  • When you unblock someone on Snapchat do the messages delete?

When you unblock someone on Snapchat, any messages that you have sent to each other will be deleted. This includes any messages that were sent while you were both blocked and unblocked. If you want to save any messages before you unblock someone, you will need to take a screenshot of the conversation.

  • Can you see old chats after unblocking someone on Snapchat?

Once you unblock someone on Snapchat, you will not be able to view any messages that were sent while that person was blocked. However, you will still have access to any messages sent after you unblock them.

How to Stream Games on TikTok: Level Up Your Game

It is obvious TikTok is playing an important role in our social or business life. Also you’re probably familiar with Game streaming in TikTok, which has become very popular in recent years. It has become as a way for gamers to connect with their viewers and show off how good they are at gaming. TikTok has joined Twitch and YouTube, which have been around for a while. If you read this full guide until the end, you will learn how to stream games on TikTok. We will tell you how to set up your account, go live, and share your game sessions with people all over the world.

Getting Started: Setting Up Your TikTok Account

In order to start game streaming on TikTok, the first phase requires the creation of a TikTok account. If the user already has an account, they can move to the following section without completing this step. To create your TikTok account, stick to the following easy guidelines:

Customize your profile: After signing up, you’ll be prompted to customize your profile. Choose a unique username that reflects your gaming persona and add a profile picture that represents you. You can also write a catchy bio to introduce yourself to potential viewers.

Explore the app: Take some time to familiarize yourself with the TikTok app. Browse through the content on your page, follow other gamers, and engage with the TikTok community. This will give you a better understanding of the platform and help you discover popular gaming trends.

How to Go Live and Start Streaming Games on TikTok?

Once you have your TikTok account set up, you’re ready to start streaming games on the platform. Follow these steps to go live on TikTok and share your gaming sessions with your audience:

  • Launch the TikTok app: Open the TikTok app if you haven’t previously done so, and login in to your account.
  • Tune in via the live-streaming option: To make a new video, open TikTok and click the “+” button at the app’s bottom. The “Live” option can be accessed by swiping left on the bottom menu. Select it to start streaming in real time.
  • Modify the streaming preferences: You can adjust your streaming preferences before going live. Title your stream, allow or disallow comments, and choose whether to broadcast to everyone or just your friends.
  • Get the live broadcast started: If everything looks OK and you’re ready to go, hit the “Go Live” button. After TikTok’s countdown, you’ll start streaming your gameplay in real time to your viewers.

Take the time to interact with those watching your stream in real time by replying to their questions and comments. Your audience will feel more connected to you and more interested in what you have to say if you do this.

How to Stream Games on TikTok: Tips and Tricks

Streaming games on TikTok can be a fun and rewarding experience, but it’s important to keep a few tips and tricks in mind to maximize your success. Here are some strategies that can help you level up your game streaming on TikTok:

Be consistent: Building an audience on TikTok requires consistency. Try to stream games on a regular schedule and stick to it. This will help your audience know when to expect your streams and increase the chances of them tuning in.

Interact with your audience: TikTok is all about engagement. Take the time to interact with your viewers during your streams. Respond to their comments, ask for their opinions, and make them feel like they’re a part of your gaming journey.

Use popular hashtags: If you want to know how to stream games on TikTok, hashtags play a crucial role in discovering your content. Research popular gaming-related hashtags and use them in your video captions to increase visibility and reach a wider audience.

Create engaging content: TikTok is a platform that thrives on creativity and entertainment. Find unique ways to showcase your gaming skills and create content that stands out. Whether it’s through funny commentary, impressive plays, or informative tips, make sure your streams are engaging and enjoyable to watch.

How to Live Stream Mobile Games on TikTok?

Streaming mobile games on TikTok is a slightly different process compared to the guide on how to stream games on TikTok (streaming PC or console games). Here’s a step-by-step guide on how to live stream mobile games on TikTok:

Install a screen recording app: You’ll need a screen recording program that allows you to capture your gameplay to stream mobile games on TikTok. There are screen recording apps for iOS and Android smartphones, such as AZ Screen Recorder and Mobizen Screen Recorder.

Install screen-capture software: After you’ve chosen a screen recording app, install it on your smartphone by following the setup instructions. Check that the recording settings are set to capture both audio and video.

Open TikTok and go live: With your screen recording app set up, open TikTok and follow the steps mentioned earlier to go live. While you’re live, your screen recording app will capture your gameplay, and you can interact with your audience through TikTok’s live chat feature.

Share your gaming session: After you’ve finished streaming, you can edit the recorded video using TikTok’s video editing tools. Add captions, effects, and music to enhance your video and make it more engaging. Once you’re satisfied, tap on the “Post” button to share your gaming session with your followers.

Why Should You Stream Games on TikTok?

Before going into the technical details on how to stream games on TikTok, it is crucial to comprehend the rationale behind investing your time and energy into this platform. TikTok has rapidly emerged as a highly popular social media platform, reaching a global user base exceeding one billion active individuals.

Streaming games on TikTok offers the opportunity to access a substantial audience and expand your follower base. In addition, the algorithm used by TikTok has been designed to improve the visibility of attracting content, which allows for a greater number of views of your gaming streams. The platform’s focus on short-form videos is advantageous, as it enables quick capturing and sharing of thrilling moments from your gaming sessions.

TikTok presents exclusive possibilities for individuals, whether they are professional gamers seeking to establish their personal brand or casual players who get pleasure from sharing their gameplay. This platform allows users to connect with others who share similar interests and show their gaming prowess.

In closing

Streaming games on TikTok gives players a lot of ways to connect with their audience, show off their skills, and get noticed. TikTok is a great place for players to share their gaming sessions and build a loyal following. It has a large number of users, unique features, and a focus on short video content.

By following this step-by-step guide, users will get the information and tools they need to learn how to stream games on TikTok. This will improve their gaming experience and help them move forward in their gaming activities.

How to Activate HBO Max/Tv Sign in

Streaming services have become a big part of our entertainment options in the modern world, giving us access to a wide range of products. One such popular streaming platform is HBO Max/TV, known for its exceptional content library. However, accessing this treasure trove of shows and movies requires a seamless sign-in process. In this guide, we will take a look into the difficulties of HBO Max/TV sign in activation, its importance, and step-by-step instructions to successfully activate HBO Max on your TV.

Why is HBO Max/TV Sign in Activation Important?

Before we get into the technicalities, let’s understand the significance of HBO Max/TV sign-in activation. In a world where convenience is key, this activation process is the gateway to a plethora of premium content.

Activating your HBO Max/TV sign in ensures a personalized viewing experience, curated recommendations, and the ability to resume watching across devices seamlessly. By linking your TV to your HBO Max account, you unlock a universe of entertainment tailored to your preferences.

How to Activate HBO Max on Your TV?

Now that we’ve covered the importance of HBO Max/TV sign-in activation and tackled common issues, let’s walk through the activation process itself. Follow these steps to unlock a world of premium entertainment:

  • Prepare Your Devices

Ensure you have a compatible TV and a stable internet connection. You’ll also need a device (such as a smartphone or computer) to navigate to the activation page.

  • Access the Activation Page

On your chosen device, open a web browser and visit the official HBO Max activation page.

  • Sign in

If you’re not already signed in to your HBO Max account, you’ll need to do so at this stage. Enter your login credentials and proceed.

  • Activation Code

After signing in, the activation page will provide you with a unique activation code. Keep this code handy.

  • Enter the Code

Using your TV remote, navigate to the HBO Max app. You might need to download and install the app if you haven’t already. Once the app is open, you’ll be prompted to enter the activation code.

  • Successful Activation

If the activation code is entered correctly, your TV will be successfully linked to your HBO Max account. You can now start exploring the extensive content library.

Common Issues with HBO Max/TV Sign in

Despite the streamlined design of the HBO Max/TV sign-in process, users may encounter some common issues. These hurdles can range from minor glitches to more complex technical challenges. Let’s explore a few of them:

  • Forgotten Credentials

The most common issue users face is forgetting their HBO Max/TV sign-in credentials. It’s easy to overlook passwords, especially if you’re using multiple streaming platforms.

  • Device Compatibility

Another stumbling block is device compatibility. Some older TV models might not be compatible with the HBO Max app, leading to sign-in difficulties.

  • Network Connectivity

Unstable internet connections can also hinder the sign-in process, causing frustration and delays in accessing your favorite content.

  • Account Verification

Occasionally, users may face challenges during the account verification step, especially if the provided information does not match the records.

Troubleshooting HBO Max TV Sign in Not Working

If you find yourself dealing with HBO Max/TV sign-in not working issue, don’t worry as solutions are within reach. Here’s a step-by-step troubleshooting guide to help you get back on track:

  • Password Reset

If you’ve forgotten your password, simply click on the “Forgot Password” option on the sign-in page. Follow the prompts to reset your password and regain access.

  • Device Updates

Ensure that your TV’s firmware and the HBO Max app are up to date. Outdated software can lead to compatibility issues.

  • Network Check

Verify that your internet connection is stable. You can do this by connecting another device to the same network and checking for any connectivity issues.

  • Account Verification

Double-check the information you’re entering for account verification. Ensure that you’re using the correct email address and any other requested details.

  • App Reinstallation

 If other methods fail, try uninstalling and reinstalling the HBO Max app on your TV. This can often resolve any glitches or bugs causing sign-in problems.

In closing

In a world inundated with entertainment choices, HBO Max/TV stands out as a premium streaming platform offering an impressive array of shows and movies. The key to unlocking this treasure trove lies in a seamless sign-in activation process.

We’ve explored the significance of HBO Max/TV sign-in, highlighted common issues users may face, provided troubleshooting techniques, and walked you through the step-by-step activation process.

Remember, while the process is designed to be smooth, occasional hiccups are not uncommon. By following the troubleshooting tips outlined in this guide, you can navigate sign-in challenges with ease and enjoy uninterrupted access to HBO Max/TV’s captivating content. Either you’re watching too much or checking up on the latest episodes, a simple sign-in process ensures that your entertainment journey is both fun and immersive.

How to Use Tradingview Desktop? (Complete Guide)

Tradingview Desktop is an advanced system that has changed how traders study markets and make trades. It has become the best tool for users of all skill levels. Tradingview Desktop has everything a day trader, market trader, or long/short positions trader needs to make smart trading choices.

What is Tradingview?

Tradingview is a website for traders that is based in the cloud and has a lot of tools and features. It gives users access to market data in real time, lets them make and customize charts, and lets them look at securities on various markets. Tradingview Desktop is the desktop version of the platform. It has more features and options, making it an even more useful tool for traders.

Getting Started: How to Use TradingView Desktop

To begin using Tradingview Desktop, go to the Tradingview website and download the desktop version. Once installed, you may log in using your Tradingview account or create one if you don’t already have one. After logging in, you’ll have access to a variety of services and tools.

The first step is to become acquainted with the interface. Tradingview Desktop offers a simple and straightforward design, with several panels that may be adjusted to fit your needs. You can add or remove panels, resize them, and organize them however you want.

Following that, you may begin researching the various markets and assets available on Tradingview Desktop. You may look for certain stocks, currencies, or cryptocurrencies and examine real-time charts for them. You may also personalize the charts by adding technical indicators, drawing tools, and other features to help you analyze data.

Once you’ve identified a potential trade, you can execute it directly from the Tradingview Desktop platform. The platform integrates with various brokers, allowing you to place trades seamlessly without having to switch between different applications.

Using Tradingview Desktop for Technical Analysis

Tradingview Desktop is a powerful tool for performing technical analysis. This allows them to conduct detailed technical analysis and discover potential entry and exit points for their trades.

Tradingview Desktop also has a social trading feature, which allows users to engage with other traders, share ideas, and learn from one another. This collaborative environment develops a sense of community and can be especially useful for new traders wishing to learn from more experienced traders.

In addition to technical indicators, Tradingview Desktop offers a variety of drawing tools that allow traders to mark key levels of support and resistance, as well as draw trend lines and channels. These tools can be used to identify potential entry and exit points for trades, as well as to set stop-loss and take-profit levels.

Furthermore, Tradingview Desktop provides access to a vast library of trading ideas and strategies shared by other traders in the community. Traders can explore these ideas and adapt them to their own trading style, helping them to stay ahead of the curve and make more informed trading decisions.

Benefits of Using Tradingview Desktop

Tradingview Desktop stands apart from other systems by providing a number of useful features. First and foremost, it facilitates entry into a wide variety of financial markets and assets. Traders can spread their bets over multiple markets this way, increasing their potential for profit.

Another major advantage of Tradingview Desktop is its charting capabilities. Traders can create and customize charts with various technical indicators, drawing tools, and timeframes. This allows them to conduct detailed technical analysis and discover potential entry and exit points for their trades.

Tradingview Desktop also has a social trading feature, which allows users to engage with other traders, share ideas, and learn from one another. This collaborative environment develops a sense of community and can be especially useful for new traders wishing to learn from more experienced traders.

Tradingview Desktop vs. Other Trading Platforms

While there are several trading platforms available in the market, Tradingview Desktop stands out for its comprehensive set of features and user-friendly interface. Unlike many other platforms, it offers a wide range of markets and assets, allowing users to diversify their trading strategies.

Moreover, Tradingview Desktop’s charting capabilities are second to none. The platform provides a vast library of technical indicators and drawing tools, enabling traders to perform detailed technical analysis. This level of customization is not always available in other trading platforms.

Furthermore, Tradingview Desktop’s social trading feature sets it apart from other platforms. The ability to interact with other traders and share ideas can be immensely valuable, especially for beginner traders who are still learning the ropes.

Also Read: “Can You Make a Living from Trading?”

In closing

Tradingview Desktop is undoubtedly the ultimate tool for successful traders. Its simple user interface, large feature set, and advanced charting capabilities make it a must-have platform. Also it’s best for rookie and experienced traders. Tradingview Desktop features everything you need to take your trading to the next level, whether you’re looking at charts, making trades, or working with other traders.

How to Report Someone on Discord: Easy Steps

In recent years, discord has been playing even more important role for gamers and traders. This platform, which is a great stage to share, connect and chat with your friends, is an integral part of our lives. However it’s inevitable to ignore the dark side of Discord: Getting bullied and feeling unsafe. If we don’t feel safe, soon it will become a disaster experience. So in this article we will show you importance of keeping Discord safe with a great guide on how to report someone on Discord in just a few easy steps.

Reporting Users on Discord

Discord has a simple reporting tool that lets people flag and report people who are acting in a wrong way. When you see someone breaking the rules of the site, you need to report them right away. By reporting, you do your part to keep the environment safe and fun for yourself and other users. The process is easy and can be done from a PC or a mobile device, among other things.

How to Report Someone on Discord from a PC or Mobile Device

There are some easy ways to report on Discord, but as you know Discord is available on PC, Mobile and web version. So we will explain reporting in various versions:

Reporting Someone on Discord Mobile App

If you are using Discord on your mobile device, follow these steps to report someone:

  • Open the Discord app on your phone or tablet.
  • Navigate to the chat or server where the offending user is located.
  • Tap and hold the user’s message or profile.
  • A menu will appear with several options. Select “Report.”
Source: GroovyPost
  • Choose the appropriate reason for the report from the available options.
  • Provide any additional details or evidence that may support your report.
  • Tap “Submit” to send the report to Discord’s Trust & Safety team.

Reporting Someone on Discord Desktop App

To report someone on the Discord desktop app, follow these steps:

  • Launch the Discord app on your computer.
  • Locate the message or profile of the user you wish to report.
  • Right-click on the message or profile to open a context menu.
  • From the menu, select “Report.”
  • Choose the reason that best describes the violation.
  • Provide any relevant information or evidence to support your report.
  • Click “Submit” to send the report to Discord’s Trust & Safety team.

Reporting Someone on Discord Web Version

If you are using Discord on the web version, you can report someone by following these steps:

  • Open your preferred web browser and visit the Discord website.
  • Log in to your Discord account.
  • Navigate to the chat or server where the offending user is located.
  • Find the user’s message or profile and right-click on it.
  • A menu will appear. Select “Report.”
  • Choose the appropriate reason for the report from the available options.
  • Provide any additional details or evidence that may support your report.
  • Click “Submit” to send the report to Discord’s Trust & Safety team.

Also, don’t miss the post “How to Tell if Someone Blocked You on Discord” if you have a problem with getting banned.

How Discord Handles Reported Users?

When a user is reported on Discord, the platform takes the report seriously and investigates the situation thoroughly. Discord has a dedicated Trust & Safety team that reviews each report and determines the appropriate action to be taken.

The team carefully reviews user actions and determines rule violations. Discord takes measures to ensure user safety, including issuing warnings, short bans, or permanent bans depending on the severity of the violation.

Discord prioritizes the safety and security of its users. Reporting someone is confidential, keeping your identity hidden from others, including the reported individual. This encourages reporting without fear of repercussions and contributes to maintaining a safe environment for all users.

Importance of Keeping Discord Safe

To encourage productive communication and community growth, it is essential to provide a secure setting for users on Discord. Consistently reporting inappropriate activity helps improve the platform for everyone.

One of the good points about Discord is they want to make a safe place where people can talk without worrying about being harassed, bullied or doing something wrong. And in this case, reporting people who do commit such behavior is a priority. If someone breaks the rules of this platform it’s our duty to report to Discord to make it a friendly and respectful place for everyone.

Also Read:How to Do Spoilers on Discord

Conclusion

With Discord’s increasing popularity, making sure of user safety is crucial. Learning how to report someone on Discord empowers you to actively promote a welcoming and secure community. Reporting inappropriate behavior helps Discord’s Trust & Safety team address violations promptly, ensuring that everyone can enjoy their time on the platform without harassment.

Remember, reporting is an essential tool in maintaining a safe online environment, and by using it responsibly, you play an active role in keeping Discord a positive place for all users.

How do You DM on Twitter: The Ultimate Guide

Twitter is a popular social media site that allows users to express themselves publicly with limited words. However, you may wish to have private talks with certain persons or groups, and in this case, you should know the steps of “how do you DM on Twitter.”

Twitter Direct Messages known as DMs play a huge role in this occasion. We’ll show you everything you need to know about how to DM on Twitter, from sending your first message to efficiently maintaining your privacy settings.

Everything You Need to Know About Twitter Direct Messages

Twitter Direct Messages offer a private and secure way to interact with other users on the platform. Unlike public tweets, DMs are not visible to everyone, making them ideal for personal or confidential discussions.

If you have no clue how do you DM on Twitter, keep reading as it could be the way out of this confusion. Let’s take a closer look into Twitter DMs and discover how to make the most of this valuable feature.

How to Use DMs on Twitter?

Sending a Direct Message on Twitter is a simple process that allows you to interact privately with your favorite users. Here’s a step-by-step guide on how do you DM on Twitter:

  • Access the Messages Tab: Locate and click on the “Messages” tab on the Twitter app or website. It is represented by an envelope icon in a Twitter profile, usually found in the top right corner.
  • Compose a New Message: Click on the “New Message” button to initiate a new conversation.
  • Select Recipients: Type the Twitter handles of the users you wish to message in the “To” field. You can also create group chats by adding multiple users.
  • Compose Your Message: Craft your message in the text box provided. You can improve your messages’ quality with emojis, GIFs, or images to add a personal touch.
  • Hit Send: Once your message is ready, click the “Send” button to deliver it to the selected recipients.

How to Manage Twitter DMs Privacy Settings

It is an issue for most Twitter users and many struggle in this part. Customizing your DM privacy settings allows you to control who can send you messages on Twitter:

Go to Settings and Privacy: Click on your profile picture on the top right corner of the Twitter app or website, and select “Settings and Privacy” from the dropdown menu.

Access Privacy and Safety: In the settings menu, navigate to the “Privacy and Safety” section.

Direct Messages: Within the “Privacy and Safety” section, you’ll find the option to manage your DM preferences.

Choose Your Recipients: You can select from three options to determine who can send you DMs:

  • Everyone: This setting allows anyone on Twitter to send you DMs.
  • People You Follow: Limit DMs to users you follow on Twitter.
  • No One: Block all incoming DMs, even from those you follow.

Save Your Settings: After making your selection, save the changes to apply your preferred DM privacy settings.

How to Turn off DMs on Twitter: Troubleshooting

In case you no longer want to receive any DM from Twitter users, turning off Direct messages in one of the ways. There are two scenarios where turning off DMs or limiting access might be helpful:

1. Limiting Unwanted Messages

If you get a lot of unwanted messages on Twitter, getting control of your DMs can be a good way to deal with the problem and keep your privacy. You can turn off Direct Messages on Twitter or only let people you follow send them to you. This can cut down on the amount of spam and unwanted messages you get.

2. Focusing on Public Interaction

For some users, Twitter is primarily a platform for public interaction and sharing thoughts with a broader audience. In such cases, turning off DMs might be a preferred option.

In closing

Twitter Direct Messages offer a powerful tool for private communication and interaction inside the platform even if Twitter’s new owner, Elon Musk, might make unstable decisions. It doesn’t matter if you’re connecting with friends, engaging with followers, or using Twitter for business issues, DMs provide a secure and efficient means of communication.

Now if someone was curious about questions like “How do you DM on Twitter”, this guide could be a way to come up with some great answers. It’s now easy to utilize Twitter DMs effectively. Respect others’ privacy, stay professional, and think before you send to create meaningful connections and conversations on the platform.

Live Instagram Follower Count: Track Your Audience Growth Real-Time

Social media have become an integral part of our lives in recent years. Among these platforms, Instagram has gained overall fame by delighting both individuals and businesses. Imagine the convenience of having up-to-the-minute updates on your follower count as an Instagram user. This is precisely where a live Instagram follower count tool proves invaluable.

By monitoring the growth of your audience in real-time, you can obtain valuable insights into your Instagram presence and use this information to make well-informed decisions that will bolster your online influence.

How to Use a Live Instagram Follower Count Tool?

Using a live Instagram follower count tool is both simple and user-friendly. There is no need for extra tools to start. You just need to find a reliable tool that shows real-time tracking options. And there are several options available online so we’ll discuss some popular ones later in this article.

Once you choose a tool, you normally need to provide your Instagram username or link your Instagram account to the tool as this is the basic of the task. Later the tool will begin tracking your follower count and show it in real time.

You can access this information through either a web-based dashboard or an application. Take some time to educate yourself with the tool’s features, such as tracking followers gained or lost over a specific period, engagement rates, and audience demographics.

Popular Live Instagram Follower Count Tools

  • Instagram Follower Checker

One popular tool for live Instagram follower count tracking is “Instagram Follower Checker.” This user-friendly tool provides real-time updates on your follower count, making it effortless to monitor your audience growth.

  • InstaLiveCounter

Another notable tool is “InstaLiveCounter,” which not only tracks your follower count but also offers additional analytics and insights. It provides a comprehensive dashboard to view your follower count, engagement rate, and audience demographics.

  • SocialBlade

SocialBlade” is a widely used tool that offers live follower count tracking for various social media platforms, including Instagram. It provides detailed analytics and allows you to compare your growth with other Instagram users.

Tips for Effectively Tracking Your Instagram Audience Growth

Tracking your Instagram audience growth is more than just monitoring numbers. To make the most out of this process, consider the following tips:

  • Set Goals

Before you start tracking your follower count, define your goals. Whether it’s increasing your follower count by a certain percentage or reaching a specific milestone, clear goals will give you direction and motivation to align your actions accordingly.

  • Monitor Engagement

While tracking your follower count is important, it’s equally crucial to monitor your audience’s engagement. Pay attention to likes, comments, and shares to gauge the quality of your followers. Remember, having an engaged audience is more valuable than having a large number of followers who are not actively interacting with your content.

  • Attention to Content

As you track your audience growth, take note of the type of content that resonates the most with your followers. Experiment with different formats, topics, and styles to keep your content fresh and engaging. Analyze the performance of each post and use the insights to refine your content strategy.

Since you’re Instagram enthusiast, don’t miss out on “How to Edit Instagram Photos: Quick Tips“. It’s a must-read for anyone looking to up their photo editing game on Instagram.

Tracking Your Competitors’ Instagram Follower Count

Tracking your competitors’ Instagram follower count can provide valuable insights into their strategies and help you stay ahead in the game. By monitoring their audience growth, you can identify tactics that are working well for them and adapt them to your own Instagram presence.

Additionally, analyzing your competitors’ follower count can help you identify market gaps or untapped audience segments, guiding your content creation and marketing efforts to target potential followers interested in your niche.

Common Mistakes to Avoid When Tracking Your Instagram Follower Count

While tracking your Instagram follower count is essential, avoid common mistakes that can lead to inaccurate or misleading data. First, don’t obsess solely over increasing your follower count.

Remember that quality and engagement are key indicators of success, and chasing numbers alone may not yield the desired results. Secondly, be cautious of sudden spikes or drops in your follower count. These fluctuations can be caused by various factors, such as bots or fake accounts. Instead of panicking, analyze the situation and take necessary measures to address any issues.

Lastly, don’t rely solely on follower count as a measure of success. Engage with your audience, build meaningful connections, and track other metrics like engagement rate and reach to have a comprehensive understanding of your Instagram presence.

Final Thoughts

Tracking your Instagram audience growth in real-time provides valuable insights to enhance your online presence. With a live Instagram follower count tool, you can monitor progress, identify trends, and optimize strategies for better results.

Analyze your audience growth, track competitors, and utilize data to refine content and engagement strategies. With the right tools and a data-driven approach, you can effectively track your Instagram follower count and take your online presence to new heights.

The Ultimate Guide to Choosing a 4K Laptop in 2024

Doing our tasks and getting it done need some high-quality devices. In fact working with a reliable and high-performance 4K laptop can be a game-changer. 4K laptops belong to another world and by saying that I mean it. That technology world is where incredible possibilities await content creators and professional designers.

In this full guide, we’ll take a deep dive into any kind of 4K laptops, to search for the most remarkable benefits, provide top recommendations, and offer best tips to help you choose the perfect 4K laptop that matches your unique needs and budget.

Exploring the World of 4K Laptops

We all know it is a key point to understand what makes 4K laptops so special. A 4K laptop is a portable computer that improves your screen resolution in an incredible way. In terms of numbers, it’s four times the detail and clarity compared to a standard Full HD display. So it is safe to say the display experience is breathtaking and sounds amazing.

In recent period of time, everyone has started to realize the importance of high-resolution displays and thanks to the increasing popularity of multimedia content, gaming, and creative applications. This is where a 4K laptop truly shines. This technology satisfies the needs by giving an immersive visual experience in images, videos, and graphics.

Even if you’re watching 4K movies or editing high-rated projects, a 4K laptop will help your computing adventure. Now is the right time to improve your device and do yourself a favor to feel power and beauty of 4K technology.

How to Choose Best 4k Laptops (2024)

Choosing the perfect 4K laptop that fits both your needs and budget needs some reflection. If you’re having second thoughts, follow these steps:

  • Think What You Need

First make it clear for yourself that how you plan to use the laptop. Are you a gamer, content creator, or someone who needs a high-resolution display? If you understand your needs, your options will fit in your limits.

  • Budget Comes First!

Determine a comfortable budget range. 4K laptops come in various price ranges, so having a budget in mind will help you focus on models that fit your financial constraints.

  • Consider Screen Size and Display Quality

Decide on the screen size that suits your preferences and usage. 4K laptops are available in different sizes, typically ranging from 13 inches to 17 inches. Also, consider the display technology (e.g., OLED, IPS) and color accuracy for your specific needs.

  • Improve Processor and Performance

To enhance processor and performance, prioritize laptops with powerful processors like the Intel Core i7 or AMD Ryzen 7. These processors ensure smooth performance and efficient multitasking. When considering RAM and storage capacity, think about your multitasking requirements and storage needs. Opt for an adequate amount of RAM and storage to support your computing tasks effectively. Don’t forget to take a look at this helpful and updated article: “Upgrading Laptop RAM: A Simple Guide for Beginners

  • Don’t Ignore Graphics Capabilities

If you’re a gamer or work with graphics-intensive applications, make the laptop has a dedicated graphics card, such as an NVIDIA GeForce RTX or AMD Radeon RX, to handle demanding tasks.

  • Read Reviews

Take the time to read reviews and user feedback to gain insights into the laptop’s performance, build quality, and customer satisfaction. This will help you make an informed decision and avoid potential issues.

  • Compare Your Options

Finally, the most common thing we do. Compare multiple laptops that meet your needs. Consider their features, specifications, and prices to find the best 4K laptop that offers the most value for your needs and budget.

By following these steps you’ll be well-equipped to choose the perfect 4K laptop that meets your needs and fits your budget in 2024. It is worth noting we didn’t mention other common ways, such as checking connectivity and ports or considering battery life and portability as these are the information you should take care of.

Top 5 Best 4K Laptops in 2024

Here are some of the best 4k Laptops you can but in this year.  This paragraph provides information based on popular opinion at the time of writing and may not represent individual preferences or technological advancements in future releases.

  • Dell XPS 15 (2024)

The Dell XPS 15 is famous for its incredible 4K OLED display, which is delivering rich colors and sharp details. Powered by the latest Intel Core i7 processor and equipped with 16GB of RAM, it’s an excellent choice for both work and play.

  • HP Spectre x360 (2024)

This 2-in-1 laptop features a 4K OLED display that can rotate 360 degrees. It offers versatile usage options. With an Intel Core i7 processor, 16GB of RAM, and a 1TB SSD, it provides great power and storage capacity.

  • Lenovo Yoga 9i (2024)

The Lenovo Yoga 9i is an adaptable 2-in-1 laptop with a 4K IPS touchscreen. It’s powered by an Intel Core i7 processor and comes with 16GB of RAM and a 1TB SSD, offering a balance of performance and storage. It’s a perfect choice for ant task.

  • Razer Blade 15 Advanced (2024)

It’s pretty much designed for gamers. The Razer Blade 15 Advanced offers a 4K OLED display and is powered by an Intel Core i7 processor. With 16GB of RAM and a 1TB SSD, it provides the necessary power and storage for gaming enthusiasts.

  • Apple MacBook Pro 16-inch (2024)

The MacBook Pro features a gorgeous 16-inch Retina Display with True Tone technology. Powered by Apple’s M1 Pro or M1 Max chips, it offers impressive performance. With options for up to 64GB of RAM and up to 8TB of SSD storage, it caters to demanding tasks.

The Bottom Line

Choosing the perfect 4K laptop is an exhilarating endeavor that promises an unparalleled visual voyage. By exploring the captivating world of 4K laptops, understanding their benefits, and carefully considering your unique requirements, you’ll be equipped to make an informed decision.

Whether you’re a content creator, a gaming enthusiast, or a professional seeking the best visual experience, a 4K laptop undoubtedly elevates your computing journey to extraordinary heights of clarity and vibrancy. Embrace the power of 4K and indulge in a world of breathtaking visuals.

Upgrading Laptop RAM: A Simple Guide for Beginners

Are you tired of your laptop’s slow performance? Are you looking to enhance its speed and responsiveness? One effective solution is upgrading laptop RAM. In this complete guide, we’ll walk you through process of how to upgrade RAM. It would still help you out even it you’re a beginner or a tech-savvy individual. This article will provide you with the ability and confidence to undertake this simple yet impactful upgrade. So, let’s dive in.

Why Should I Upgrade Laptop RAM

Your laptop’s RAM – It is called Random Access Memory – plays a crucial role in its overall performance. Upgrading the RAM can significantly enhance your laptop’s speed and multitasking capabilities. Here are a few reasons why you should consider upgrading your laptop’s RAM:

  • Improved multitasking

With more RAM, your laptop can handle multiple tasks simultaneously without slowing down.

  • Enhanced performance

Upgrading RAM allows your laptop to run applications and programs more smoothly, reducing lag and delays.

  • Better gaming experience

If you enjoy gaming on your laptop, upgrading the RAM can help improve graphics rendering and reduce game lag.

  • Future-proofing

As technology advances, newer applications and software require more RAM. Upgrading now ensures your laptop can handle future demands.

How to Upgrade RAM: Do it in the Best Way

Now that you understand the benefits of upgrading the laptop’s RAM, let’s walk through the step-by-step process of upgrading it:

Step 1: Determine compatibility and maximum RAM capacity

Before purchasing new RAM, it’s crucial to check your laptop’s specifications and determine its compatibility and maximum RAM capacity. Refer to your laptop’s manual or manufacturer’s website for this information.

Step 2: Purchase the appropriate RAM

Once you know your laptop’s compatibility and maximum RAM capacity, you can proceed to purchase the appropriate RAM modules. Look for reputable brands and ensure the RAM matches the required specifications, such as type, speed, and capacity.

Step 3: Prepare your laptop

Before installing the new RAM, ensure your laptop is powered off and unplugged. Also, make sure to ground yourself by touching a metal surface to discharge any static electricity.

Step 4: Access the RAM slots

Locate the RAM slots on your laptop. In most cases, they can be found on the bottom or under a removable panel. Consult your laptop’s manual if you’re unsure about their exact location.

Step 5: Remove the existing RAM

If there are existing RAM modules in the slots, carefully remove them by pushing the clips on the sides of the module outward. Gently lift the module out of the slot at an angle.

Step 6: Insert the new RAM

Take the new RAM module and align it with the slot at a slight angle. Firmly press it down until the clips on the sides lock into place. Ensure it is securely seated.

Step 7: Repeat for additional modules

If you’re installing multiple RAM modules, repeat the previous step for each module, ensuring they are installed in the correct slots and orientation.

Step 8: Test and verify

Once all the new RAM modules are installed, replace any panels you removed and secure them in place. Power on your laptop and verify that the new RAM is detected by checking your system information.

Also Read: “How to Destroy a Hard Drive

Benefits of Upgrading Laptop RAM

Upgrading laptop RAM offers several benefits that can greatly improve your computing experience. Let’s explore these advantages in detail:

  • Improved Speed and Responsiveness

Upgrading laptop RAM provides it with more temporary storage space, allowing it to access data faster and run applications more smoothly. You’ll experience quicker boot times, faster file transfers, and reduced loading times for programs and websites.

  • Efficient Multitasking

With additional RAM, your laptop can handle multiple tasks simultaneously without performance degradation. You can seamlessly switch between applications, run resource-intensive software, and have numerous browser tabs open without experiencing slowdowns or crashes.

  • Enhanced System Stability

Upgrading RAM can prevent system crashes and freezes, especially when running memory-intensive programs. It provides stability by ensuring your laptop has sufficient memory to handle demanding tasks without overwhelming the system.

  • Better Gaming Performance

If you’re a gamer, upgrading your laptop’s RAM can significantly improve your gaming experience. It allows for smoother gameplay, reduced lag, and faster loading times. With more RAM, your laptop can store and process game data efficiently, resulting in a more immersive gaming session.

Future-Proofing Your Laptop: Upgrading your laptop’s RAM ensures that it remains capable of handling future software updates and technological advancements. As applications become more resource-demanding, having ample RAM will prevent your laptop from becoming obsolete too quickly. If you face any issue in that area, be sure to explore “The Complete Guide to Formatting an External Hard Drive for Mac and PC“. It will provide you with total assistance and solutions.

Common Mistakes to Avoid When Upgrading Laptop RAM

While upgrading your laptop’s RAM is a relatively straightforward process, there are a few common mistakes to avoid:

  • Incompatible RAM: Ensure that the RAM you purchase is compatible with your laptop’s specifications. Mismatched RAM can lead to system instability and performance issues.
  • Incorrect installation: Take care when inserting the RAM modules into the slots. Ensure they are properly aligned and firmly seated. Improper installation can prevent your laptop from booting up.
  • Neglecting static electricity: Static electricity can damage sensitive electronic components. Remember to ground yourself before handling the RAM modules, and avoid working on a carpeted surface.
  • Mixing different RAM types: It is generally recommended to use RAM modules with matching specifications. Mixing different RAM types or speeds can lead to compatibility issues and performance degradation.
  • Ignoring the maximum capacity: Check your laptop’s maximum RAM capacity and avoid installing more RAM than it can support. Exceeding the limit may result in system instability or failure to boot.
In the End

Upgrading laptop RAM can provide a significant performance boost, making your computing experience smoother and more enjoyable. By following the step-by-step guide outlined in this article, you can confidently upgrade your laptop’s RAM and unlock its full potential.

Remember to consider your laptop’s compatibility, buy the appropriate RAM modules, and follow proper installation procedures. With upgraded RAM, you’ll experience faster speeds, improved multitasking, and enhanced stability.

How to Edit Instagram Photos: Quick Tips

In the world of Instagram, captivating photos play a pivotal role in engaging your audience and leaving a lasting impression. Upgrading your visuals through photo editing can make them stand out amidst the crowded social media landscape. Learning how to edit Instagram photos, will become a big deal in your social media life.

And you don’t need to be an influencer, this article is packed with quick and effective tips on editing photos for Instagram that will truly wow your followers. Let’s get started and unlock the secrets to creating stunning visuals for your Instagram profile.

How to Edit Instagram Photos?

Regarding editing Instagram photos, maintaining a perfect balance between improving visual appeal and holding a natural look is so important to you could imagine. And here are some quick tips to help you achieve best results:

  • Definitely Start with a High-Quality Image

The basis of any amazing photo edit lies in a high-resolution image. There’s no magic touch! Just make sure you capture or select a photo with good lighting, sharp details, and minimal noise to get it to full potential of your editing efforts.

  • Enhance Brightness and Contrast

Adjusting the brightness and contrast can significantly make the overall appearance of your photo better. By increasing the brightness, your image will pop, while adjusting the contrast adds depth and definition.

  • Fine-Tune Colors with Saturation and Vibrance

Utilize the saturation and vibrance tools to infuse your colors with vibrancy and make them more eye-catching. However, remember to exercise restraint to maintain a natural and appealing appearance.

  • Experiment with Filters

The other part step in how to edit Instagram photos journey, is working with filters. Instagram provides an array of filters that can add unique styles and moods to your photos. Explore different Instagram filters and adjust their intensity to discover the one that perfectly complements your image and aligns with your overall aesthetic.

  • Crop and Straighten

Crop your photo to remove any unnecessary elements and improve composition. Straighten the image if needed to correct any skewed horizons or angles.

  • Enhance Details with Sharpening

Apply a subtle sharpening effect to enhance the details and make your photo appear crisper. Be cautious not to overdo it, as excessive sharpening can introduce noise or artifacts.

  • Reduce Noise

If your photo appears grainy or noisy, use the noise reduction tool to smooth out unwanted grain and create a cleaner look.

Editing Photos for Instagram Stories

Instagram Stories have become an integral part of the platform, offering a more informal and ephemeral way to engage with your audience. Here are some editing tips specifically tailored for Instagram Stories:

  • Utilize Story-Specific Editing Tools

Instagram provides a range of features designed specifically for Stories, such as stickers, text overlays, drawing tools, and filters. Experiment with these tools to add creativity and personality to your Stories.

  • Adjust Aspect Ratio

Instagram Stories have a vertical aspect ratio, so ensure your photos are properly sized to fit the screen. You can do this by using photo editing apps or Instagram’s built-in editing tools. In general, you should know how to edit Instagram photos for a better result.

  • Play with Text and Graphics

Add captions, quotes, or relevant graphics to your Stories to convey your message effectively. Experiment with different fonts, sizes, and colors to match your branding and make your Stories visually appealing.

  • Incorporate Engaging Effects

Instagram offers a variety of effects like boomerangs, superzooms, and face filters. These effects can add an element of fun and interactivity to your Stories, capturing the attention of your followers.

If you’re a passionate Instagram user, don’t forget to check out “Best Ways to Get More Real Instagram Followers.”

The Best Instagram Photo Editing Apps

To streamline your photo editing process and unlock more advanced editing capabilities, consider using dedicated photo editing apps. Here are some of the best Instagram photo editing apps in 2023:

  • Adobe Lightroom

A powerful editing app with comprehensive tools for adjusting exposure, color, and detail. Lightroom offers presets and the ability to create your own editing styles.

  • VSCO

Known for its vast selection of beautiful presets, VSCO allows you to create a cohesive and consistent look for your Instagram feed. It also offers manual editing controls and a community platform for sharing your photos.

  • Snapseed

A user-friendly app developed by Google, Snapseed provides a wide range of editing tools, including selective adjustments, healing brushes, and perspective correction.

  • Afterlight

With a user-friendly interface and a wide variety of filters and editing tools, Afterlight is a popular choice for quick and easy photo edits. It also offers additional features like dust and light leak overlays.

In Closing

Editing Instagram photos is a powerful way to elevate your visual content and captivate your audience. By implementing the quick tips mentioned in this article, you’ll be well on your way to perform best and even show others how to edit Instagram photos.

Remember to start with a high-quality image, adjust the brightness and contrast, fine-tune colors, experiment with filters, crop and straighten, enhance details, and reduce noise.

Additionally, for Instagram Stories, utilize the story-specific editing tools, adjust the aspect ratio, play with text and graphics, and incorporate engaging effects. And to take your editing to the next level, explore the best Instagram photo editing apps like Adobe Lightroom, VSCO, Snapseed, and Afterlight.

Now armed with these editing techniques and tools, you can transform your Instagram feed into a visually striking gallery that showcases your creativity and captivates your audience. So go ahead, dive into the world of photo editing, and watch as your Instagram photos receive the attention they truly deserve.

Exit mobile version