How to Open Bios Windows 11? (In Asus, Dell, Lenovo, HP and Acer Laptops)

Do you want to get to your Windows 11 PC’s BIOS or UEFI firmware? You must enter the BIOS in order to make changes to your motherboard, CPU, or boot devices. We will look at a lot of different ways on how to open BIOS Windows 11. We’ll talk about well-known laptop names like Acer, Dell, HP, Lenovo, and Asus. Okay, let’s begin.

What is BIOS?

Before we get into the steps, let’s understand what BIOS is. BIOS, which stands for “Basic Input/Output System,” is a very simple tool that manages and syncs all the hardware on your PC. It controls things like the CPU, RAM, storage drives, and other tools and is like the firmware for your motherboard. BIOS is sometimes called Unified Extensible Firmware Interface (UEFI) BIOS on new systems.

Why Do You Need to Access the BIOS in Windows 11?

Accessing the BIOS in Windows 11 can be useful for several reasons. Here are some common scenarios where you might need to enter the BIOS:

  • Overclocking: If you want to push your GPU or RAM to their limits for better performance, accessing the BIOS is necessary to enable overclocking features.
  • Virtual Machines: If you plan to run virtual machines on your PC using software like VMware or VirtualBox, you may need to activate Intel Virtualization Technology (VT-x) or AMD-V in the BIOS.
  • Changing Boot Order: When installing a new operating system or booting from a USB or CD/DVD-ROM, you may need to change the boot order in the BIOS to prioritize the desired device.
  • Hardware Configuration: The BIOS provides access to various hardware settings, allowing you to configure parameters such as date and time, fan speed, and power management.
  • Security Settings: If you want to add an extra layer of security to your Windows 11 PC, you can set a master password in the BIOS to restrict unauthorized access.

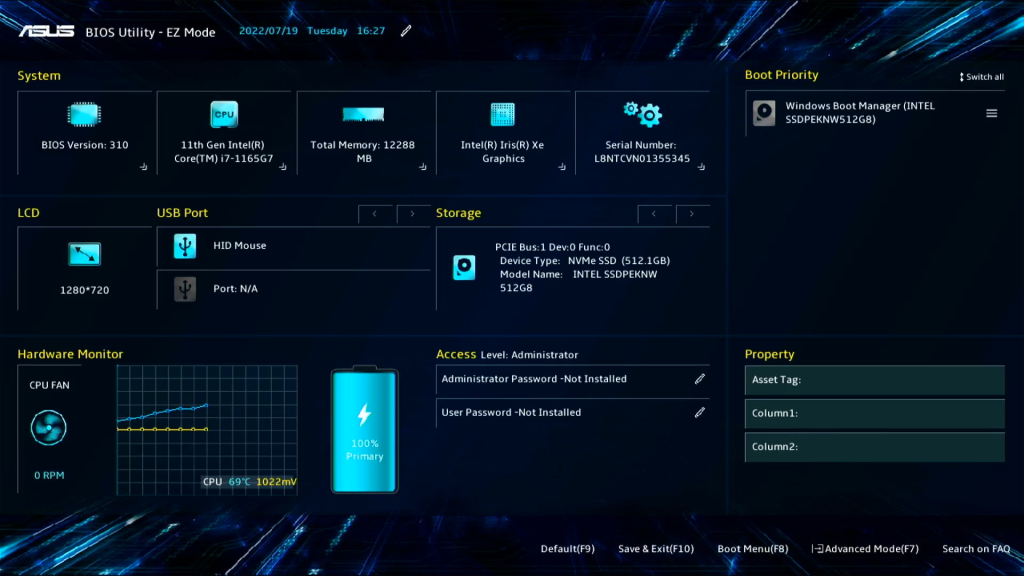
How to Open BIOS in Asus Laptops Running Windows 11

To access the BIOS on an Asus laptop running Windows 11, follow these steps:

  • Start by shutting down your laptop completely.
  • Press the power button to turn on your laptop.
  • As soon as the Asus logo appears, press the F2 key repeatedly until you enter the BIOS setup utility.

If the F2 key doesn’t work for your specific Asus laptop model, you can try using the Del key instead. Refer to your laptop’s user manual or Asus support website for the exact key to access the BIOS.

How to Open BIOS Windows 11 in Dell Laptops?

If you own a Dell laptop and want to access the BIOS in Windows 11, follow these steps:

  • Shut down your Dell laptop completely.
  • Press the power button to turn on your laptop.
  • When the Dell logo appears, press either the F12 or F2 key repeatedly until you enter the BIOS setup.

If neither of these keys works for your Dell laptop, consult the user manual or Dell’s support website for the correct key combination to enter the BIOS.

How to Open BIOS Windows 11 in HP Laptops?

To access the BIOS on an HP laptop running Windows 11, follow these steps:

  • Power off your HP laptop.
  • Press the power button to turn on your laptop.
  • Immediately start pressing the Esc key repeatedly until the startup menu appears.
  • Press the F10 key to enter the BIOS setup.

If the Esc key doesn’t work for your HP laptop, try using the F10 or F2 key instead. Check the user manual or HP’s support website for the correct key for your specific model.

How to Open BIOS Windows 11 in Lenovo Laptops?

Accessing the BIOS on a Lenovo laptop running Windows 11 can be done using the following steps:

  • Shut down your Lenovo laptop completely.
  • Press the power button to turn on your laptop.
  • When the Lenovo logo appears, press either the Fn + F2 or F2 key repeatedly until you enter the BIOS setup.
  • If the Fn + F2 or F2 key combination doesn’t work, consult the user manual or Lenovo’s support website for the correct key sequence to access the BIOS.

How to Open BIOS Windows 11 in Acer Laptops?

To access the BIOS on an Acer laptop running Windows 11, follow these steps:

  • Power off your Acer laptop.
  • Press the power button to turn on your laptop.
  • As soon as the Acer logo appears, press either the F2 or Delete key repeatedly until you enter the BIOS setup.
  • If neither the F2 nor Delete key works for your Acer laptop, refer to the user manual or Acer’s support website for the correct key combination to access the BIOS.

Now that we have covered the methods for popular laptop brands, let’s explore a general method to access the BIOS in Windows 11.

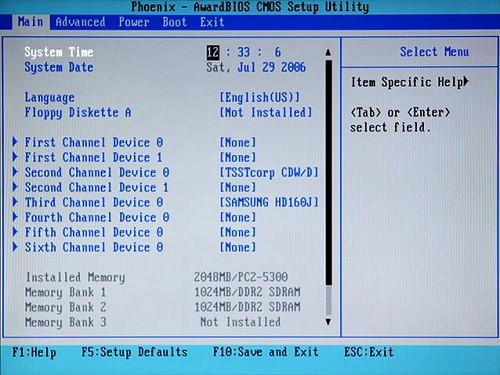
How to Open BIOS in Windows 11: General Method?

If you are unable to access the BIOS using the methods specific to your laptop brand, you can try the general method outlined below:

  • Shut down your Windows 11 PC completely.
  • Press the power button to turn on your PC.
  • Look for a message or logo displayed during the boot process that indicates the key to press to enter the BIOS (e.g., “Press F2 to enter BIOS”).
  • Press the key several times until the BIOS setup tool shows up.

If you don’t see any indication of the key to enter the BIOS, you can try pressing the F2, F10, Delete, or Esc key repeatedly during the boot process. Keep in mind that the exact key may vary depending on your motherboard or PC manufacturer.

In Closing

You need to be able to get to the BIOS in Windows 11 in order to make significant changes to your PC’s hardware setup and settings. It’s important to know how to get into the BIOS if you have an Asus, Dell, HP, Lenovo, or Acer laptop or a PC that was built just for you. Following the instructions in this guide will make it easy for you to get into the BIOS on your Windows 11 PC and make the changes you need.

Remember to look at the user manual for your laptop or the manufacturer’s support website for specific directions on how to use your device. Now that you know how to get into the BIOS, you can easily go through the firmware settings and make the most of Windows 11.

What are Possible Red Flags or Signs of a Scam When Buying a Car?

It’s really important to know what are possible red flags or signs of a scam when buying a car. Whether you’re a first-time buyer or a seasoned veteran, understanding these warning signs can help you avoid falling victim to unscrupulous practices and make informed decisions when purchasing a vehicle. In this comprehensive guide, we will explore the common red flags to watch out for when buying a car, how to protect yourself from scams, and what to do if you encounter a scam.

What are Possible Red Flags or Signs of a Scam When Buying a Car?

When buying a car, it’s crucial to be vigilant for potential red flags or signs of a scam. Some common indicators include:

Unrealistically Low Prices

An unreasonably low price is one of the most common signs that you shouldn’t buy a car. It’s likely that a deal is fake if it seems too good to be true. Scammers often use low prices to get people to buy things they don’t need. They may advertise a famous car model at a significantly lower price than the market value to attract attention.

To avoid falling for this scam, it’s important to get prices from more than one place and know how much the car you want to buy is worth on the market. Find out how much similar models usually cost to see if the deal you’re thinking about is within a fair range.

Rushed Sale

Another red flag to watch out for is a seller who is overly eager or pushy about closing the deal quickly. Scammers may try to create a sense of urgency to pressure you into making a hasty decision without thoroughly inspecting the car or conducting proper due diligence.

A legitimate seller will understand your need to take your time, think things over, and have the car inspected by a trusted mechanic. If a seller is rushing the sale or trying to push you into a quick decision, it’s a warning sign that something may be amiss.

Not Enough or Missing Paperwork

When you buy a car, you need to have all of the necessary papers with you. The history report and maintenance records of a vehicle are very helpful because they show any accidents, repairs, or big problems that the vehicle has had in the past. It’s a red flag that something might be wrong with the car if the seller can’t give you these papers or if they look missing or sketchy.

Always make sure you look over all the papers before you buy something. You should back out of the deal if the seller can’t or won’t give you the necessary paperwork. This will help you avoid scams or other problems.

Changed Odometer

Odometer theft is a common scam in the used car market. Scammers change the odometer to make the car look younger or better maintained than it really is by lowering the recorded mileage. This dishonest practice is meant to raise the price of the car and keep buyers from finding out the truth about its past.

To spot possible odometer scam, be wary of cars whose mileage seems incredibly low for their age. If the odometer number doesn’t seem right, it could mean that someone has tampered with it. A full vehicle history record can also show how many miles the car has been driven over time.

Reluctance to Meet or Show the Car

If a seller is reluctant to meet in person or hesitant to show you the car, it’s a significant red flag. Legitimate sellers should be willing to arrange a meeting and allow you to inspect the car thoroughly. Scammers may try to avoid personal interactions or prevent you from examining the vehicle to hide potential issues or misrepresent the car’s condition.

Always insist on seeing the car in person and conducting a thorough inspection. If a seller refuses or provides excuses for not showing the car, it’s best to walk away from the deal to avoid potential scams.

Pressure to Pay Upfront

One of the most common tricks scams use is to get people to pay for the car before they even see it or fill out the paperwork. They might demand payment right away or ask for a big deposit to hold the deal. This method is meant to get your money without giving you the car they said they would or protecting you legally.

You should never pay for a car before seeing it and making sure it’s in good shape. Use safe ways to pay, like trust services or bank transfers, that protect the buyer. If you fall for a scam, don’t use cash or wire payments because they are hard to track down and get back.

Vague Maintenance Claims

If the seller of a used car says that it only needs minor repairs or an easy tune-up, you should be wary. “Just needs a tune” is a term that is often used to play down or hide bigger problems. Before selling a car, honest sellers would usually take care of any maintenance or fixes that need to be done.

If the seller doesn’t give you clear information about the car’s repair needs or tries to convince you that small problems are easy to fix, it’s a sign that the car may have bigger issues.

Frequent Ownership Changes

Frequent changes in ownership can indicate potential problems with a car. If the vehicle has had multiple owners in a short period, it may suggest that previous owners encountered issues or were dissatisfied with the car’s performance. A comprehensive vehicle history report can provide information about the car’s ownership history and reveal any potential red flags.

Review the ownership records and pay attention to any patterns of quick turnovers. If a car has had numerous owners in a short span, it’s advisable to investigate further and consider the reasons behind the frequent ownership changes.

Lack of Maintenance Records

Maintenance records are essential for assessing a car’s history and understanding how well it has been maintained over time. If a seller cannot provide proper maintenance records or if there is a lack of documentation, it raises concerns about the car’s condition and whether it has received regular servicing.

This red flag is particularly pertinent for sports cars, luxury vehicles, and convertibles that require meticulous maintenance. A lack of maintenance records could indicate neglect or improper care, potentially leading to expensive repairs or hidden issues down the line.

Suspicious Vehicle History

A comprehensive vehicle history report is an invaluable tool when buying a used car. It provides insights into the car’s past, including any accidents, flood damage, title issues, or previous repairs. Reviewing the vehicle history report can help identify potential red flags and make an informed decision.

Pay attention to any significant incidents or recurring problems in the vehicle history report. Look for discrepancies between the seller’s claims and the information provided in the report. Additionally, consider obtaining additional reports from reputable sources to cross-reference and validate the information.

Online Car Buying Scams

Since there are more online classified ads and car lots, online scams are becoming more common. It’s very important to be careful and alert when doing business online. Watch out for these usual scams when you buy a car online:

  • Phantom Cars: Scammers may advertise cars they don’t actually own, using stolen photos and descriptions to deceive buyers.
  • Fake Escrow Services: Scammers may pose as legitimate escrow services, offering to hold funds until the vehicle is delivered.
  • Title Washing: Title washing involves hiding a car’s history, such as previous accidents or flood damage, by obtaining a new title from another state with more lenient regulations.
  • Odometer Fraud: Scammers may manipulate the odometer reading to decrease the recorded mileage, making the car appear more desirable and valuable.

Protecting Yourself from Car Buying Scams

While being aware of the red flags and common scams is crucial, there are additional measures you can take to protect yourself when buying a car. Here are some important steps to consider:

  • Research and Educate Yourself: Before entering the car buying process, educate yourself about the specific make, model, and year of the car you’re interested in.
  • Get a Pre-Purchase Inspection: Always have a trusted mechanic or professional inspect the car before finalizing the purchase.
  • Use Secure Payment Methods: When making payments, opt for secure methods that offer buyer protection, such as escrow services or secure online payment platforms.
  • Trust Your Instincts: If something feels off or too good to be true, trust your instincts and walk away from the deal.
  • Verify the Seller’s Identity and Reputation: Take the time to research the seller and verify their identity. Look for reviews, ratings, or testimonials about their previous transactions.

In Summary

When buying a car, it’s crucial to be aware of the possible red flags or signs of a scam. By understanding these warning signs and taking necessary precautions, you can protect yourself from unscrupulous practices and ensure a safe and gratifying car purchasing experience. Remember to research, verify, and trust your instincts to make informed decisions and avoid falling victim to scams.

Why Won’t My Xbox Turn On but It Makes the Noises?

If you are wondering, “Why won’t my Xbox turn on?” You’re not alone in facing this frustrating issue. Many Xbox users have faced the problem of their console not powering up despite hearing noises. Luckily, before seeking professional help, there are several tried-and-true fixes you can attempt. In this guide, we’ll explore the most common reasons for this problem and provide instructions on how to resolve it.

Reasons Why Your Xbox Isn’t Turning On

There could be various factors contributing to your Xbox not turning on. Let’s explore some common reasons:

Power Supply and Cable Issues

The power supply and cables play a crucial role in providing a stable power source to your Xbox. If the power cord is damaged or improperly connected, it can prevent the console from turning on. Similarly, a faulty power brick can result in insufficient power delivery to the console, causing it to beep but not fully power up.

Overheating

Like any electronic device, the Xbox is susceptible to overheating. If the console is placed in an environment with poor ventilation or if the vents are blocked by dust, it can lead to overheating. In such cases, the console may shut down as a safety measure and refuse to turn back on until it cools down.

Moisture on Motherboard

Moisture on the motherboard can be a significant issue for Xbox consoles. It can occur due to condensation or internal cooling system problems. When moisture builds up on the motherboard, it can cause various power-related issues, including beeping but not turning on. Moisture can also lead to short circuits and other hardware malfunctions if left unaddressed.

How to Fix an Xbox That Won’t Turn On

Now that we understand the potential causes, let’s explore the step-by-step solutions to fix your Xbox One:

Soft Reset and Power Cycle

Performing a soft reset and power cycle can often resolve minor software glitches and power-related issues.

Soft Reset

  • Unplug the power cord from the console and wait for 15 seconds.
  • Press the power button on the console a few times while it is unplugged to discharge any residual power.
  • Plug the power cord back into the console.
  • Press the power button to turn on the console and see if it powers up correctly.

Power Cycle

  • Ensure the console is turned off.
  • Press and hold the power button on the console for 10 seconds
  • Check the LED indicator on the power brick; it should flicker from orange to white.
  • Once the LED indicator remains steady orange, the console is in standby mode.
  • Press the power button again to turn on the console.

Triple Button Hold

If the soft reset and power cycle didn’t resolve the issue, you can try a triple button hold to reset the internal software.

  • Press and hold the power, eject, and sync buttons simultaneously for ten seconds.
  • Release the eject button after ten seconds.
  • Continue holding the power and sync buttons for an additional fifteen seconds.
  • Release the power and sync buttons.
  • Press and hold the power and sync buttons once again until the console powers up and starts syncing data.

Eject Button Tapping

An unconventional but effective solution is to tap the eject button multiple times. This action can help break any software loops causing the console not to turn on.

  • Tap the eject button on the console at least ten times in a row.
  • You don’t need to have a disc in the tray for this method.
  • The purpose is to redirect the console’s focus and trigger a new task, such as ejecting the disc tray.

Check Power Supply and Cables

Make sure that the power supply and cables are properly connected and not damaged.

  • Check that the power cord is securely plugged into the console and the wall outlet.
  • If the LED indicator on the power brick is not lit or blinking orange, consider replacing the power supply.
  • Inspect the power cord for any tears or other signs of damage. If damaged, replace it with a new one.

Overheating Issues

If your Xbox shuts down due to overheating, proper ventilation is crucial. Take the following steps to address this issue:

  • Remove any objects or obstructions around the console that may block airflow.
  • Place the console in a well-ventilated area.
  • Clean the vents using compressed air or a gentle brush to remove any dust buildup.
  • Consider using a cooling stand or external fan to improve airflow around the console.

Moisture on Motherboard

If you suspect moisture on the motherboard, take the following precautions:

  • Turn off the console and unplug it from the power source.
  • Allow the console to sit at an angle, allowing any moisture to drip out.
  • Use a hairdryer on the coolest setting to gently dry the internal components.
  • Alternatively, let the console sit undisturbed for 2-3 days to naturally dry out.
  • Consider using a dehumidifier in the room to reduce moisture levels.

Faulty Internal Power Supply

If the issue persists and is not related to external factors, the internal power supply may be faulty. In such cases, professional repair or replacement may be necessary. Contact Microsoft support or an authorized technician for further assistance.

Replace the Controller

If you’ve tried all the previous solutions and your Xbox still won’t turn on, consider replacing the controller. A faulty or malfunctioning controller can prevent the console from powering up correctly.

Check Power Strip and Wall Outlet

Ensure that the power strip or wall outlet you’re using is functioning correctly.

  • Verify that the power strip is turned on and has not tripped any fuses or circuit breakers.
  • If the outlet on the power strip is dead, replace it immediately.
  • Try plugging the console directly into a different wall outlet to rule out electrical issues.

Also Read: Can You Use a PS5 Controller on a PS4? (Simple Ways to Do It)

In Closing

When faced with the frustrating situation of ‘Why won’t my Xbox turn on,’ it can indeed be annoying, especially when it has beeps and noises. But there are a few things you can try to fix the problem. You can improve your chances of getting your Xbox working again by following the steps in this guide, such as doing a soft restart, power cycling, checking the power supply and cables, fixing problems with overheating and moisture, and replacing broken parts.

If all else fails, consider seeking professional assistance or exploring replacement choices. Always put safety first, and if you need more help, look to official sources.

Best Ways to Fix SSD Not Showing Up in Windows 11

SSD is becoming more and more common because it works faster and is more reliable than regular hard drives. But one problem that a lot of people have is that the SSD doesn’t show up in Windows 11. This can be annoying because it keeps people from getting to their files and making the most of their SSD. This guide will look at the best ways to fix SSD not showing up in Windows 11 and give you great instructions on how to fix the problem.

How to Fix “SSD Not Showing Up” Error?

Before we talk about how to fix the problem, it’s important to know why the SSD might not be showing up in Windows 11. By finding the problem’s root cause, you can successfully deal with it and put in place the right solution. Here are a few common reasons:

  • Bad links between hardware: It is possible that the SSD is not properly connected to the motherboard or power source of your computer. The SSD might not be found if the wires are too loose or the connectors are broken.
  • Free disk space: The SSD might not show up in Windows 11 if it hasn’t been set up or divided up. Before the operating system can see unallocated drive space, it has to be formatted and given a name.
  • Assigning drive letters: Windows gives storage devices drive letters so that they can talk to each other. If the SSD doesn’t have a drive letter or has drive letters that don’t match, it might not show up in File Explorer or Disk Management.
  • Misconfigured BIOS settings: The SSD might not be recognized because the BIOS settings are not set up properly. This might happen if the SATA mode is set to IDE instead of AHCI, which might make the drive not work with other devices.
  • Out of date SSD drivers: Windows 11 might not be able to find an SSD if the drivers are out of date or don’t work with the SSD. It is very important to keep your SSD drivers up to date for the best speed and compatibility.

Now that we know what might be causing the SSD not showing up problem in Windows 11, let’s look at how to fix it.

Solution 1: Check Hardware Connections

The first step in troubleshooting the SSD not showing up issue is to ensure that the hardware connections are secure. Follow these steps to check the hardware connections:

  • Power off your computer and unplug the power cord
  • Find the SSD when you open the case of your computer.
  • Check the SATA data cable and power cable connections. Make sure they are securely connected to the SSD and the motherboard.
  • If possible, try using a different SATA cable and power cable to rule out any cable-related issues.
  • Close the computer case, plug in the power cord, and power on your computer.
  • Check if the SSD is now detected in Windows 11.

By verifying the hardware connections, you can eliminate any potential issues caused by loose cables or faulty connectors.

Solution 2: Initialize the SSD

If the SSD is new or has not been initialized, Windows 11 may not recognize it. Initializing the SSD will prepare it for use and allow Windows to detect it. Follow these steps to initialize the SSD:

  • Press the Windows key + R to open the Run dialog box.
  • Type “diskmgmt.msc” and press Enter to open the Disk Management utility.
  • In Disk Management, locate the SSD that is not showing up.
  • If the SSD appears as unallocated space, right-click on it and select “Initialize Disk.”
  • Select the appropriate disk initialization style (MBR or GPT) and click OK.
  • Right-click on the unallocated space and select “New Simple Volume.”
  • Follow the on-screen instructions to create a new partition on the SSD.

Once the initialization and partitioning process is complete, check if the SSD is now detected in Windows 11.

Initializing the SSD will prepare it for use by creating a partition and formatting it with a file system. This allows Windows to recognize and assign a drive letter to the SSD.

Solution 3: Assign or Change Drive Letter

If the SSD is not assigned a drive letter or has conflicting drive letters, it may not show up in File Explorer or Disk Management. Follow these steps to assign or change the drive letter:

  • Open Disk Management by pressing the Windows key + R, typing “diskmgmt.msc”, and pressing Enter.
  • Locate the SSD that is not showing up.
  • Right-click on the SSD’s partition and select “Change Drive Letter and Paths.”
  • If no drive letter is assigned, click “Add” and select a drive letter from the dropdown menu.
  • If a drive letter is already assigned but there is a conflict, click “Change” and select a different drive letter.
  • Click OK and check if the SSD is now visible in File Explorer.

Assigning or changing the drive letter ensures that Windows recognizes and communicates with the SSD properly.

Solution 4: Check BIOS Settings

Misconfigured BIOS settings can prevent Windows 11 from detecting the SSD. By adjusting the SATA mode, you can resolve compatibility issues and allow the SSD to be recognized. Here’s how to check the BIOS settings:

  • Restart your computer and enter the BIOS setup by pressing the designated key (e.g., Del, F2, or F10) during startup.
  • Navigate to the Storage or SATA Configuration section in the BIOS settings.
  • Locate the SATA Mode or SATA Configuration option and change it to AHCI.
  • Save the changes and exit the BIOS setup.
  • Once your computer restarts, check if the SSD is now detected in Windows 11.

Changing the SATA mode to AHCI ensures proper communication between the SSD and the operating system.

Solution 5: Update SSD Drivers

Outdated or incompatible SSD drivers can prevent Windows 11 from detecting the SSD. It’s important to keep your SSD drivers up to date to ensure optimal performance and compatibility. Here are the steps to update the SSD drivers:

  • Press the Windows key + X and select “Device Manager” from the menu.
  • Expand the “Disk drives” category to view the SSD.
  • Right-click on the SSD and select “Update driver.”
  • Choose the option to search automatically for updated driver software.
  • Windows will search for the latest driver for your SSD and install it if available.
  • Once the driver update is complete, restart your computer and check if the SSD is now recognized in Windows 11.

Updating the SSD drivers ensures that you have the latest software to support optimal performance and compatibility with Windows 11.

Solution 6: Seek Professional Help

If none of these work to fix the problem where the SSD doesn’t show up in Windows 11, it could mean there is a bigger issue. In this situation, it is best to get help from computer techs or people who specialize in data recovery. They know how to figure out what’s wrong and have the right tools to fix any hardware or software problems that might be stopping the SSD from being seen.

Professional data recovery services can also help get data back from SSDs that can’t be accessed or are destroyed. If your info is important and can’t be lost, you might want to get help from a professional.

In Summary

Having trouble with your SSD not showing up in Windows 11 can be annoying, but if you follow the right steps to fix the issue, you can get back to using your SSD. You can fix this problem and make sure your SSD works properly by checking the hardware connections, initializing the SSD, giving or changing the drive letter, checking the BIOS settings, updating the SSD drivers, or getting help from a professional.

To keep your SSD drivers and operating system from becoming incompatible, make sure to keep them both up to date. By following these steps, you can easily fix the problem where the SSD is not showing up in Windows 11.

WireGuard vs OpenVPN: Most Important Differences

Protecting your privacy and safety online has become very important in today’s digital world. Virtual Private Networks (VPNs) are very important for keeping our private information safe and letting us stay anonymous online. We will look at the main differences between WireGuard vs OpenVPN in this guide. We will talk about encryption, security, speed, availability, and more. After reading this, you’ll have a good idea of which VPN protocol fits your needs the best.

WireGuard vs OpenVPN: The Differences

Before exploring the technical nuances, let’s take a brief look at the origins and characteristics of each VPN protocol.

OpenVPN

OpenVPN, developed by James Yonan and released in 2001, has established itself as a reliable and secure open-source VPN protocol. Its flexibility, compatibility across various operating systems, and ability to bypass firewalls and Network Address Translators (NATs) have contributed to its widespread adoption.

WireGuard

WireGuard is a new VPN system that aims to be better than IPsec and OpenVPN by being faster, easier to use, and using less resources. WireGuard has a small script of about 4,000 lines and uses the latest encryption methods and cryptographic building blocks to make sure it works well and is safe. WireGuard was first made for the Linux kernel, but it now works on Windows, macOS, BSD, iOS, Android, and other systems.

Encryption: Comparing the Approaches

Encryption forms the bedrock of any VPN protocol, determining the level of security and privacy it can provide. WireGuard vs OpenVPN employ distinct approaches when it comes to encryption.

  • OpenVPN’s Flexible Algorithms

OpenVPN leverages the OpenSSL Library to offer a wide range of encryption algorithms, including Camellia, DES, Triple DES, Blowfish, and AES. This flexibility allows users to tailor their encryption settings according to their specific requirements. However, the variable algorithms employed by OpenVPN’s codebase may result in a slight speed reduction compared to WireGuard.

  • WireGuard’s Speed-Optimized Design

WireGuard, on the other hand, focuses on speed and efficiency by taking a more simple method to encryption. For security reasons, it uses encryption methods like Poly1305 and ChaCha20, which are much faster. WireGuard limits the encryption algorithms that can be used, but the ciphers that are used are very safe and have been through a lot of testing and development.

Security and Privacy Considerations

When entrusting our data to a VPN protocol, we must assess its commitment to security and privacy. Let’s explore how OpenVPN and WireGuard approach these crucial aspects.

  • OpenVPN’s No-Log Policy

The strict “no-log” approach of OpenVPN makes it stand out. This means that the protocol doesn’t collect or keep any information that could be used to find out who someone is. As a result, users can feel safer about their privacy and identity. Privacy is important to OpenVPN, as shown by numerous third-party audits and its long-standing name in the VPN community.

  • WireGuard’s Data Storage Approach

WireGuard and OpenVPN have some differences in how they handle privacy. WireGuard keeps users’ IP addresses on the computer until the system is restarted by default. Some users may be worried about this, but it’s important to remember that many VPN providers have built their own protocols on top of WireGuard to reduce or remove this data storage risk. Using features like Network Address Translation (NAT) or multi-hop setups can also help protect your privacy and lessen any problems that might arise.

VPN Client: User-Friendliness and Compatibility

The user experience offered by VPN clients can significantly impact the overall satisfaction and ease of use. Let’s compare the client applications provided by OpenVPN and WireGuard.

  • WireGuard’s Growing Compatibility

While WireGuard was still in its early stages, there was only a Linux program available. This used to be the case, but now WireGuard has apps just for Windows as well as clients for other major operating systems. These clients make it easy for users to set up VPN tunnels and copy or export data. Keep in mind that you might need management rights to do some things with the WireGuard client.

  • OpenVPN’s User-Friendly Approach

OpenVPN has had its main Windows client, OpenVPN Connect, for a long time. This client has an easy-to-use interface that makes it simple to add accounts and import connection information by URL or file upload. OpenVPN Connect is a stable and easy-to-use VPN client, but it might not have all the advanced features that WireGuard’s client does. Additionally, OpenVPN works well with many other programs and is built into trustworthy VPN services such as NordVPN, Surfshark, and hide.me.

Speed: WireGuard’s Performance Advantage

Speed is without a question an important thing to think about when looking at VPN protocols. Come with me as I compare the speeds of WireGuard and OpenVPN. WireGuard is famous for being very fast; in many tests, it regularly performs better than OpenVPN. WireGuard had great download speeds—often exceeding 277.9 Mbps—during our tests, while OpenVPN had trouble going above 30.64 Mbps.

Because it has less latency and faster throughput, WireGuard is a great choice for online games and other activities that need fast connections. It’s important to remember, though, that OpenVPN still offers fast and stable connections that make browsing the web smooth.

Availability: OpenVPN’s Wider Support

When picking a protocol, availability across VPN providers is one of the most important things to think about. OpenVPN is currently supported by more VPN services than WireGuard, which is slowly but surely becoming more popular. OpenVPN is used by a huge number of VPN providers because it has a long history of being the best system. More VPN services are likely to use WireGuard in the future as it continues to get better and show what it can do.

Our Recommendation: Choosing the Right Protocol

The choice between WireGuard and OpenVPN ultimately depends on your specific priorities and use cases. Let’s summarize the key considerations to help you make an informed decision.

  • WireGuard: Streamlined Performance

WireGuard works best when speed and efficiency are important. It’s perfect for home users who want a fast and responsive VPN because its codebase is efficient and its security methods are optimized. However, WireGuard may not be as good for workplaces or people who want to stick to a “no-log” policy because it is still in its “experimental” phase and needs management rights in its client.

  • OpenVPN: Time-Tested Reliability

OpenVPN is a safe and effective VPN service that has been around for a long time and is used by many people. With its wide range of devices and operating systems support, thorough testing, and strict “no-log” policy, it’s a great choice for people looking for a VPN protocol that they can trust. While OpenVPN may not be as fast as WireGuard, it offers stable and reliable performance.

Also Read: How to Change Netflix Region Without VPN? (Bypass Netflix Region Lock)

In Summary

WireGuard is a good choice for people who want to get online quickly, while OpenVPN is still a popular choice because it is reliable and protects your privacy. You can figure out which protocol is best for your VPN needs by looking at your individual needs and preferences.

With the information provided in this guide, you are now equipped to make an informed decision between WireGuard and OpenVPN. Choose the protocol that aligns with your priorities, whether it’s optimized speed or time-tested reliability, and enjoy a secure and private browsing experience.

Apple TV vs Apple TV+: What Are Their Differences?

Apple has made a name for itself in the world of streaming services with two unique products: Apple TV and Apple TV+. Even though these names sound alike, they stand for different parts of Apple’s move into digital entertainment. This post will go into detail about Apple TV vs Apple TV+ and highlight their differences. We will look at their features, content, pricing, and other things.

What is Apple TV?

The main thing that Apple TV is a digital video player and streaming device that was made by Apple Inc. It connects your TV to a lot of different types of digital material, like movies, TV shows, music, photos, and videos. From the comfort of their living rooms, Apple TV users can access a wide range of streaming services, apps, and online sites.

With an HDMI cable, Apple TV connects to your TV and uses your current Wi-Fi network to give you easy access to a wide range of streaming services. The gadget has changed over the years, adding things like app shops, gaming features, and voice-activated features through Siri integration. This flexible gadget makes watching TV more enjoyable by letting you watch digital content in the comfort of your own living room.

What is Apple TV+?

Now, Apple TV+ is a streaming service that you sign up for and pay for. What is the difference between Apple TV and Apple TV+? Apple TV+ is a service that works on its own. It offers many unique things, like TV shows, movies, films, and more. Apple thinks that Apple TV+ will give people with a lot of different devices access to content that is only available on Apple TV.

Apple TV+ is an over-the-top (OTT) streaming service that began in 2019. It lets people watch TV shows and movies online without having to pay for cable. The site has a library of original shows with a lot of different themes and for a lot of different types of people. Well-known actors, directors, and writers work together on Apple TV+ to make one-of-a-kind and interesting shows that focus on new ways to tell stories and high production standards.

Apple TV vs Apple TV+: The Differences

To understand the differences between Apple TV vs Apple TV+, it is necessary to learn the basic concepts behind each service. Apple TV refers to the hardware device developed by Apple Inc., while Apple TV+ is the subscription-based streaming service that offers exclusive original content.

Apple TV plays media and streams material from numerous streaming providers and apps. The device connects to your TV and lets you watch movies, TV, music, and more.

However, Apple TV+ is a separate streaming service that works without Apple TV. Apple’s original content gives users unique access to high-quality entertainment.

Apple TV+ is available on smartphones, tablets, smart TVs, and gaming consoles, letting customers watch their favorite shows and movies anywhere.

Content Offerings

Content-wise, Apple TV and Apple TV+ differ greatly. Apple TV lets customers stream Netflix, Hulu, HBO Max, and more. It centralizes your streaming needs, making it easy to find and watch content from multiple providers.

Apple TV+ features Apple-made programming. Apple TV+ customers can watch exclusive TV series, movies, documentaries, and more. Apple TV+ connects famous actors, directors, and producers to create immersive stories with a focus on quality and creativity.

Apple TV+ delivers original and exclusive content to hook viewers while Apple TV offers a huge library of material from many providers. Apple TV+ subscribers get a growing library of Apple-produced episodes and movies, creating a unique streaming experience.

Compatibility

Their device compatibility is another major difference between Apple TV and Apple TV+. Apple TV may be linked to your TV and accessible via iOS, macOS, Roku, Fire TV, Xbox, PlayStation, and other smart devices. It’s made for a wide range of users and ecosystem compatibility.

Apple TV plus streams on more devices. Apple TV+ is available on smartphones, tablets, Macs, streaming boxes, and smart TVs. Apple TV+ has been made available on many platforms to reach more people.

Apple TV and Apple TV+ work on a range of devices, so customers can watch their favorite shows and movies on their TV, smartphone, or tablet.

Pricing

There is a pricing structure difference between Apple TV and Apple TV+. Depending on the model and features you choose, the price of the Apple TV hardware device varies. Storage capacity and other features can affect how much an Apple TV costs.

A subscription is required to access Apple TV+. Access to the platform’s exclusive content is accessible to subscribers for a monthly subscription. Apple TV+ is now available for $7 per month, with cheaper yearly contracts now on the market. New members can try out Apple TV+ for free during the trial period to see if it meets their needs.

Apple TV does not cost anything, but Apple TV+ does. While Apple TV gives customers access to a plethora of streaming applications and services, some of the material on those platforms may necessitate paying for a separate subscription or purchase.

Features and Benefits: Apple TV vs Apple TV+

When considering the features and benefits of Apple TV and Apple TV+, it is essential to understand their unique offerings.

Apple TV, as a hardware device, provides a user-friendly interface for navigating through various streaming services and apps. It offers features such as app stores, gaming capabilities, and integration with Siri for voice-activated commands. With Apple TV, users can enhance their television experience by accessing a wide range of digital content from different providers.

On the other hand, Apple TV+ focuses on delivering exclusive and high-quality original content to subscribers. The service aims to captivate audiences with its unique storytelling and exceptional production values. With Apple TV+, subscribers gain access to a growing catalogue of Apple-produced shows and movies, providing a curated selection of content that sets it apart from other streaming services.

Both Apple TV and Apple TV+ offer features and benefits that cater to different aspects of the streaming experience. Whether you are looking for a versatile streaming device or exclusive original content, Apple has options to suit your preferences.

Comparing Apple TV vs Apple TV+: Which One Should You Choose?

Now that you know what makes Apple TV and Apple TV+ different, the question is: which one should you get? In the end, the answer rests on what you want and need.

Apple TV might be a good choice for you if you want to watch a lot of different types of material from different providers. It connects all of your streaming services together, so you can watch movies, TV shows, music, and more on your TV. Apple TV gives you a flexible viewing experience because it works with many devices and has an easy-to-use interface.

On the other hand, Apple TV+ might be a better choice if you want to watch only Apple-made shows and movies. Apple TV+ subscribers can watch a growing library of shows and movies made by Apple. This carefully chosen material is what makes Apple TV+ different from other streaming services. If you like the way Apple tells stories and makes movies, Apple TV+ can give you a unique and fun viewing experience.

if you choose Apple TV as your streaming device, you can still sign up for Apple TV+ to watch material that is only available on that service. You can enjoy a lot of different content from different companies while also watching Apple’s own shows with these two services working together.

FAQs

  • Can I watch Apple TV+ content on Apple TV?

Yes, Apple TV allows you to watch Apple TV+ content on your television. Simply connect your Apple TV device to your television and access the Apple TV+ app to enjoy exclusive Apple-produced shows and movies.

  • Do I need an Apple device to watch Apple TV or Apple TV+?

While Apple devices offer a seamless integration with Apple TV and Apple TV+, both services are accessible on various platforms. Apple TV can be accessed on devices such as Roku, Fire TV, Xbox, PlayStation, and many other smart devices. Similarly, Apple TV+ is available on smartphones, tablets, Mac computers, Apple TV streaming boxes, and select smart TVs.

  • Do I need to pay separately for content on Apple TV and Apple TV+?

Apple TV allows you to access various streaming services and apps, some of which may require separate purchases or subscriptions. Apple TV+ operates on a subscription-based model, requiring a monthly fee to access its exclusive content.

  • Can I try Apple TV+ before subscribing?

Yes, Apple TV+ offers a free trial period for new subscribers. This allows you to experience the service and explore its exclusive content before committing to a subscription.

In Summary

At the end of the day, Apple TV and Apple TV+ are two different parts of Apple’s move into digital entertainment. Apple TV is a flexible streaming device that lets you use a number of streaming services and apps on your TV. A subscription to Apple TV+, gives you access to material that is only available on that service. There are different features, material, and pricing plans for each service, so users can make their streaming experience fit their needs. If you want to stream, Apple has choices for you, whether you choose Apple TV, Apple TV+, or both.

How to Turn On WiFi on LG TV? (Quick Tips to Solve Problems)

Are you struggling to connect your LG smart TV to WiFi? Don’t worry, setting up a WiFi connection on your LG TV is usually a straightforward process.  This guide has everything you need to know on how to turn on WiFi on LG TV, fix common WiFi connection problems, and look at other ways to connect to the internet.

How to Turn On WiFi on LG TV?

Although LG smart TVs have a lot of features and can stream content, you need to connect them to the internet to get the most out of them. If your LG TV is connected to WiFi, you can watch your favorite shows, browse the web, and use different apps. This step-by-step guide will help you whether you are setting up a new TV or having trouble connecting it.

To turn on WiFi on your LG TV, Here are some easy steps:

  • Press the Home button on your LG remote to access the home menu.
  • Navigate to the Settings option on the top right of the screen.
  • Select Network from the settings menu.
  • Choose Wi-Fi Connection to access the wireless network settings.
  • A list of available networks will appear. Select your home network.
  • Enter the password for your WiFi network if prompted.
  • Finally, select Connect to establish a connection to your WiFi network.

If you did these things, your LG TV should now be able to connect to the internet through WiFi. Your LG smart TV lets you watch videos and use a number of online services without any problems.

How to Fix Common WiFi Connection Problems?

Sometimes, when you try to connect your LG TV to WiFi, you might have trouble. Why these problems happen and how to fix them:

Update your TV’s location

LG TVs often face connectivity issues when the location is set to “Set Automatically.” To fix this, manually update the location of your TV:

  • Go to All settings > General > Location > LG Service Country.
  • Select a random country on the list (not your actual country).
  • The TV will reset.
  • Go back to the location settings and select your actual country.
  • After the TV resets again, open the location settings and select Set Automaticall.
  • You will be prompted to set up your WiFi connection, and after logging in, your internet should be working again.

“WiFi is turned off” message

If you receive a “WiFi is turned off” message on your LG TV, it could be due to a crimped WiFi cable inside the TV. To fix the problem, do these things:

  • Place the TV face down on a flat surface.
  • Remove the back cover of the TV.
  • Look at the flat silver wires that come from the WiFi module at the base. If they are bent or folded over, straighten them out carefully.
  • Replace the back cover of the TV and try reconnecting to WiFi.

WiFi connection drops in and out

If your LG TV keeps losing the WiFi connection, try the following tips:

  • Move your wireless router closer to your TV for a stronger signal.
  • Consider using an Ethernet cable for a more stable connection.
  • Remove any nearby devices that could interfere with the WiFi signal, such as baby monitors or cordless phones.
  • Check if any external hard drives connected to the TV’s USB port are causing interference.
  • If these steps don’t fix the problem, you should call your internet service provider for more help.

Turn off Quick Start

The “Quick Start” feature on some LG TVs can sometimes cause connectivity issues. Follow these steps to turn it off:

  • Go to the Settings menu and select All Settings.
  • Choose General from the options.
  • Scroll down to the Quick Start option and turn it Off.
  • Make sure your TV is not plugged in and turn it off.
  • Press the power button on your TV for 30 seconds.
  • Plug the TV back in and turn it on. Try reconnecting to the WiFi network.

Your network doesn’t appear in the list

If your WiFi network doesn’t appear in the list of available networks on your LG TV, try the following:

  • Check that your WiFi router is turned on.
  • Ensure that the router is near the TV without any obstacles like walls in between.
  • Unplug both the TV and router, wait for 30 seconds, then plug them back in
  • Both devices should restart, and your network should appear in the list.

Software updates

Outdated software on your LG TV can sometimes cause WiFi connectivity issues. Check for software updates using the following steps:

  • Press the Settings menu on your remote.
  • Select All settings.
  • Choose General.
  • Select About this TV
  • Select Check for Updates.
  • If your TV requires an update, connect it to the WiFi using an Ethernet cable to download the updates.

Unable to join with an incorrect password

Double-check that you have entered the correct password for your WiFi network. Passwords are case-sensitive, so ensure you enter both uppercase and lowercase letters correctly. You can also choose the “show password” option to verify what you are typing. If the issue persists, contact your internet service provider for assistance.

In Closing

Connecting your LG TV to WiFi opens up a world of possibilities, including seamless streaming and access to a diverse choice of online entertainment. By following the steps in this tutorial, you can simply enable WiFi on your LG TV and troubleshoot typical connectivity issues. Remember to keep your TV’s software up to date, and if WiFi fails, consider alternative methods of connecting.

How to Turn off Vanish Mode on Instagram (Complete Guide)

Instagram added a feature called “Vanish Mode” that lets users send messages, photos, and videos that disappear in their chats. This feature provides an extra layer of privacy and ensures that your conversations remain temporary. We will explore how to turn off Vanish Mode on Instagram and provide a detailed understanding of what Vanish Mode is and how it works. We’ve got you covered whether you want to get back in charge of your disappearing messages or are just interested in this tool.

Why Using Vanish Mode is a Good Idea?

There are several benefits to using Vanish Mode on Instagram:

  • Enhanced Privacy: Vanish Mode ensures that your messages vanish without a trace, providing an added level of privacy for sensitive conversations.
  • Reduced Clutter: With Vanish Mode, your chat threads stay clean as messages are automatically deleted after being viewed, reducing message overload.
  • Playful and Casual Chats: Vanish Mode adds a fun and fleeting vibe to your conversations, making it perfect for casual chats with friends.

How to Turn off Vanish Mode on Instagram

If you want to disable Vanish Mode and keep your messages visible, you can easily turn it off using the following methods:

  • To turn off Vanish Mode for all your chats, follow these steps:
  • Open the Instagram app on your device.
  • Tap the Messenger or DM icon to access your direct messages.
  • Tap the three-dot menu icon in the top right corner.
  • Select “Settings” from the menu.
  • In the Settings menu, choose “Privacy” or “Privacy and Security”.
  • Look for the option related to Vanish Mode and toggle it off.
  • Once Vanish Mode is disabled in your chat settings, your messages will no longer disappear after being viewed.

How to Turn off Vanish Mode for Individual Chats

If you only want to turn off Vanish Mode for specific chats, you can do so by following these steps:

  • Open the Instagram app on your device.
  • Tap the Messenger or DM icon to access your direct messages.
  • Select the chat for which you want to disable Vanish Mode.
  • Look for the Vanish Mode toggle switch within the chat settings.
  • Toggle the switch off to disable Vanish Mode for that specific chat.

Things to Think About When You Use Vanish Mode

While Vanish Mode can be a useful feature, there are a few things to keep in mind when using it:

Discretion and Privacy

Vanish Mode on Instagram gives you extra privacy by making sure that your messages are erased after they have been read. This can be helpful for private talks that you don’t want to be saved forever. Still, keep in mind that photos can be taken even when Vanish Mode is turned off. Be careful when sharing private information.

Limitations of Vanish Mode

It’s worth noting that Vanish Mode is only available for one-on-one chats and does not work in group chats. Additionally, messages sent in Vanish Mode cannot be recovered once they’ve disappeared, so be mindful of this when using the feature.

FAQ

  • Can Vanish Mode messages be recovered?

No, messages sent in Vanish Mode cannot be recovered once they’ve disappeared. This is because the purpose of Vanish Mode is to provide temporary and ephemeral conversations.

  • Can screenshots be taken in Vanish Mode?

While Vanish Mode is designed to prevent screenshots, it’s important to note that some devices or third-party apps may still allow users to take screenshots. To ensure maximum privacy, it’s recommended to avoid sharing sensitive or intimate content in Vanish Mode chats.

  • Can you see when someone turns off/turns on Vanish Mode on Instagram?

No, when someone turns off/on Vanish Mode in a chat, the other person will not receive a notification or any indication that Vanish Mode has been enabled/disabled.

  • Can you save chats in Vanish Mode?

No, chats sent in Vanish Mode are designed to disappear after being viewed. They cannot be saved, copied, or forwarded by either participant in the conversation.

Final Thoughts

Vanish Mode on Instagram is a unique way to talk to your friends in private for a short time. Adding an extra layer of privacy makes sure that your texts disappear after being read. However, it’s important to know what this feature can’t do and what risks it might pose. If you follow this guide, it will be easy to turn on or off Instagram’s “Vanish Mode” and control which messages disappear. Keep in mind that photos can still be taken in Vanish Mode, so be careful when sharing private information.

Best Portable Printer of 2024 (List of Top Models)

Portable printers are getting more and more popular because they are small, light, and easy to use with battery power. A portable printer gives you the freedom and flexibility you need, so we will talk about the best portable printers in this guide. Our objective is to give you all the details you need to make a smart choice and pick the best portable printer for your unique requirements and tastes.

Why Portable Printers Are Better Than Traditional Printers?

Portable printers offer several advantages over traditional printers, making them a popular choice for individuals on the go. Here are some key advantages to consider:

  • Portability: As the name suggests, portable printers are designed to be lightweight and compact, making them easy to carry around in a bag or backpack. This makes them ideal for students, business professionals, and anyone who needs to print while traveling.
  • Wireless Connectivity: Portable printers come with various connectivity options, such as Wi-Fi and Bluetooth, allowing you to print wirelessly from your laptop, tablet, or smartphone. This eliminates the need for cumbersome cables and provides the convenience of printing from anywhere within range.
  • Print Quality: Despite their smaller size, portable printers do not compromise on print quality. Many models are specifically designed for photo printing and deliver impressive results, especially when used with the right photo paper. This makes them a great option for photographers or anyone who values high-quality prints.
  • Battery Power: One of the key features of portable printers is their ability to operate on battery power. This means you can print without being tied to a power source, making them perfect for outdoor events, business meetings, or when you’re on the move.
  • Versatility: Portable printers are versatile devices that can handle a variety of printing tasks, from documents and photos to labels and receipts. Some models even offer additional features like scanning and copying, making them a convenient all-in-one solution.

Best Portable Printer of 2024 (Top Models)

We can tell you about some aspects that you should look for in the best portable printers in a general sense. To get the most up-to-date information, you might want to look at our newest reviews:

The Brother PocketJet PJ-773 is a top contender when it comes to portable printers. Utilizing thermal print technology, this printer requires no ink and is incredibly compact. It can easily fit into a bag or briefcase, making it ideal for travel.

The printer offers a print speed of 8 pages per minute and supports paper sizes up to A4. With built-in Wi-Fi, Bluetooth, and USB connectivity options, it provides seamless wireless printing from various devices. The PocketJet PJ-773 delivers detailed prints and is suitable for text-oriented documents. However, it may not be the best choice for those looking for complex graphics or vibrant photo prints.

Pros of the Brother PocketJet PJ-773 Portable Printer:

  • Inkless thermal print technology eliminates the need for ink cartridges.
  • Compact and lightweight design for easy portability.
  • Multiple connectivity options for wireless printing.
  • High-quality prints with sharp details.

Cons of the Brother PocketJet PJ-773 Portable Printer:

  • Requires thermal paper for printing.
  • Prints mostly in black and white.
  • Limited printing speed compared to larger office printers.

The Epson WorkForce WF-110 is a portable inkjet printer that offers excellent print quality in a compact size. With a resolution of 5,760 x 1,440 dpi, this printer produces vibrant and detailed prints. It supports paper sizes up to A4 and has a paper capacity of one sheet.

The WF-110 features Wi-Fi Direct and USB connectivity, allowing for easy printing from laptops, tablets, and smartphones. It is powered by a rechargeable battery, making it perfect for on-the-go printing. However, the WF-110’s printing speed is relatively slow compared to some other portable printers.

Pros of the Epson WorkForce WF-110 Portable Printer:

  • Compact and lightweight design.
  • High-resolution prints with vivid colors.
  • Supports wireless printing from various devices.
  • Rechargeable battery for portable use.

Cons of the Epson WorkForce WF-110 Portable Printer:

  • Costly ink cartridges.
  • No automatic duplex printing.
  • Slower print speed compared to other models.

The Canon PIXMA TR150 is a portable inkjet printer that offers both compact design and high print quality. It supports paper sizes up to A4 and has a paper capacity of 50 sheets. With Wi-Fi and optional battery power, this printer provides convenience and portability.

The TR150 is compatible with AirPrint and Google Cloud Print, allowing for easy printing from mobile devices. It is also equipped with the Canon Easy-PhotoPrint Editor app, which offers various templates and customization options. However, the cost of ink cartridges for the TR150 can be expensive.

Pros of the Canon PIXMA TR150 Portable Printer:

  • Compact and lightweight design.
  • Optional battery power for on-the-go printing.
  • Wireless connectivity for easy printing from mobile devices.
  • Canon Easy-PhotoPrint Editor app for customization.

Cons of the Canon PIXMA TR150 Portable Printer:

  • Expensive ink cartridges.
  • Limited paper capacity.
  • Not suitable for large document printing.

Included in the list of the best portable printer of 2024, the HP OfficeJet 200 is a portable inkjet printer that offers a balance of portability and functionality. With a print speed of 10 pages per minute, it can handle a variety of printing tasks. The printer has a paper capacity of 50 sheets and supports paper sizes up to A4. It offers wireless connectivity options such as Wi-Fi and Bluetooth, allowing for easy printing from laptops, tablets, and smartphones.

The OfficeJet 200 is powered by a rechargeable battery, making it suitable for on-the-go use. However, the cost of ink cartridges for the OfficeJet 200 can be a drawback for some users.

Pros of the HP OfficeJet 200 Mobile Printer:

  • Compact and lightweight design.
  • Wireless connectivity for easy printing.
  • Rechargeable battery for portable use.
  • Suitable for a variety of printing tasks.

Cons of the HP OfficeJet 200 Mobile Printer:

  • Expensive ink cartridges.
  • No automatic duplex printing.
  • Limited paper capacity.

The Fujifilm Instax Link WIDE is a portable printer specifically designed for instant smartphone photos. It uses a unique instant film technology to produce prints without the need for ink cartridges. The printer supports paper sizes of 86 x 108mm and has a paper capacity of 10 sheets.

With Bluetooth connectivity and the Instax Link Wide app, users can easily print photos from their smartphones. The Instax Link WIDE is compact and lightweight, allowing for easy portability. However, the printing speed of this printer is relatively slow compared to other models.

Pros of the Fujifilm Instax Link WIDE Portable Printer:

  • Unique instant film technology for instant prints.
  • Compact and lightweight design.
  • Bluetooth connectivity for easy printing from smartphones.
  • Fun and creative printing experience.

Cons of the Fujifilm Instax Link WIDE Portable Printer:

  • Expensive photo film.
  • Slow printing speed.
  • Limited paper capacity.

Things to Think About Before Buying a Portable Printer

When choosing the best portable printer for your needs, there are several factors to consider. Here are some key considerations to keep in mind:

  • Size and Weight: The size and weight of the printer are important factors to consider, especially if you plan to carry it with you frequently. Look for a compact and lightweight model that can fit easily into your bag or backpack without adding unnecessary bulk.
  • Connectivity Options: Check the connectivity options offered by the portable printer, such as Wi-Fi, Bluetooth, or USB. Ensure that the printer is compatible with your devices, whether it’s a laptop, tablet, or smartphone, to ensure seamless wireless printing.
  • Print Speed: Consider the print speed of the portable printer, especially if you frequently need to print large documents or photos. Look for a model that offers fast printing without compromising on print quality.
  • Print Quality: Evaluate the print quality of the portable printer, particularly if you need to print high-resolution photos or detailed documents. Look for models that offer high DPI (dots per inch) for crisp and clear prints.
  • Battery Life: If you plan to use the printer on the go, battery life is a crucial factor to consider. Look for a portable printer with a long battery life that can last through your printing needs without frequent recharging.
  • Printing Costs: Consider the cost of ink or thermal paper for the portable printer. Some models may have expensive consumables, which can add up over time. Evaluate the printing costs to ensure it fits within your budget.
  • Additional Features: Some portable printers offer additional features such as scanning, copying, or mobile app integration. Assess your specific needs and look for models that offer the features that will enhance your printing experience.

In Summary

For those who need to print while they’re on the go, portable printers have become important tools. Thanks to their small size, wireless connection, and battery power, they can be used for a wide range of printing tasks. Think about things like size, weight, connectivity choices, print speed, print quality, battery life, and printing costs when picking the best portable printer for your needs.

You can choose the best portable printer for your needs by carefully considering these factors and looking at the best models on the market in 2024. A portable printer will give you the freedom and convenience to stay busy on the go, whether you’re a student, a worker, or someone who just loves printing photos.

How to Make a Reel on Facebook (Ultimate 2024 Guide)

Facebook has also added a new feature called Reels that lets users make and share short videos on the site. Reels on apps like TikTok and Instagram are becoming more and more popular. Facebook has now joined the trend to give its users a fun and interesting way to express themselves. We will show you how to make a reel on Facebook, from making the video to sharing it with your friends and fans.

Facebook Reels: A Beginner’s Guide

Facebook Reels are short videos that are typically between 15 and 60 seconds in length. They are designed to be creative and entertaining, allowing users to showcase their talents, share funny moments, or simply express themselves in a concise and engaging format. Like TikTok and Instagram Reels, Facebook Reels can be improved with music, effects, filters, and text overlays to make them look better and be more interesting to watch.

How to Make a Reel on Facebook?

The following straightforward actions are required in order to create a Facebook Reel:

Launch the Facebook App

Start by opening the Facebook app on your mobile device. Ensure that you have the latest version of the app installed to access the Reels feature.

Access the Reels Tab

Once you are on the Facebook app, locate the camera icon in the top-left corner of your screen and tap on it. This will take you to the Facebook camera interface. Next, tap on the Reels option, which is located at the bottom of the screen. This will switch your camera mode to Reels.

Choose Your Content

Now that you are in the Reels mode, you can choose whether to capture new footage or select videos and photos from your camera roll. If you choose to capture new footage, you can use the various tools and features available to enhance your video.

Record and Edit Your Reel

When you are ready to start recording your Reel, tap on the Record button. You can record multiple short clips to create a seamless and engaging video. While recording, you can experiment with different effects, filters, and audio options to make your Reel more visually appealing and entertaining.

Add the Finishing Touches

Once you have finished recording your Reel, you can further enhance it by adding text overlays, stickers, or additional audio. You can also adjust the speed of your video or apply filters to give it a unique look. Take your time to explore the editing options available and make your Reel truly stand out.

Share Your Reel

After you have perfected your Reel, it’s time to share it with your friends and followers. Tap on the Next button to proceed to the sharing options. Here, you can add a caption, tag friends, and choose the audience who can view your Reel. You can select from options such as Public, Friends, Friends except…, or Only me, depending on your preferences.

Post Your Reel

Once you have customized the sharing settings, tap on the Share Reel button to post your video. Your Reel will now be visible on your Facebook feed and can be enjoyed by your friends and followers.

The Best Ways to Make Facebook Reels

Now that you know how to make a Reel on Facebook, let’s explore some best practices to make your videos more engaging and increase their reach:

Be Authentic and Creative

When creating a Facebook Reel, it’s important to let your authentic self shine through. Be creative and showcase your unique talents, skills, or interests. Think outside the box and experiment with different ideas to create captivating and original content.

Keep it Short and Sweet

Facebook Reels are designed to be short and concise, so make sure to keep your videos within the recommended time frame of 15 to 60 seconds. This allows viewers to consume your content quickly and increases the chances of them watching it in its entirety.

Use Captivating Visuals and Effects

To grab the attention of your audience, incorporate visually appealing elements into your Reels. Experiment with filters, effects, and transitions to make your videos more dynamic and engaging. This will help your content stand out and leave a lasting impression on viewers.

Choose the Right Music

Music can greatly enhance the mood and impact of your Reel. Facebook provides a library of licensed songs that you can choose from to add background music to your videos. Select a track that complements the theme or message of your Reel to create a more immersive and enjoyable viewing experience.

Optimize Your Captions and Descriptions

When posting your Reels on Facebook, take the time to craft compelling captions and descriptions. Use relevant hashtags to increase the discoverability of your content and ensure that your captions provide context or add value to the video. This will encourage viewers to engage with your Reel and leave comments or likes.

Engage with Your Audience

Building a community around your Reels is essential for long-term success. Respond to comments, engage with your viewers, and consider collaborating with other creators to expand your reach. Encourage viewers to share your Reels with their friends and engage in meaningful conversations around your content.

Analyze and Iterate

Pay attention to the performance of your Reels and analyze the engagement metrics, such as views, likes, comments, and shares. This data will help you understand what resonates with your audience and allow you to iterate and improve your content over time. Experiment with different styles, themes, and formats to find the ones that generate the most positive response.

Also Read: How to Unlink Facebook from Instagram? (Fastest Methods)

In Summary

The Facebook Reels feature is fun because it lets users make and share short videos that keep people interested. You can start making interesting Reels on Facebook by following this guide. To build a strong community around your products, remember to be real, try out different features, and interact with your audience.

Exit mobile version