How to Delete a Repost on TikTok (Step-By-Step)

TikTok, the popular social media platform, offers users the ability to repost videos, allowing them to share content with their followers. However, there may be instances where you want to delete a repost. Whether it was an accidental repost or you simply changed your mind, this guide will show you how to delete a repost on TikTok with the best way possible.

What is TikTok Repost and How Do You Use It?

When you repost a video on TikTok, it appears in your followers’ feeds as if it’s your own content. However, it’s important to note that deleting a repost does not remove the original video from the platform. It only removes your repost of that particular video.

You need to know how to share a video on TikTok before you can delete one. Reposting can be a good way to share information and interact with your audience. To share a video again, tap on the share icon, which is generally a right arrow. Here’s the next step: In the “Share To” box, choose “Repost.” Next, the video will be reposted to your profile, and it will appear in your followers’ feeds.

Reasons to Delete a Repost on TikTok

There could be several reasons why you might want to delete a repost on TikTok. Here are a few common scenarios:

  • Changing your mind: Sometimes, you may repost a video and later decide that you no longer want it on your profile.
  • Copyright concerns: If you reposted a video without giving proper credit to the original creator, you may receive a copyright warning and choose to delete the repost.
  • Accidental repost: The repost button on TikTok is located close to other sharing options, making it easy to tap unintentionally.
  • Disassociation: If you no longer want to endorse someone or a brand, deleting reposts associated with them can be a way to disassociate yourself.

How to Delete a Repost on TikTok?

Once you have located the reposted video, follow these steps to remove it from your account:

  • Open the video by tapping on it.
  • On the right side of the video, you will see a share icon (usually represented by a right-arrow). Tap on it.
  • In the “Share To” menu that appears, look for the option labeled “Remove Repost” and tap on it.
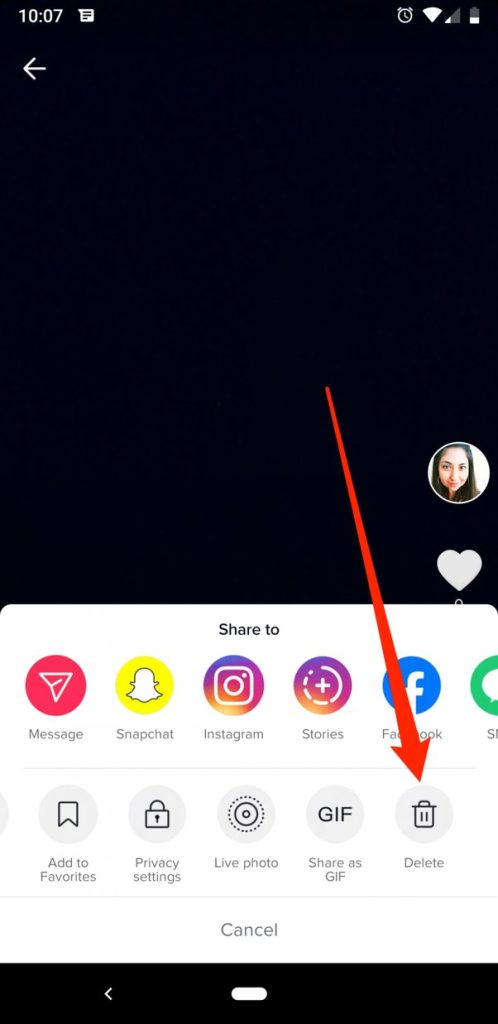
  • You should see a confirmation message at the top of the screen indicating that the repost has been successfully deleted.

Additional Methods to Find and Delete Reposts

If the reposted video doesn’t immediately appear in your profile or if you are having trouble finding it, here are a few additional methods you can try:

Method 1: Watch History

TikTok allows you to track your watch history for up to seven days. You can use this feature to find the reposted video you want to delete. Follow these steps:

  • Tap on your profile icon at the bottom of the screen.
  • Look for the three dots at the top corner of your screen and tap on them.
  • Select “Settings and Privacy” from the menu.
  • Choose “Comment and Watch History.”
  • Tap on “Watch History” to access the videos you have watched.
  • Look for the target video in your watch history.
  • Once you find it, follow the steps mentioned earlier to delete the repost.

Method 2: Ask a TikTok Friend

If you are still having trouble finding the reposted video, you can ask a TikTok friend to message the video to you if it’s in their feed. This way, you can easily locate the video and delete it from your account.

How to Turn Off TikTok Repost?

If you have had negative experiences with the repost feature or simply want to avoid accidentally reposting videos in the future, you can turn off the repost button. Here’s how:

  • Tap on your profile icon at the bottom of the screen.
  • Look for the three stacked lines at the top right and tap on them.
  • Select “Settings and Privacy” from the menu.
  • Choose “Notifications.”
  • Toggle off the option for video repost.
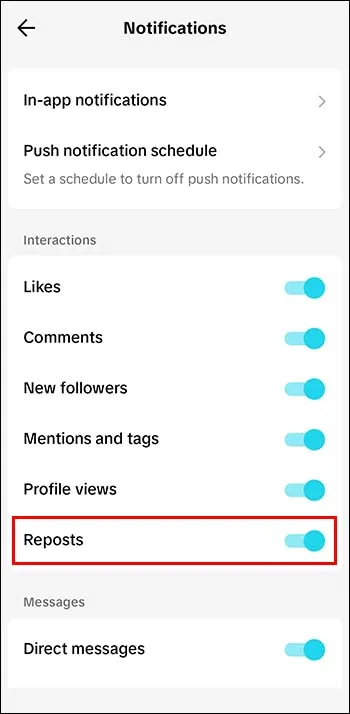
  • The repost button will no longer be visible on TikTok.
  • You can turn on the repost button again by following the same steps and toggling the option back on.

Also Read: Download TikTok Video Without Posting: On Android and iPhone)

Final Words

Deleting a repost on TikTok is a simple process that can be done in a few easy steps. Whether you accidentally reposted a video or simply changed your mind, following the instructions outlined in this guide will help you successfully remove the repost from your account. Remember to always give credit to the original creators and consider the reasons why you want to delete a repost. With these tips, you can effectively manage your TikTok feed and ensure a positive user experience.

How to Replace AirTag Battery [Step-By-Step]

Do you use an Apple AirTag? If so, you might be thinking about how to get a new battery when the old one dies. While Apple says that an AirTag’s battery should last about a year, it’s always smart to be safe than sorry. Today, we will show you how to replace AirTag battery in a quick way. This guide is simple to follow, no matter how tech-savvy you are or how new you are to it.

Why AirTag Batteries Need to be Changed?

Before we talk about how to replace the battery in AirTag, let’s talk about why it’s important to do so. The charge in your AirTag will run out on its own over time. You may notice that Bluetooth and UWB signal ranges get shorter as the battery level drops, and the Find My app’s precision finding feature may stop giving you correct distance information.

You may also get messages and alerts through the Find My app when your battery is low. It is suggested that you change the battery in your AirTag once a year to get the best performance and avoid any problems.

How to Replace AirTag Battery

If you want to safely change the battery in your AirTag, follow these steps:

Materials Needed

To replace the battery in your AirTag, you’ll need a few materials. Gather the following items before you begin:

  • A new CR2032 coin cell battery: This standard 3V lithium battery is commonly used in watches, remotes, and other small electronic devices. Make sure that you purchase an authentic battery from a reputable retailer.
  • A non-conductive pry tool: You’ll need a thin plastic pry bar or portable tool to safely open the AirTag casing. Avoid using metal tools, as they can damage the components.
  • A soft lint-free cloth: This will be used to clean the AirTag and remove any fingerprints or smudges on the surface.
  • Disposable gloves (optional): If you prefer, you can wear disposable gloves when handling used batteries to avoid skin exposure to battery acid.

Prepare the AirTag

Once you have these materials ready, we can proceed with the battery replacement process but before you begin the battery replacement process, remove the AirTag from any accessories it’s attached to, such as a keychain or luggage tag. This will give you direct access to the device.

Open the AirTag Casing

  • Locate the thin seam running along the edge of the AirTag casing. This seam is where you’ll pry open the casing.
  • Take your non-conductive pry tool and gently insert it into the seam gap. Slowly twist the tool to widen the gap.

Continue prying all the way around the perimeter of the AirTag until the plastic casing pops open. Be cautious not to use excessive force or bend the AirTag excessively.

Remove the Old Battery

Once the AirTag casing is open, you’ll see the old CR2032 battery inside. Gently lift the battery out of the holder, taking care not to damage any internal components. There are two options you can try if you come across a CR2032 battery that is treated in bitterant and might not work with AirTags:

  • Option 1: Look for a brand of battery known to be compatible with AirTags. Check the packaging for compatibility information.
  • Option 2: If you already have a bitterant-coated battery, you can slightly scratch off the coating using a sandpaper sheet. Ensure that the battery contacts are not damaged during this process.

Insert the New Battery

  • Check that the new battery you have is a CR2032 and that the positive side (marked “+”) is facing up.
  • Using disposable gloves (optional), carefully place the new battery into the holder, ensuring that it is firmly seated.
  • Double-check that the battery is properly aligned and securely in place. You should hear a click or chirping sound, indicating that the battery is recognized.

Reseal the AirTag

  • Align the front and back pieces of the AirTag casing.
  • Firmly press the casing shut with your hands, ensuring that it clicks back into place. Take care not to apply excessive force or damage the plastic casing.
  • Once the AirTag is resealed, reattach it to its accessory or item.

Test and Verify

  • Open the Find My app on your Apple device and check that the AirTag appears connected with a good battery level.
  • Navigate to the “Items” tab in the Find My app, select your AirTag, and look at the battery level indicator. If it shows a healthy battery level, the replacement was successful.

Final Words

You may easily and quickly replace the battery in your AirTag so that your item tag continues to function properly. You can save yourself the trouble of dealing with a dead battery by keeping an eye on the level and replacing it annually. With the correct equipment, care, and following our guide, you can simply learn how to change AirTag battery and continue to track your assets. Do the right thing when you throw away old batteries and keep them out of children’s reach.

How to Appear Offline on Xbox One/Series X/S in 2024

When you play games online, sometimes you just want to play by yourself, without friends or party invites getting in the way. Xbox has a tool that lets you look like you’re not online, so you can play games without anyone bothering you. This guide will show you how to appear offline on Xbox One, Xbox Series X, or Xbox Series S.

Why You Need to Appear Offline on Xbox One/Series X/S?

Before we get into the details of how to appear offline on Xbox, let’s explore why this feature is essential for many gamers. Appearing offline offers several benefits:

  • Privacy: Appearing offline allows you to maintain your privacy by concealing your online status from friends and other players.
  • Solo Gaming: Sometimes, you just want to enjoy a single-player game without any distractions or interruptions. Appearing offline ensures that you can focus on your gaming experience without any distractions.
  • Avoiding Invites: Appearing offline prevents you from receiving party chat or game invites, giving you the freedom to choose when and with whom you want to play.

Now that you understand the importance of appearing offline, let’s explore the step-by-step process for Xbox One, Xbox Series X, and Xbox Series S.

How to Appear Offline on Xbox One/Series X/S?

It has two ways, which we will talk about one at a time.

Method 1: Xbox Console

Xbox One
  • To appear offline on the Xbox One, follow these simple steps:
  • Sign into your Xbox account on the console.
  • Press the Home button twice or access the online/shortcuts panel.
  • Select the User Icon from the pop-up menu.
  • Choose “Shortcuts” and then “My Profile.”
  • Among the options presented, select “Appear Offline.
Xbox Series X/S

If you’re using an Xbox Series X or Xbox Series S, follow these steps to appear offline:

  • Access the Home Screen on your console.
  • Press the up arrow on the Xbox controller’s D-Pad to highlight your profile at the top of the page.
  • Select your Profile Picture.
  • Scroll down to find the “Appear Online” option.
  • Choose “Appear Offline” from the three available options (Appear Online, Appear Offline, and Do Not Disturb).
  • Exit the profile page to activate the offline status.

Method 2: Xbox Mobile App

If you prefer to manage your online status on the go, you can use the Xbox mobile app. Here’s how to appear offline on the mobile app:

  • Download and launch the Xbox mobile app on your smartphone.
  • Log in with the same credentials you use on your Xbox console.
  • Tap on your Profile Picture located at the bottom right side of the screen.
  • Select “Appear Offline” under the Profile Picture and Name.
  • Your Xbox status will change to “Offline.”

Who Can See Your Online Status? (Change It)

In addition to appearing offline, Xbox offers customization options for your online status. This allows you to control who can see your online presence and provides further privacy measures. Here’s how to customize your online status on Xbox One/Series X/S:

  • Press the Xbox button on your controller to open the quick menu.
  • Navigate to your profile, indicated by your gamer picture, and select it.
  • Click on “My Profile” to access your profile information.
  • On the right-hand side of the screen, you’ll see three options: Appear Offline, Customize Profile, and Privacy Settings.
  • Choose “Customize Profile” to access further customization options.

From here, you can adjust settings such as who can see your online status, what others can see on your profile, and your game/app history.

Additional Important Tips and Tricks

At this point, you undoubtedly have a decent understanding of the process of appearing offline on Xbox; however, it would be beneficial to acquire other recommendations.

  • Setting the Xbox to Offline vs. Appearing Offline: It’s important to know the difference between these two options. Friends won’t be able to tell that you’re online if you make it look like you’re not, but you can still play games and connect to Xbox services. However, if you set the Xbox to offline, it will no longer link to any Xbox services. Choose the right choice based on how private and useful you want it to be.
  • Privacy for Online Status: You can change your private settings to further control who can see that you are online. Go to Profile & System > Settings > Account > Privacy & online safety > Xbox Live privacy on your Xbox. Here, you can choose which people, including friends, can see if you’re online.
  • Making the Change Between Online and Offline: Just follow the steps above and choose the right choice based on your current preference if you want to change between looking online and offline.

In Closing

You now have the ability to take charge of your online presence on Xbox One, Xbox Series X, and Xbox Series S thanks to the guidelines and suggestions that are provided here. You can choose when you wish to socialize with your pals and enjoy uninterrupted gaming sessions. Don’t forget that if you appear offline, you will have the flexibility to play games on your own terms.

How to Add Grammarly to Google Docs (Step-By-Step)

Google Docs is a well-known word processor that lets users work together and save time. Google Docs does have a built-in spelling and grammar checker, but it might not catch all of your mistakes and make your work better overall. This is where Grammarly comes in handy. Grammarly is the best way to improve your writing in Google Docs because it has a strong AI writing assistant and full grammar and spell-checking features. We will show you how to add Grammarly to Google Docs in this post.

First Things First: Download Google Chrome

Make sure you have Google Chrome on your computer before we start walking you through how to add Grammarly to Google Docs. If you want to use Grammarly with Google Docs, you should use Google Chrome. In case you don’t already have Google Chrome, you can get it from the Google Chrome page for free.

How to Add Grammarly to Google Docs in Google Chrome

Once you have Google Chrome installed, follow these steps to add Grammarly to Google Docs:

  • Open Google Chrome and go to the Chrome Web Store.
  • In the search bar, type “Grammarly” and press Enter.
  • Click on the “Grammarly for Chrome” extension from the search results.
  • On the extension page, click the “Add to Chrome” button.
  • A dialog box will appear asking for confirmation to add the extension. Click “Add extension” to proceed.
  • Once the extension is installed, a new tab will open, prompting you to sign in or create a Grammarly account. Sign in with your existing account or create a new one.
  • After signing in, Grammarly will be accessible in your Chrome browser.

How to Enable Grammarly on Google Docs

To enable Grammarly in Google Docs, follow these simple steps:

  • Open Google Docs in your Google Chrome browser.
  • You can either start a new document or access an existing one.
  • In the toolbar at the top of the Google Docs interface, click on the “Extensions” option.
  • From the drop-down menu, select “Grammarly for Chrome”.
  • The Grammarly icon will appear in the bottom-right corner of the page.
  • Click on the Grammarly icon and toggle the “Check for writing suggestions on Google Docs” switch to enable Grammarly in Google Docs.

Now Grammarly is enabled and ready to help you enhance your writing in Google Docs. It’s time to explore how to use Grammarly effectively within Google Docs.

How to Use Grammarly in Google Docs

Grammarly offers various features to improve your writing in Google Docs. To get the most out of Grammarly, follow these steps:

  • While typing in Google Docs, Grammarly will underline words and phrases with red or blue lines to indicate potential errors or suggestions.
  • Hover over the underlined text to see Grammarly’s suggestion or correction. You can either accept the suggestion by clicking on it or dismiss it if you don’t agree.
  • Grammarly also displays an icon in the lower-right corner of the Google Docs interface. The icon provides an overview of the writing issues detected by Grammarly.
  • To access a more detailed list of suggestions, click on the Grammarly icon in the lower-right corner. This will open the Grammarly sidebar, where you can review and accept or reject specific suggestions.
  • Grammarly allows you to set goals for your writing, such as audience, formality, domain, and intent. Open the Grammarly sidebar and click on the target icon to modify these goals.

You can use Grammarly’s powerful writing help while working on your Google Docs projects if you follow these steps. But before we end, let’s answer some of the most common questions about how to add Grammarly to Google Docs.

In Summary

We showed you how to add Grammarly to Google Docs in this guide. You can get the most out of Grammarly’s spelling and spell-check features in Google Docs by following these steps. Make sure you add the Grammarly app to Google Chrome, turn on Grammarly in Google Docs, and use Grammarly’s features to improve your writing. When you use Grammarly, you can be sure that your papers are free of mistakes and of the highest standard.

FAQs

  • How Do I Connect Grammarly to Google Docs?

To connect Grammarly to Google Docs, you need to install the Grammarly extension for Google Chrome. After installing the extension, open Google Docs, click on the Extensions option in the toolbar, and select Grammarly for Chrome from the drop-down menu. Grammarly will then be enabled in Google Docs.

  • How Do You Fix Grammarly Not Working In Google Docs?
  1. If Grammarly is not working in Google Docs, there are a few troubleshooting steps you can try:
  2. Ensure that you have the Grammarly extension installed and enabled in Google Chrome.
  3. Check your internet connection to ensure it is stable.
  4. If you’re still experiencing issues, try logging out of Grammarly and logging back in or reinstalling the Grammarly extension.
  5. If the problem persists, you can reach out to Grammarly support for further assistance.

How to Clean a Mouse Pad (Different Kinds of Mouse Pads)

As an important piece of equipment for computer users, a mouse pad is used all the time and can quickly get dirty from our hands. Regularly cleaning your mouse pad not only keeps it looking good, but it also makes sure it works at its best. In this detailed guide, we’ll talk about the different kinds of mouse pads and show you how to clean a mouse pad in the best way possible.

How to Clean Different Kinds of Mouse Pads?

Mouse pads come in various materials, including fabric, hard-surface, leather, plastic, and metal. Each type requires specific cleaning methods to ensure proper maintenance.

Fabric Mouse Pads

Fabric mouse pads are commonly used and require a bit more effort to clean compared to other types. The fabric’s porous nature makes it prone to stains and debris buildup.

To clean a fabric mouse pad, follow these steps:

  • Fill a small tub or your kitchen sink with warm water.
  • Add a small amount of mild dish soap or shampoo to the water.
  • Submerge the mouse pad in the soapy water and let it soak for a few minutes.
  • Gently scrub the surface of the mouse pad using a soft brush to remove stains and debris. Avoid scrubbing too hard to prevent damage.
  • Rinse the mouse pad thoroughly under clean water until all soap residue is removed.
  • Shake off any excess water and lay the mouse pad flat on a towel to air dry. Ensure it is completely dry before using it again.

Hard-Surface Mouse Pads

Hard-surface mouse pads, made from materials like plastic or metal, are easier to clean due to their non-porous nature.

To clean a hard-surface mouse pad, follow these steps:

  • Spray a mild screen cleaner or rubbing alcohol onto a microfiber cloth.
  • Wipe the surface of the mouse pad thoroughly, applying gentle pressure where necessary.
  • For added disinfection, you can also use disinfectant wipes on the surface of the mouse pad.
  • Use a dry towel to wipe away any excess moisture.
  • Allow the mouse pad to air dry completely before using it again.

Leather Mouse Pads

Leather mouse pads require special care to prevent damage to the material. Avoid using water or harsh cleaning agents on leather mouse pads.

To clean a leather mouse pad, follow these steps:

  • Use a clean, dry cloth to wipe off any dust or debris from the surface of the mouse pad.
  • Apply a small amount of leather cleaner to a microfiber cloth.
  • Gently wipe the mouse pad with the cloth, taking care not to saturate the leather.
  • Follow the manufacturer’s instructions for drying time.
  • Once dry, buff the leather with a clean, dry cloth to restore its shine.

How Often Should You Clean Your Mouse Pad?

Cleaning your mouse pad on a regular basis is important to keep it clean and working well. You should clean your mouse pad once a month just to keep it in good shape. But first, you should know how to clean a mouse pad. If you spill something on it or see spots, you should clean it right away to keep the damage from getting worse.

The Best Cleaning Products for Mouse Pads

When it comes to cleaning your mouse pad, using gentle cleaning agents is key to avoiding damage. Here are some recommended cleaning products based on the type of mouse pad:

  • Fabric Mouse Pads: Mild dish soap or shampoo
  • Hard-Surface Mouse Pads: Screen cleaner or rubbing alcohol
  • Leather Mouse Pads: Leather cleaner (specifically designed for leather)
  • Ensure you have the necessary cleaning supplies on hand before beginning the cleaning process.

What Should I Do to Clean the Mouse Pad in the Best Way?

In addition to regular cleaning, here are some tips to help maintain a clean mouse pad:

  • Before you use the computer, wash your hands to keep grease and dirt from getting on the mouse pad.
  • Don’t eat or drink near your computer to keep the mouse pad from getting dirty.
  • Between cleanings, use a hand cleaner or compressed air to get rid of dust and other things that are on the mouse pad.
  • You might want to put a cover or mat over your mouse pad to keep it from coming into direct touch with oils and dirt.
  • If your mouse pad needs to be maintained in a certain way, follow the manufacturer’s directions.

Also Read: The Top 10 Gaming Laptops for Ultimate Performance and Immersion

In Closing

A clean mouse pad not only looks nice, but it’s also necessary to keep your mouse working at its best. Understanding the type of mouse pad you have and using the right cleaning methods will help you keep the surface clean and in good shape for your mouse. Remember to clean your mouse pad often, but be careful. Also, make sure you dry it the right way to keep it from getting damaged. If you follow these steps, your mouse pad will always be clean and smooth when you use your computer.

How to Cancel Starz Subscription on Various Platforms (2024 Guide)

If you’re looking to cancel your Starz subscription, you’ve come to the right place. In this guide, we’ll walk you through the steps of how to cancel Starz subscription on various platforms and devices. Whether you subscribed through Amazon, the Starz website, Hulu, Roku, or your mobile device, we’ve got you covered.

How to Cancel Starz Subscription on Various Platforms?

There are different ways to cancel a Starz subscription, based on how you signed up in the first place. You can follow these general steps:

How to Cancel Starz on Amazon

To cancel your Starz subscription on Amazon, follow these simple steps:

  • Log in to your Amazon account.
  • Go to the top right and select “Accounts and Lists.”
  • Get to the “Memberships and Subscriptions” part and then find “Prime Video Channels.”
  • Locate the Starz channel and click on “Cancel.”
  • To confirm the cancellation, follow the on-screen instructions.

Cancelling Through the Amazon App

If you prefer to use the Amazon app to cancel your Starz subscription, here’s what you need to do:

  • Launch the Amazon mobile app.
  • Tap the icon with a person’s silhouette (located between the shopping cart and house icons).
  • Tap on “Your Account.”
  • Choose the subscription you want to cancel (Starz).
  • Tap on “Manage Membership.”
  • Click “End Membership” to finalise the termination.

How to Cancel Starz on the Starz Website

If you subscribed to Starz directly through their website, follow these steps to cancel your subscription:

  • Go to the Starz website and log in to your account.
  • To access your profile, locate your profile picture in the top right corner and click on it.
  • Choose “Settings” from the drop-down menu.
  • In the “Billing Plan and Information” section, click on “Cancel Subscription.”
  • Follow the on-screen instructions and click on “Submit” to confirm the cancellation.

How to Cancel Starz on Hulu

If you subscribed to Starz through Hulu, here’s how you can cancel your subscription:

  • Open your web browser and go to the Hulu add-on settings page.
  • Find the Starz channel in the list of add-ons.
  • Deselect the box next to Starz to remove it from your subscription.
  • Click on “Review Changes” and confirm your cancellation.

How to Cancel Starz on Roku

To cancel your Starz subscription on a Roku device, follow these steps:

  • From the Roku Home menu, choose the Starz app.
  • Grab the remote and hit the Options button.
  • Choose “Manage Subscription” and then “Cancel Subscription.”

How to Cancel Starz on iPhone or iPad

If you have the Starz app on your iPhone or iPad, here’s how you can cancel your subscription:

  • Open the App Store on your device.
  • Go to your profile and choose “Subscriptions.”
  • In the active subscriptions section, find Starz and click on “Cancel Subscription.”
  • Follow the steps and confirm your cancellation.

How to Cancel Starz on Android

If you’re using an Android device, follow these instructions to cancel your Starz subscription:

  • Open the Starz app on your Android phone.
  • Please log in to your account if you are not already logged in.
  • Choose “More” from the menu that appears in the bottom right corner.
  • Pick “Settings” and then “Account Management.”
  • In the “My Subscription” section, tap on “Cancel Subscription.”

This will open the browser version of Starz. Follow the on-screen instructions and click on “Submit” to confirm the cancellation.

What Are the Best Alternatives to Starz?

If you’re looking for alternative streaming services similar to Starz, consider these options:

  • HBO Go: Offers a wide range of premium content, including original series and movies.
  • Epix: Provides on-demand content, offline downloads, and original documentaries, series, and movies.

How to Delete Your Starz Account?

If you want to completely delete your Starz account, you will need to contact Starz customer support directly. They will guide you through the account deletion process and ensure that all personal information is removed from their systems.

FAQs

  • Can I Pause My Starz Subscription Instead of Cancelling?

Unfortunately, Starz does not offer the option to pause your subscription. You can only cancel your subscription and resubscribe at a later date if you wish to use the service again.

  • Will I Get a Refund if I Cancel Starz?

When you cancel your Starz subscription, you will not receive a refund for any unused portion of your subscription. However, you will have access to Starz until the end of your current billing cycle.

  • Is It Difficult to Cancel Starz?

While the cancellation process for Starz is generally straightforward, some common issues may arise. These include:

Charges on your credit card after cancellation: It’s important to check your billing statements after canceling to ensure that you are not charged for any additional periods.

Difficulty contacting customer support: If you encounter issues with cancellation or have questions, reaching Starz customer support may take time. Consider using alternative methods such as email or social media to get in touch.

In Closing

Canceling your Starz subscription is a simple process that can be done through various platforms and devices. Whether you subscribed through Amazon, the Starz website, Hulu, Roku, or your mobile device, following the steps outlined in this guide will help you cancel your subscription with ease. Remember to check for any potential issues, such as charges after cancellation, and explore alternative streaming services for your entertainment needs.

How to Transfer Ownership on Discord Server [Desktop and Mobile]

In the past few years, Discord, a famous voice and text chat platform, has become very popular. It gives people an easy way to talk to each other, share thoughts, and do different things. As the owner of a Discord server, it’s your job to keep the server and its users running smoothly. But there may come a time when you want to give someone else ownership. This complete guide will show you how to transfer ownership on Discord account on both desktop computers and mobile phones.

Ownership Transfer on Discord: How Does It Work?

You should know what will happen when you change your Discord title before you start the move process. The person who owns the computer needs to follow the rules, make important decisions, and make sure everything works well. This is what you give someone when you give them ownership. You should choose a person you can trust to run the server and its groups well.

How to Transfer Ownership on Discord Server on Desktop

Transferring ownership of Discord is a straightforward process. Follow these steps to transfer ownership on a Discord server using a desktop device:

  • Open Discord App and Select the Server

To begin, open the Discord app on your desktop and log in to your account. Once logged in, navigate to the server for which you want to transfer ownership. Click on the server name to access its options panel.

  • Access Server Settings

In the options panel, select “Server Settings” from the drop-down menu. This will take you to the server settings page.

  • Navigate to the Members Tab

Within the server settings, locate the “Members” tab under the “User Management” section in the left sidebar. Click on it to access the list of server members.

  • Select the Member and Open Options

Scroll through the member list and find the individual whom you want to transfer ownership to. Once you’ve identified the member, click on the three dots next to their name to open the individual options.

  • Choose “Transfer Ownership”

From the options menu, select “Transfer Ownership.” A confirmation prompt will appear, ensuring that you want to proceed with the transfer.

  • Confirm the Transfer

Read the confirmation prompt carefully, acknowledging that the ownership will be transferred to the selected member. Once you are certain about the transfer, click on the appropriate button to confirm and complete the process.

How to Transfer Ownership on Discord Server on Mobile

If you prefer to use Discord on your mobile device, the process of transferring ownership is equally simple. Follow these steps to transfer ownership on Discord using a mobile device:

  • Open Discord Mobile App

Begin by opening the Discord application on your mobile device. Locate the Discord icon and tap on it to launch the app.

  • Select the Server and Access Options

Once the app is open, navigate to the server for which you want to transfer ownership. Tap on the three dots located next to the server name to access the options menu.

  • Go to Server Settings

From the options menu, select “Server Settings” to access the server settings page.

  • Access the Members Tab

Within the server settings, locate and tap on the “Members” tab. This will display the list of server members.

  • Choose the Member and Open Options

Scroll through the member list and find the individual to whom you want to transfer ownership. Tap on the member’s name to open their options.

  • Transfer Ownership

Within the member’s options, select “Transfer Ownership.” A confirmation prompt will appear, ensuring that you want to proceed with the transfer.

  • Confirm the Transfer

Carefully review the confirmation prompt, acknowledging that ownership will be transferred to the selected member. Once you are certain about the transfer, tap on the appropriate button to confirm and complete the process.

Important Things to Think About When Transferring Ownership

When transferring ownership on Discord, there are a few important considerations to keep in mind:

  • Trust and Reliability

Choose a member whom you trust and who demonstrates reliability in managing the server. Ensure that they have a clear understanding of the server’s rules and responsibilities associated with ownership.

  • Communication with Members

Before transferring ownership, communicate with your server members to inform them of the upcoming change. This will help maintain transparency and prevent any confusion or concerns.

  • Ownership Limitations

Keep in mind that Discord servers can only have up to four owners. Additionally, at least one owner must always be present. If the server becomes ownerless, it may be deleted after a period of time.

  • Leaving the Server

Transferring ownership does not automatically remove you from the server. If you wish to step away entirely, you must manually leave the server following the appropriate steps.

In Summary

There you have it! That’s all you need to know on how to transfer ownership on Discord, and it should be easy to perform it. Remember to pick someone you can trust who can run the server and its community well. Talk to the people on your server as well to make sure the transfer goes smoothly. If you follow these steps, you can give someone else ownership of your Discord server and their duties, letting the server grow.

How to Add Roles in Discord and Manage Them (2024 Updated)

A lot of people like Discord because it lets them make groups, talk to their friends, and improve their game experiences. You can add jobs to your server, which is one of the main things that makes Discord flexible and useful. In Discord, roles are groups that can be changed to control how a user looks and what rights they have on a server. This guide will show you how to add roles in Discord and go over the different customization choices that are available.

What are Discord Roles?

Discord roles are groups that you can give to people on your server to control their look and rights. These roles help server owners run their communities well by letting them control what material members can see and what actions they can take on the server. You can change many things about Discord roles, such as the colour of role members’ names, their access to channels and rights, and how connected apps and integrations affect certain roles.

How to Add Roles in Discord?

Adding roles to your Discord server is a straightforward process. To get started, follow these steps:

  • Open Discord and select the server where you want to add roles.
  • Click on the server’s name in the top-left corner to access the server menu.
  • From the server menu, choose “Server Settings.”
  • In the Server Settings menu, select “Roles.”
  • Click the “Create Role” button to add a new role.

Customizing and Managing Discord Roles

You can change the way a job works for you after you’ve made it. There are a lot of ways to change jobs in Discord, so you can make them fit the needs of your server. Let’s look at the different Discord settings you can change for jobs.

Display Settings for Roles

In the “Display” tab of the role settings, you can modify how the role appears to other members. Here are the available customization options:

  • Role Color: Choose a color for the names of members assigned to this role. The selected color will be displayed in channel messages and the online users list.
  • Role Icon: If your server is boosted to Level 2, you can assign an icon to the role, which will appear next to the names of members with that role.
  • Display Role Members Separately: Toggle this option to separate members with this role into their own category in the online users list.
  • Allow Anyone to @Mention this Role: Enable this setting to allow users to tag this role in messages using the @ symbol. This will notify all members with the role.
  • View Server as Role: This feature allows you to see your Discord server from the perspective of a specific role, ensuring that the role has the desired access to channels and features.

Role Permissions in Discord

The “Permissions” tab in the role settings is where you can define the actions and abilities that members with this role can perform. Discord categorizes role permissions into several categories:

  • General Server Permissions: Determine the role’s ability to manage channels, roles, emoji, stickers, or the server itself.
  • Membership Permissions: Control whether role members can manage other members, change their nicknames, create invites, or ban users.
  • Text Channel Permissions: Define the role’s permissions for sending messages, adding reactions, starting threads, and mentioning other members in text channels.
  • Voice Channel Permissions: Specify what role members can do in voice channels, such as joining, speaking, using video, and enabling the Priority Speaker setting for better audio clarity.
  • Stage Channel Permissions: For stage channels, which are dedicated spaces for specific discussions, you can grant or restrict role members’ ability to request to speak in these channels.
  • Events Permissions: This section allows role members to create, edit, and cancel events within the server.
  • Advanced Permissions: The “Administrator” button grants a role all available permissions, overriding any channel-specific permissions. Use this with caution.

You can change how members of your Discord server interact with each other and what they are responsible for by changing their job permissions.

Managing Members within Roles

The “Manage Members” tab in the role settings allows you to view and manage members assigned to a specific role. Clicking on a role name will display the members assigned to that role. From there, you can modify their settings and add or remove members as needed.

How to Make Admins in Discord?

Admins are very important for running a Discord group. They have a lot of permissions that let them do different administrative jobs. Here are the steps you need to take to authorise someone:

  • Access the Server Settings menu in Discord.
  • Navigate to the Roles section and find the role you want to grant admin access to.
  • Click on the role and select “Edit” to modify its settings.
  • In the Permissions tab, scroll down to the Advanced Permissions section.
  • Toggle the Administrator switch to grant admin powers to the role.

Be careful giving admin rights to other people, and make sure that only people you trust can use them.

Also Read: How to Report Someone on Discord: Easy Steps

In Closing

Adding roles in Discord is a great way to manage your server and give each person of your community a unique experience. Learning how to add roles, change their settings, and come up with creative solutions can help increase interest, make communication easier, and keep the server running smoothly. Roles in Discord let you make your server exactly how you want it, whether you’re setting up separate lines for each role, using reaction roles, or giving admin rights. Play around with the different roles to get the most out of your Discord group.

FAQs

  • How many roles can I have on my Discord server?

Discord allows a maximum of 250 different roles on a server.

  • Can bots have their own roles?

Bots typically have their own role when added to a server, allowing you to customize their appearance and permissions.

  • Can admins kick the owner of a Discord server?

No, admins cannot kick the owner of a Discord server. Similarly, admins cannot kick other admins.

  • What can admins do on Discord?

Admins, or users with the Administrator role, have access to all server elements and can make changes equivalent to those made by the server owner.

  • Can I change the name of a server as an admin?

A: Generally, only the server owner has the power to change the name of a Discord server unless they grant that permission to an admin.

How Do I Stop Microsoft Teams from Showing Away After 5 Minutes (Solved)

Microsoft Teams is an excellent tool for working together that lets teams that are spread out easily do their jobs. Users often get annoyed, though, because Microsoft Teams keeps showing them as “Away” even when they are actually using the platform. This can cause misunderstandings and make it take longer to respond. How do I stop Microsoft Teams from showing away after 5 minutes? This article will answer that question and make sure that your presence is correctly shown.

How Do I Stop Microsoft Teams from Showing Away After 5 Minutes?

Why does Microsoft Teams show you as “Away” even when you’re using the platform? Let’s find out before we get to the answers. This problem might be caused by a number of things, such as inactivity, incorrect state settings, or issues connecting to the network. By taking care of these core issues, we can find good ways to stop Teams from showing you as “Away.” Let’s take a closer look:

Manual Reset of Your Status

One simple solution to override the automatic “Away” status is to manually reset your status to “Active” on Microsoft Teams. This will keep your status as active until you manually change it to “Away” or “Offline.” The steps to do this vary slightly depending on your device.

On Windows or Mac:

  • Launch the Microsoft Teams application.
  • Click on your profile picture at the top right corner of the screen.
  • Select the “Availability” option from the drop-down menu.
  • Choose “Available” from the options provided.

On Android or iOS:

  • Open the Microsoft Teams app on your mobile device.
  • Tap on your profile picture or initials in the top-left corner.
  • Select the “Offline” option or the option below your account name.
  • From the drop-down menu, choose “Available.”

By manually resetting your status, you can ensure that Microsoft Teams accurately reflects your presence and prevents it from automatically changing to “Away.”

Check for App Updates

Sometimes, the issue of Microsoft Teams showing you as “Away” can be due to a glitch or an app-related problem. To resolve this, it’s important to check for updates and ensure that you have the latest version of the Teams app installed on your device.

On Windows or Mac:

  • Press the Windows key on your keyboard and type “Microsoft Teams.”
  • Open the application and click on the three-dot icon next to your profile picture.
  • Select “Check for updates” from the drop-down menu.

On Android or iOS:

  • Go to the Google Play Store or App Store on your mobile device.
  • Search for “Microsoft Teams” and check if there are any available updates.
  • If updates are available, click on the “Update” button.
  • Updating the Teams app on your device can often resolve any issues related to the “Away” status.

Set a Status Message

Another workaround to ensure that your availability is communicated to your team members is by setting a status message on Microsoft Teams. This message will be displayed when others message or mention you, even if your status shows as “Away.” Setting a status message is easy and can be done on both desktop and mobile devices.

On Windows or Mac:

  • Launch the Microsoft Teams application.
  • Click on your profile picture at the top-right corner of the screen.
  • Select “Set status message” from the drop-down menu.
  • In the modal that appears, type your status message in the text section.
  • Tick the box next to “Show when people message me.”
  • Click “Done” to save your status message.

On Android or iOS:

  • Open the Microsoft Teams app on your mobile device.
  • Tap on your profile picture or first-name alphabet icon in the top-left corner.
  • From the left pane, tap on “Set status message.”
  • On the next screen, type your status message in the text section.
  • Toggle the switch next to “Show when people message me.”
  • Tap the tick mark in the top-right corner to save your status message.

Use Third-Party Apps to Keep Your System Active

You can use third-party apps or utilities to stop Microsoft Teams from going into an idle or inactive state if the other options don’t work for you. These apps can keep your machine running, which means that your Teams status stays live as well. For Windows, Move Mouse and Jiggler are two apps that you might want to try.

These apps will keep your computer open and running, so Teams won’t be able to mark you as “Away.” Keep in mind that Microsoft and other software companies do not officially support these apps. Be careful when you use them and make sure they work with your system.

Also Read: FIX: Microsoft store error code 0x80131500

In Closing

Microsoft Teams is a great way to work together from afar, but it can be annoying when it says “Away” when you’re actually using it. In this article, there are methods that will stop Teams from showing you as “Away” after 5 minutes and make sure that your presence is shown correctly. These steps will help you stay connected and busy in your Teams environment. You can use them to reset your status by hand, check for app updates, set a status message, or use third-party apps to keep your system active. Make sure to fix any problems and let your team know when you’re available clearly so there are no mistakes.

FAQs

  • Can screen sharing or active meetings prevent the “Away” status?

Yes, actively participating in screen sharing or meetings can often prevent your status from changing to “Away,” even if there is no other computer activity. This is because Teams recognizes your active engagement with the platform.

  • Can my organization enforce or override my status settings?

Depending on your organization’s policies, administrators may have the ability to enforce certain status settings. It’s advisable to check with your IT department or Teams administrators for specific guidelines.

Deezer vs Spotify: Which Is Better? [The Differences]

Streaming music has become an important part of our lives because it gives us instant access to a huge library of songs. There are many streaming services, but Deezer and Spotify are two of the biggest and best. For this Deezer vs Spotify comparison, we’ll look at all of the features, user experience, song libraries, sound quality, pricing plans, and more to help you decide which platform is better.

Deezer vs Spotify: All You Need to know on Differences

Deezer is known as one of the best music streaming services. But if Deezer and Spotify went head-to-head, who would win? Let’s see which one is better.

User Interface and Functionality

When it comes to user interface and functionality, both Deezer and Spotify have designed their platforms to provide a seamless and intuitive experience.

Deezer’s User Interface

Deezer has an attractive, user-friendly interface. The vibrant style draws attention and makes browsing fun. The home screen has four tabs: “Music,” “Podcasts,” “Favorites,” and “Explore.” This area makes tailored content, trending music, and recommended podcasts easy to find. The FLOW feature of Deezer’s interface stands out. FLOW creates a playlist based on your music tastes and history. As you like or dislike music on FLOW, the system improves its recommendations.

Spotify’s User Interface

The dark UI for Spotify is beautiful and easy to use. Because it’s simple, the platform is easy for both new and experienced people to use. On Spotify’s home screen, you can find “Home,” “Search,” “Your Library,” and “Premium.” Each place serves a different purpose and makes it easier to find features and content. The layout of Spotify shows animated album covers, which is a unique feature. Some tracks have short movies or montages that add visual interest.

Music Discovery

A key aspect of any music streaming platform is its ability to help users discover new music and artists. Both Deezer and Spotify excel in this area, utilizing advanced algorithms and personalized recommendations to deliver a tailored music discovery experience.

Deezer’s Music Discovery

Deezer personalizes music recommendations using multiple approaches. Deezer asks you to choose genres and musicians you like to create your musical identity. Deezer adapts its recommendations to your listening habits and preferences as you use it. The FLOW function of Deezer’s music discovery is notable. FLOW produces an endless playlist based on your music likes and updates it based on your feedback. This personalized radio station keeps you discovering new music you like.

Spotify’s Music Discovery

Spotify is great for finding new songs. Its smart technology makes personalized playlists and suggestions for you based on what you’ve listened to, liked songs, and bands you follow. Discover Weekly is a Monday mix that lets you find new music that you like. Spotify has more than just Discover Weekly. It also has Daily Mixes, which are personalized mixes of your best songs and new suggestions, and Release Radar, which is a playlist of new music from artists you follow. These things help you find new songs you like.

Music Libraries

The size and diversity of a music streaming platform’s library play a significant role in attracting and retaining users. Both Deezer and Spotify boast extensive music libraries, offering millions of songs across various genres and languages.

Deezer’s Music Library

Deezer offers over 90 million songs. The site supports many genres, so users can locate music they like. You can listen to pop, rock, hip-hop, jazz, or any other genre on Deezer. Deezer also connects with big record companies and independent distributors to deliver a variety of popular and independent music. This lets consumers discover new artists alongside their favorites.

Spotify’s Music Library

Spotify’s musical library exceeds 100 million recordings. Licenses from Universal Music Group, Sony Music Entertainment, and Warner Music give the platform access to a huge repertoire of hits and new releases. Spotify also lets independent musicians submit music, so consumers can discover new and hidden talent. Users can access a vast and growing music catalog because to the platform’s support of independent musicians.

Sound Quality

Sound quality is a crucial factor in the Deezer vs Spotify comparison. Both Deezer and Spotify offer different sound quality options to cater to the varying needs and preferences of users.

Deezer’s Sound Quality

Deezer offers high-quality audio streaming for its users. With a standard subscription, users can enjoy streaming at 320kbps, delivering crisp and clear sound across various devices. However, for audiophiles seeking the utmost sound fidelity, Deezer HiFi is the ultimate option. Deezer HiFi offers lossless FLAC audio streaming at 16-bit/44.1kHz, ensuring the preservation of every detail and nuance in the music.

Spotify’s Sound Quality

Spotify provides users with high-quality audio streaming as well. The platform offers up to 320kbps Ogg Vorbis streaming for its Premium users, delivering excellent sound reproduction. While Spotify does not currently offer lossless audio streaming, it has announced plans to launch a hi-fi tier in the future. This upcoming feature will cater to users who demand the highest level of sound quality.

Pricing Plans

Users think a lot about price when they are picking a music streaming service. There are free versions of both Deezer and Spotify that don’t have many features. There are also paid plans that have more features and no ads.

Deezer’s Pricing Plans

Deezer offers a range of pricing plans to suit different user needs. The options include:

  • Deezer Free: The free version of Deezer allows users to access the platform with limited features and occasional ads.
  • Deezer Premium: Priced at $10.99 per month, Deezer Premium offers ad-free listening, unlimited skips, offline listening, and high-quality audio streaming.
  • Deezer Family: The Family plan, priced at $17.99 per month, allows up to six family members to enjoy the benefits of Deezer Premium under one subscription.
  • Deezer HiFi: For audiophiles seeking the highest sound quality, Deezer HiFi offers lossless FLAC audio streaming at 16-bit/44.1kHz. This plan is priced at $19.99 per month.

Spotify’s Pricing Plans

Spotify also offers a range of pricing plans to cater to different user preferences. The options include:

  • Spotify Free: The free version of Spotify provides access to the platform, but with occasional ads and limited features.
  • Spotify Premium Individual: Priced at $10.99 per month, Spotify Premium Individual offers ad-free listening, unlimited skips, offline listening, and high-quality audio streaming.
  • Spotify Duo: The Duo plan, priced at $14.99 per month, is designed for couples under one roof. It includes all the benefits of the individual plan, along with a Duo Mix playlist tailored to the couple’s musical tastes.
  • Spotify Family: The Family plan, priced at $16.99 per month, allows up to six family members to enjoy the benefits of Spotify Premium under one subscription. It also includes a Family Mix playlist and parental controls for explicit content.
  • Spotify Student: Priced at $5.99 per month, the Student plan offers all the benefits of the individual plan, along with access to Hulu (ad-supported) and SHOWTIME.

Also Read: How to delete Spotify playlist? (Desktop and Mobile)

In Summary

Both Deezer and Spotify offer unique features and cater to diverse user interests. Spotify excels at personalization, social features, and device connectivity, making it a great music streaming service. The HiFi package from Deezer offers lossless music streaming for audiophiles, which improves sound quality.

Your needs and priorities determine whether you choose Deezer or Spotify. Spotify wins for personalization, social features, and device integration. If sound quality and a vast music library are most important, Deezer is best.

Both services include free trials, so you can choose the one that suits your music streaming needs. Deezer or Spotify will provide an immersive and engaging music streaming experience.

Exit mobile version