Nowadays, social media plays a significant role in every aspect of our life, especially our business. Having a Facebook page is an inevitable part of every business.
Nowadays, social media plays a significant role in every aspect of our life, especially our business. Having a Facebook page is an inevitable part of every business. Research shows that people search for brand social media before making a purchase decision.
Scroll down to see the answer to questions like, “can you schedule posts on Facebook?” and “how to schedule your content on Facebook in advance.” Different options, like posting on Facebook personal accounts, business pages, or groups, were given in detail.
Can you schedule posts on Facebook?
Yes, fortunately, you can schedule posts on Facebook using two methods. The first one is using the in-app scheduling tools that Facebook offers or use a reliable Facebook scheduling tool instead.
Once your content is ready, you can schedule a month’s worth of posts in half an hour and relax for the next of the month, considering your posts will be shared at their set time! I’ve done it – you can too.
As a social media user, you might also like o know how to schedule Instagram posts and stories too, that’s why we have gathered great guides on this subject for you on inosocial, as well.
Let’s get started with finding out how to schedule Facebook posts in advance.
How to fix can’t schedule Facebook posts?
There are two main ways to schedule Facebook posts:
Schedule by Facebook: This is limited, and you would post to a single account only.
InoSocial Scheduling tools: With InoSocial publishing tools, you are able to post to multiple accounts at once and get the analytics and other necessary tools too.
If you have to trouble your social media management tools, you should contact them through the support ticket.
If you can schedule Facebook posts using a creator studio or Facebook account, try these ways. It should work.
Go to the right place
Facebook moved the schedule option to another place called the publishing tools section available on the Facebook page. So, if you are publishing on groups or events, that is alright. You can see the scheduler option on the post itself. However, if you are sending posts to the pages, so you should find it on the publishing tools section.
Restart the network connection
It is always good to switch off and on the network connection. Then try again a few minutes later.
Close the browser
If you cant Schedule, you can close the browser and open it again.
Log out and log in again
The same as above, you can log out of your Facebook account, either on the creator studio or Facebook page, and log in again. Try again to see if the problem still exists.
If none of the above ways work, then wait for a couple of hours and try again later. It might be facebook bugs.
But before scheduling Facebook posts, you must have a Facebook page first connected to a personal account. If you haven’t done yet, here is the instruction:
Once your Facebook page is ready, go to the next step and schedule your post through Facebook or InoSocial software online.
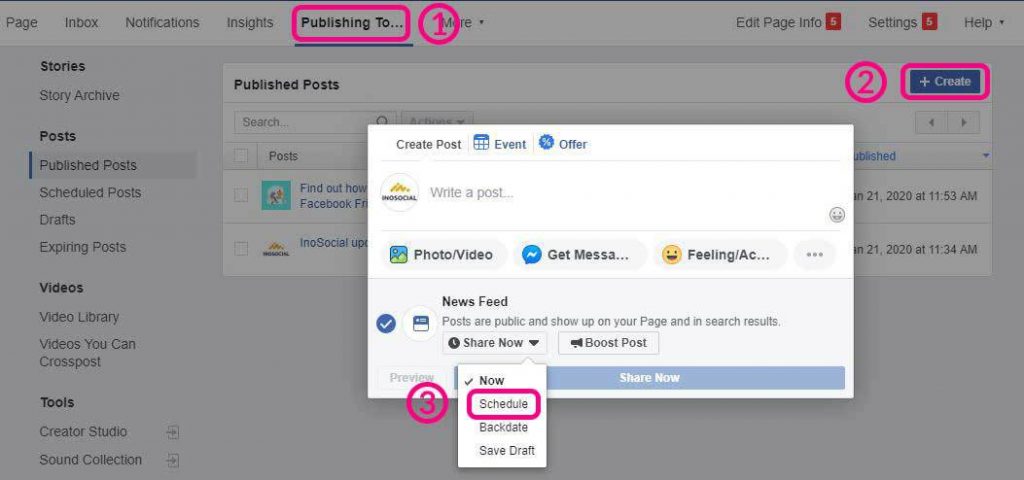
How to schedule posts on the Facebook page?
Schedule posts on the Facebook page are simple, and do it in 3 steps:
Step 1: Go to Facebook Page and Choose Publishing Tools on the top menu
Step 2: Click on Create in blue color
Step 3: Choose Schedule
Select a date and time and click Schedule!
You can schedule as many posts as you want for any date in the future. Though scheduling posts on Facebook itself is limited, and you would post to a single page.
How to schedule Facebook posts on a personal page?
Unfortunately, Facebook doesn’t allow you to schedule posts on personal accounts, but instead, you enjoy a wide verity of other options such as posting automatically to Facebook pages, Facebook groups, and even posting automatically to Facebook albums and changing the cover photos of Facebook pages.
Facebook Page: Post the updates to the Facebook Fan Pages automatically.
Facebook Page Stream: Read and respond to posts, comments, and direct messages on your Facebook Fan Page stream.
Facebook Page Album: Post pictures to albums on your Facebook Fan Pages.
Facebook Page Cover Photo: Upload and set your Facebook cover photo
Facebook Ads: Read and reply to incoming comments from your Facebook Ads with the Priority Inbox.
Facebook Group: Post updates to the walls of any of your Facebook Groups.
How to schedule multiple posts on Facebook?
Are you wondering if you can schedule multiple Facebook posts?
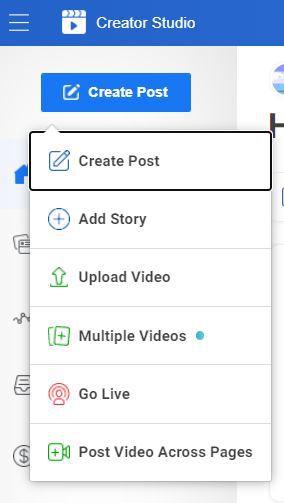
Yes, you can schedule Facebook posts from desktop or laptop using the creator studio website, which belongs to Facebook. It’s easy and fast.
However, you can add as many pages as you want and post one by one. But if you want to post one content to multiple accounts,s the story is a bit different. Facebook allows you to post one content to one page only using the creator studio or Facebook itself.
Scheduling multiple posts to multiple Facebook accounts is of great help not only to save time and energy but also to grow the accounts faster and in a more professional way.
How many posts can you schedule on Facebook?
You can schedule an unlimited number of posts on Facebook. If you are wondering how long you can schedule posts on Facebook, the good news is that you can plan as long as you want. There is no time limit to schedule posts on Facebook.
How to edit scheduled posts on Facebook?
To edit scheduled posts or to find where are your scheduled Facebook posts are, go to the Facebook page from Facebook Home (on the right side of the home, you can see all lists of your Facebook pages). Then from the list on the left side under Posts, you can see the scheduled posts.
Conclusion
Facebook is the best platform to get more traffic or increase your sales. So, it would be better to use this platform to grow your business. Scheduling posts can help you a lot. You can save time and energy. If you are using multiple accounts, better to use a creator studio or a social media management tool.
Instagram is the most influential mobile applications used by the millennial and Gen-Z population across the world. With a count of 500 million steady users daily and 1 billion users monthly, Instagram statistics witnessed an unbelievable rise in the usage amidst the COVID-19 lockdown.
Before the lockdown, people spent about 53 minutes scrolling through Instagram on an average. But with nothing much to do at home, users are glued to their mobile screens for more than a couple of hours.
With increased screen time during the pandemic, businesses should be burning the midnight oil ‘on Instagram’ to get their business through the surging and undefined apocalypse.
How to promote your business during a crisis?
To stand out of the 25 million business accounts, it is best to promote your business wisely to grab attention from more eyeballs who are spending hours on phones and laptops than ever. However, you need to find the fine line of overselling and smart selling suiting the global circumstances.
Without wasting any more of this crucial time, let’s get rolling with how to encash your Instagram handle.
#0 Your business ideas
You can promote a business which is quite needed these days, or is of interests of users. For example, Laser engraving on metals is a field in which you can grow a lot.
“Laser etching metal is possible to do at home with relatively low-power lasers. In order to successfully etch metal with a laser, you’re going to need a machine equipped with a laser rated for at least 60 W of power. A laser with a power rating less than 60 W will, at best, leave a pale shadow of your art on the metal.”
#1 Choose your content wisely
Already planned advertising campaigns and brand promotions will have a dwindling effect amidst the pandemic situation. People are constantly envisaging and trying hard to keep their mental and emotional health stable. Amidst such grave happenings around the world, people are surely not interested in mainstream sales and advertisements.
I would recommend a peculiar revision of your scheduled posts according to the current situation worldwide. Relevant and socially aware content that connects people is the call of the hour.
#2 Acknowledge Your Customers and Staff
This is the best time to say thank you to all the people who have contributed and participated in the journey of your business. Amidst all the chaos a small gesture of acknowledgement will go a long way.
Also, make sure you thank all your staff members who are coming to the office or working from home despite all the odds. Designing a few posts that thank all the pivotal members of your organization will imbibe a sense of satisfaction for working with your company.
If you would like to learn more about the steps that businesses can take to ensure that the transition back to the workplace is a success, Zenefits made a return to work guide that is filled with helpful tips and resources.
#3 Tell Your Customers About Your Operations
If you are already operating or planning to operate your manufacturing and delivery options, make sure your customers know about all the precautionary steps being taken.
A well-captured and well-written ‘behind the scenes’ of your production line will be helpful for people to trust the safety measure of your products. Social distancing and sanitation were ignored and created a serious upsurge in the number of cases. Hence, I personally advise that you tell your customers that your business is completely cautious about employee and customer health.
#4 Contribute in The Welfare of The Society
Contributing to society is an exceptional step to promote your business. Good work will be noticed and acknowledged in the Instagram world as well. Many good deeds of businesses went viral amidst the pandemic and received great recognition. Hence, contribute to society and let people know about it with stories or posts. Also, make it a point to retweet and appreciate the good work others are doing. Support the local business owners, feed the street animals, help the poor with food, initiate campaigns with an NGO.
Let people know that you are a helpful business owner. These steps will be etched in the minds of people and a new flock of people will venture into becoming your customers in future.
#5 Communicate With Your Customers
With home quarantine and social distancing, people are missing human interaction and communication. Well, this is the best time to connect with people socially and interact with them.
I strongly suggest not oversee any direct messages that you receive in your inbox. Make sure you reply to the most of them and prepare frequently asked questions (FAQ’s) list and answer them through a post or stories so that your followers feel connected to your business and brand.
However, a live session for people to talk and communicate is highly powerful to reach out to your followers. Talking about random things in the live session while directly communicating via comments or split-screen is a recommended move during the pandemic lockdown.
#6 Free Virtual Classes regarding your business
Instagram’s live session is on the top list for businesses to reach out to more and more people. For example, if your business is a cosmetic line then you can educate people about the best skincare routines with your products. Talk about the pros of each product and how it can transform skin health completely. And there are many other ways to attract your clients too.
Such real-time conversations or classes will harvest an immense impact on your audience. Come up with unique and different ideas for your live sessions and throw some challenges with winning prizes and vouchers.
#7 Use the IGTV option
IGTV’s feature was a welcome for all the users and business owners amongst the other marketing tools. Businesses can talk and feature information for more than a minute and with increased screen time, it is the best time to make use of the feature.
Put up interesting information and how one can use it effectively in their lives. For example, if you own a gym you can put up fitness videos for all body types on your IGTV and stay well connected to all the layers of audience.
#8 Do Not Hoard Your Customers with News
People across the globe are already reading quite a lot of news, you need not add to it. The pandemic has ignited anxiety and depression levels amongst human beings. This is an extremely cautious step to keep out of the news and keep people entangled in activities that will help them divert their minds and keep calm.
#9 Talk About Trends
The pandemic has seen innumerable trends throughout the lockdown. You also need to be an active part of the trends. Using hashtags and viral tags will help you reach out to a larger chunk of people.
Nonetheless, you cannot turn a blind eye to all the social issues that ignited worldwide fire amidst the pandemic. George Floyd killing was a global protest and if your Instagram handle fails to recognize the issue, can be a serious problem. However, put out well-informed and honest opinions about incidents. Half-baked information can pose threats to your reputation.
#10 Get Feedback
It is the best time to gain positive and negative feedback for your products. Arranging a question and answer session with your loyal customers and knowing things they do not like about the product will help know what the customers want.
This is an important step to make your audience feel welcomed with their thoughts and opinions in your business. Feedbacks can also be gained with Instagram reviews and feedback.
#11 Flexible and Revised Plans
During uncertain and fluid situations, your promotions plans must be flexible enough to make an impact during the pandemic. A revised plan and well-structured strategies will help you promote your business in the right direction.
#12 Build an Emotional Relationship
An emotional relationship with the customers will be helpful for your business. Honest testimonials, replying to messages, helping people, polls, reaching out to people with positive thoughts and connecting to other brands to help people will help build an emotional relationship with your target audience. A strong emotional bond will establish brand relationships for a longer run than ever.
Conclusion
Instagram is one of the best tools to invest during a pandemic and global crisis. Make the best out of the time and impact an exceptional number of people through your Instagram handle. Be creative, connect to the customers and concentrate on your business promotion.
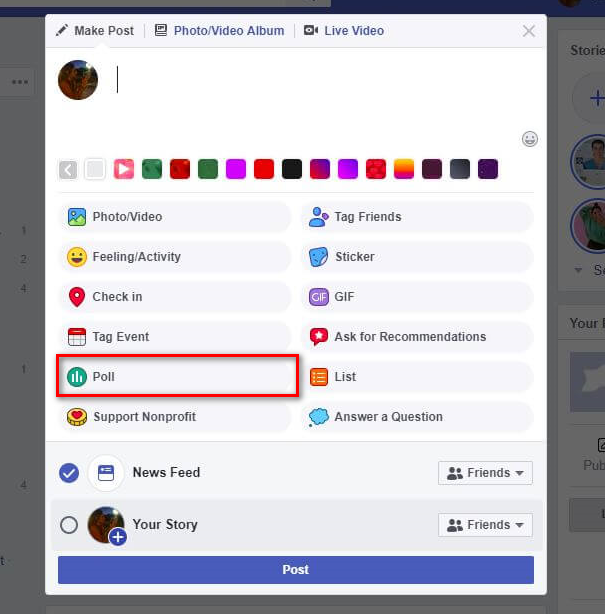
You cannot send a Poll on Facebook news feed or timeline anymore. Instead, you should create a Poll on Facebook groups or stories. People or your audience can vote or answer to your questions on the Poll you create.
How do I create a poll in a group?
If you have a question, you can ask in the group by creating a poll. To create a survey, you should first find the group you are going to share the Poll, then the same as creating a post, select the Poll among the posting options.
To create a poll in a group on mobile:
Open the Facebook app on your phone
Login to your account
the Tap three-line icon in the top right of the Facebook app.
Then find the Groups, tap it, and select a group you are going to share on it.
Tap Write something…. in the group you have selected.
Scroll down to find Poll, tap it, then type in the question.
Tap Add Option, then you can enter options for members of the group to select.
Tap POST.
Done!
Please note that only the members of the group can vote for the Poll you have created.
To create a poll in a group on the desktop:
The process is the same. You should only find the group from the Facebook home of your account, then follow the instruction above.
Go to Facebook website
Login to your account
Click the triangular icon in the top right of the Facebook home.
Then find the Groups, click on it, and select a group you are going to share on it.
Click Write something…. in the group you have selected.
Scroll down to find Poll, click on it, then type in the question.
Click on Add Option… then you can enter options for members of the group to select.
Click POST.
Done!
How to make a poll on facebook story?
You should use a Facebook app to share a poll on your story. This option is not available on the Facebook messenger story sharing part.
Tap a three-line icon in the top right of Facebook, then tap your name.
Tap + Add to Story.
Add your photo or video using available options there.
Tap sticker icon in the top right, then tap POLL.
Type in the question, then tap Yes or No for answers
Tap Done in the top right.
If you are going to change the audience for your story, you can tap gear icon Privacy in the bottom left.
Tap Share to Story.
One of your audience answer to the Poll, they can see the results. They can answer once only. If you swipe up the story, you can see the analytics and number of voters. Also, you can see the voters with their answers.
How do I create a poll on Facebook Page?
If you are admin or editor, you can create a poll on a Facebook page.
To add a poll on a Facebook Page:
Tap the three-line icon in the top right of Facebook.
Tap Pages, then select the Page you want
tap Create Post icon (a rectangular icon with a pen), At the bottom of your Page,
Scroll down to see Poll. Tap it
Type the question you want to ask from your audiences
Write the options in the boxes for your Poll. for each option, you can type up to 25 characters
Tap picture (gallery icon) to add a photo or GIF to your options.
Next to Poll Ends, tap the small triangular icon 1 WEEK to choose when you want your Poll to end.
Tap NEXT, and then PUBLISH.
Please note that Polls on Facebook can’t be boosted.
Instagram is now an inevitable part of everyone living in this modern world. Instagram files and documents are essential and sometimes becomes a matter of life for people. Deleting Instagram accounts, or photos, and videos can be done accidentally, and the owner may look for a way to recover the deleted ones.
How to see deleted Instagram photos?
If you are the one using Instagram in your everyday life, and you have deleted a photo accidentally, here is the way you may find the one.
The only ways to find the deleted Instagram photos are through saved pictures on the mobile gallery (if you turn the option on already), Instagram data download, and searching the web.
You should remember some points before looking for delete photos:
If you are looking for someone else deleted photos, I would say that you cannot access, unless you have their Instagram login info (or access to the app), and email address.
The above is valid for the archived post by others
If you were looking for your own deleted photos, there is no guarantee that you can find them
Method #1: Check the gallery of your phone
There is an option on Instagram to save photos and videos in your mobile gallery. So, a folder would separately be created on your phone named Instagram to archive your photos.
Method #2: Check Facebook
If you connected the Instagram to your Facebook account, or you already created the Instagram by Facebook, there should be a folder named Instagram on your Facebook gallery.
If you open your Facebook account, in the photos section, you should see the Instagram folder.
Method #3: Check the Instagram data
The other way is to download your Instagram and check if you can find them there.
To download your Instagram data:
Open the Instagram app
Login to your account by entering the username and password
Go to your profile by tapping the profile picture on the right bottom of the Home
Find the three-line icon on the top right of the screen
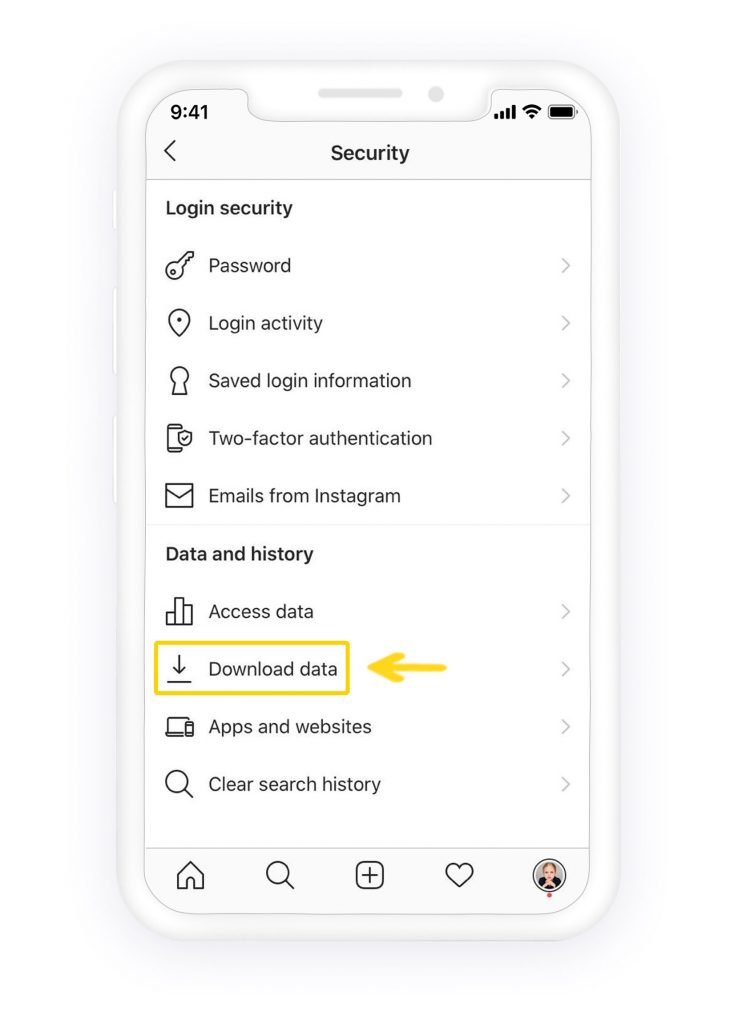
Go to Security
Find Download data
Enter the email address (you have access to it)
Wait for couple e of minutes
Once the download link is ready, Instagram will notify you
Follow the link and download the data on your computer or mobile phone
Extract the file
Find the photos folder
Check if your deleted photos are there
Method #4: Search the web
You can search your Instagram username, and go through the Google image search. All the images related to your username would appear there. If your account was public, some of the websites might archive your photos. You can find them there.
How to hide Instagram photos without deleting them?
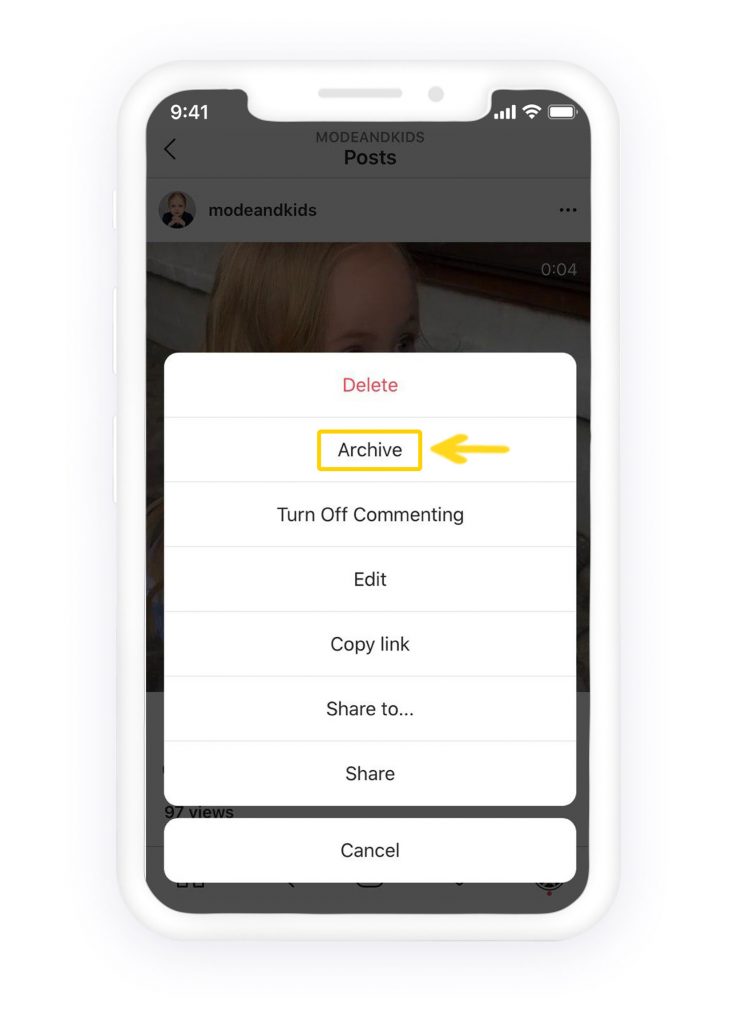
It is better to hide and archive the photos from the Instagram profile instead of deleting them. If you hide a picture, no one can see it on your profile, and it goes to the archived posts on Instagram. You only can see the archived posts on Instagram through your Instagram app.
To hide a photo from a profile without deleting it:
Open the Instagram app and log in to your account
The tap profile picture on the right bottom
Find any photos from your feed
Tap three-dot icon on top right
Select Archive
Now, the photo would disappear from your Instagram feed
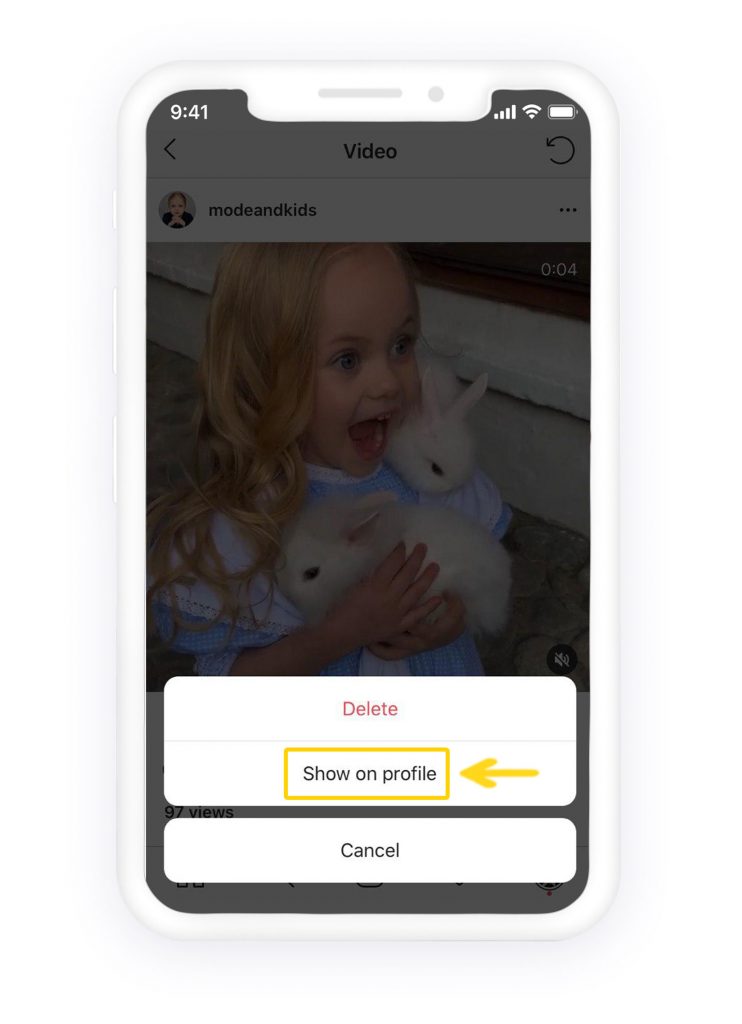
To show the archived photos on Instagram profile:
Open the Instagram app and log in to your account
The tap profile picture on the right bottom
Tap three-line icon on the top right of the Instagram profile
Go to Archive
Select posts or stories
Find the archived posts
Tap three-dot icon on the top right of the post
Select show on profile
Now you can see the post on your Instagram feed
How to see deleted Instagram posts of others
There is no way to see deleted Instagram posts of others once they are deleted by the original poster. This is not only about Instagram, and most of the social media platforms do not allow any one to see deleted posts anymore.
There is only a chance that someone might have taken a screenshot of it (or you work at Facebook or Instagram); otherwise, you can’t, and if you try and use the post URL (if you even had it to begin with), you’ll get a notification: “Sorry, this page isn’t available.” So as disappointing it might be to you, there is no way to see deleted Instagram posts of others when the poster decided to remove them.
Conclusion
Knowing some tips on Instagram would help you to perform better. It is good to archive the posts instead of deleting them. Feel free to share your thoughts in the comments.
Instagram is now one of the most popular social networks all around the globe. However, not all users aware of every nuance on it, and they need guidance to perform better on this social media.
There is some necessary information that every Instagram user must know. This helps you to boost your account and perform better on Instagram. It also helps you to make more connections through other channels. You can also make use of a service like Growthoid to really accelerate your growth on this platform, allowing you to make even more connections. This blog will explain some of the most asked questions as simple as possible. If you need more help on every topic, you can go through the added links in each section, and read more.
Frequently asked questions about the Instagram post
Here are the most asked questions about Instagram posts and stories. If you are running an Instagram account, so it is necessary to go through these questions. These are the basic needs of every Instagram user.
1. Does Instagram notify when you screenshot a post
No. Instagram will not let users know who has taken a screenshot of their posts or stories. Previously Instagram used to show the number of screenshots for business accounts, but they have removed these options too. On other Instagram related apps like Facebook messenger, there is a button that takes the screenshot, which would notify the users about it. But this is not the case on Instagram stories or posts.
2. How to post multiple photos on Instagram
using ca arousal option, on you can quickly post various pictures on Instagram. You should go to the Instagram app or Instagram for desktop (through creator studio). Tap on the + icon to create a new post. Select the first picture, and tap on the multiple photos’ icon just under the image you are going to select. You can only choose up to 10 photographs and videos on carousel posts.
3. How to post a GIF on Instagram,
you should download the GIPHY app. Find a GIF on it, and from the share button, share the GIF on Instagram. You can go to ghify.com on a browser on a laptop or desktop and share the GIF from desktop to Instagram too.
You can create a gif from a bunch of pictures, or a video. If you want to create a GIF from the picture, you can follow the instruction in the blog to create GIFs on photoshop.
You can also go to GIPHY.com and use the free tools to create a GIF.
4. How to edit an Instagram post
you can easily edit any published Instagram post captions, business partners tagged, but not the photos or videos. Once you publish a post by tapping the three-dot icon on the top right the post, you can edit captions, hashtags, location, etc. however, you cannot change the pictures once it is published.
5. How to post videos on Instagram from pc
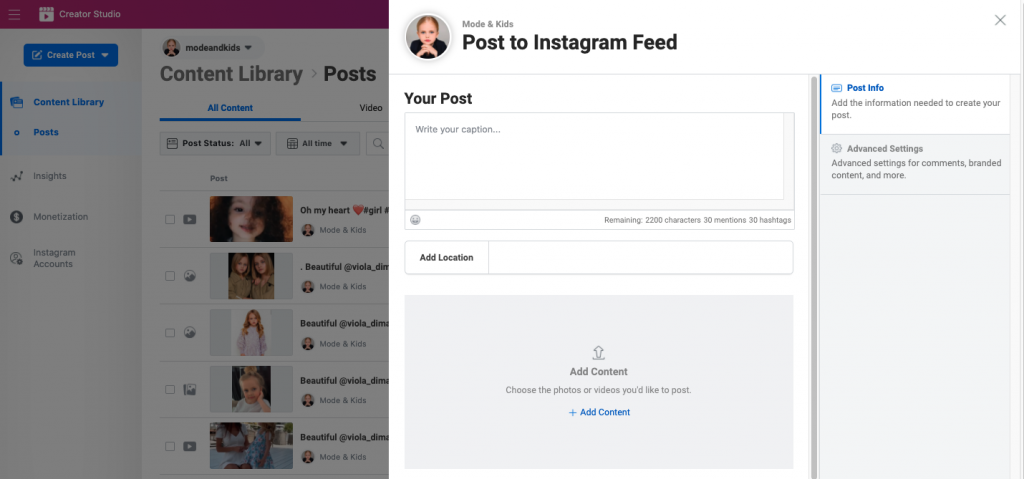
to post videos on Instagram from PC, you should use the Creator Studio website, which is for Facebook and Instagram. Search creator studio on Google on your desktop using a browser like Chrome or Safari. Open the creator studio and login using your Instagram account. From there, by clicking on Create post blue button, you can upload a video (less than 60 seconds). If your videos are longer than 60 seconds, you should upload it as IGTV, which is an option in the blue button.
6. How to post a YouTube video on Instagram
unfortunately, YouTube does not support Instagram to reshare the videos. To post any YouTube videos on Instagram, you should first download the YouTube video using any YouTube downloader available on the internet. Then save the videos to your phone or desktop. Share that video to Instagram from PC or mobile phones. There is no direct way to share YouTube videos on Instagram from YouTube.
7. How to add music to an Instagram post
Using a music sticker, you can add available music from the Instagram library to your stories. To add music to Instagram stories, open the accounts, from the top of the screen tap sticker icon, find music sticker, and choose the music, tap share. However, the music sticker is not available for all countries. If you do not see the music sticker, it means that it is not available for your country of residency.
8. How to delete a post on Instagram
You can delete an Instagram post soon as it is published. To delete an Instagram post, go to the post, tap on the three-dot icon on the top right of the post. Find the Delete button and tap it. Remember that you cannot undo this action, and the post will permanently delete from Instagram.
9. How to share a Facebook post to Instagram
Since Facebook sharing is based on the URL and link, you can share directly from Facebook to other apps like WhatsApp, telegram, messenger, etc. so, using social management tools, you may post on Instagram and Facebook at the same time. But if you are not using these tools, you should download the content separately, and post on Instagram again. However, you can share a post from Instagram to Facebook directly from the Instagram app. If you connect your Facebook account to Instagram, when sharing new content, the bottom will be available to share with other apps like Facebook.
10. How do I post multiple pictures on Instagram from my computer?
Using the creator studio, you can upload content and share it on your Instagram. Go to the creator studio website and log in using Facebook or Instagram. Then click on create a post, and upload up to 10 videos or pictures. Write the caption, schedule, or publish right away.
11. How long of a video can you post on Instagram?
You can upload up to 10 short videos 60 seconds long in a carousel post. However, you should split the video into ten parts. If you want to have it a single file, then upload it as IGTV. When uploading a video on Instagram, you can choose to upload as IGTV or short video.
12. Why can’t I post a GIF on Instagram?
You can fix the issue of cannot posting something on Instagram by updating your app, reinstall the app, clear Instagram app cache from the phone, try the desktop version (creator studio), checking the internet connection, or give it some time and try later. If you still could not fix the issue, attempt to contact Instagram support withing the setting>help>report a problem.
13. How to post a YouTube video on Instagram story
The same as a Facebook post, YouTube video is also related to sharing a link. Therefore, there is no option to directly publish the YouTube video on Instagram unless you download the YouTube video using any YouTube downloader and save it to the desktop or phone. Then, reshare the video on Instagram.
14. How can I post a video longer than 1 minute on Instagram?
You can easily share any videos longer than 60 seconds on Instagram using the IGTV option. Once you are uploading a video as a new post on Instagram, it will show you the opportunity to post the video as IGTV. If it did not show:
Open the Instagram app
Login to your account
Tap explore icon on from the home
Find the first option IGTV on the top left
Tap IGTV
Tap + icon on top right to upload a new video
Select the video from the library
Write the description and title
Share the video
It will show up on your profile, and separately in the IGTV menu, on your profile between Instagram feed, and tagged photos section.
15. What is the difference between a post and a story on Instagram?
An Instagram post will remain forever, or until you purposely delete it from the feed, but Instagram stories only last for 24 hours. After this time, Instagram stories will disappear automatically unless you make it as highlights, and add it to your Instagram profile. The other difference between Instagram stories and posts is that you can see all the insight for Instagram posts at any time. Still, the Instagram stories viewers will disappear after 24 hours, even if you make it as highlights. You are only able to see the number of viewers.
Another difference between Instagram stories and posts is that you can add links, stickers, music, and many features on Instagram stories. Still, an Instagram post, you can only edit the content and write a text for it as a caption.
16. How to unarchive a post on Instagram,
You can easily archive a post on Instagram. to archive post:
go to the Instagram app,
login to your account
Open the post you are going to archive
Tap three-dot icon on the top right of the post
Find Archive
Tap archive
When you unarchive a post on Instagram does it repost?
It will be sent to the archive you can access through a three-lined icon on Instagram profile. You can unarchive posts at any time, by finding them through the archived list, and repeat the same process, and select show on my profile.
When you unrchive a post, it goes right back to the place and order it was in your profile. Photos won’t reappear on the news feed and they will only reappear in your profile. So, users won’t know that you have unarchived your posts.
17. How to post multiple photos on the Instagram story
It is easy, and you can upload directly from the Instagram stories part. To post multiple photos on Instagram stories:
Open the Instagram app
Login to your account
Tap on profile picture on the top left to go to the stories
Tap on the gallery icon on the bottom left
First, select the multiple on the top right of the screen
Then select as many as you want
Tap Done
Tap share
18. How do I delete an Instagram post?
You can do all the action from the post itself. You should open the post, tap the three-dot icon on the top right of the post. Find the delete button, and tap it. Confirm the deletion, and it will be deleted permanently. Remember that you cannot undo this action.
19. How to post a video on Instagram story
You can quickly post any videos on Instagram stories using the story uploading section. You should open the Instagram app, log in to your account, tap on the profile picture on the top left to go to the story section. From the galley icon on the bottom left of the story section, select the video from the library, add any stickers, effects, and tap share. You have two options: sending the stories to close friends or all your followers.
20. How to post camera roll photos on Instagram story
To send a photo from camera roll to the Instagram story, you should open the photo you want to share on Instagram, find the sharing icon on the bottom left, select the Instagram app. It should redirect you to the caption writing section. Write the caption if you want, and tap share.
21. How to boost an Instagram post
You can use the Instagram ads section to promote a post on Instagram if you have switched it into a business account. If not, the only way is to promote through Instagram stories or posts of influencers or accounts with several followers. The main point about boosting an Instagram account is to show it up to many users. If you want to do it for free, you can use hashtags strategies, try to get into the explore section of Instagram, or use any other approach like using location to increase the probability of showing your content to others.
22. How to cite an Instagram post
If you want to use a post on Instagram to cite in your thesis or dissertation, you should deal with it like website content.
How to cite an Instagram post in MLA:
Account holder’s Last name, First name or Username. “Photo Title or Description.”* Instagram, Other contributors, Date photo, was published, URL (without // or //).
Example: National Geographic. Photo of the Bering Sea. Instagram, photographed by Corey Arnold, April 2. 2017, www.Instagram.com/p/BSaisVuDk7S/?taken-by=natgeo.
How to cite an Instagram post in APA:
Account holder’s Last Name, First Initial, or Username (Year, Date Published). Photo Title* [Photo description]. Retrieved from URL
Example: National Geographic [@NatGeo]. (2017, April 2). [Photograph of the Bering Sea by Corey Arnold]. Retrieved from //www.Instagram.com/p/BSaisVuDk7S/?taken-by=natgeo
How to cite an Instagram post in Chicago:
Account holder’s Last name, First name or Username. “Photo Title.” Instagram, Date published. Date accessed. URL.
Example: National Geographic. “Photo of Bering Sea by Corey Arnold.” Instagram, April 2, 2017. Accessed April 7, 2017. //www.Instagram.com/p/BSaisVuDk7S/?taken-by+natgeo.
23. How do you add more photos to an already posted post on Instagram?
You cannot add more photos to an Instagram post that is already published. If you missed any images, you should delete and republish the post. You can only edit the caption, adding location, tagging partner. You cannot even write photos or crop them.
24. How to delete an Instagram post on pc
To delete an Instagram post on PC, you should go to the creator studio website and log in there with your Facebook account (if it is connected to your Instagram). You can also log in with the Instagram account too. You can see the published posts there, click on the post, open it, and from the available options, delete the post. You cannot delete a post directly from the Instagram website. Creator studio is the only free way to remove an Instagram post from desktop.
25. How to post a live picture on Instagram,
You can upload any type of photos on Instagram using the same way as you upload pictures. However, the point is that if you upload a live photo on Instagram, it will not be played after you upload it. It would be converted to a simple picture. If you want to upload it as live, you should first convert it to a video, then upload it on Instagram.
26. How to add links on Instagram post
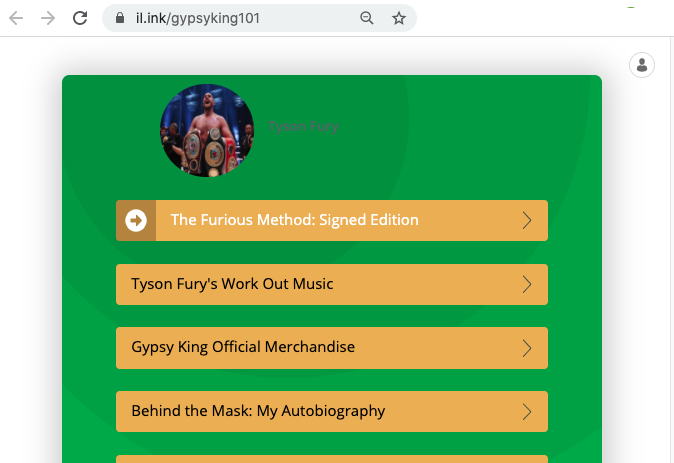
You cannot add a clickable link in Instagram bio, but you can tag an Instagram username that is clickable. The other way people use to add links is using tools to add multiple links in Instagram bio like iLink. All you need is to write “the link is in bio” in the caption. Users would visit the profile and click on the available links. There are also possibilities to share the post on Instagram stories, and add a link from there only (if you have more than 10K followers).
27. Why can’t I post on Instagram?
There could be many reasons why you cannot post a photo or video on Instagram. You better check the following options:
Check your internet connection
Off and on the internet connection and try again
Update the Instagram app
Check the dimension, and size of the content you are going to upload
Delete the app and reinstall it
Clear the Instagram app through the app setting
Try to upload the content from PC
Contact Instagram support within the app in Setting>Help>report a problem
28. How to post Instagram videos on Snapchat
To post any Instagram videos on Snapchat, you must download the videos separately. Then, upload it on Snapchat. You can use any Instagram downloader to download videos. All you should do is copying the URL of the post and paste the copied link in any Instagram downloader tool. They will show you up the button to download the videos. Then, you can follow the simple way to upload that videos on Snapchat. If you are using a phone, use any browser to download Instagram videos.
Conclusion
This blog would help you to fix some of the most common issues on Instagram, and to perform better on it. If you have any inquiries or ideas, you can insert it as a comment under this article.
Having an Instagram account is necessary for everyone living in this modern world. Instagram is not only a platform to share photos and videos, but it also a platform to edit your photos, videos, or even save them in a private account.
You can use Instagram as a cloud to store your content. With lots of features and options on it, Instagram has become a favorite app for small or medium-sized businesses. Even retailers love it as they can sell quickly on Instagram. Your business can also expect a similar fate; simply buy Instagram likes and increase its exposure efficiently. But Instagram will not stop growing; shopping is a new feature on Instagram that makes it possible to shop directly from Instagram. Soon Instagram would be the competitor for Amazon or other sites like Alibaba.
Users are joining Instagram day by day, and it is becoming increasingly challenging to grow the account. Unless celebrities that are well known and people already search for them, others should try many ways to improve on this platform.
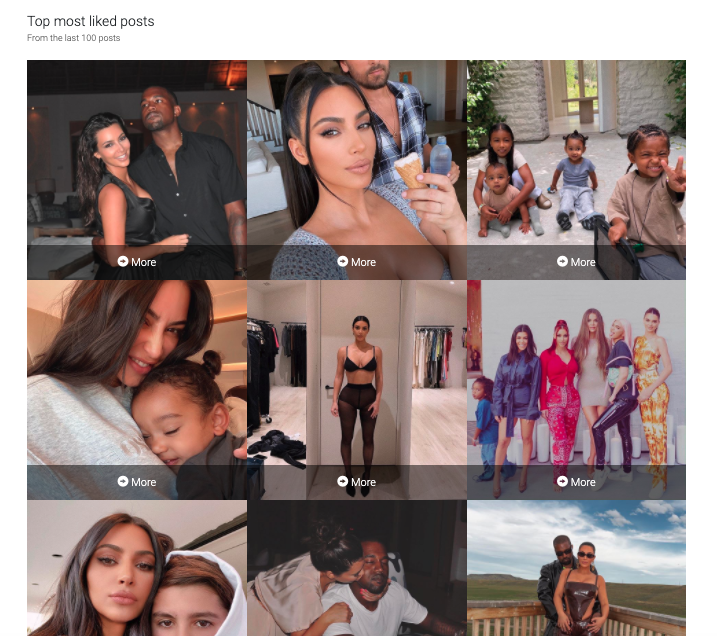
Instagram engagement is a factor in defining how good an Instagram account is. Participation is about Instagram likes, comments, save, share. All of this would help a post get more reach and impressions that all bring benefits for the account holders.
How to get more Instagram likes?
Yes, the number of likes depends on what content you are sharing, and what you do then. There are some points that you should know about getting more like, as well as instagram followers:
#1 Irrelevant content gets fewer likes. If you are working on fashions, for example, and you share some irrelevant content about cars, of course, it is not related to your niche, and your audience will not like it. Irrelevant content causes many unfollowing too. So, make sure that you are posting the right material for your viewers. If they are your followers, it means that they have visited your profile at least once, and they are interested in what they have most seen on your Instagram feed. So, they are not interested in any other topic from your account, and this cause is getting fewer likes.
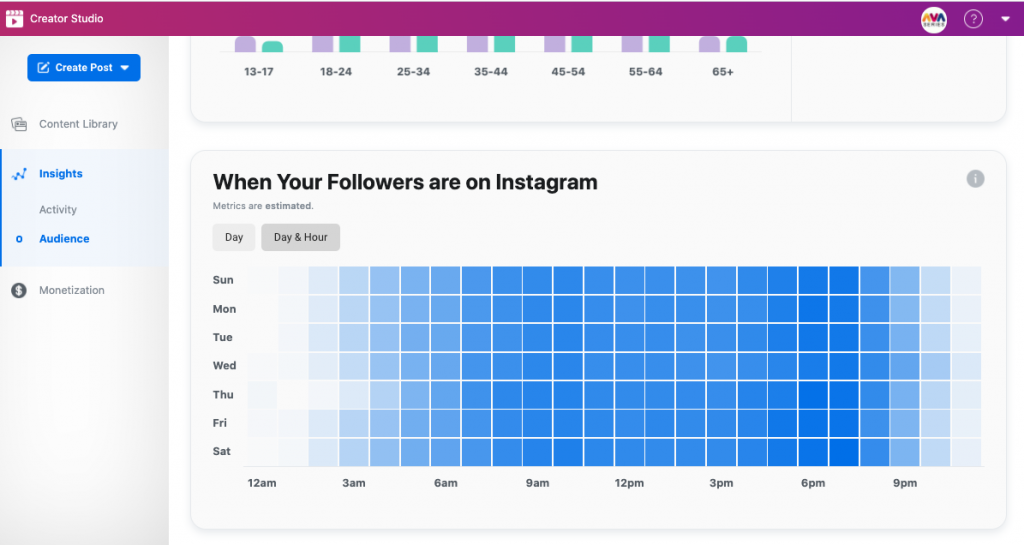
#2 Post at the right time. You might have heard that posting when people are online for sure gets more attention. So, find the peak hours from your Instagram insight (audience section), and post your content regularly there. Unless your audience needs the content sooner. For example, if it is about announcing any event time, etc.
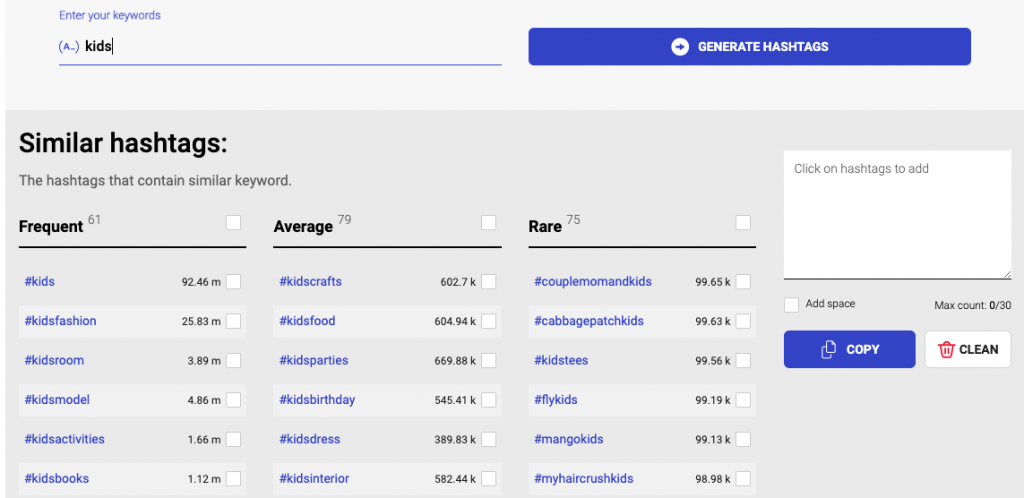
#3 Use the right hashtags. Again, relevant hashtags, using Instagram hashtag generators to get the most popular ones and using up to 30 hashtags for sure to increase your content impressions and reach. You can check this from the reach percentages (for example, 10% were not your followers). It means that they come from hashtags, or explore. So, do not miss this opportunity.
#4 Choose the right content. You might notice that some of the posts are getting more likes than others. This is true for comments. However, the story of getting more comments is different, that we would consider it later. To know which content may get more likes, I would check it through similar accounts. Suppose you are reposting to your Instagram account that is quite easy. Use a profile analyzer to find the most liked photo of the Instagram account. Then, repost it to your Instagram feed, and you see that it gets more likes in your account too. The conclusion about this tip is that, if people like a photo more, it is true for all users, in all accounts (and of course with the same niche, interest, field of work).
#5 Use profile analyzer: it is good to know which Instagram post of your or other accounts got more likes. So, you can get an idea of what you should post to get more likes. I have used this trick, and it does work. Give your username to the Instagram profile analyzer tool. It will show you the most liked photos of your profile. You will get what your audiences like more, so share similar posts more.
#6 Post on the best day: again, through the Instagram insight, you can get what day is better to work for our account. Remember that you should not compare your content with others. The day of activity is different for different accounts, and even it is different in every country. For example, in some states, people won’t check Instagram at the weekend. So, you might get fewer likes, compare to other days of the week.
#7 Run contest: another method that works for sure is running game. As you know, some tools select a user that had liked your photos. So, you can give a price, and run a contest from who they have liked the posts. Instagram users love participating in these kinds of challenges. You should try it.
#7 Share posts on Instagram stories: this will show up the post to more Instagram users. They can visit the post by tapping the picture. So, the content would get more impressions and reach.
#8 Promote the post: Instagram ads are not the only way you can get more engagement on your job, but if the post is worthy and you can make money from it eventually, you can try Instagram and too. It might work for you. There are some blogs available that thoroughly explained how Instagram ads work and how much does it cost. Remember that you should switch to the Instagram business to get this option.
#9 Buy Instagram likes: If you have recently opened your accounts, and you need to make it better, you can add some likes or comments. For example, you can Buy Instagram likes at Champmarketer. It will help users to find posts more attractive and eye-catching.
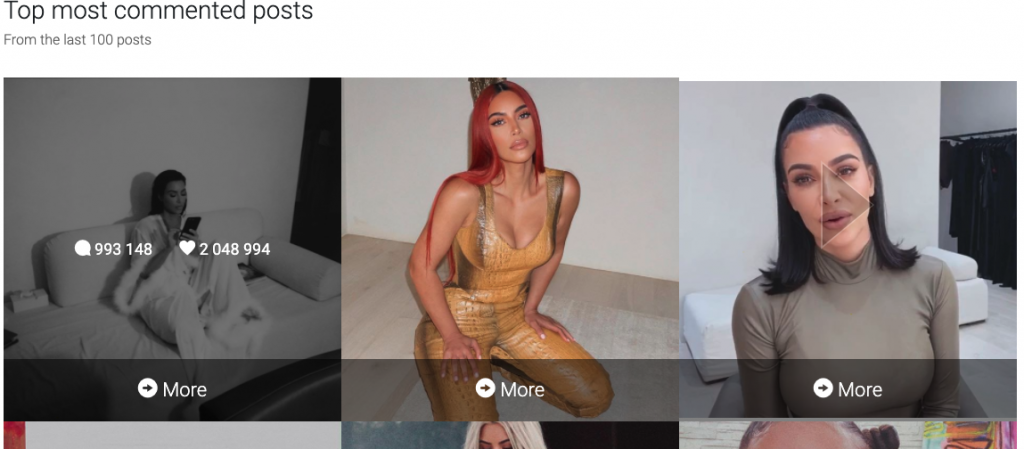
How to get more Instagram comments?
Like getting more Instagram likes, getting more Instagram comments needs to know some tips. Some of these tips are indeed similar, but not necessarily people comment on a post that they like it. It is good to have both likes, and comments which shows a reasonable rate of engagement on Instagram. in general, every post engagement depends on the number of likes, comments, saves, and shares. You can see all of this from Instagram insight available for business accounts.
To get more Instagram comments, you should share the post that people have something to say, or they have feelings to show. This can be asking their opinion, controversial topics, funny memes, sad news, or campaigns, or some missing information. So, we use any of these tricks to get more comments on Instagram, and of course, other experiences about this.
#1 Use profile analyzer: as I have stated before in getting more Instagram likes, you can check what the most commented posts on Instagram of a profile with a tool are. Some provides this tool, and by giving the username of that public profile, it will analyze it for you. However, there is a link to the original post, and you can save it for later in your Instagram collection. So, if you share the same position, or something similar, then most probably you will get more comments than your other post. This works. You should try it. Though this is good if you are reposting, or you are going to share something from other accounts. If you have your idea, or you are creating content, you should check what other insert comment more.
#2 Ask their opinion: many Instagram accounts are getting more followers, likes, and comments only by resharing other account content and ask users opinions. For example, choose one from number 1 to 10 in a carousel post. This will encourage users to give their idea, and what makes them more enthusiastic is getting an answer from the owner of the account or other users. Fortunately, like and reply to Instagram, comments are an excellent option to encourage others to give their opinion.
#3 Controversial topics: if you search across Instagram, you realize that some posts get many comments. There are some topics that always people have something to say about that. Like why some celebrities are famous, some not. This is true for news too. People for Marriage news, for example, have a lot to say. You can try this in your niche. Find a relevant and controversial topic and share it to get comments.
#4 Comments for the specific post: if you are selling a product on Instagram, and you want to get other comments on it, you should write your caption carefully. Make the content stunning. Even if users do not have any comments about the procedure of purchase, they express their feelings. That is helpful too. The more a post gets positive feedback, the more it is likely to get sold out. So, try to publish the most amazing pictures of those products.
#5 Reply to comments: you might know all replies on every comment, count as one separate comment. So, if you are looking for more feedback, you can use this option and reply as many comments as you can. This will show up in the comments. The better point of this is that others would be able to see your replies on their Instagram feed. This will encourage them to participate in the conversation. So, the number of comments will increase up.
#6 Induce more comments: when you are replying to comments, you can ask for more info there. It is an excellent opportunity to get more feedback from that person.
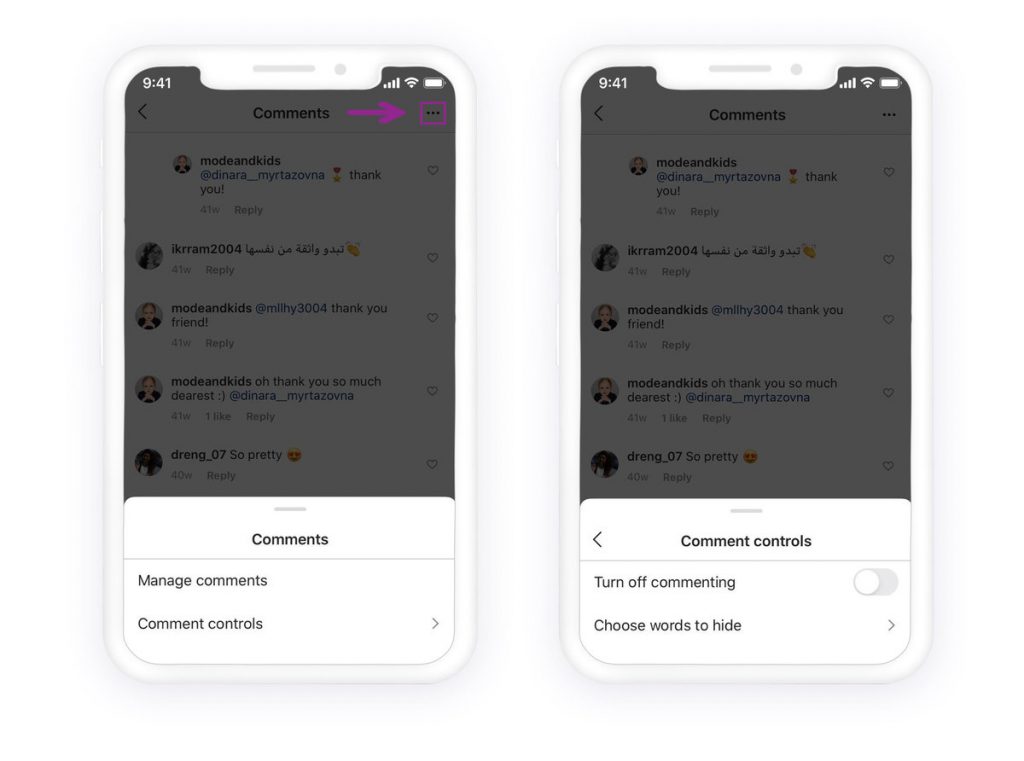
#7 Use Instagram comment control: if you want to have a positive environment on your Instagram feed, you can restrict individual accounts (right from the comment manager). Or you can scape specific words in a comment through Instagram comment control. This will hide up all the spam unless you approve them to show up in your post.
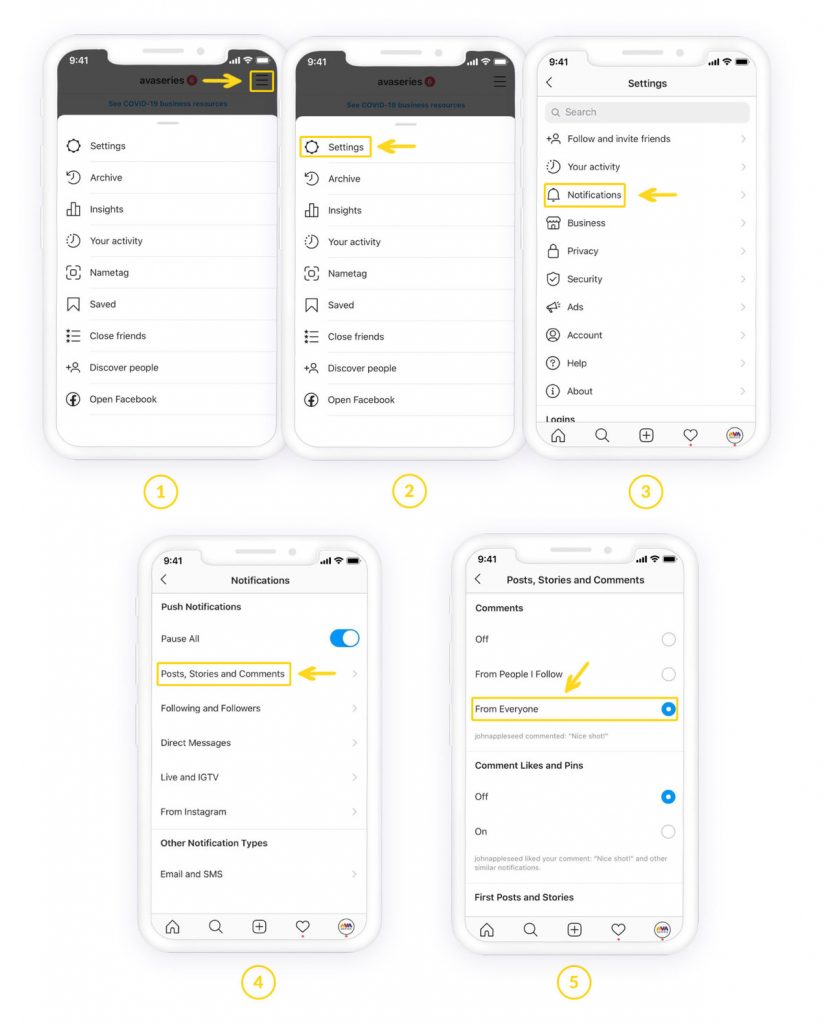
#8 Turn on the comment notification: this will let you reply and view comments at the earliest time. So, you will not miss any comments. With responding and reacting to all of them, the number of your comments will be doubled.
How To Maintain Boost To Your Instagram Likes
Do you already have a decent like-base on Instagram? If yes, congratulations because you already made the first base. During this stage, it’s crucial to maintain boosting your Instagram likes for broader social media exposure. Most often than not, brands work with social media services to keep getting more likes. For instance, Insta-likes – Get real likes and followers on Instagram, and other social media companies offer these services.
Of course, it also pays off if you know how to maintain boosting your likes on Instagram. In that way, you know how the process works and implement the most suitable tactic for your business or personal social media needs.
Check out the following tips to maintain boosting your Instagram likes:
#1 Promote your Instagram post to your website: This is a great way to increase people’s awareness that you have an existing Instagram account. They can interact and engage with you through this platform.
#2 Promote your Instagram to other social media pages: You can attach your Instagram post’s link to your other social media pages to attract more likes and word-of-mouth referrals.
#3 Incorporate your Instagram post into digital marketing campaigns: You may include your Instagram posts in your email marketing, paid ads, content marketing, and influencer marketing campaigns.
Overall
Getting more Instagram likes and comment worth it because you can make money from it. The tips mentioned above are from the experiences of users on Instagram. So, you can try anyone you can, and see the results. If you have any other ideas or questions, you can share it in the comments.
YouTube is the largest video sharing platform and a social channel too. Not only to can you share the videos and edit the shared ones, but also can you send stories, live videos, and get in touch with friends and family. YouTube is getting bigger and bigger, and it is worth to be active on this social platform.
If you are new to a social media like YouTube or you have not been that active, you might not know how to fix some issues on the YouTube channel. Once you open the YouTube app or on the desktop, it looks confusing. Here I would explain how to change the YouTube name on both apps and desktop. So, you can do it with any devices. Remember that you should read the limitations of changing a name on YouTube.
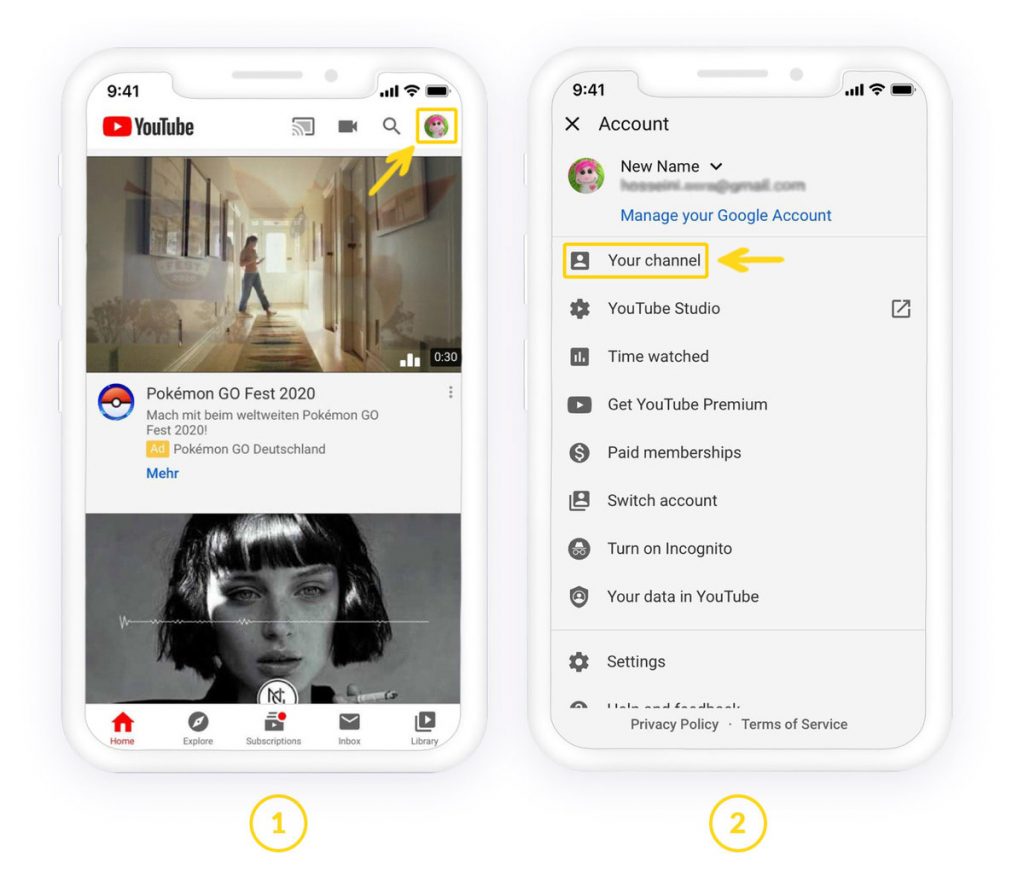
How to change a simple YouTube channel name on mobile?
As you know, the name of the channel is significant to get more subscribers on YouTube. The more the name is close to the people’s needs, the more they would follow you on YouTube. So, it is better to select a name that best defines your channel. The character limit of choosing YouTube channel name is characters with space. The YouTube account name also can be changed, and the military is characters with space.
To change the name of the account on a mobile phone
To change the channel name of a mobile phone
Open the YouTube app on your mobile phone
Login to your account
Tap your profile picture (if any) on top right corner
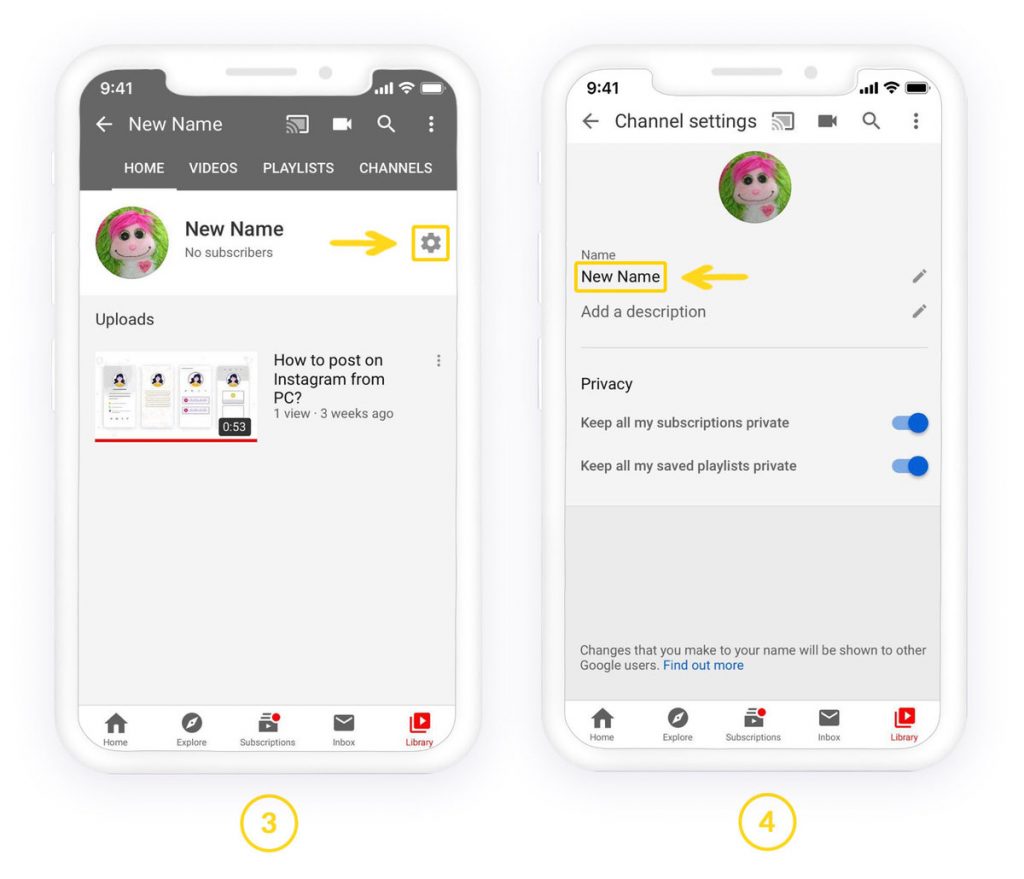
Tap your channel
Tap setting (a gear icon)
Add a new name
Tap mark icon to save the changes
Done!
How to change YouTube name without changing Google name
You should connect your channel to a Brand Account if you want to have a different channel name than your Google account. A Brand Account is a type of account that supports businesses or brads on YouTube apart from your google account.
What will happen if you connect your YouTube channel to a Brand Account:
You can manage the brand account which is connected to a YouTube channel with your Google account
You can access the brand account using google account
You can hide your email address and information on a brand account unless you make them public
You can manage multiple YouTube channels with only one google account
You can have team workers, admins, managers, or any other member for your channel.
Differences between YouTube channel and brand account
A YouTube brand account is created through a personal YouTube channel. The difference between having a standard YouTube channel and having a YouTube Brand Account is that with the latter, you have the option to change owners and managers, while a YouTube channel is always associated with a specific person and their email address. Another useful option for the brand accounts is that YouTube adds channel managers to these accounts.
Google Account: You need a Google Account to sign in to YouTube. Your channel name is automatically the same as the one on your Google Account.
Brand Account: A Brand Account is an account that is specifically for your brand. This account is different from your personal Google account. If a channel is linked to a Brand Account, multiple people can manage it from their Google Accounts.
Change YouTube channel to brand account
A brand account is a google account that is created from a google account, but it is not connected to the google account. So, you can add any channel inside it and change everything without having changes on your google account.
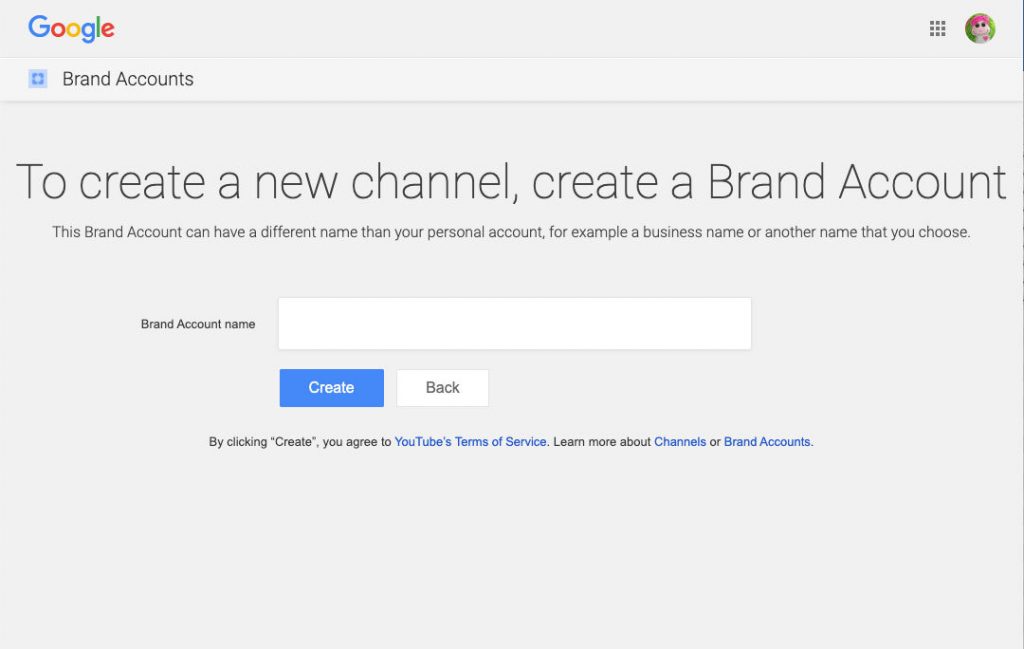
To create a new Brand account, follow the instruction below:
Fill out the details to name the Brand Account and verify your account.
Then, click Create.
Now you can see your brand account. From here, you should connect the channel to this brand account. Once you connect it, you can change the channel name, without changing your google account.
Switch between YouTube accounts
If you want to manage your account or your channels, you can switch between the brand account or google account.
Go to YouTube website
Login to your account
Click the profile picture in the top-right corner.
Click the Switch account.
Choose the account you want to use with YouTube from the list.
How to change YouTube channel URL?
it is good to have an easy to read web address, so fans and friends may distinguish or find it easier and more convenient.
The URL can be a link based on your name, username or the name of your website. You can also capitalize on the URL for ease of reading.
Please note that You can’t edit a custom URL. Instead, you should claim a new URL, and delete your existing one. Once it is removed, that is free for another creator to choose. However, you should check your eligibility before changing the URL.
To create a custom URL, your account needs to:
Have 100 or more subscribers.
Be at least 30 days old.
Have a photo as a channel icon.
If you were eligible to change the URL of your channel, you could see the notification in the advanced account setting, or your creator studio dashboard.
You cannot edit your custom URL later. So, make sure you entered the right one.
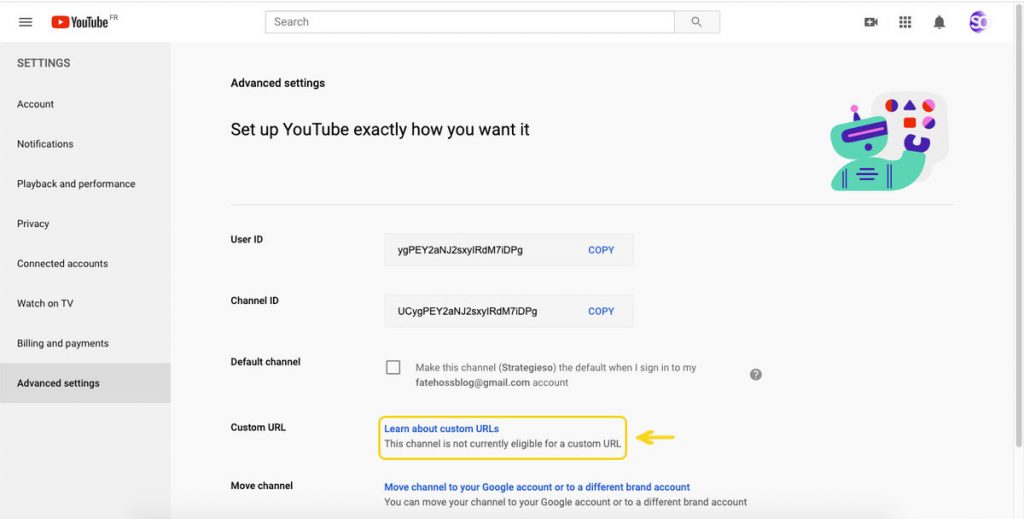
Click on your profile picture in the top right corner
Go to Setting
Go to Advanced setting
Under “Channel settings,” choose the link next to You’re eligible for a custom URL. You cannot see the link if you are not qualified.
In the “Get a custom URL” box, you should see the custom URL(s) you’ve been approved for. You cannot make changes to the part in the gray box, but you can add a few letters or numbers to make it unique.
Read the “Custom URL Terms of Use,” select the box to agree to them, then click Change URL.
Once it is approved, you can’t change it, so make sure this is the URL you want before clicking Confirm.
Overall
Making some changes to the YouTube channel is a good idea once you are going to boost your YouTube channel. It is good to change the name and make it different from the google account. Or even change the YouTube channel URL for ease of access and reading of your fans and subscribers.
Nowadays, having an online store is necessary for all kinds of businesses with ever-increasing issues of a pandemic. All companies can set up an eCommerce using ready themes and sell their products there, even if the store is closed.
Why Shopify alternatives?
Building an eCommerce website is necessary for all kinds of businesses, including small, medium, or large ones. Most probably all large, or even medium-sized business have their eCommerce platform already. But these are small businesses, and retailers should think about making an online store that is accessible for all.
Why do we need an eCommerce website instead of a complete website? The reason is apparent. Now, many platforms are providing ready themes making an online store without having coding knowledge or being worry about the domain name, host, or anything else.
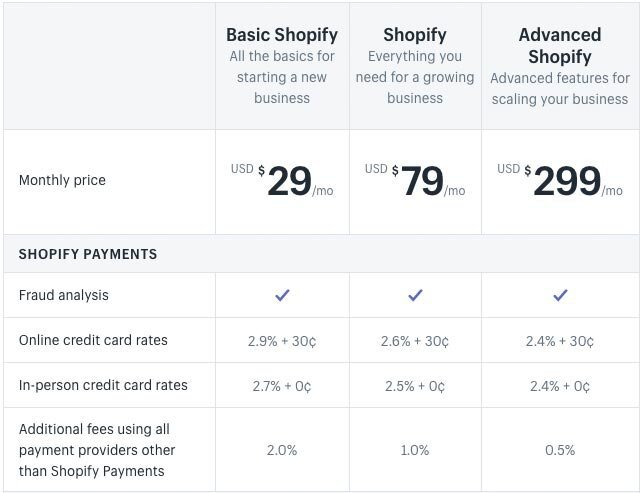
Shopify pros
Of course, Shopify is one of the best leading eCommerce platforms, but the main point about Shopify is that it is not suitable for all.
It seems that Shopify does work for large sales.
Of course, its features, designs, integration with Ordorro, being available on Instagram, user-friendly environments make it the right choice.
Shopify cons
extra transaction fees – you should pay about 2% for every transaction on Shopify. So, if you have recently started the online store, or you think that is too much for you, you should try Shopify alternatives.
You can only use the gift card if you have an advanced plan. There are also some features like real-time shipping rates that are locked unless you pay the extra money.
Because of the plugins and rough URLs, unfortunately, Shopify does not rank you on Google, and the not being optimized for search engines is its weakness if you want to have customers from Google too.
Best Shopify alternative
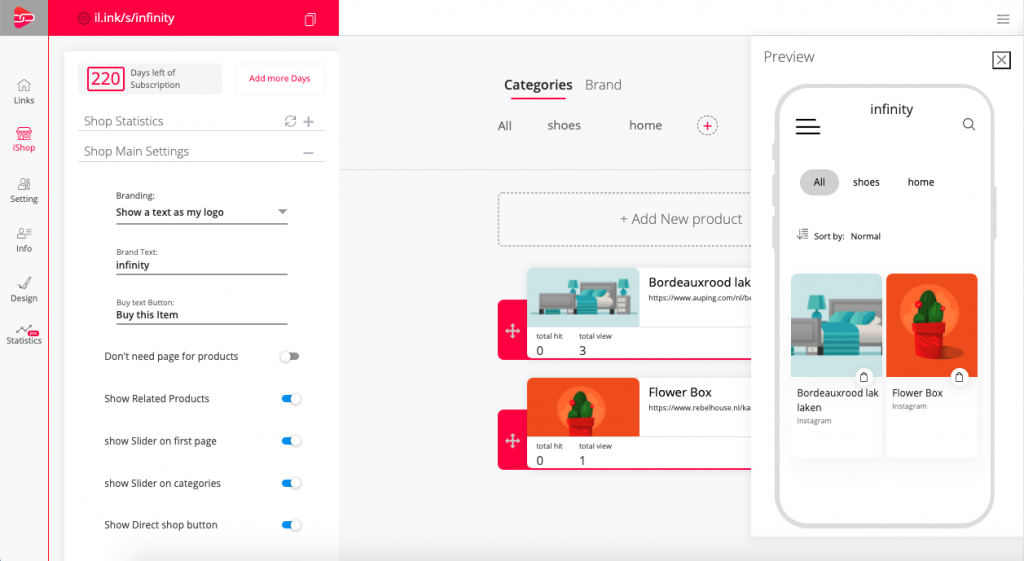
iLink is an eCommerce platform that helps individuals or brands to create their landing pages and online store. Using iLink iStore, you can build an online store, add your products (physical, digital, services) there, and add details, prices, purchase links, etc.
iLink landing page is a free service and is useful if you have multiple URLs. You can gather all the links on one web page and design it as you want.
ILink iStore is also customizable, and you can change it based on your need. Here I would mention some of the main benefits of using iLink iStore to build an online store.
Sorting out the products in iLink
While you can add iStore in your Instagram bio, or any other place, your audience can visit the page and sort out the products based on their popularities, prices, categories, brands, etc.
This would help serious buyers to choose better and faster. They can find the base of the product don the brands and prices they are looking for. Even if they are new to your store, they can see a wide verity of options in front of them, which can be sorted out based on their needs. So, using an online store catalog, you can tell customers what you have for them!
No competitors
If you sell on the other websites like Amazon, you realize that the algorithm would suggest other brands or competitors for the visitors. Even when customers are searching on Instagram explore, they face many companies selling the same products. Even Instagram would suggest similar accounts. However, when customers visit your iStore page (for example, from Instagram bio), they will not see any other suggestions from your competitors. This leads to more sales for your brands because all they see is your products.
Stunning online store
Being different has always been the key to success. iLink iStore has provided many fantastic options on their dashboard to look at the web page stunning. This would attract customers and keep them in your online store, which leads to more sales. You can build a modern online store with your design.
Customers from Google
iLink iStore is an SEO friendly eCommerce platform, and you will come to Google search. When you log in to your dashboard, on iLink website, when adding a product, you can add extra details describing the products. iLink is a blog and online store together, which helps you create the content of your product too. This will take you on the Google search engine, and users would visit the products directly from Google.
No coding knowledge
You may hear about how difficult it is running a website from choosing a domain name, hosting, coding, and all necessary items. However, using iLink you can build an eCommerce website with no coding knowledge, even with no specific knowledge about the online stores. All you need is uploading the pictures, adding the detail, title, purchase links, information, and info like this. You will enjoy making your eCommerce website with fast and efficiently.
Linktree alternatives
If you have already used Linktree to make your landing page, now you can have both an online store and landing page in one place and from a single dashboard. Building a landing page is another primary service of iLink, and you can even have an advanced design with iLink pro. The main point of this is you can create all with one account, and no need to have a separate dashboard, or report to build an online store, and landing pages.
Ever-increasing grow
ILink rank is going up day by day, and soon it becomes a leading eCommerce platform. So, having a unique username might be difficult later, like Instagram and Facebook. So, it is useful if you create your account (you can log in with Google too), and have iLink iStore in your bio of social channels.
Affordability
If you are more prominent or you are selling online from home, you might know how expensive it could be to create a website. However, with less than $10 per month, you can own an eCommerce website selling online. It is well worth it.
Growcer
Growcer is another major contender in the space of eCommerce platforms and is an excellent Shopify alternative. Developed by FATbit Technologies, Growcer is a grocery ecommerce platform that is designed especially for different niches in the retail or FMCG industry.
With Growcer, entrepreneurs can build, maintain and manage their online grocery marketplace with ease. A hyperlocal solution acts as a bridge to unify the gap between grocery retailers and consumers. Retailers can list their grocery items online for consumers to purchase using the platform.
Designed to boost sales and drive business growth, Growcer comes equipped with robust mobile apps for both buyers and delivery staff. Being a ready-made turn-key solution, Growcer comes with a myriad of outstanding features. Mentioned below are a few benefits of Growcer:
Interactive Interface
Growcer has been impeccably designed after rigorous brainstorming sessions. In the process, many ideas were scrapped to make the front-end design attractive and user-friendly.
Aesthetically pleasing, Growcer has an interactive interface with intuitive navigation. Its enriching appeal provides a coherent experience with better customer acquisition.
The UX/UI elements are carefully planned and placed to serve the users appropriately. This means that the interface design facilitates smooth user interaction, rather than expecting them to adjust their behavior to the product. The user-centered design approach amplifies engagement.
Fully Customizable and Lifetime License
Built with agile methodologies, Growcer is a fully customizable white-label solution that offers a lifetime license. Tailored to meet business requirements, the look and feel of the product can be enhanced to make it more appealing to users’ eyes. With direct access to eCommerce developers, Growcer can be custom-built to match your brand’s identity.
PWA and Mobile Apps
Growcer comes equipped with easy-to-use Progressive Web Apps that go in sync with your eCommerce marketplace. Being a mobile-friendly platform, users on any device like laptop, tablet, desktop, and more can be captured by Growcer. It also provides robust and intuitive apps for buyers and delivery staff.
Can Launch Marketplaces in Different Niches
Having a marketplace that caters to a specific niche has an advantage over other platforms. As there is domain specialization, the products and services offered by a niche-based marketplace are more specific.
Growcer, in conjunction with customized features and functionalities, can be used to launch marketplaces in several niches. These are – grocery, pet supplies, electronics, pharmacy, liquor/wine, farmer products, and more.
Impeccable Features for All Users (Admin, Seller, Buyer, Delivery Staff)
Growcer is an effective eCommerce solution that helps you streamline crucial components for your online grocery marketplace. It has in-built features for admin, sellers, buyers, and delivery staff that offer radical flexibility for an enthralling experience. Listed below, are a few elements:
Admin:
Product Catalog System,
Delivery Staff Management,
Multiple Revenue Channels,
Advanced Reports and Statistics,
And More.
Sellers:
Delivery Slot Management,
Order Cancellation Request Management,
Order Refund Request Management,
Subscription Plans,
And More.
Buyers:
Order Tracking,
Multicart,
Guest-User Checkout,
Single Item Cancellation,
And More.
Delivery Staff:
Define Radius,
Delivery Order Management,
Accept or Reject Orders,
Route Navigation to Sellers and Buyers Location,
And More.
Free 1-Year Technical Support
The team of Growcer believes in maintaining long-term relations with its clients and customers. For a smooth ruffle-free experience, Growcer offers 1-Year of free technical support to look after any unforeseen surprises like:
a) Server-side scripting/programming errors/bugs
b) Logical bugs/calculation-related errors/bugs
c) Connection errors/API integration errors
That said, Growcer improves transparency between clients and their customers by eliminating the chances of any lags or errors.
Yo!rent
The aforementioned eCommerce platforms are suited for online selling operations and daily deliveries. However, not every online business follows these business models. With the expansion of the rental industry, online rental businesses also require a robust eCommerce solution to suit their needs. Yo!Rent is one such solution that is precisely developed to resolve the various problems of online rental businesses.
With the help of Yo!Rent entrepreneurs can launch a single vendor or multi-vendor rental eCommerce store. Through this store, they can rent out several types of products including furniture, medical equipment, adventure gear, party supplies, boats, cars, bikes, trucks, RVs and various other vehicles.
In terms of launching an online rental business, Yo!Rent is not only an alternative to Shopify but even better and more reliable in several terms.
Dedicated Features to Resolve Rental Challenges
Rental businesses face problems like complex pricing, inventory management, return management, repair and maintenance of damaged goods and much more. With features such as advanced booking calendar, rental security deposit, eSign, agreement management, product inspection and return, Yo!Rent stands out as one of the only few rental platforms meticulously developed to support essential and non-essential rental operations.
20+ Payment Gateways and Tons of APIs
Irrespective of rental or selling model, cart abandonment rate is a serious problem for all eCommerce businesses. Poor choice of payment options is one of the reasons behind high cart abandonment rate. With 20+ payment gateways, Yo!Rent makes it possible for business owners to provide customers with their preferred payment methods with minimum transaction rate.
On the other hand, Yo!Rent also supports various third-party business tools like MailChimp, Aftership, Taxjar and Quickbooks to help rental business owners simplify numerous business operations. They can select a tool that they trust and continue lending products.
Localization
Localization settings are important for an online rental business. Yo!Rent has features like multi-currency and multilingual support, GPS enabled map view, location-based product sorting and custom pickup slots.
It also has a price surge feature that enables business owners to capitalize on sudden increase in demand in particular regions for products like wedding dresses, RVs and cars.
The chat module allows customers and product owners to handle local matters, such as negotiate pricing, clear queries or discuss the pickup location.
Tailored Themes for Various Niches
The team behind Yo!Rent has also developed captivating themes for various industrial niches. These themes use color psychology to represent the ideal expectations of the industry and leave a powerful impact on first impression, making your online rental business look professional and formidable.
As Yo!Rent is fully customizable, business owners can also customize its themes any time they want.
One Year of Free Technical Support
Like Growcer, Yo!Rent also offers one year of free technical support to all its clients. This support is to ensure that the platform does not hurdle your business operations due to any technical flaws.
Array of Helpful Features
Along with the aforementioned features, Yo!Rent also has an array of various other important features including:
Bulk import/export
Catalogue management
Tax management
SEO optimization
PPC module
Multi-user CMS
Promotions and discount codes
Loyalty program
Bulk discounts
Real time stock availability
Multiple revenue streams
Other eCommerce platforms
You can also try some other eCommerce platforms, like, Shopify, BigCommerce, WooCommerce, Volusion, LemonStand, 3dcart, BigCartel, Magento, and Wix.
All of them helping users to create their eCommerce platform. However, not all of them are easy to set up or user friendly like iLink, but you can give a try.
Overall
It seems that Shopify is the most popular eCommerce builder website on the market, but it looks not fit for all size businesses. Small businesses or retailers might not be able to pay all transaction fees, or fees for extra features to sell on Shopify. So, it is logical to get other alternatives like iLink that have the same quality at affordable prices. It is well worth it to try.
Instagram is the most popular app among the young generation, and having a good Instagram account can be like an asset. However, growing an Instagram account is not easy, and it needs concepts and ideas. Instagram users use the repost method to boost their Instagram account, which is good.
Since TikTok has launched, many Instagram users repost TikTok videos on Instagram to get more followers. To do this, they must download, save the videos to their devices, and then share on Instagram again. But thanks to the technology that some tools do the repost. Meanwhile, if you want to dowload instagram vidoes, you ca take a look at:”What are the best Instagram downloaders?”
How to convert Instagram videos?
To convert Instagram videos, you have some ways.
Use Instagram repost app
Use Instagram video downloader
Use Instagram video convertor to mp4 or Mp3
Use Instagram video converter to convert any videos
Repost app would take the URL of a post, download the photo or video, and the caption. So, with a few clicks, you can share the videos on Instagram. However, this is not the only method. You can separately download the Instagram videos, and save it to your mobile or computer. Then share it on Instagram any time you want.
Remember that all the software and tools helping to download Instagram videos, or repost them using the URL of a post.
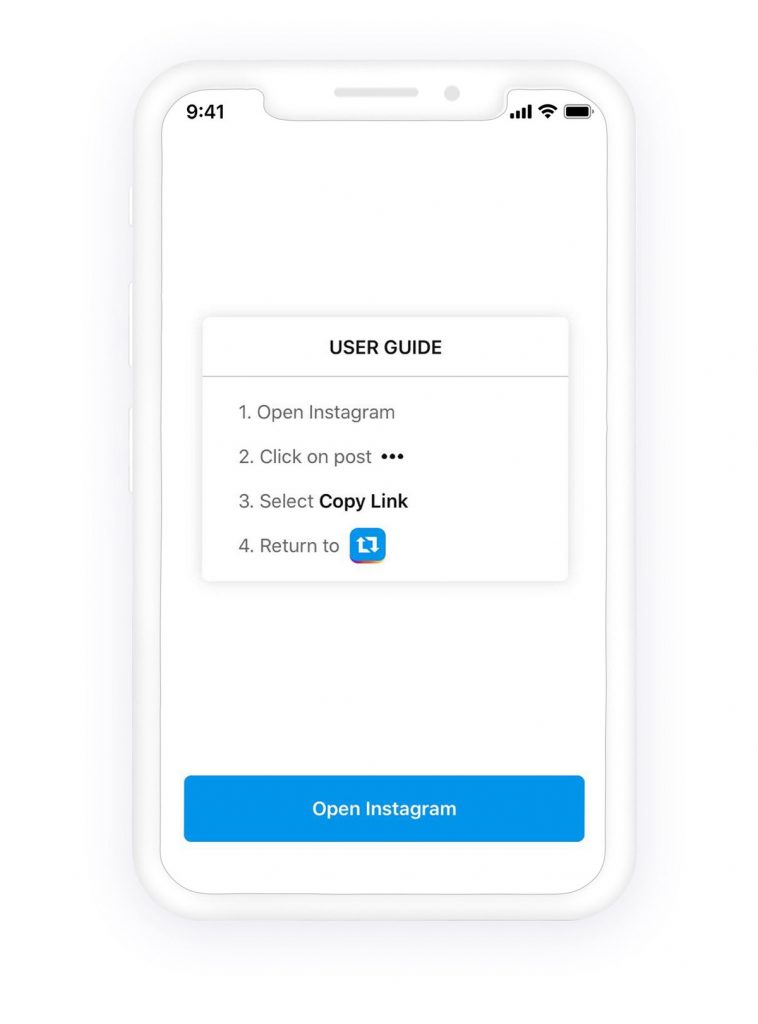
So, it is better to know how to copy the URL of a post.
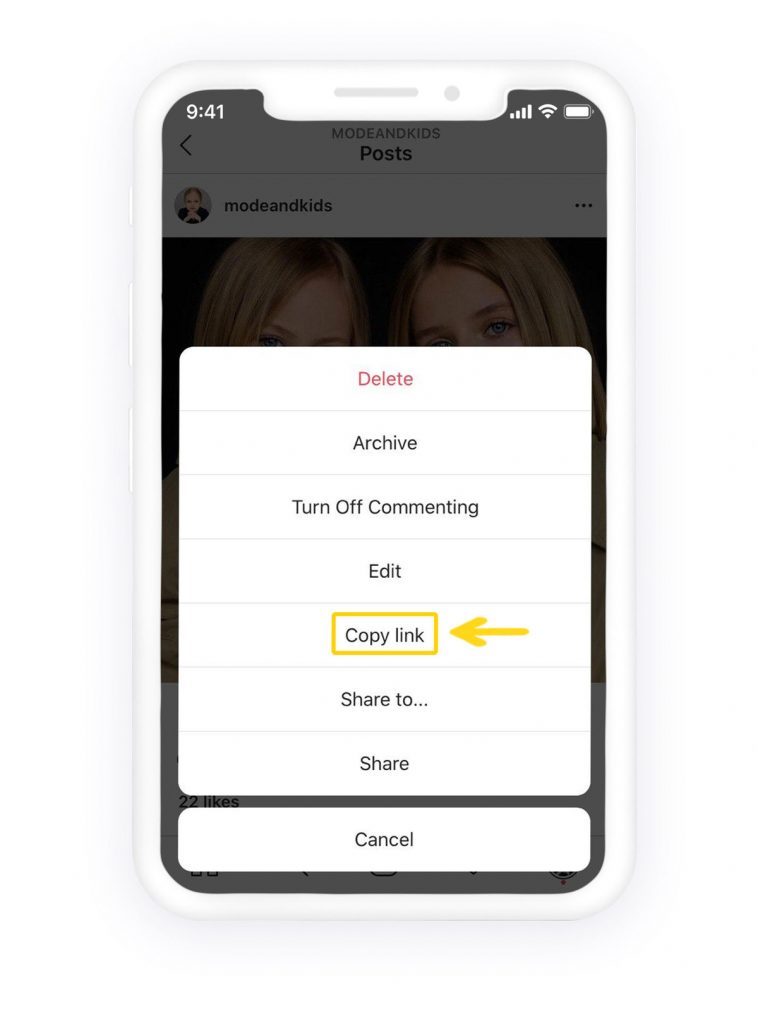
To find the URL of a post for repost or Instagram video convertor:
Go to Instagram website or app
Login to your account
Open any post you are going to download
Tap on three-dot on the top right of the post
Tap Copy link
Now you can paste the link anywhere it is needed. To download Instagram videos, you can use these four methods.
Method #1 Use the repost apps
Using the reposting app is easy and free. However, they put a mark on it that you can easily remove with a video editor.
Go to the Appstore or Google Play store
Search for repost app
Download the app
Open the Instagram and login to your account
As it is stated in the previous section copy the post URL that you want to download
Tap the three-dot icon and copy the link
Back to the repost app
It should automatically get the link you have copied
It will start to download the video (if it is not from the private account)
then you can share it directly to Instagram, or it will automatically save to the gallery
How to remove the watermark of repost app?
If you purchase the app, so you can easily remove the watermark. If you could not, you can crop it through the edit video option available on iPhone or any editing video apps like PicsArt. To remove the watermark, back to the gallery
Find the video and tap edit
Crop the video to remove the watermark
Save the video
Back to Instagram and share the video if you need to post it there.
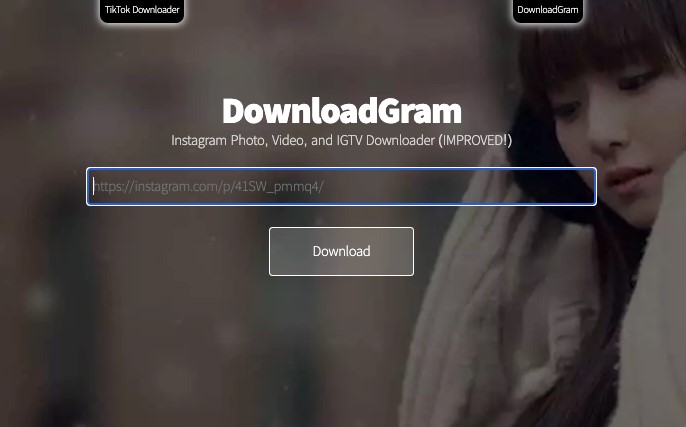
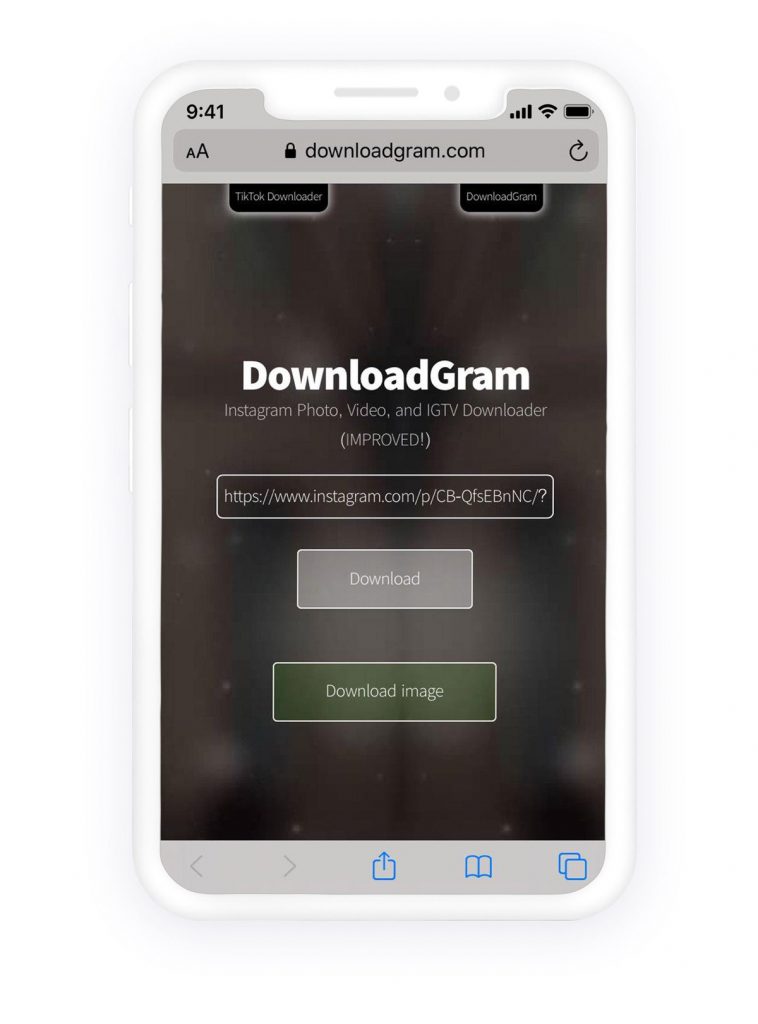
Method #2 use downloadgram.com
Downloadgram.com is a trustable website to download all links, including Instagram videos. However, its bugs are sometimes annoying, but you can try later if you face any glitches.
To download the Instagram videos using downloadgram.com
Go to Instagram app or website
Copy the link of the video you are going to download
Back to downloadgram.com and paste the URL in the box
Click download video
choose a place on your device, or it will automatically download to the location you had already selected on your browser
How to download Instagram videos on mobile?
You should use a browser if you want to download on your phone and make sure that the videos are not in the private account because the downloader should have access to the videos.
Go to Instagram app or website
Copy the link of the video you are going to download
Back to downloadgram.com and paste the URL in the box
Click download video
choose a place on your device, or it will automatically download to the location you had already selected on your browser
Method #3 Convert Instagram video to MP4 or Mp3
There are available tools on the internet to convert any Instagram video directly to the mp4 or mp3 format. However, if you convert the video to audio (mp3), you will not be able to report it on Instagram unless you convert to the video format again.
To convert the Instagram video to mp4:
Go to Instagram app or website
Copy the link of the video you are going to download
Choose a place on your device, or it will automatically download to the location you had already selected on your browser
Convert videos to an Instagram format
sometimes, you may want to fit a video to the Instagram format. So you can use any converter like what I would mention. If you search the internet, there are available tools like https://webservice.online-convert.com/convert-for-instagram that covert any videos to the Instagram format.
To convert the videos to Instagram video dimension
Install the PicsArt app on your mobile phone
Open the app
Tap + in the center of the screen
Select the video you are going to edit
In the option find the crop
Choose the Instagram post or stories
Tap Next
Tap Save
You can directly share the video with any social media like Instagram, Facebook, or twitter.
Overall
Downloading all Instagram videos is possible except for the private ones. You can download on all devices like mobile or laptop. If you are using a laptop downloadgram is the best option, and if you are using a mobile phone, you can sue the browser like chrome and safari. The other method is using repost apps on your mobile phones. Download and reposting Instagram videos to YouTube account or any other channel can be of great help to boost the accounts.
Running a social media campaign is a challenging yet exciting task for marketers. The aim of online platforms campaigns is the promotion of social media that leads to sales if launched flawlessly. So, increasing the engagement and reach of your accounts on social media appears to be very important for businesses. As each platform has its own unique way of functioning, it is wrong to post a similar design and content on all of them. As a result, it is better to enhance your knowledge about each social media and plan to use marketing tools ahead of time. This article will give you some clues about the anatomy of a perfect social media marketing campaign.
What is the Anatomy of a Perfect Social Media Marketing Campaign?
In the following sections, we discuss 7 professional tips that can help you start your social media marketing campaign and become a professional social media manager for your brand.
1. Point Out Your Goals
Prior to any actions, you have to set clear goals and aims for your campaign. Not knowing why you are running a campaign on your social media can lead to a chaotic useless ending. So, in order to have an effective campaign, it is necessary to have your SMART goals well-defined beforehand. Some goals can be the increase of engagement, creating brand awareness, and keeping the former customers.
2. Know Your Audience
Generally speaking, analyzing the metrics of your accounts uncover a lot of information. By analyzing social media, you can easily know your audience and their taste. Investigate your analytics to know what your audience likes and dislikes most. If a post does not receive attention as much as the others, it can mean that it is not desirable to your audience or at least less desirable. Therefore, you should stop posting related content to that post and change your strategy. You can still achieve your goal but you have to make alternatives. It is like you are a vegetarian and do not like eating meat, but you can still have a meat analog. So, instead of posting direct advertising posts, for example, you can resort to informative or inspiring posts.
3. Set Out Your Tone
Depending on your audience and your product or service, you can choose what tone and which social media you should stick to. As mentioned earlier, you should know the function of each social media first. For instance, Instagram necessitates you to be friendly, casual, and highly creative. On the other hand, Twitter requires a less informal tone. In fact, it means that the people who are using these accounts have quite different characteristics, interests, age, etc. and it is wrong to treat them all in the same way. As a result, Instagram marketing differs from Twitter marketing. However, though the specific plans vary for each channel, the general core concept is the same and depends heavily on your goals.
4. Choose Your Channels
If you are a new business and do not know which social media to use, you may want to choose as many as possible. But please do not do that because it is a huge failure. The marketing strategy for each social media is different from others. The best solution is to choose one or two channels and work perfectly on them. In other words, it is better to have one good channel than multiple mediocre channels.
By the way, if you are managing multiple channels on social media websites simultaneously, always try to choose one as main and support it by other channels. For instance, we all know that YouTube is the best place to share videos and since it is searchable, you may get more viewers on this platform. However, if Instagram is your main channel, try to add youtube video to an Instagram story and get more attractions by doing so.
5. Take Your Social Responsibility Serious
The outdated marketing strategies contained only sales-related material. Nowadays, people are bombarded by a great variety of products in any field due to globalization and consumerism. Therefore, your strategies will not work if you merely prompt them to buy your product or service. So what is the modern social media marketing strategy? One of these strategies is to show them that you care about your social responsibility as a group of human beings and as a brand. People understand and care about your efforts in that field and respect your work. They may even like to take part in your preserving sustainability actions as they would feel emotionally touched. It would create stronger ties between you and your customers and would greatly enhance the engagement on your channels.
6. Use Social Media Tools/Applications/Software
A good marketer always reaches out for budget and time-saving choices. You can search for social media AI tools and applications that can make managing your account easier. So, knowing what each tool can do might come in handy for growing your channels.
7. Execute the Campaign
When all the plans are ticked and a strategic schedule is drawn, it is time to execute the campaign. The start of the work is more or less like a testing performance. So, you go on the first few weeks to A/B test what your audience likes and who you are talking to. Based on the achieved analytics, you can measure your results and revise or adjust your strategies for the coming days and the future.
Conclusion
Planning for a perfect social media campaign makes a lot of differences on the way to achieve your goals. A successful campaign leads to a satisfactory and constant growth of the engagement in each channel. Reaching your goals is easy when there is an increasing number of the audience out there for your channels. With a smart social media marketing strategy, the success of your business on online platforms is ensured.