You can find and recover the deleted tweets from seeing Twitter archive data, Google search bar, some archive-related websites, and search the same Tweets on twitter.
Since 2011 Twitter has become the most popular short-text social media. It might happen for users to delete their tweets on purpose or accidentally, and recovering the tweets becomes an issue.
Let’s start with a short brief about the possibility of recovering the deleted tweets. You might wonder which kind of tweets can be searched or viewed once you or someone else removed them?
How to Recover Deleted Tweets?
The first thing I must make you sure about is, unfortunately, you are not able to recover the deleted tweets, but you can find the similar tweets that others have published.
So, if you are looking for someone else deleted tweets or for Donald Trump’s deleted tweets, I assure you that it is impossible unless you find similar posts.
Nonetheless, here I would mention some of the ways that you can look for some data on Twitter, which is the better and fastest way to find similar tweets. It means you should look for other tweets with the same topic.
Search on Twitter website
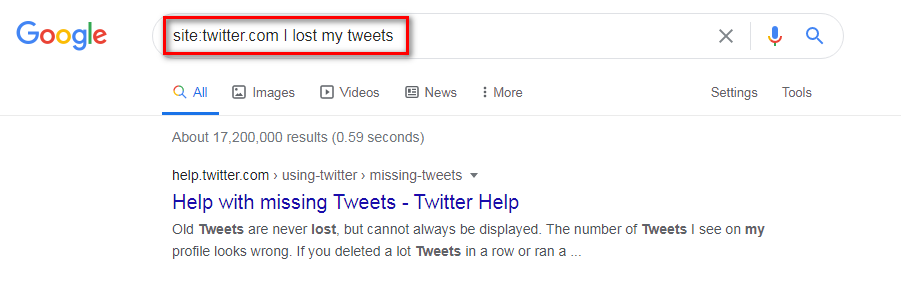
As I have mentioned before, it is unlikely that you can find the deleted tweets anywhere, but you can search on google to find the similar or exact text by putting the text in “….”.
If you want google to find that text on the Twitter website adds the website address before the text, for example, site:twitter.com I lost my tweets.
This would help you to narrow down your search.
Deleted Tweets Website
One way to see and find the deleted tweets is to look for them in a website that already crowded and archived millions of tweets like https://www.twipu.com
So, you can go to this kind of site and type in the deleted tweets text in their search bar. You can also find all archive from the specific account by putting the username just after the website name with a slash, for example, https://www.twipu.com/username
In this way, you would g to that person’s tweets only, and it will help you narrow down the search.
Twitter Archive Data
Apart from the methods mentioned above, you can also find your Twitter data on its archive. You can send your request through the Twitter profile, and once you receive the email that the data is ready, you can download it as a zip file.
How to find old tweets
You might want to find old tweets for any reason. You might just want to retweet them, or you need to get some old data from them. Let me tell you that the first method to find old tweets is to scroll down long enough until you find the desired tweet, which is a very tough and time-consuming thing to do. That’s why you surely would want some alternative methods to get back old tweets, and below I am going to talk about those two easier methods.
How to find Old Tweets Using Twitter Search
The most straightforward way to find old tweets is to use Twitter’s own main search bar with the proper search pattern.
Log in to the Twitter account and head to the search bar to get started.
Type the below search pattern but with your own Twitter username and your desired date.
from:username since:yyyy-mm-dd until:yyyy-mm-dd
Here is an example of this method to clarify it more: from:inosocial_co since: 2017-04-14 until: 2021-03-06
To get all the tweets from your chosen date, select “All”, since the default search results are sorted out by “Top.”
This search function also works individually if you like tweets from a certain username or just a certain period of time, such as:
from: username (will show you all tweets by the @username)
since:yyyy-mm-dd (will show you all tweets done since yyyy-mm-dd)
until:yyyy-mm-dd (will show you all tweets done until yyyy-mm-dd)
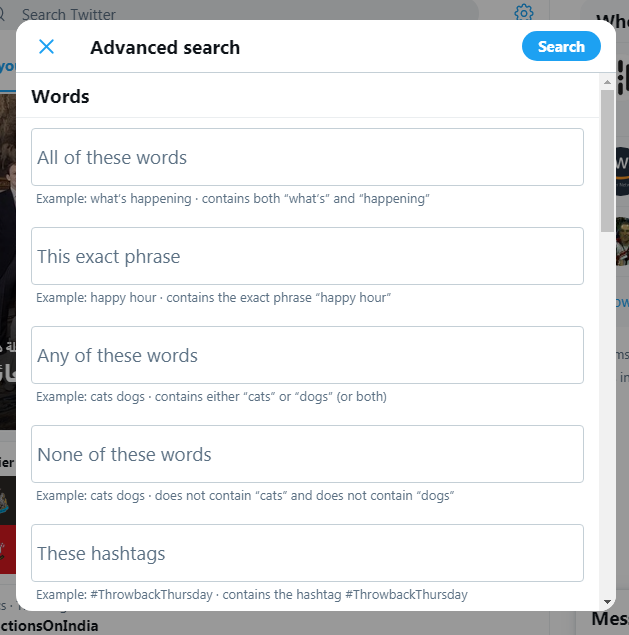
How to Find Tweets with Twitter’s Advanced Search
If you did not use the Twitter’s advanced search before, let me tell you that this powerful search tool makes it easy to get date-range searches and find old tweets from your profile or another user.
Type the desired username with no “@ “in the “From these accounts” field.
To set a specific range of time, scroll down to find “Dates,” select the start and end date.
When you are done, tap “Search,” and you will get a list of tweets you were looking for.
Where is the Twitter Archive of Deleted Tweets?
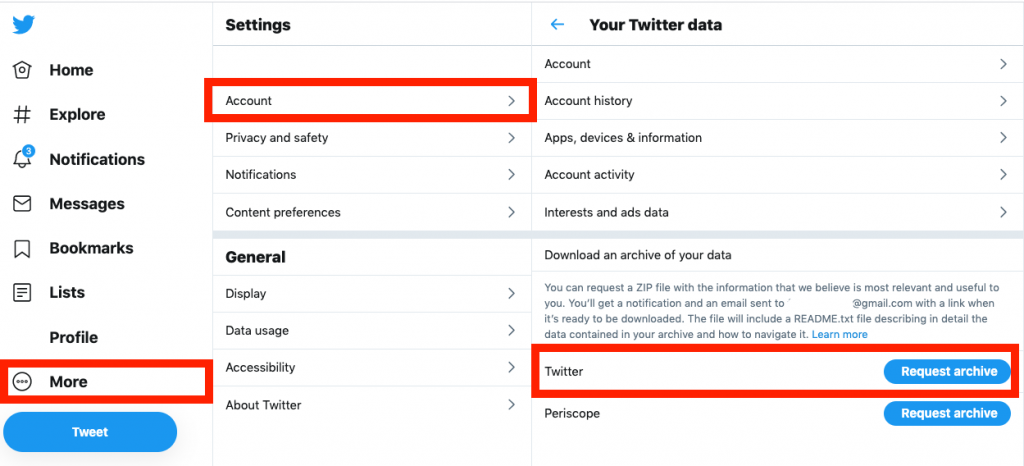
To get the archived Twitter tweets:
Go to your account and click on the three-dots icon under your profile photo
Select the setting and privacy
Click on your Twitter data
Enter your account password and click confirm
You can see the request data. You can download the periscope data too.
Once you request and the data is ready, you will receive an email notification from the connected email to our Twitter account.
Then from the setting, you can download the zip file of your Twitter archive.
Please note that I do not believe you could find the deleted tweets from months ago here. Still, you would receive the data that Twitter distinguishes as relevant and most valuable (as they have mentioned in the description of downloading tweets archive).
Find the Twitter archive data to download your tweets
To find your Facebook username: Click on the triangular icon on the main menu>Setting & Privacy>Setting> General>Username
Facebook is now is the biggest social media with more than 2 billion active users monthly. There are many tricks about using Facebook such as how to look up facebook by phone number. As a Facebook user, you may want to share your id with a developer or game owner but you are struggling to find it.
If you do not know what is facebook url, I have to mention that Facebook username and user id are parts of Facebook public profile and anyone can see that from your URL. Though at first, once you are opening an account Facebook would set that for you based on your name (if available). You can change that later if you want to have a custom Facebook username and link (URL). Continue reading and learn more about facebook id lookup, how to find facebook account by username, facebook email lookup, what is a facebook url, how to find facebook url, and how to find facebook handle.
What is my Facebook username?
Before explaining how do u change your name on facebook, and how to find facebook account by username you have to know that a Facebook username and user ID are parts of your public profile, which can help your friends, find you on Facebook. Like all other important questions like how to find my facebook email, or how to change your name on fb, many users like to know what is their facebook username?
A Facebook username can include your name and surname, or you can create your own username or choose a username that Facebook suggests.
Your Facebook username is not the same as your Facebook display name, which is the name that appears on your posts and when you’re tagged. It is your username that appears in the Facebook URL of your profile; that’s why it is an important part of each profile. Here in this guide, you’ll get to know how to find your Facebook user ID and username easily, or you can check out the Facebook like service.
How do I find my Facebook usernames?
As I mentioned above there are many tricks about Facebook like how to find my facebook email. Previously, I have explained what is my facebook username. Now, I want to tell you one of the most important challenges is when you need your Facebook user ID to share on any website or groups or even you may want to give it to your friends. Though, Facebook now is like a very complicated software in which you hardly find what you are looking for.
If you are looking for your Facebook username and Facebook URL you can read this section but if you are looking for your Facebook ID of any specific websites or apps you should go to the next section in this blog.
In the next sections, you can find out about how to change or create a Facebook username and how to find facebook id.
To find your Facebook username:
Login to your Facebook account
From Home, Click on the triangular icon on the main menu
Select Setting & Privacy
Select Setting
From the left menu click on the GENERAL
Click on the USERNAME
This is your Facebook profile username which is available for public and they can see it from your Facebook link (in the browser) also.
Now that you know how to find my facebook username, I have to state that you can change the Facebook username just by typing in any username you want and customize your Facebook public link (Facebook URL).
How to create a Facebook username?
Go to your Facebook profile
From the left menu click on the GENERAL
Click on the USERNAME
Type in the username you want and see if it is available
If it is available, click on SAVE and exit
Now you can see the new Facebook username in your Facebook profile link in your browsers. If you want to share it with anyone you can simply put your username after facebook.com (For example https://facebook.com/username). As a Facebook user, it will be very useful for you to learn how hackers hack into a Facebook account in order to keep your account safer.
How to do a Facebook search account by name?
If you do not know how to find facebook username, you can learn how to make a facebook search account by name. Searching for people is one of the most obvious uses of Facebook search. Just type the name of the person you want to find, and you search among the results. As it might be hard to find the exact person on the first try, Facebook enables you to use other criteria like the city.
Also, I suggest you to continue reading and learn more about others ways how to find a facebook username.
How to find my facebook account by my name?
Previously, I generally talked about how to find my facebook username. But sometimes the answer to what is my facebook username is not so simple because you might have forgotten the phone number or email address, you used while creating your account with Facebook. Here, I want to show you a trick that you can use when you want to know how to find my facebook account by my name.
Login into another Facebook account like one of your friends.
Search your name on the top search bar.
As you are friends with this account, you should see your username at the top of the searched list.
Use the username on top of the address bar after “https://facebook.com/username” to login into Facebook.
How to find Facebook account by phone number?
When you are here, it means you want to learn more about how to find facebook handle. For example, how to find facebook id, how to find facebook username, how to make facebook search account by name, and so on. In this paragraph, I want to tell you how to find facebook account by phone number.
Go to the Facebook site and log in.
Tap on the search bar above the screen.
Add the phone number of the account you’re searching for and hit return. (it is better to include the area code and increase your chance of success.)
What Is The Facebook User ID?
Previously, I talked about how to find my facebook account by my name. Now, let’s see what is facebook use id and how to find facebook id. facebook id lookup is an important subject among Facebook users, which will help you how to find someone’s facebook id. Before anything, let’s find out what a Facebook ID or FB user ID is. If I want to explain simply, I have to mention that it is a unique identifier connected to a Facebook profile, Facebook Group or Facebook Page. Whenever you choose to make a new Facebook Profile, Page, or Group, the Facebook system creates a Facebook ID automatically. If you do not know how to find your Facebook ID, or how to find someone’s facebook id, continue reading. The next paragraph will help you to look up facebook by phone number.
How To Find Facebook User ID On Facebook?
In this paragraph, I want to show you how to find someone’s facebook id. Be careful that you need to use a computer and web browser to find someone’s Facebook ID.
First, search Facebook Address on any browser you would like.
Now, you have to type your username and password above the page at the right corner and click to sign in.
Find that specific person’s profile by typing his name in the search box or choosing his name from your Friends list.
When you open his profile, you will see gray areas to the left and right of the profile. Right-click on this area, and you will see a brief menu. (Instead of right-clicking, you can press Ctrl on the keyboard as you left-click)
Now, you have to look for an option like Click View page source, “View source” or “Page Source”, when you find this option, just click on it.
Here, you have to press Ctrl+F if you are using Windows or ⌘ Command+F if you are using macOS. Then, you will see a search box.
Type profile_id in that box and press ↵ Enter if your system is Windows. And if you are using macOS, choose ⏎ the Return key.
Finally, you can see the person’s user ID to the right of “profile_id.”
Can’t Find The Facebook User ID
If you want to find someone’s facebook id, but the previous method is hard for you. There is another way, which you can use some online Facebook ID finders. There are many online sources that you can use for the second method. Just, there is a point that happens rarely and some people could not find the user ID through these online finders. So the first way might be a little hard, but be sure you can find the Facebook user ID in this way.
How To Check If You Found The Correct Facebook ID?
Previously, you read about how to find facebook username, and how to find facebook username. For example, you have learned how to find facebook accounts by username. Now, you might want to check if a facebook ID you found is valid or not.
One solution is to check ID after generating via Graph API.
Put the generated ID at the end of the URL and check the received response. For example, if the idea is “1303834107”, you have to check the http://graph.facebook.com/1303834107 address. And if you see an error in the response, it means it is not a valid ID.
How do I find my user ID for apps and games on Facebook?
Facebook user ID is different from Facebook’s username which is a bunch of numbers that are connected to your profile and does not necessarily identify you.
The function of a Facebook user ID is to:
Allow others to see your profile and public information (your public information privacy can be controlled through your setting)
Helps apps to connect to your profile and access your public information such as name. although, you should allow apps to connect to your Facebook before this stage, for example, if you log in Spotify through Facebook it means you have allowed Spotify to access your Facebook public info.
User ID also can help developers to assess the issue if you face any issue with an app. For example, once you contact the developer of a game app, they might ask for your Facebook user ID which you can find in the following where to find it.
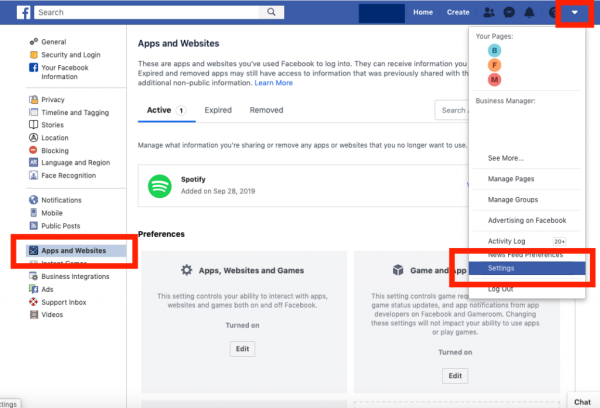
To find Facebook user ID:
Click the triangular icon in the top right of your Facebook profile
Select set as it is shown in the picture bellow
Click on apps and websites on the left menu
Find the app you want its connected Facebook user ID
Click on view and edit
Scroll down and you can see a bunch of numbers in a box which is your Facebook.
How to edit your name on facebook
Another important question for all Facebook users is how to edit your name on facebook. That is not complicated, too, and you can learn how to change your name on facebook profile by following some simple steps. Before I’ll go to explain how to edit your name on facebook, I want to remind you to read the Facebook naming policies, first.
How do you change your name on facebook profile on your desktop?
If you are using a computer or laptop, and want to know how to change your name on facebook profile, follow these steps:
First, log in to Facebook.
Find the “Account” tab on the menu bar at the top right of the screen and click on the downward caret.
There will be a dropdown menu, and you have to choose “Settings & Privacy”.
After that, again choose the “Settings” option, which will lead you to the “General Account Settings” page.
Now, click on the first row titled “Name” and choose to edit.
Type your name, and click to review the change.
Here will be a pop-up box asking you how your name should be displayed on your profile. Choose your favorite option.
Finally, enter your password and save this setting.
At last, click on “Save Changes”, and complete the process.
Now that you know how to change your name on facebook profile, continue reading and learn how to do it if you are using a mobile device.
How do u change your name on facebook on your mobile device?
Previously, you learned how to find my facebook username, but if you wonder how to find facebook handle, do not miss this paragraph. For a better facebook handle, you have to know how to change your name on fb when you are using a mobile device. Follow these steps and learn how do u change your name on facebook.
Just open your Facebook app.
Choose the menu icon, which will be in different places when you use iOS or Android devices
Go down and find “Settings & Privacy” and click on it.
From the next box, choose “Settings.”
Then you will see the “Settings & Privacy” page. Here, choose “Personal and Account Information.”
Tap on the “Name” option.
In the given text boxes, enter your name.
Tap on “Review Change.”
Choose your desired option for the question of how you want your name to be displayed on your profile.
Save these changes by entering your password.
What is facebook url
Until here, you learned how do you change your name on facebook profile, but There is another popular subject among Facebook users, which is what’s my facebook url. Before explaining how to find a facebook url, let’s see what is a facebook url. A Facebook Page URL would be a part of any web address after the https://www.facebook.com/. So it might be different based on your page name. The point is that you can change your name but not change your Facebook URL. Continue reading to learn more about what’s my facebook url subject and how to find facebook url.
How do i find my facebook url
Now that you know what is a facebook url, let’s answer the question: how do i find my facebook url. Here are the steps that you have to follow and find your facebook URL, which is as simple as what you read about how do you change your name on facebook profile,
Click your profile picture and open your Facebook profile.
Now, copy the URL on top of your browser’s URL bar.
All in all
How to find my facebook username? How to find facebook account by username? Facebook is getting confusing and sometimes you might feel confused about facebook handle because of its different options like facebook email lookup. But I suggest you read the above instructions and learn about different tricks of how to find your Facebook username, such as how to find facebook account by phone number. Moreover, you can learn how to find Facebook ID for any specific apps, games, or websites. Also, I explained how to edit your name on facebook, how to find facebook url, and other points about what is a facebook url which will help you to find the answer of what’s my facebook url. All of them are important points when you want to look up facebook by phone number.
Social media reports analyze all the essential and important social media metrics and show your business’s progress in detail.
Social media reports analyze all the essential and important social media metrics and show your business’s progress in detail. Get at least a monthly report to know what is driving clicks and bringing engagement.
Creating a social media report is an effective way to present your social media performance to your teammates, boss, audience, etc.
It may seem to be an easy task- just entering some numbers and graphs in a template and sending it to your boss or colleagues- but it is way more than that!
Social media reports analyze all the essential and important social media metrics and show your business’s progress in detail; then you can easily find out what worked and what didn’t!
No one can deny the fact that businesses or normal users can come to a conclusion about the process of their activity on social media, but the point is that getting social media reports manually, takes a lot of energy and time, and you may not get the real information!
So, you need a comprehensive report for analyzing your social media strategies.
Why do I need a social media report?
Being active on popular social media platforms has become one of the effective strategies for the majority of successful businesses.
So, in order to grow your business and find out about your strategy’s weakness, you need to get at least a monthly report to know what is driving clicks and bringing engagement.
Also, the social media report will:
Show you whether you have reached your business’s goal
Prove your wins and losses
Analyze and monitor your social media channels
Show the contents that bring engagement
Let you know more about your competitors (by using the listening and monitoring tool)
Before getting a social media report, you need to:
Set the goal
First of all, you need to set the report’s goal to have a comprehensive and complete social media report. It might be a:
Regular report
One-off report
Research report
Define the recipient
You should clarify who would see the report; it lets you decide what to include in the report and whether they should be in detail or not. Obviously, there are too many differences in the prepared report for your colleagues, senior management, customer support, boss and audience!
Define the timeline
It depends on the purpose of the report, and people who ask for, but generally, the common periods are:
Weekly report
Monthly report
Yearly report
Quarterly report (90 or 180 days)
Choose the necessary metrics
Avoid adding unnecessary information and think of what data you need to present. Focus on the specific social media metrics to show your business’s growth and success. Here is a list of some of the important social media metrics to include in a report:
Engagement
Reach
New followers
Like
Comment
Clicks
Traffic
impression
Listening data
How to create a social media report?
Finally, it is time to get what you were waiting for! Let’s get into it:
With InoSocial you’ll go through each section of what social media should include. In order to get a social media report by InoSocial, you should:
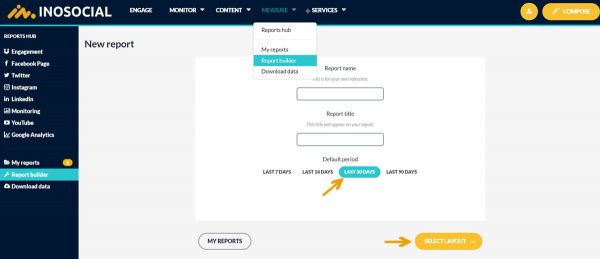
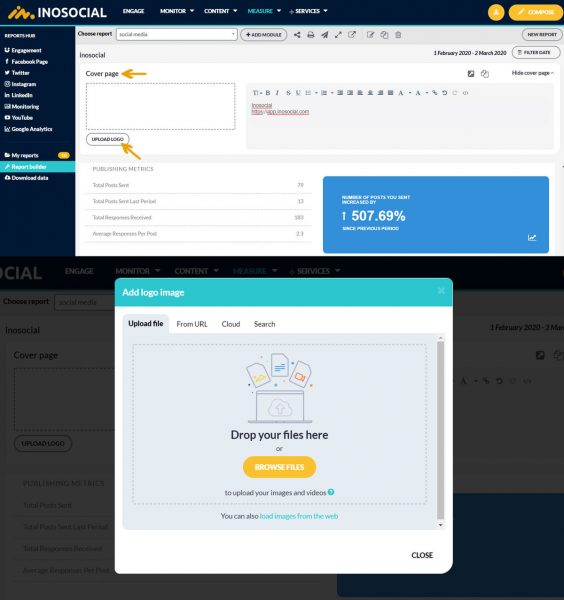
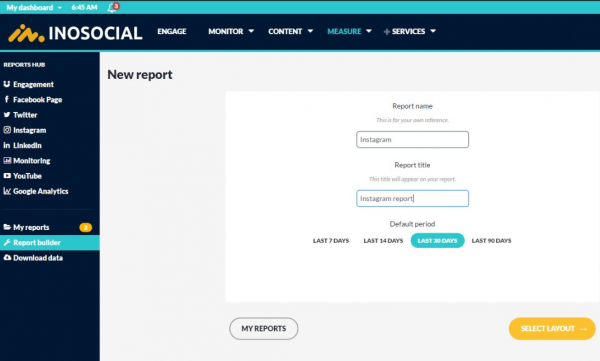
Tap on the “measure” tab, then tap on “report builder”
Before selecting the layout, you can choose the report’s period.
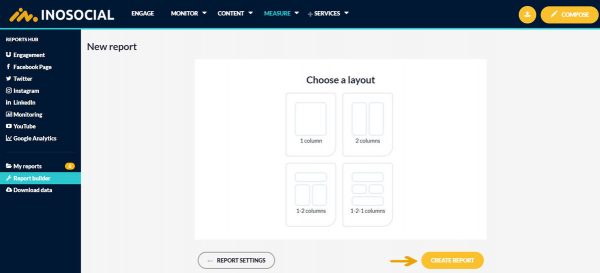
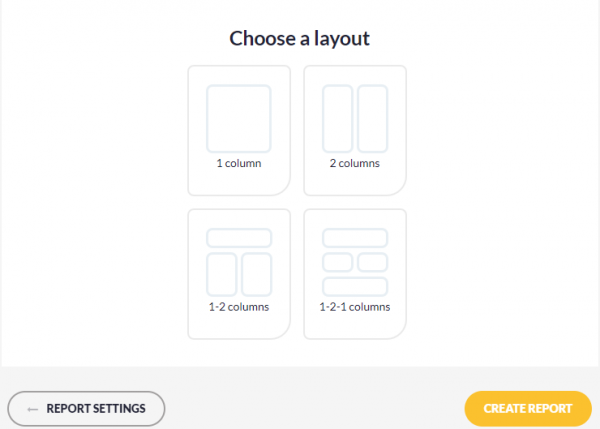
Now you can choose the report that fits you the best and tap on “create a report.”
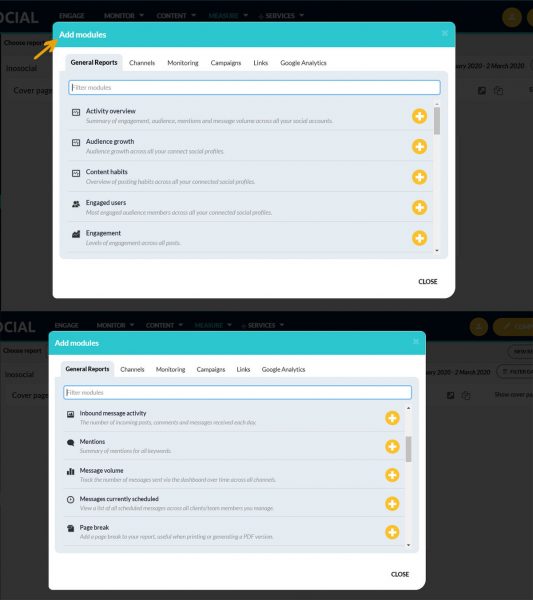
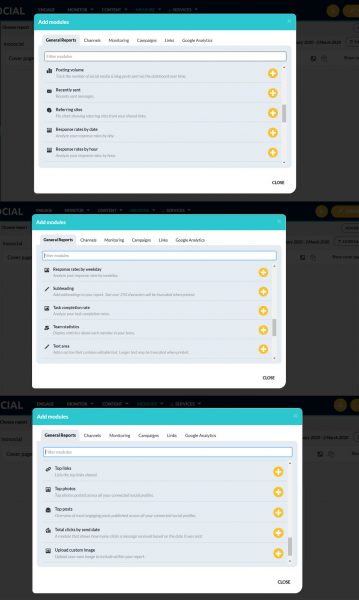
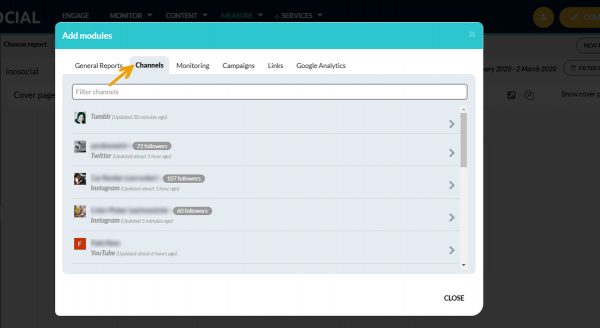
Here you can see the long list of modules that help you have a complete report. You are free to add any of them by tapping on the plus icon.
By tapping on the “channels” tab, you’ll see all the added platforms; tap on any of the platforms to get its specific report.
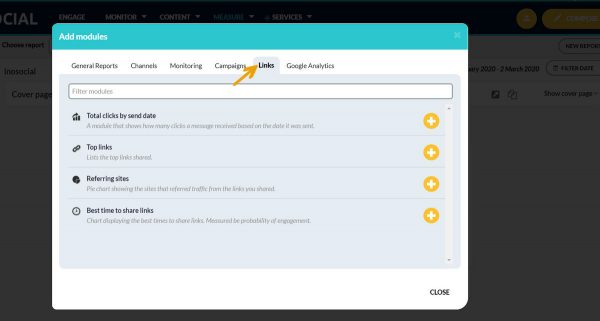
As you see, you have all the needed options for links as well.
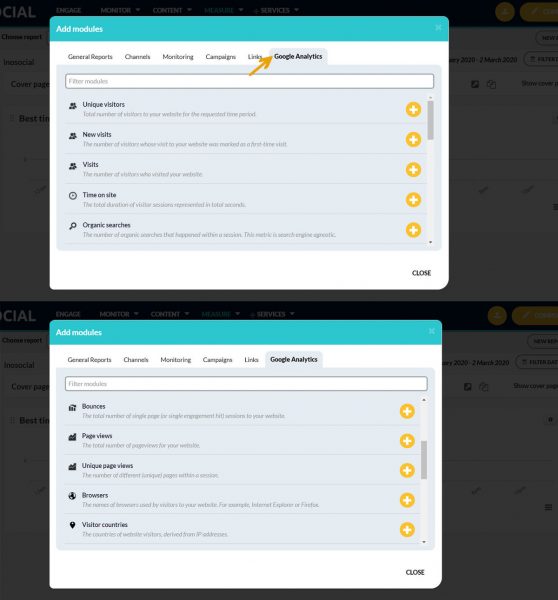
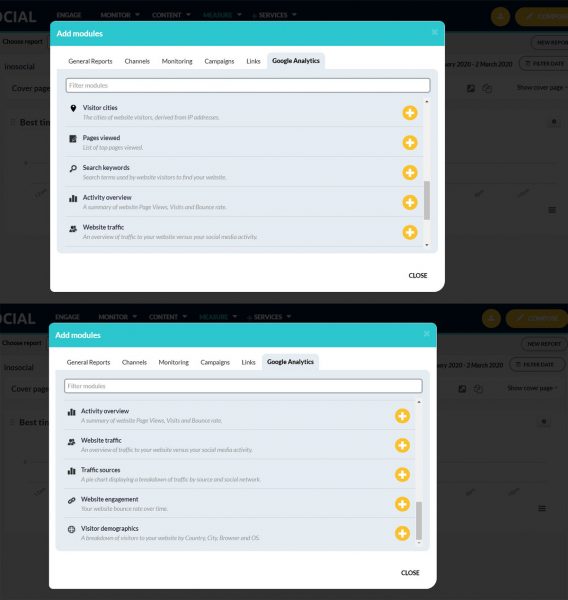
Another useful report you can get from InoSocial is its “Google Analytics” report.
Once you choose the items you need to have in your social media report, then you can add your company’s logo, email address, phone number, etc. on top of the report.
As soon as you are all done with adding charts, graphs, texts, etc. you can get the report.
InoSocial users can share the social media reports by sharing it with other teammates, print the report, email it, share the live report URL, create a copy of the report, etc.
Don’t miss InoSocial’s social media report and sing up today!
All in all
Social media reports analyze all the essential and important social media metrics and show your business’s progress in detail. So, don’t miss it and get the complete social media report by InoSocial.
Please share your experiences with us. We are all ears!
Instagram lets us post multiple photos to our feeds and stories. Here is how to do it.
Instagram lets us post multiple photos to our feeds and stories. Here is how to do it.
Being able to post multiple photos on Instagram was once like a dream for users, but it has been a couple of years now that Instagram lets us choose multiple photos and videos to share on the platform.
The process of sharing multiple photos is very easy, but there is also another thing Instagramers crave for, that Instagram has not yet added to its platform.
Users love to be able to post to multiple accounts at the same time. By multiple accounts, I mean sharing content with multiple Instagram accounts at the same time or being able to post to Facebook and Instagram at the same. Let me tell you that you’ll find your answers to both of these popular matters on Instagram, and some additional information on how to schedule and post to multiple Instagram accounts, and even sharing posts to different social media accounts simultaneously.
How to post multiple photos on Instagram?
So many of us experienced those times we had taken so many good pictures, and we could not pick one to share on Instagram, and that was exactly when we hoped that we someday be able to post more photos as a single post. Well, that is now possible.
So, before going over the answer to the popular subject of posting to multiple Instagram accounts, let’s begin with getting to know the procedure of adding multiple photos on the platform, which is very simple.
To start posting multiple photos on Instagram, follow the steps below:
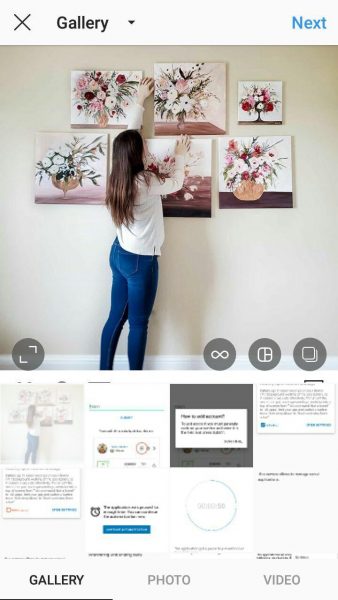
Open the Instagram app and tap the “+” button in the middle of the home page to start picking pictures and videos for multiple uploads.
Find the “Select multiple” icon on the bottom right of the picture, which is either selected by Instagram or you.
After that, you are now free to select up to 10 other photos and videos to add to the carousel post. You can also change the order of the photos by tapping and holding on the image to move it, then drag it to where you wish.
After your desired photos and videos are chosen, all you have to do is to Tap “Next” at the top of the screen to head to the editing page, where you can change filters of the photos you’ve chosen.
Note: You can apply a filter to either all the photos or separately. If you want the same filter on all the images, tap on a filter without selecting a photo. To edit images individually, tap on one, edit and tap “Done.”
Tap “Next” to head to the next stage, which is adding captions, locations, and tagging people. Unfortunately, when you decide to post multiple photos on Instagram, all of them would have one caption.
As the last step just tap “share,” and your multiple photos and videos are now in your followers’ feed and they can swipe left and right to watch them just like an album.
Now you know exactly how to post multiple photos on Instagram.
How to add multiple photos to Instagram story?
We have the option to add multiple photos to the Instagram story as well as posting multiple contents as a feed post, which is very useful. With only a few easy steps, we can create carousel stories using more than one photo. Here are the steps to add multiple photos to the Instagram story:
Open the Instagram story camera by tapping on the camera icon in the top left corner of the home page.
To select pictures, click on the image icon in the bottom left corner of the screen to go to your gallery.
To enable multiple photo selection, click “select multiple” from the top right corner.
Now, you are able to select multiple photos a form anywhere in your gallery. Each selection you make, a number will appear beside it. These numbers correspond with the order the images will be uploaded in.
Note: You can add extra elements such as stickers, polls, location, and username tags, and much more individually to each photo. Firstly, select your images. To select the image, just click on it. Add the extra elements, and then move to the next.
After you are done editing and adding elements to the stories, click “Next” then “Share,” and you have finally learned how to add multiple photos to an Instagram story.
By increasing the number of users spending several hours a day on popular platforms such as Instagram, Facebook, and Twitter, you need to have an effective strategy to keep your business on top.
Tracking and monitoring the strategies are the essential actions that a business should take to be a step ahead of competitors. Using metrics for your social media platforms plays an important role in knowing the success of your business.
By increasing the number of users spending several hours a day on popular platforms such as Instagram, Facebook, and Twitter, you need to have an effective strategy to keep your business on top. Tracking and monitoring the strategies are the essential actions that a business should take to be a step ahead of competitors.
What are social media metrics?
Let’s go through an example to know about the “social media metrics” better; you consider a goal for your business, which might be “increasing the number of your followers.” Then you can easily identify which social media metrics and measures are necessary to increase the number of your followers. To reach your goal, you should have some strategies such as sharing attractive posts, posting at the best time, following new users, commenting on users’ posts, etc.
To measure and make sure about the way your strategy work, you need a social media report and a measuring tool to show you the process of your taken actions.
In Short, social media metrics help you reach your primary before reaching the main one.
Using social media analytics and metrics are important because:
It proves your company’s success.
It shows how your strategies are working
It makes you free of spending a lot of time to collect data manually.
It keeps you aware of your platform
It is useful for users who manage several accounts
It is a good reminder of your social media presence
What should a social media report include?
Well, you can barely find businesses that include the same information in their report, so it mainly depends on the purpose of your report. After clarifying the important elements, you can decide what to include in your social media report.
But generally, whenever you decide to have a social media report, you should answer some questions from yourself:
Who should see the report?
What are the important factors in the report?
What information is related to include in the report?
In what format should the report be?
How often should I share the report?
Answering all the mentioned questions is a big help in deciding what to include in the report.
Now let’s review the most common metrics that businesses prefer to measure:
Number of posts
Net followers gain or loss
Number of likes
Post reach
Number of comments
Number of shares
Number of page/profile views
Number of clicks on post links
Number of clicks on the link in your bio
Number of story views
Number of video views
Top-performing post(s)
Number of leads generated
Number of conversions
Total revenue generated
Total spent (on social ads)
Social share of voice
Social sentiment
If you are preparing the report for your teammate, we recommend reporting a complete and in detail report, including what worked well and what needs some improvements.
Sharing all the related information will help you avoid future mistakes and experience a grow up in your company instead.
Moreover, you may need to get multiple reports for different audiences, so you should find out what’s important and matter for each of your audiences.
Now it is time to measure the social media metrics
Users have two options in getting analytics of their social media platforms, including the platform’s own analytics such as Twitter and Instagram’s analytics, or you can save your time and get more in detail information by using a social media report tool.
By using InoSocial, you will have access to the filterable social media reports. InoSocial filters the report by platform and date; then you can share the report with the teammates, send it as an email, get its pdf, download it as an image, etc. and share it anywhere.
Any of the metrics clarify specific information about your social media platform. In other words, it’s about interpreting what that metric tells you and translating that back to your business goals.
InoSocial’s listening and monitoring feature
Generally, social media monitoring saves a lot of time and collects all the relevant information about your business and shows all of them in one place to you. Then you can use it to develop your business and make up your mistakes.
Actually, you can monitor your social media platform manually and look for mentions, hashtags, keywords, etc. all by yourself, but it may take a long time, even a whole day! And after taking a lot of time to find some information, you may not find all the data you were looking for and you may miss some of them!
Happily, you don’t have to do it all by yourself; you should just leave it to a social media monitoring tool and use your time to promote your business.
How to use InoSocial’s report and measure tool?
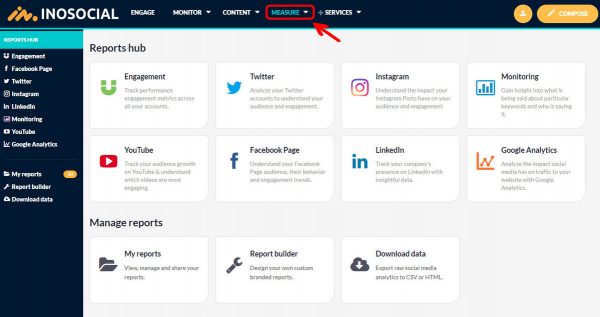
After signing up in InoSocial, you should tap on the “Measure” tab and choose the platform that you are willing to get its report.
We are going to try Instagram’s metrics as an example.
If you have added several Instagram accounts on InoSocial, choose one of the accounts by clicking on it. Then tap on the “Generate report.”
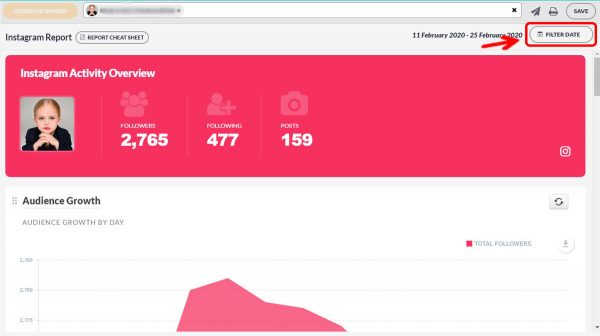
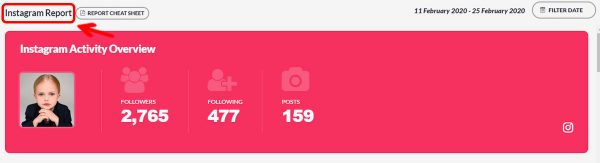
The report is set to show the 15 days report automatically, but you can change the date by tapping on the “Filter Date.”
Number of received comments for the specific period
Number of sent posts
List of engaged users
You can email the complete report or get it pdf, but if you just need a specific chart or information, tap on the right corner of the page to get the part of the report.
To wrap up
Using metrics for your social media platforms plays an important role in knowing the success of your business. You may not need all the metrics at the moment, but we predict that the majority of companies will need them after a period of time by considering new goals.
Try InoSocial and watch your business’s growth anytime, just take a look at our pricing plans and choose the small, medium or large business based on what you need.
Repost on Instagram, Twitter and Facebook is one of the best ways to send your marketing message by a validated source.
Repost on Instagram, Twitter and Facebook are some of the best ways to send your marketing message by a validated source; now, it is the time to learn how to build your success with repost features as a marketing task.
Repost on Instagram or any social media platform such as Facebook is a great way to build the marketing strategy up to the right path. Generally, brands make the most of reposting to share the most popular posts or content on Instagram or everywhere to inform others and build a community around their audience. Also, people taking advantage of saving Instagram pictures or videos to repost and drawing the attention of more followers and inviting people to get involved in the content. Now we want to make it easy for users how to repost on Instagram as well as other social media platforms to pass this step quickly.
Reshare content from other social media accounts has some particular ways to come up with.
In this blog, I am going to express the best ways to share photos and learn how to repost on IG and other platforms.
Best ways to repost on Instagram
Using Instagram repost seems a little bit challenging because we need permission to share the other photos on our social media feeds. Here some useful ways will be mentioned, and then we shift away to one of the most comprehensive ways to whenever you heard the name of repost you assure that there is a perfect tool to help you with this job on every social platform effectively.
1. Go with Instagram third party apps
There are some different Instagram repost apps you can benefit from in sharing other Instagrammers’ posts. The first step is searching Instagram repost on the App Store or google play to face with the Instagram repost apps such as Repost for Instagram, Instarepost as well as DownloadGram.
Downloadgram: By the use of this app, you can download videos and photos free from Instagram space.
Repost for Instagram: Another kind of third party app compatible with android. This app provides a few different modes to choose from: a Standby Mode, a Selection Pop-up Mode, Quick Save Mode, Quick Repost mode, and a Quick Post-Later mode.
Instarepost: The app known as a simple and easy Instagram repost app for sharing photos and videos with your friends.
Note: Pay attention that, according to Instagram’s rules, It needs permitting from the person you want to share whose content.
It is doable by commenting on the image and asking, or by sending them an Instagram Direct Message
Considering all these things together, we can start these marketing ideas(sharing photos &videos) with third part apps reposting. Each Instagram repost app has its efficiency and steps
The steps of Repost for Instagram
Open up the Instagram app
Select the post you want to share
Check the full view of the post(photo, video)
Tap the “…” icon on the top right corner of the post.
Then, tap “Copy Share URL.”
After that, open repost for Instagram
Tap on the arrow on the right top side of the post
Tap the Repost button
Choose Copy to Instagram option
Edit the post’s caption and share your repost
2. How to save photos from Instagram by Screenshot
If you tend to save Instagram photos to do Instagram repost. It is better to leave any third-party app, behind and take a screenshot to share the content on your Instagram feed.
Find the photo that you want to repost
Take a screenshot on your phone
Crop the picture
Create a new Instagram post with the new photo
If you are supposed to follow this way in repost on Instagram, think about the resolution of the shared post, because cropping photo will lead to the low-quality picture.
How to repost on Facebook
Repost each other’s content is very common on Facebook too, and the good news is that the process of sharing content on Facebook is much easier than Instagram and other stuff. If you like to share a post on Facebook with your friends or followers, the best way to share is to copy and paste.
The other official and vital way to repost the original post on Facebook is using the Share feature available at the bottom of the photo; the original poster gets credit though the post shows up on your Facebook wall.
Have you ever come up with the idea that marketing your business needs a repost feature to do all reposting on Facebook as well as twitter from an inbox to not only ease this action from one place but also let you repost Twitter and Facebook posts on your different social media platforms such as LinkedIn, Instagram and so on.
It is also Interesting to know that the possibility of choosing multiple social media accounts to repost a particular photo or video on them exists.
Can you post to Instagram from a computer
There must have been times you wanted to share your Instagram posts from a computer. Fortunately, there are so many ways you can promote your brand awareness on each social media platform, especially Instagram. Now I mention the typical ways plus a new way of posting from a computer for those who follow want to repost into plenty of social media accounts with an overview and management on them.
Five ways to post on Instagram on computer
Instagram desktop (a chrome extension)
Instagram app
Bluestacks
Facebook creator studio
User-Agent on Safa
The above-listed items are useful to post content right inside the computer, but it is not sufficient. What if you could have an option to search for a specific topic like social media on a platform and serve you back with a long list of social media content and to select to share the desired content on Instagram, Twitter, and Facebook business accounts.
Repost for Instagram, Facebook, Twitter
First of all, you need to sign up for a social media monitoring tool to access this repost feature. Do not worry Inosocial has seven days free trial to experiment with this feature as well as possible.
Go to monitor tab and click on the search option
Type a keyword on the search bar like “social media.”
Click on the Repost option of each post you want
Add every social media account in the “select-service” part
Now, click on “Send Now” to complete the action of a repost on each social platform
Note: You can search twitter and Facebook posts for every keyword and share the content on each social media from Instagram to medium and WordPress.
The last but not the least
Repost is one of the most trending ideas resonates with a marketing job to expose you to a wider audience, as an Instagram marketer or social media manager it is a good option to utilize it beside the monitoring tool to complete the mission of marketing your business. When experiencing is free, why not testing repost out! Go through it I am sure you will get more out of it.
there are two main ways to get your YouTube analytics and metrics, which are completely explained here.
YouTube is the biggest platform for sharing videos and visual content in the whole world. Understanding how beneficial using YouTube analytics of any kind, either free or paid, would be to the success of your YouTube channel, makes you want to use it to track your metrics daily.
The key to own a popular YouTube channel is not to get all your videos viral on the platform, but it begins by better understanding the audience, and that’s where you’ll feel the need for analytics. YouTube video analytics has two general methods, which would be discussed later in the blog after getting to know what we actually mean by analytics on YouTube and how it can help us perform better on the platform.
What is YouTube analytics, and how is it useful?
YouTube analytics is a free or paid service which provides us detailed information about how our videos and channel have performed, who our subscribers and audiences are? How long do people spend time watching our videos? What our audience wants from watching our videos and things like this. Using YouTube channel analytics, we can better understand our channel’s viewing statistics and trends.
By knowing such information about your shared YouTube videos, you can decide on when to post content, how to optimize the video strategy, and much more, which would ultimately lead to happier audiences and more channel growth.
YouTube channel analytics has two different methods which are as below:
Using a reliable social media analytics tool
Sticking with YouTube’s in-app analytics tool
As I mentioned above, there are two ways to track down the YouTube channel’s metrics, which one of them is available from the platform itself. YouTube offers its own analytics platform, which gives creators some extra information about the performance of their videos and metrics to know how their channel is doing. But there are some disadvantages of only leaning on the in-app analytics of YouTube, which gets so many users to look for better tools that offer them much more detailed video analytics.
The cons of using only YouTube’s own analytic app are:
It’s not much of a use for a creator with a very small fan base.
Users have reported that except for the real-time section, all other sections have at least a 2-day delay before statistics are displayed.
Most of the creators are not even aware of it; therefore, they do not take advantage of them.
Beginners might find it hard to work with and a bit confusing.
It only provides users with basic analytic metrics, sufficient for ordinary users and new, small businesses.
The reasons above make the creators look for a better YouTube analytics app to get help from.
How to Use YouTube Analytics?
To start using the in-app YouTube analytics, all you have to do is to either login to your YouTube channel or sign in with Gmail to get down to business. Follow the step by step guide below, to access your YouTube channel analytics easily:
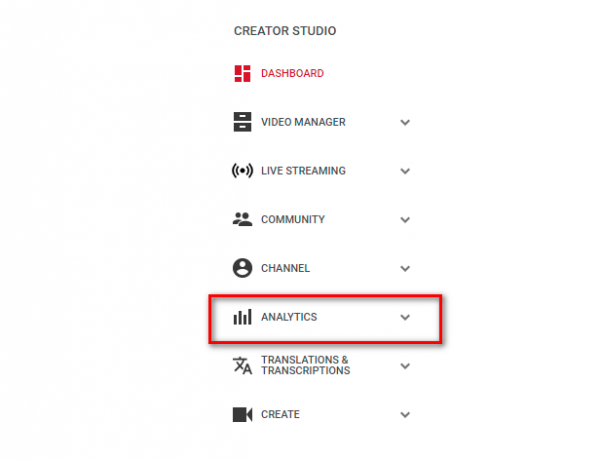
1. At the top of your channel page, click the profile icon in the top right and tap on “Creator Studio” or “YouTube Studio.”
2. You’ll be redirected to the “Creator studio” dashboard, where you’ll see the basics of video analytics such as (Watch time, Views, Subscribers and Estimated revenue) in the middle of the screen.
3. From the menu on the left side of the panel, click on “Analytics” to go to the main page of your video metrics.
There is a second way to access the YouTube analytics tool, which is much easier and takes only a couple of clicks. Simply go to YouTube.com/Analytics or select the “Analytics” drop-down in the “Creator Studio” tab of your account.
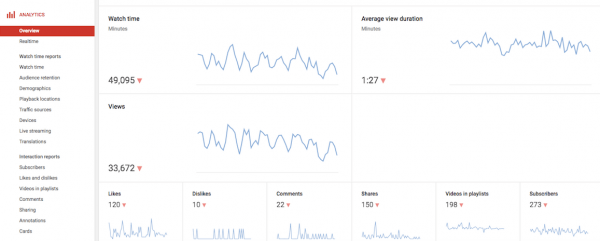
After following either of the ways mentioned, you have access to your YouTube channel analytics, and by default, the first page shows the Overview of your metrics. The overview is set to show you the analytics of the last 28 days by default, but you can change that to any period of time that you wish.
The main options of YouTube’s report and analytics tool are Overviews, Realtime, Earnings, Watch Time, and Engagement.
Conclusion
Becoming successful on a huge and popular platform like YouTube requires us to have a great marketing strategy and to act wisely. One of the first useful steps we can take to maintain great content on this platform is to analyze the videos we share with a reliable analytics tool, to find out what we are doing wrong and keep track of our content’s metrics. So never underestimate the power of analytics for all social media channels.
YouTube is the biggest platform to share videos, and it is the second popular website all over the glove. Scheduling YouTube videos is a must for those who want to boost their accounts on YouTube.
YouTube is the biggest platform to share videos, and it is the second popular website all over the globe. Scheduling YouTube videos is a must for those who want to boost their accounts on YouTube.
Schedule YouTube videos is a must to keep your consistency and presence on this social media platform. Recently, YouTube has added a stories section to its website, which shows the presence and activity are getting more important than before.
Can you schedule YouTube videos?
Yes, of course. YouTube allows its users to schedule videos easily with in-app options. If you have multiple videos, it’s better to schedule them ahead of time instead of posting them all at once.
As a social media user, you surely know that almost all other platforms allow in-app scheduling as well. There are scheduling options of Twitter, Facebook and etc. YouTube is not an exception in this. YouTube is now catching up, but it may not be easy to find the settings and take the steps you need to do so. Bellow’s what you need to know.
What are the best ways to schedule YouTube videos?
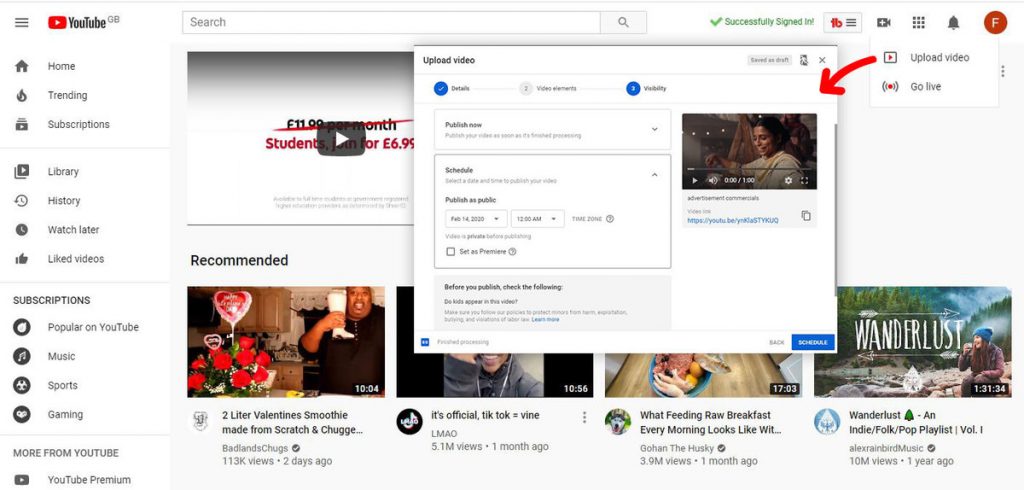
There are two main ways you can use to schedule and plan your YouTube videos. First, the YouTube website in which you can only schedule one video to one account.
YouTube scheduler
In this way, you can keep your account organized, even if you are away.
Some of you may be heard of the importance of uploading time on YouTube, which is true.
You should upload to YouTube at that so many people are online. This action may increase your chance to be seen by others, or even in the rending section of YouTube. It is essential to upload YouTube videos at the right time.
Though, you might be wondering where to find the best time to post on YouTube channel. What you need to keep in mind is that it might differ according to your audiences and viewers.
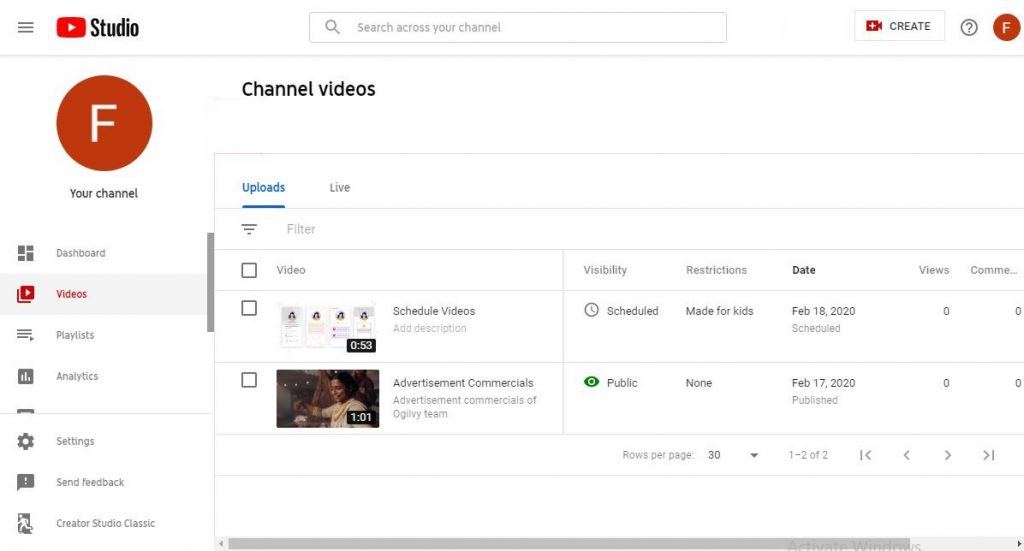
How to find scheduled videos on YouTube?
Finding your schedule posts on YouTube is easy, and you can see all videos on your YouTube channel with a few clicks.
Go to YouTube and click on your Profile
Click on the Videos on the left menu
Find the scheduled videos and their status on the list
From there, you can change the scheduled date or delete your videos. To remove the scheduled videos on youtube, select the video and click on the three-dots icon. Click on permanently delete, accept the rules, and delete.
Remember that you are not able to undo the deleted videos on youtube. To change the date of scheduling, click on the time, and enter any other you need.
Improve the marketing performance by using the inosocial best analytic tool to experience the new chapter of your business life by considering people’s needs or desires with Instagram metrics better than always.
Improve the marketing performance by using the inosocial best analytic tool to experience the new chapter of your business life by considering people’s needs or desires with Instagram metrics better than always
Success is impossible without Instagram analytics tools for active Instagram business accounts!
Knowing a complete list of Instagram tracker tools are absolutely essential to the success of Instagram marketing because today, with measuring the Instagram metrics and activities, you will see the steady Instagram growth as well.
Why are most Instagram marketers testing a variety of ways to analyze the performance of their accounts? There might be a few reasons! Maybe they are looking for the most efficient Instagram analytics resonates with their needs, and of course, we can not take a blind eye to make money and the massive popularity it can bring up for them.
And it is good to know that it is the power of Information that build up your business. It won’t be solved actually without competitors’analysis.
Now, to serve the customers as a waitress for achieving the marketing goals, walk through this guide to get the beneficial Instagram analytics roles.
Instagram analytics Increases the engagement
Now, it is time to get how to track Instagram metrics with the power of Instagram analytics tool to increase engagement.
It is undeniable with Instagram analytics reach the average Instagram engagement rate is more convenient, and every Instagram business account needs to know these critical factors to appear stronger than other competitors in this space.
Some essential terms put in this list:
Reach: The number of specific users that saw your Instagram post or story on any given day
Impressions: The number of times the content, whether a post or a story, was shown to users
Engagement Rate: This is the post engagement divided by post impressions.
Saved Posts: The number of users who saved your Instagram posts
Instagram Stories: to see how people view and interact with the Instagram stories
The interesting point is that your success depends on these simple metrics at a glance. Whenever marketers want to know where a business account stands among +30 million active Instagram business accounts, these parameters come to eyes to evaluate the Instagram performance and strategy.
All of the marketing attempts are on the head of average Instagram engagement rate that is 4.7%
Instagram insight is crucial to success as an analytic tool
Instagram Insights is an Instagram analytics tool that comes to help the Instagram marketers community with its useful facilitates known as Instagram users demographics to grow your Instagram business account.
It provides Instagram stats on content, engagement, and user action. This information lets you track and measure the Instagram marketing efforts to help you consistently improve.
Profile view, website clicks, follower, impression are the Instagram data Instagram insight can give time to time
It is a beneficial option as a free Instagram follower tracker for those who can access their public Instagram accounts from the cellphones. Totally, it is a useful discovery tool that is right inside the app that captures and estimates the Instagram statistic accounts.
Instagram insight
The result of your marketing efforts summarized in insights for specific posts and stories you’ve created to see how each performed and how people engaged with them.
Key points to get the acceptable feedback from Instagram analytics tools
Let me mention that a good Instagram report contains the items below
Selecting the right target Instagram presence
Using mentions for Instagram accounts could be leading to future partnerships
posting at the best time of each day
Publishing at least three Instagram posts in a day
Taking advantage of the comments or stories for more engagements.
Use the best Instagram analytics tool
Considering all about Instagram insight app that is accessible from Instagram business pages. You can still sense having a lack of an Instagram analytics tool act as one of the best Instagram growth services to start to grow the business by analyzing Instagram metrics data for building up the effective marketing strategies.
It is your right to select the most appropriate performance tools to measure your Instagram engagement rate as well as the impression to be specified what kind of achievements you have made.
Inosocial can help marketers to take the right path throughout their Instagram marketing journey to bring lifechanging changes into their businesses with plenty of parameters powerful metric tools.
The advantage Inosocial analytic tool
Imagine you are going to pay on the Instagram business expenses, what the main points persuade you to go through with an Instagram analytics tool?
In response to this question, I should announce that, considering the tool features are more likely to attract the attention to try it out.
Consider critical factors such as Free trial, supporting both personal and business accounts, reasonable price based on services received will lead us to no need to think of another social media analytics product in the long run.
Use the full capacity of our Instagram analytics tools advantages to boost up the brand engagement
Get the audience’s growth report for every social media account separately.
Use it 7 days free trial.
Provide with all in one social media analytical report;
Available for both personal and business social media accounts
Run a social media campaign by considering the engaged users
Connect the Google analytics to get data to of the website traffic and visitors’ demographics
Social media metrics are what kills or breathe life to the businesses for Instagram, Twitter, Facebook, Linkedin, and youtube accounts.
Fortunately, this social media analytics tool is an all-in-one platform that not only manages all social media in one place but also provides you with every social media accounts statistics and reports. Indeed this is a full package with so many features such as
Automatic Scheduler
Data Analytics Tools
Social media monitoring reports
Social media performance tracking
Content measuring
Best keywords tracker
How to build an Instagram analytics report
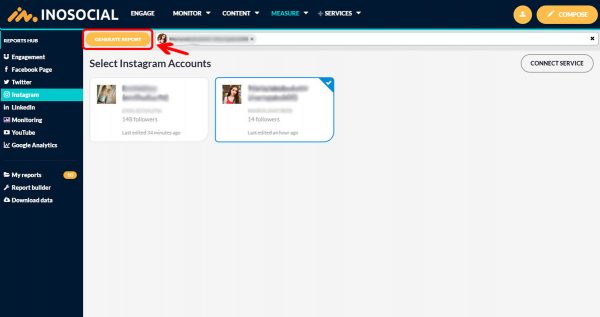
After signing up to Inosocial, there is a need to login to the dashboard and work with any services you prefer most, here I want to explain Instagram analytics steps.
Login to inosocial dashboard and enter your Email and Password
Login page
After signing, set the timezone based on the location
Inosocial timezone
Go to Services tab, and choose Add services
Add service
In this step, you can add every social media account
Tap on Add option of Instagram
Add instagram service
Three options appear, choose the first one,” Instagram Streams &Analytics.”
Setup Instagram analytics
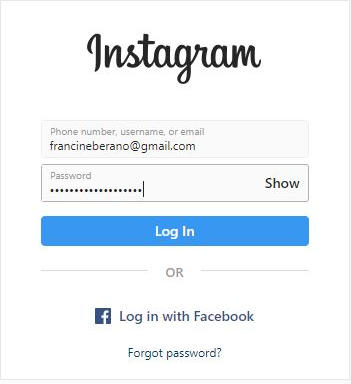
Then you will be asked to enter your Instagram username and password
Enter Instagram Email & password
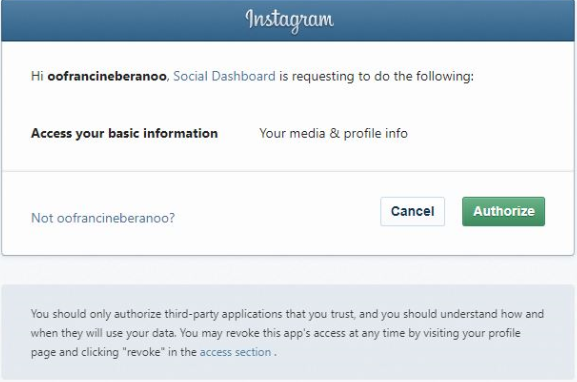
After that, it needs to be authorized to sync the InoSocial dashboard with the Instagram account to access necessary information, Click on Authorized
Authorize Inosocial dashboard to get data
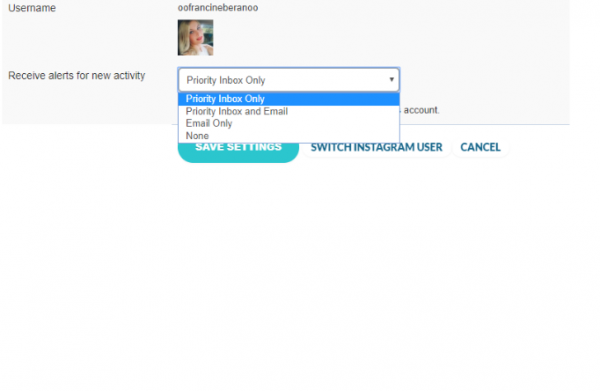
After that, a combo box appears to select how to receive for new activities
Inbox Only
Inbox and Email
Email-only
None
Select the most suitable one and click on Save Setting
select an item to how to receive an alert
Finally, your Instagram account added to Inosocial dashboard
Instagram account sync to Inosocial dashboard
Now, Go to Measure tab and select Report Builder
Build an Instagram analytics report
Type a Report name and Report title for your report (and select the period you want), Now tap on Select layout button
The default period is Last 30 Days
Here, choose a layout and click on Create Report
Choose a report layout
This window comes in turn of the setting you did to add the module
Add module window
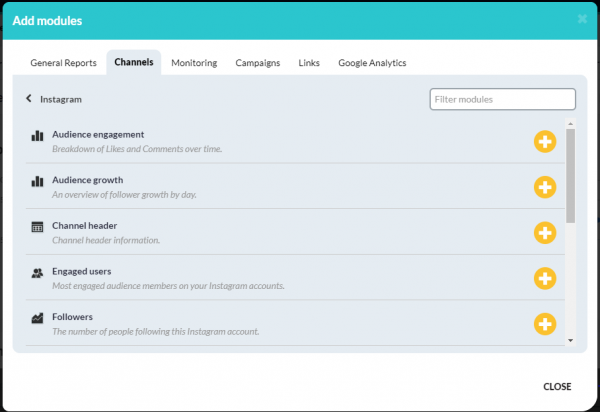
Go to the Channels tab, and select the Instagram account you ‘ve added
Add a module from channels tab
Click on + sign to add the essential Instagram metric to the Instagram report
Add Instagram metrics
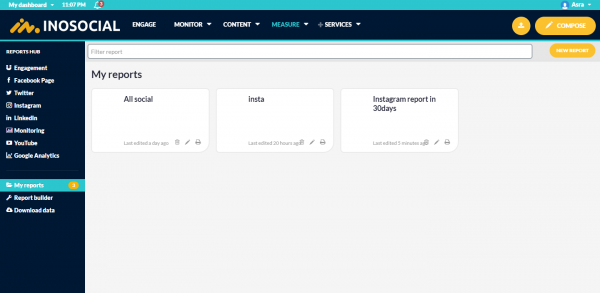
Now go to My Reports section to see all of the reports you have created for every social media or all of them.
My reports
What are the Inosocial Instagram metrics?
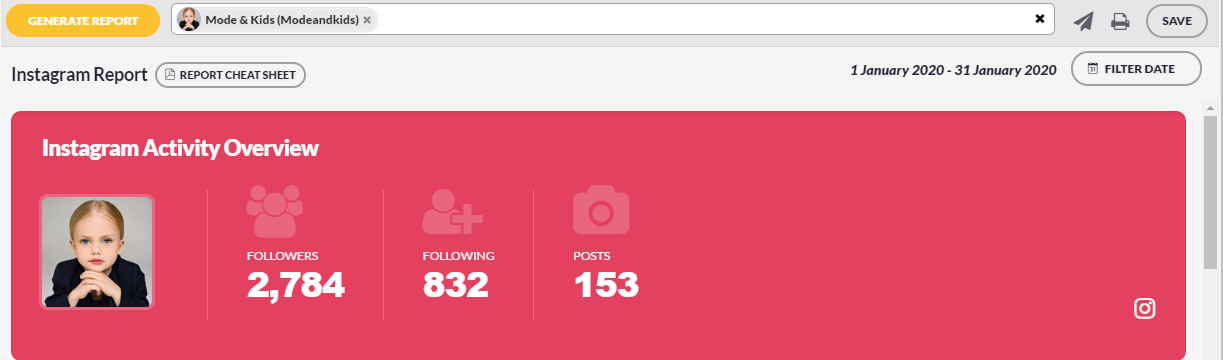
Instagram activity overview: This metric gives you general information about the Instagram account by Filer Date (1Jan-31Jan)
Followers
Following
Posts
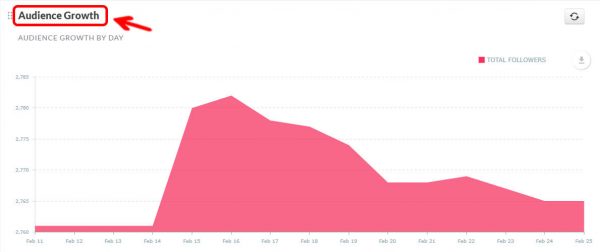
audience growth: It shows the growth of your Instagram followers by day in over a period of time.
The chart fluctuation shows better this growth and shrinking of the audience detail.
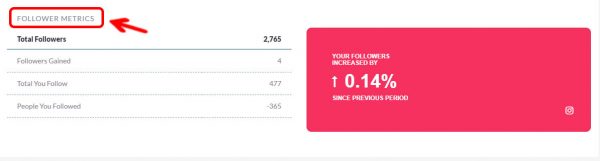
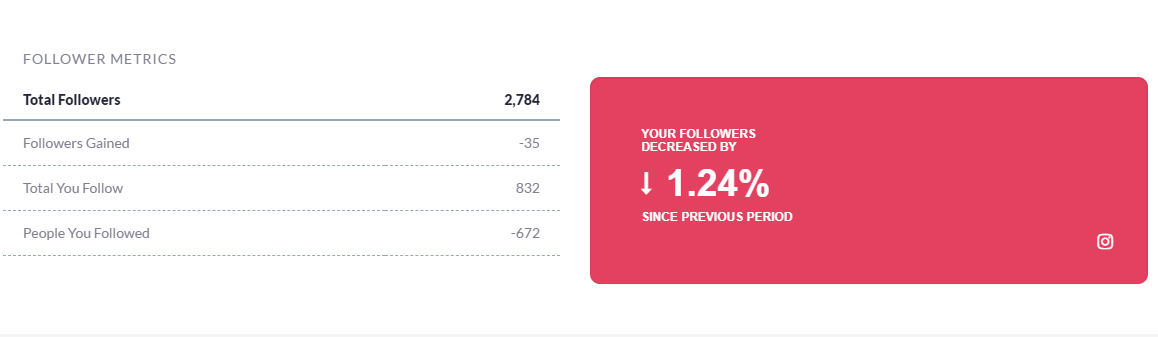
Followers Metrics: Follower metric is showing the followers you gained in a particular interval as well as your following people in a while (1Jan-31Jan), but Total you follow refers to the number of audiences that have been followed from the first time of establishing the account up to now.
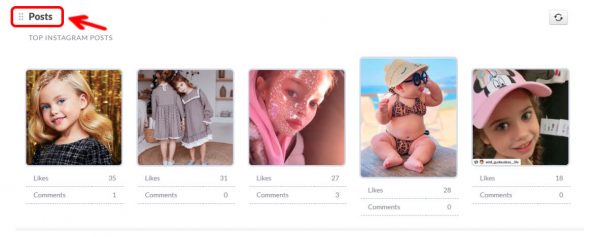
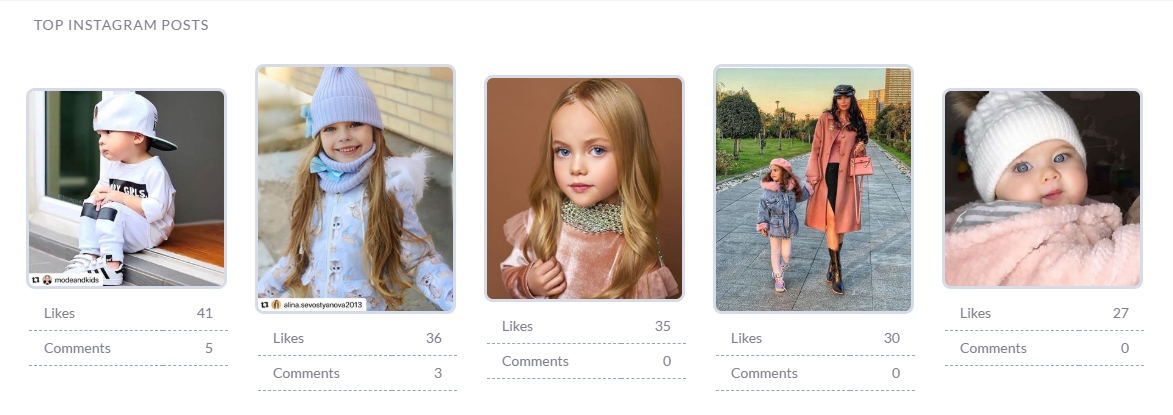
Top Instagram posts: It is obvious that the posts that have the most engagements (comments, likes) are available.most of the marketers assess this metric to find whether theirs targeted valuable posts went viral or not and I think it is the most useful point to run a contest for to reach the number of likes you want.
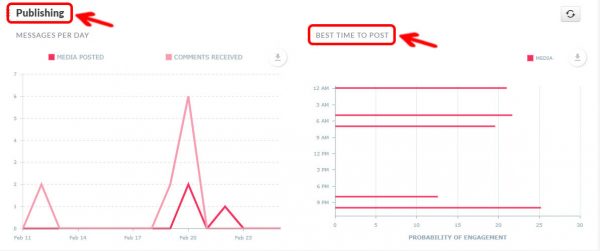
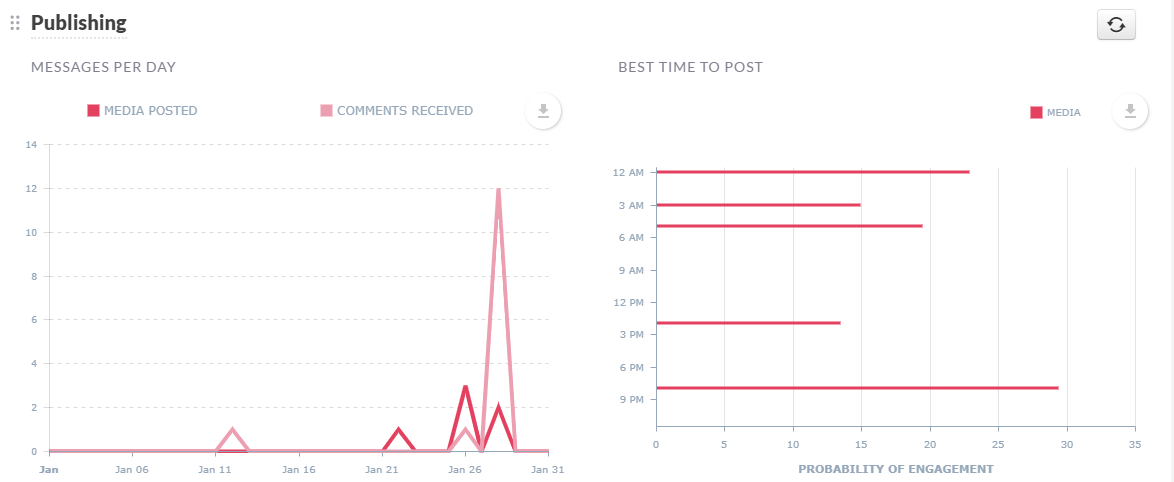
Publishing: It is another important metric to analyze the Instagram business page performance. It divided into two parts Messages Per Dayand theBest time to post.
Messages per day: display how many comments received in publishing the posts on each date.
Best time to post: It acts as an indicator to show in which time range the account gets the most engagements. For instance, 10 PM was the best time to post on Instagram from 1Jan to 31Jan
Publishing Messages Per Day
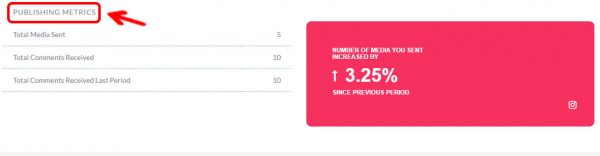
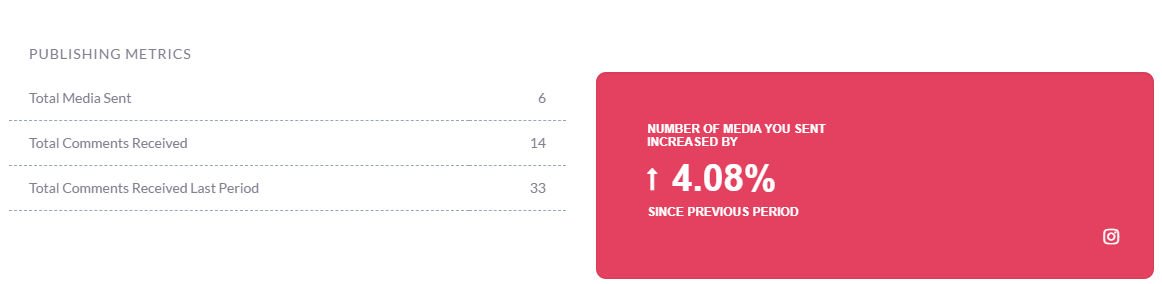
Publishing Metrics: It provides you with the total number of media sent, comments received
Also, Total comments in a while(1Jan-31Jan) are available separately.
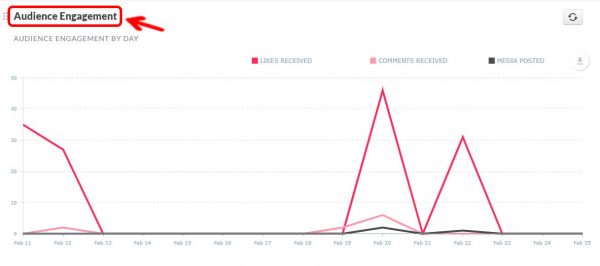
Audience Engagement:
It shows the connection between the number of posting in a day with likes and comments gained, which are specified with three colors in the below chart. Also, it is like an analytics metric that shows which days had the most engagement and analyzes which posts come to top posts in your Instagram report.
So, it is good to know to publish three posts at least during a day.
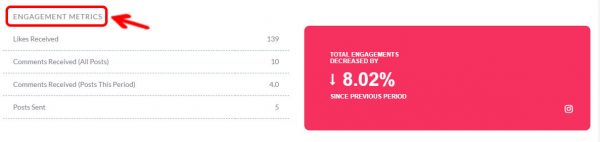
Engagement Metrics:
The result of engagement metrics is in a table format that estimates all comments from all Instagram posts in compersion to the comments for the posts plus the amount of likes and sent posts in this selected duration (e.g., 1Jan-31Jan)
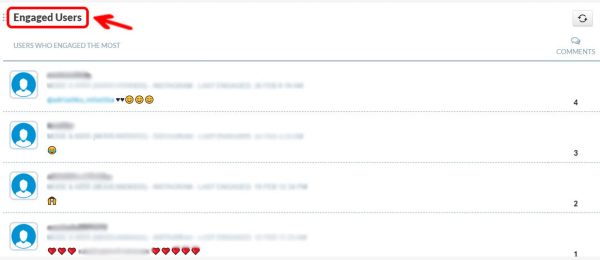
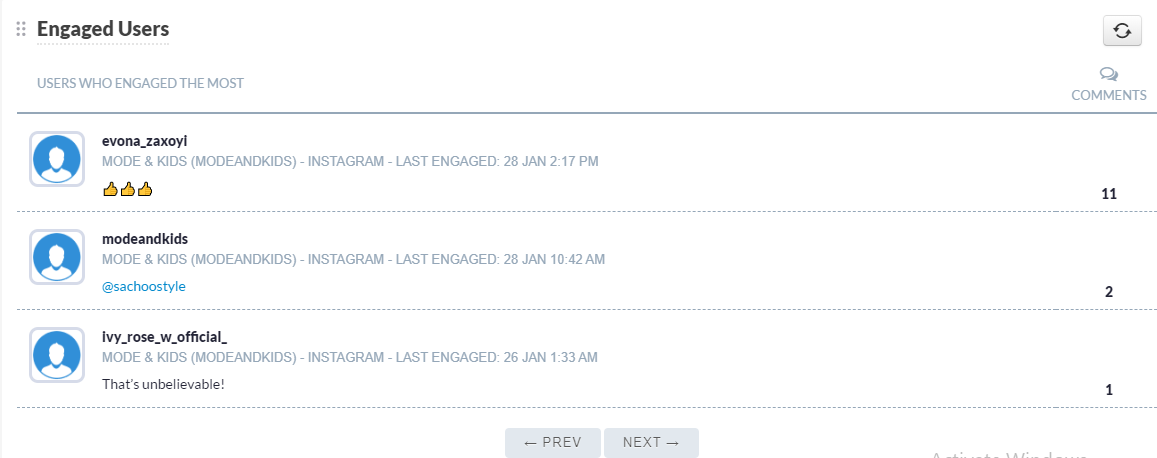
Engaged Users:
This metric shows with Instagram users engaged the most with the Instagram content.
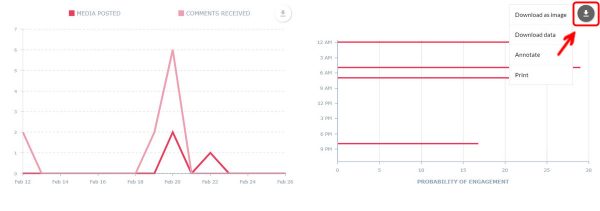
Instagram insight is beneficial to use at the first look if you want to get to know how an Instagram analytic tool works. Although in general, it includes essential metric tools to give the complete report of your business accounts such as overview, reach, impression, and promotion, etc., it limits just the last 7 days of your Instagram activity and honestly, a professional business account, of course, need efficient analytics tool to act as the best way tracker of your Instagram engagement rate in details. Inosocial analytics tool has several options to extract from different Instagram metric separately in image, data, annotate as well as print format. Moreover, It shows the top Instagram posts with the number of comments and likes they received in a row while Instagram insight adequate to view these items under each Instagram post individually.
A few but Important Instagram insight v.s Inosocial Instagram analytics tool:
Metrics
Inosocial
Instagram insight
Report Duration
Different duration
Last 7 days
Report Output
Available in a different format
_
Top Posts
Yes
No
Audience Engagement
Likes, comments, media posted
Follow and unfollow
Engaged users
Show each username and last engagement
_
The last word, Instargam analytic tools are as many as possible for any marketers or business owners with any taste and need on Instagram, but the noticeable point is that whenever we want to think about modern marketing, it is our wisdom to focus on every social media channel to get the real and best result of our business performances, Inosocial, all in one management tool, allows us to go with not only with Instagram business tools like analytics but also with other social media tools and metrics to appear shiny and better than yesterday. The monitoring tool is ready in this all in one box for those with the aim of competitor analysis.
If you are managing a Facebook page either for your personal experiences or for your business, knowing more about audiences, user behaviors, time to posts, and other analytics factors is a must. Facebook analytics is a tool to help find out more about the users, their actions and other important factors.
What is Facebook Analytics?
Facebook analytics is a tool to see the engagement rate, account growth rate, the best time to post on Facebook, top posts, and other Facebook data to see the status of the Facebook page.
Facebook analytics, which is also known as Facebook Insights, tracks likes, page views, and more. Facebook analytics tells you who your audience is and how they’re interacting with your page. … It’s packed full of insights and data that can help you get the most from the social media that reaches 1.62 billion users every day.
What is Facebook engagement?
Facebook engagement includes every action of users on Facebook posts. These actions include like, comments, clicks, and share.
Facebook engagement shows how useful a post is or how is the growth of the account. Undoubtedly, the more involvement an account has, the better that account performs in general.
How to use Facebook analytics?
The main way to see Facebook analytics is the Facebook insights which is the in-app analytics feature on this platform, just lie Twitter analytics, and Instagram analysis tools.
To use Facebook page insight, you should log in to your account and go to the Facebook page.
Login to your Facebook account
Go to Facebook page from home
Click on the top menu on insight
You can choose different parts from the left menu. By clicking each section on the main page, you will get a more in-depth insight. Though, It may look a bit confusing specifically for beginners to use Facebook insight.
If you have just started your Facebook page, or you have no ideas on how to use Facebook insight, you should go for InoSocial. It has a simple and easy to use dashboard, in which you can add all other social media too. Below are some of the Facebook analytics parts.
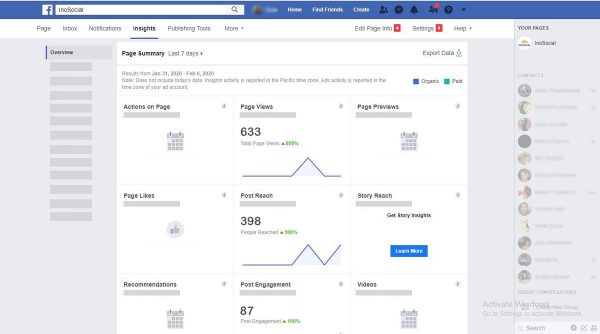
Facebook page analytics
Unfortunately, Facebook doesn’t provide any analytics for personal profiles. Therefore, to see Facebook metrics, you should create a Facebook page. Facebook page analytics can be divided into main sections:
Followers
Like
Reach
Pageviews
Page previews
Action on page
Posts data
Events
Videos
Stories
Demographic
Messaging connections
Facebook video analytics
For advanced analysis of other people’s pages, you need to use tools, for example, Popsters.
In the video analytics, you can see two different data:
Performance: the number of minutes all videos are watched from the selected period.
Top videos: highest performing videos by minutes viewed from the selected periods
All in all
If you are running a Facebook business page for your brand, using Facebook analytics is a must for further improvement. In general, Facebook analytics gives you a better insight into what users may love and how to perform better on Facebook.