In the ever-evolving realm of statistics era, databases form the backbone of data management for agencies across the globe. Rapid technological improvements have now not only transformed how statistics is generated and applied however have also necessitated a paradigm shift inside the function of Database Administration (DBA) offerings. This article explores the pivotal function of DBA services within the ongoing database evolution, shedding light on their significance in contemporary IT landscapes.
The DBA is liable for understanding and dealing with the general information base climate. By creating and carrying out an essential plan to follow while sending data sets inside their association, DBAs are instrumental in the continuous viability of uses that depend on data sets for information capacity and access.
The Changing Landscape of Databases:
Rise of Big Data and NoSQL:
As organizations grapple with unparalleled volumes of records, the emergence of Big Data technologies and NoSQL databases has reshaped the database landscape. DBA services now amplify their know-how to coping with and optimizing non-relational databases, accommodating the diverse records sorts and structures ordinary inside the era of massive statistics.
Cloud Database Services:
The migration of IT infrastructure to the cloud has been a recreation-changer. DBAs are an increasing number of concerned in handling cloud-based totally databases and addressing scalability, security, and performance challenges in cloud environments. This shift needs a new set of skills and strategies from DBA professionals.
II. The Expanded Role of DBA Services:
Automation and Artificial Intelligence:
Modern DBA services harness the energy of automation and artificial intelligence to streamline routine tasks. Automation complements operational performance and permits DBAs to recognition on strategic tasks which includes performance optimization and protection enhancements.
Security within the Age of Cyber Threats:
Cybersecurity concerns have escalated with the digitization of agencies. DBA services now play a essential position in imposing sturdy safety features, together with encryption, get admission to controls, and ordinary protection audits. Proactive safety strategies have come to be integral to safeguarding touchy enterprise facts.
Performance Tuning for Complex Architectures:
With the arrival of complicated database architectures and distributed structures, DBA offerings are at the forefront of performance tuning. From optimizing queries to exceptional-tuning disbursed databases, DBAs make sure that structures perform seamlessly no matter complex technological infrastructures.
III. The Business Impact:
Data-Driven Decision Making:
As companies increasingly rely upon records for decision-making, the role of DBA services in preserving statistics accuracy, consistency, and availability becomes paramount. DBAs create a foundation for dependable and timely insights, empowering businesses to make knowledgeable selections.
Adaptability to Change:
The dynamic nature of era needs adaptability. By evolving along the converting database panorama, DBA services permit corporations to live agile and attentive to technological shifts, making sure that their facts infrastructure remains sturdy and scalable.
Conclusion:
Unprecedented challenges and opportunities mark the evolution of databases in cutting-edge IT. With their adaptability and expanded talent units, DBA services stand because the guardians of facts integrity, protection, and performance. As corporations retain to navigate the ever-converting IT landscape, the function of DBA offerings stays central in shaping the future of statistics management and utilization. Embracing this evolution is a need and a strategic imperative for businesses aiming to thrive within the virtual generation.
If you are wondering, “Why won’t my Xbox turn on?” You’re not alone in facing this frustrating issue. Many Xbox users have faced the problem of their console not powering up despite hearing noises. Luckily, before seeking professional help, there are several tried-and-true fixes you can attempt. In this guide, we’ll explore the most common reasons for this problem and provide instructions on how to resolve it.
Reasons Why Your Xbox Isn’t Turning On
There could be various factors contributing to your Xbox not turning on. Let’s explore some common reasons:
Power Supply and Cable Issues
The power supply and cables play a crucial role in providing a stable power source to your Xbox. If the power cord is damaged or improperly connected, it can prevent the console from turning on. Similarly, a faulty power brick can result in insufficient power delivery to the console, causing it to beep but not fully power up.
Overheating
Like any electronic device, the Xbox is susceptible to overheating. If the console is placed in an environment with poor ventilation or if the vents are blocked by dust, it can lead to overheating. In such cases, the console may shut down as a safety measure and refuse to turn back on until it cools down.
Moisture on Motherboard
Moisture on the motherboard can be a significant issue for Xbox consoles. It can occur due to condensation or internal cooling system problems. When moisture builds up on the motherboard, it can cause various power-related issues, including beeping but not turning on. Moisture can also lead to short circuits and other hardware malfunctions if left unaddressed.
How to Fix an Xbox That Won’t Turn On
Now that we understand the potential causes, let’s explore the step-by-step solutions to fix your Xbox One:
Soft Reset and Power Cycle
Performing a soft reset and power cycle can often resolve minor software glitches and power-related issues.
Soft Reset
Unplug the power cord from the console and wait for 15 seconds.
Press the power button on the console a few times while it is unplugged to discharge any residual power.
Plug the power cord back into the console.
Press the power button to turn on the console and see if it powers up correctly.
Power Cycle
Ensure the console is turned off.
Press and hold the power button on the console for 10 seconds
Check the LED indicator on the power brick; it should flicker from orange to white.
Once the LED indicator remains steady orange, the console is in standby mode.
Press the power button again to turn on the console.
Triple Button Hold
If the soft reset and power cycle didn’t resolve the issue, you can try a triple button hold to reset the internal software.
Press and hold the power, eject, and sync buttons simultaneously for ten seconds.
Release the eject button after ten seconds.
Continue holding the power and sync buttons for an additional fifteen seconds.
Release the power and sync buttons.
Press and hold the power and sync buttons once again until the console powers up and starts syncing data.
Eject Button Tapping
An unconventional but effective solution is to tap the eject button multiple times. This action can help break any software loops causing the console not to turn on.
Tap the eject button on the console at least ten times in a row.
You don’t need to have a disc in the tray for this method.
The purpose is to redirect the console’s focus and trigger a new task, such as ejecting the disc tray.
Check Power Supply and Cables
Make sure that the power supply and cables are properly connected and not damaged.
Check that the power cord is securely plugged into the console and the wall outlet.
If the LED indicator on the power brick is not lit or blinking orange, consider replacing the power supply.
Inspect the power cord for any tears or other signs of damage. If damaged, replace it with a new one.
Overheating Issues
If your Xbox shuts down due to overheating, proper ventilation is crucial. Take the following steps to address this issue:
Remove any objects or obstructions around the console that may block airflow.
Place the console in a well-ventilated area.
Clean the vents using compressed air or a gentle brush to remove any dust buildup.
Consider using a cooling stand or external fan to improve airflow around the console.
Moisture on Motherboard
If you suspect moisture on the motherboard, take the following precautions:
Turn off the console and unplug it from the power source.
Allow the console to sit at an angle, allowing any moisture to drip out.
Use a hairdryer on the coolest setting to gently dry the internal components.
Alternatively, let the console sit undisturbed for 2-3 days to naturally dry out.
Consider using a dehumidifier in the room to reduce moisture levels.
Faulty Internal Power Supply
If the issue persists and is not related to external factors, the internal power supply may be faulty. In such cases, professional repair or replacement may be necessary. Contact Microsoft support or an authorized technician for further assistance.
Replace the Controller
If you’ve tried all the previous solutions and your Xbox still won’t turn on, consider replacing the controller. A faulty or malfunctioning controller can prevent the console from powering up correctly.
Check Power Strip and Wall Outlet
Ensure that the power strip or wall outlet you’re using is functioning correctly.
Verify that the power strip is turned on and has not tripped any fuses or circuit breakers.
If the outlet on the power strip is dead, replace it immediately.
Try plugging the console directly into a different wall outlet to rule out electrical issues.
When faced with the frustrating situation of ‘Why won’t my Xbox turn on,’ it can indeed be annoying, especially when it has beeps and noises. But there are a few things you can try to fix the problem. You can improve your chances of getting your Xbox working again by following the steps in this guide, such as doing a soft restart, power cycling, checking the power supply and cables, fixing problems with overheating and moisture, and replacing broken parts.
If all else fails, consider seeking professional assistance or exploring replacement choices. Always put safety first, and if you need more help, look to official sources.
SSD is becoming more and more common because it works faster and is more reliable than regular hard drives. But one problem that a lot of people have is that the SSD doesn’t show up in Windows 11. This can be annoying because it keeps people from getting to their files and making the most of their SSD. This guide will look at the best ways to fix SSD not showing up in Windows 11 and give you great instructions on how to fix the problem.
How to Fix “SSD Not Showing Up” Error?
Before we talk about how to fix the problem, it’s important to know why the SSD might not be showing up in Windows 11. By finding the problem’s root cause, you can successfully deal with it and put in place the right solution. Here are a few common reasons:
Bad links between hardware: It is possible that the SSD is not properly connected to the motherboard or power source of your computer. The SSD might not be found if the wires are too loose or the connectors are broken.
Free disk space: The SSD might not show up in Windows 11 if it hasn’t been set up or divided up. Before the operating system can see unallocated drive space, it has to be formatted and given a name.
Assigning drive letters: Windows gives storage devices drive letters so that they can talk to each other. If the SSD doesn’t have a drive letter or has drive letters that don’t match, it might not show up in File Explorer or Disk Management.
Misconfigured BIOS settings: The SSD might not be recognized because the BIOS settings are not set up properly. This might happen if the SATA mode is set to IDE instead of AHCI, which might make the drive not work with other devices.
Out of date SSD drivers: Windows 11 might not be able to find an SSD if the drivers are out of date or don’t work with the SSD. It is very important to keep your SSD drivers up to date for the best speed and compatibility.
Now that we know what might be causing the SSD not showing up problem in Windows 11, let’s look at how to fix it.
Solution 1: Check Hardware Connections
The first step in troubleshooting the SSD not showing up issue is to ensure that the hardware connections are secure. Follow these steps to check the hardware connections:
Power off your computer and unplug the power cord
Find the SSD when you open the case of your computer.
Check the SATA data cable and power cable connections. Make sure they are securely connected to the SSD and the motherboard.
If possible, try using a different SATA cable and power cable to rule out any cable-related issues.
Close the computer case, plug in the power cord, and power on your computer.
Check if the SSD is now detected in Windows 11.
By verifying the hardware connections, you can eliminate any potential issues caused by loose cables or faulty connectors.
Solution 2: Initialize the SSD
If the SSD is new or has not been initialized, Windows 11 may not recognize it. Initializing the SSD will prepare it for use and allow Windows to detect it. Follow these steps to initialize the SSD:
Press the Windows key + R to open the Run dialog box.
Type “diskmgmt.msc” and press Enter to open the Disk Management utility.
In Disk Management, locate the SSD that is not showing up.
If the SSD appears as unallocated space, right-click on it and select “Initialize Disk.”
Select the appropriate disk initialization style (MBR or GPT) and click OK.
Right-click on the unallocated space and select “New Simple Volume.”
Follow the on-screen instructions to create a new partition on the SSD.
Once the initialization and partitioning process is complete, check if the SSD is now detected in Windows 11.
Initializing the SSD will prepare it for use by creating a partition and formatting it with a file system. This allows Windows to recognize and assign a drive letter to the SSD.
Solution 3: Assign or Change Drive Letter
If the SSD is not assigned a drive letter or has conflicting drive letters, it may not show up in File Explorer or Disk Management. Follow these steps to assign or change the drive letter:
Open Disk Management by pressing the Windows key + R, typing “diskmgmt.msc”, and pressing Enter.
Locate the SSD that is not showing up.
Right-click on the SSD’s partition and select “Change Drive Letter and Paths.”
If no drive letter is assigned, click “Add” and select a drive letter from the dropdown menu.
If a drive letter is already assigned but there is a conflict, click “Change” and select a different drive letter.
Click OK and check if the SSD is now visible in File Explorer.
Assigning or changing the drive letter ensures that Windows recognizes and communicates with the SSD properly.
Solution 4: Check BIOS Settings
Misconfigured BIOS settings can prevent Windows 11 from detecting the SSD. By adjusting the SATA mode, you can resolve compatibility issues and allow the SSD to be recognized. Here’s how to check the BIOS settings:
Restart your computer and enter the BIOS setup by pressing the designated key (e.g., Del, F2, or F10) during startup.
Navigate to the Storage or SATA Configuration section in the BIOS settings.
Locate the SATA Mode or SATA Configuration option and change it to AHCI.
Save the changes and exit the BIOS setup.
Once your computer restarts, check if the SSD is now detected in Windows 11.
Changing the SATA mode to AHCI ensures proper communication between the SSD and the operating system.
Solution 5: Update SSD Drivers
Outdated or incompatible SSD drivers can prevent Windows 11 from detecting the SSD. It’s important to keep your SSD drivers up to date to ensure optimal performance and compatibility. Here are the steps to update the SSD drivers:
Press the Windows key + X and select “Device Manager” from the menu.
Expand the “Disk drives” category to view the SSD.
Right-click on the SSD and select “Update driver.”
Choose the option to search automatically for updated driver software.
Windows will search for the latest driver for your SSD and install it if available.
Once the driver update is complete, restart your computer and check if the SSD is now recognized in Windows 11.
Updating the SSD drivers ensures that you have the latest software to support optimal performance and compatibility with Windows 11.
Solution 6: Seek Professional Help
If none of these work to fix the problem where the SSD doesn’t show up in Windows 11, it could mean there is a bigger issue. In this situation, it is best to get help from computer techs or people who specialize in data recovery. They know how to figure out what’s wrong and have the right tools to fix any hardware or software problems that might be stopping the SSD from being seen.
Professional data recovery services can also help get data back from SSDs that can’t be accessed or are destroyed. If your info is important and can’t be lost, you might want to get help from a professional.
In Summary
Having trouble with your SSD not showing up in Windows 11 can be annoying, but if you follow the right steps to fix the issue, you can get back to using your SSD. You can fix this problem and make sure your SSD works properly by checking the hardware connections, initializing the SSD, giving or changing the drive letter, checking the BIOS settings, updating the SSD drivers, or getting help from a professional.
To keep your SSD drivers and operating system from becoming incompatible, make sure to keep them both up to date. By following these steps, you can easily fix the problem where the SSD is not showing up in Windows 11.
Protecting your privacy and safety online has become very important in today’s digital world. Virtual Private Networks (VPNs) are very important for keeping our private information safe and letting us stay anonymous online. We will look at the main differences between WireGuard vs OpenVPN in this guide. We will talk about encryption, security, speed, availability, and more. After reading this, you’ll have a good idea of which VPN protocol fits your needs the best.
WireGuard vs OpenVPN: The Differences
Before exploring the technical nuances, let’s take a brief look at the origins and characteristics of each VPN protocol.
OpenVPN
OpenVPN, developed by James Yonan and released in 2001, has established itself as a reliable and secure open-source VPN protocol. Its flexibility, compatibility across various operating systems, and ability to bypass firewalls and Network Address Translators (NATs) have contributed to its widespread adoption.
WireGuard
WireGuard is a new VPN system that aims to be better than IPsec and OpenVPN by being faster, easier to use, and using less resources. WireGuard has a small script of about 4,000 lines and uses the latest encryption methods and cryptographic building blocks to make sure it works well and is safe. WireGuard was first made for the Linux kernel, but it now works on Windows, macOS, BSD, iOS, Android, and other systems.
Encryption: Comparing the Approaches
Encryption forms the bedrock of any VPN protocol, determining the level of security and privacy it can provide. WireGuard vs OpenVPN employ distinct approaches when it comes to encryption.
OpenVPN’s Flexible Algorithms
OpenVPN leverages the OpenSSL Library to offer a wide range of encryption algorithms, including Camellia, DES, Triple DES, Blowfish, and AES. This flexibility allows users to tailor their encryption settings according to their specific requirements. However, the variable algorithms employed by OpenVPN’s codebase may result in a slight speed reduction compared to WireGuard.
WireGuard’s Speed-Optimized Design
WireGuard, on the other hand, focuses on speed and efficiency by taking a more simple method to encryption. For security reasons, it uses encryption methods like Poly1305 and ChaCha20, which are much faster. WireGuard limits the encryption algorithms that can be used, but the ciphers that are used are very safe and have been through a lot of testing and development.
Security and Privacy Considerations
When entrusting our data to a VPN protocol, we must assess its commitment to security and privacy. Let’s explore how OpenVPN and WireGuard approach these crucial aspects.
OpenVPN’s No-Log Policy
The strict “no-log” approach of OpenVPN makes it stand out. This means that the protocol doesn’t collect or keep any information that could be used to find out who someone is. As a result, users can feel safer about their privacy and identity. Privacy is important to OpenVPN, as shown by numerous third-party audits and its long-standing name in the VPN community.
WireGuard’s Data Storage Approach
WireGuard and OpenVPN have some differences in how they handle privacy. WireGuard keeps users’ IP addresses on the computer until the system is restarted by default. Some users may be worried about this, but it’s important to remember that many VPN providers have built their own protocols on top of WireGuard to reduce or remove this data storage risk. Using features like Network Address Translation (NAT) or multi-hop setups can also help protect your privacy and lessen any problems that might arise.
VPN Client: User-Friendliness and Compatibility
The user experience offered by VPN clients can significantly impact the overall satisfaction and ease of use. Let’s compare the client applications provided by OpenVPN and WireGuard.
WireGuard’s Growing Compatibility
While WireGuard was still in its early stages, there was only a Linux program available. This used to be the case, but now WireGuard has apps just for Windows as well as clients for other major operating systems. These clients make it easy for users to set up VPN tunnels and copy or export data. Keep in mind that you might need management rights to do some things with the WireGuard client.
OpenVPN’s User-Friendly Approach
OpenVPN has had its main Windows client, OpenVPN Connect, for a long time. This client has an easy-to-use interface that makes it simple to add accounts and import connection information by URL or file upload. OpenVPN Connect is a stable and easy-to-use VPN client, but it might not have all the advanced features that WireGuard’s client does. Additionally, OpenVPN works well with many other programs and is built into trustworthy VPN services such as NordVPN, Surfshark, and hide.me.
Speed: WireGuard’s Performance Advantage
Speed is without a question an important thing to think about when looking at VPN protocols. Come with me as I compare the speeds of WireGuard and OpenVPN. WireGuard is famous for being very fast; in many tests, it regularly performs better than OpenVPN. WireGuard had great download speeds—often exceeding 277.9 Mbps—during our tests, while OpenVPN had trouble going above 30.64 Mbps.
Because it has less latency and faster throughput, WireGuard is a great choice for online games and other activities that need fast connections. It’s important to remember, though, that OpenVPN still offers fast and stable connections that make browsing the web smooth.
Availability: OpenVPN’s Wider Support
When picking a protocol, availability across VPN providers is one of the most important things to think about. OpenVPN is currently supported by more VPN services than WireGuard, which is slowly but surely becoming more popular. OpenVPN is used by a huge number of VPN providers because it has a long history of being the best system. More VPN services are likely to use WireGuard in the future as it continues to get better and show what it can do.
Our Recommendation: Choosing the Right Protocol
The choice between WireGuard and OpenVPN ultimately depends on your specific priorities and use cases. Let’s summarize the key considerations to help you make an informed decision.
WireGuard: Streamlined Performance
WireGuard works best when speed and efficiency are important. It’s perfect for home users who want a fast and responsive VPN because its codebase is efficient and its security methods are optimized. However, WireGuard may not be as good for workplaces or people who want to stick to a “no-log” policy because it is still in its “experimental” phase and needs management rights in its client.
OpenVPN: Time-Tested Reliability
OpenVPN is a safe and effective VPN service that has been around for a long time and is used by many people. With its wide range of devices and operating systems support, thorough testing, and strict “no-log” policy, it’s a great choice for people looking for a VPN protocol that they can trust. While OpenVPN may not be as fast as WireGuard, it offers stable and reliable performance.
WireGuard is a good choice for people who want to get online quickly, while OpenVPN is still a popular choice because it is reliable and protects your privacy. You can figure out which protocol is best for your VPN needs by looking at your individual needs and preferences.
With the information provided in this guide, you are now equipped to make an informed decision between WireGuard and OpenVPN. Choose the protocol that aligns with your priorities, whether it’s optimized speed or time-tested reliability, and enjoy a secure and private browsing experience.
Apple has made a name for itself in the world of streaming services with two unique products: Apple TV and Apple TV+. Even though these names sound alike, they stand for different parts of Apple’s move into digital entertainment. This post will go into detail about Apple TV vs Apple TV+ and highlight their differences. We will look at their features, content, pricing, and other things.
What is Apple TV?
The main thing that Apple TV is a digital video player and streaming device that was made by Apple Inc. It connects your TV to a lot of different types of digital material, like movies, TV shows, music, photos, and videos. From the comfort of their living rooms, Apple TV users can access a wide range of streaming services, apps, and online sites.
With an HDMI cable, Apple TV connects to your TV and uses your current Wi-Fi network to give you easy access to a wide range of streaming services. The gadget has changed over the years, adding things like app shops, gaming features, and voice-activated features through Siri integration. This flexible gadget makes watching TV more enjoyable by letting you watch digital content in the comfort of your own living room.
What is Apple TV+?
Now, Apple TV+ is a streaming service that you sign up for and pay for. What is the difference between Apple TV and Apple TV+? Apple TV+ is a service that works on its own. It offers many unique things, like TV shows, movies, films, and more. Apple thinks that Apple TV+ will give people with a lot of different devices access to content that is only available on Apple TV.
Apple TV+ is an over-the-top (OTT) streaming service that began in 2019. It lets people watch TV shows and movies online without having to pay for cable. The site has a library of original shows with a lot of different themes and for a lot of different types of people. Well-known actors, directors, and writers work together on Apple TV+ to make one-of-a-kind and interesting shows that focus on new ways to tell stories and high production standards.
Apple TV vs Apple TV+: The Differences
To understand the differences between Apple TV vs Apple TV+, it is necessary to learn the basic concepts behind each service. Apple TV refers to the hardware device developed by Apple Inc., while Apple TV+ is the subscription-based streaming service that offers exclusive original content.
Apple TV plays media and streams material from numerous streaming providers and apps. The device connects to your TV and lets you watch movies, TV, music, and more.
However, Apple TV+ is a separate streaming service that works without Apple TV. Apple’s original content gives users unique access to high-quality entertainment.
Apple TV+ is available on smartphones, tablets, smart TVs, and gaming consoles, letting customers watch their favorite shows and movies anywhere.
Content Offerings
Content-wise, Apple TV and Apple TV+ differ greatly. Apple TV lets customers stream Netflix, Hulu, HBO Max, and more. It centralizes your streaming needs, making it easy to find and watch content from multiple providers.
Apple TV+ features Apple-made programming. Apple TV+ customers can watch exclusive TV series, movies, documentaries, and more. Apple TV+ connects famous actors, directors, and producers to create immersive stories with a focus on quality and creativity.
Apple TV+ delivers original and exclusive content to hook viewers while Apple TV offers a huge library of material from many providers. Apple TV+ subscribers get a growing library of Apple-produced episodes and movies, creating a unique streaming experience.
Compatibility
Their device compatibility is another major difference between Apple TV and Apple TV+. Apple TV may be linked to your TV and accessible via iOS, macOS, Roku, Fire TV, Xbox, PlayStation, and other smart devices. It’s made for a wide range of users and ecosystem compatibility.
Apple TV plus streams on more devices. Apple TV+ is available on smartphones, tablets, Macs, streaming boxes, and smart TVs. Apple TV+ has been made available on many platforms to reach more people.
Apple TV and Apple TV+ work on a range of devices, so customers can watch their favorite shows and movies on their TV, smartphone, or tablet.
Pricing
There is a pricing structure difference between Apple TV and Apple TV+. Depending on the model and features you choose, the price of the Apple TV hardware device varies. Storage capacity and other features can affect how much an Apple TV costs.
A subscription is required to access Apple TV+. Access to the platform’s exclusive content is accessible to subscribers for a monthly subscription. Apple TV+ is now available for $7 per month, with cheaper yearly contracts now on the market. New members can try out Apple TV+ for free during the trial period to see if it meets their needs.
Apple TV does not cost anything, but Apple TV+ does. While Apple TV gives customers access to a plethora of streaming applications and services, some of the material on those platforms may necessitate paying for a separate subscription or purchase.
Features and Benefits: Apple TV vs Apple TV+
When considering the features and benefits of Apple TV and Apple TV+, it is essential to understand their unique offerings.
Apple TV, as a hardware device, provides a user-friendly interface for navigating through various streaming services and apps. It offers features such as app stores, gaming capabilities, and integration with Siri for voice-activated commands. With Apple TV, users can enhance their television experience by accessing a wide range of digital content from different providers.
On the other hand, Apple TV+ focuses on delivering exclusive and high-quality original content to subscribers. The service aims to captivate audiences with its unique storytelling and exceptional production values. With Apple TV+, subscribers gain access to a growing catalogue of Apple-produced shows and movies, providing a curated selection of content that sets it apart from other streaming services.
Both Apple TV and Apple TV+ offer features and benefits that cater to different aspects of the streaming experience. Whether you are looking for a versatile streaming device or exclusive original content, Apple has options to suit your preferences.
Comparing Apple TV vs Apple TV+: Which One Should You Choose?
Now that you know what makes Apple TV and Apple TV+ different, the question is: which one should you get? In the end, the answer rests on what you want and need.
Apple TV might be a good choice for you if you want to watch a lot of different types of material from different providers. It connects all of your streaming services together, so you can watch movies, TV shows, music, and more on your TV. Apple TV gives you a flexible viewing experience because it works with many devices and has an easy-to-use interface.
On the other hand, Apple TV+ might be a better choice if you want to watch only Apple-made shows and movies. Apple TV+ subscribers can watch a growing library of shows and movies made by Apple. This carefully chosen material is what makes Apple TV+ different from other streaming services. If you like the way Apple tells stories and makes movies, Apple TV+ can give you a unique and fun viewing experience.
if you choose Apple TV as your streaming device, you can still sign up for Apple TV+ to watch material that is only available on that service. You can enjoy a lot of different content from different companies while also watching Apple’s own shows with these two services working together.
Yes, Apple TV allows you to watch Apple TV+ content on your television. Simply connect your Apple TV device to your television and access the Apple TV+ app to enjoy exclusive Apple-produced shows and movies.
Do I need an Apple device to watch Apple TV or Apple TV+?
While Apple devices offer a seamless integration with Apple TV and Apple TV+, both services are accessible on various platforms. Apple TV can be accessed on devices such as Roku, Fire TV, Xbox, PlayStation, and many other smart devices. Similarly, Apple TV+ is available on smartphones, tablets, Mac computers, Apple TV streaming boxes, and select smart TVs.
Do I need to pay separately for content on Apple TV and Apple TV+?
Apple TV allows you to access various streaming services and apps, some of which may require separate purchases or subscriptions. Apple TV+ operates on a subscription-based model, requiring a monthly fee to access its exclusive content.
Can I try Apple TV+ before subscribing?
Yes, Apple TV+ offers a free trial period for new subscribers. This allows you to experience the service and explore its exclusive content before committing to a subscription.
In Summary
At the end of the day, Apple TV and Apple TV+ are two different parts of Apple’s move into digital entertainment. Apple TV is a flexible streaming device that lets you use a number of streaming services and apps on your TV. A subscription to Apple TV+, gives you access to material that is only available on that service. There are different features, material, and pricing plans for each service, so users can make their streaming experience fit their needs. If you want to stream, Apple has choices for you, whether you choose Apple TV, Apple TV+, or both.
Are you struggling to connect your LG smart TV to WiFi? Don’t worry, setting up a WiFi connection on your LG TV is usually a straightforward process. This guide has everything you need to know on how to turn on WiFi on LG TV, fix common WiFi connection problems, and look at other ways to connect to the internet.
How to Turn On WiFi on LG TV?
Although LG smart TVs have a lot of features and can stream content, you need to connect them to the internet to get the most out of them. If your LG TV is connected to WiFi, you can watch your favorite shows, browse the web, and use different apps. This step-by-step guide will help you whether you are setting up a new TV or having trouble connecting it.
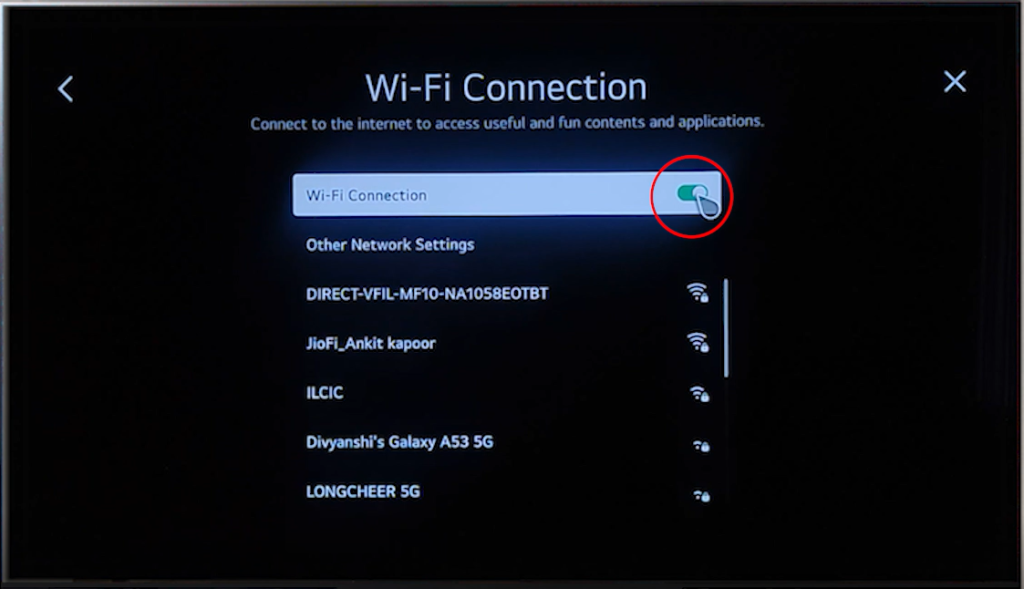
To turn on WiFi on your LG TV, Here are some easy steps:
Press the Home button on your LG remote to access the home menu.
Navigate to the Settings option on the top right of the screen.
Select Network from the settings menu.
Choose Wi-Fi Connection to access the wireless network settings.
A list of available networks will appear. Select your home network.
Enter the password for your WiFi network if prompted.
Finally, select Connect to establish a connection to your WiFi network.
If you did these things, your LG TV should now be able to connect to the internet through WiFi. Your LG smart TV lets you watch videos and use a number of online services without any problems.
How to Fix Common WiFi Connection Problems?
Sometimes, when you try to connect your LG TV to WiFi, you might have trouble. Why these problems happen and how to fix them:
Update your TV’s location
LG TVs often face connectivity issues when the location is set to “Set Automatically.” To fix this, manually update the location of your TV:
Go to All settings > General > Location > LG Service Country.
Select a random country on the list (not your actual country).
The TV will reset.
Go back to the location settings and select your actual country.
After the TV resets again, open the location settings and select Set Automaticall.
You will be prompted to set up your WiFi connection, and after logging in, your internet should be working again.
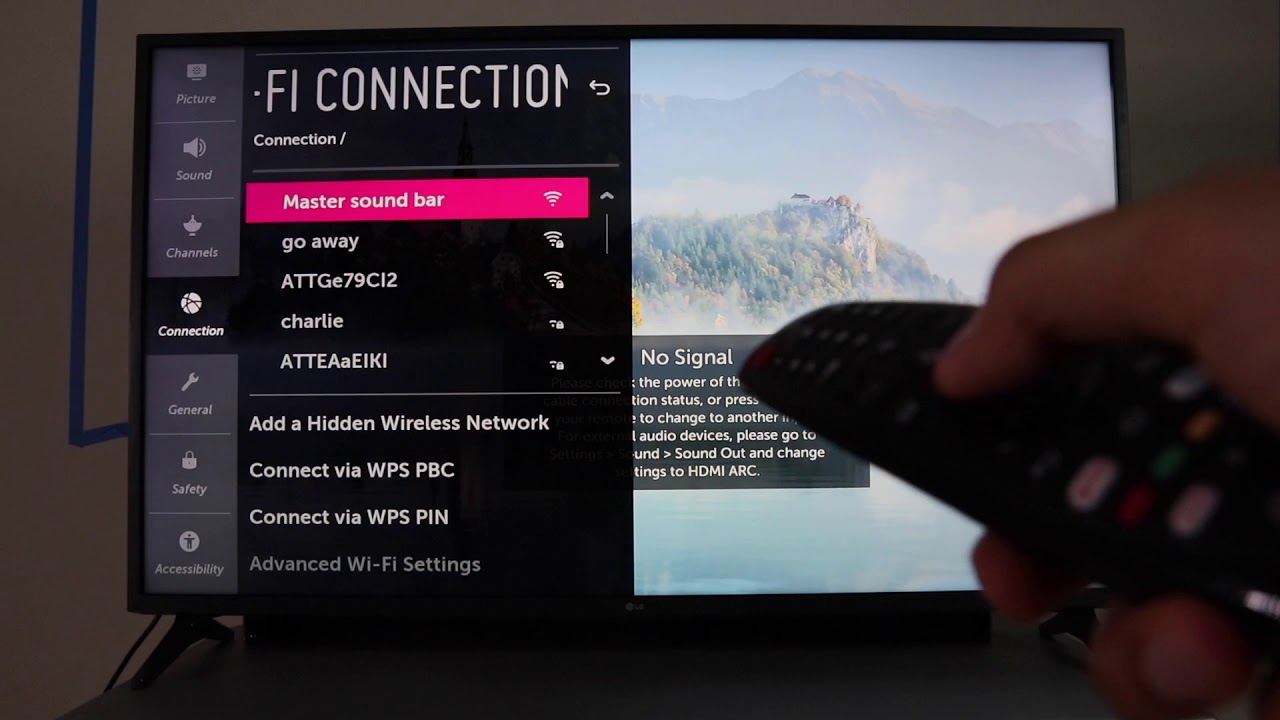
“WiFi is turned off” message
If you receive a “WiFi is turned off” message on your LG TV, it could be due to a crimped WiFi cable inside the TV. To fix the problem, do these things:
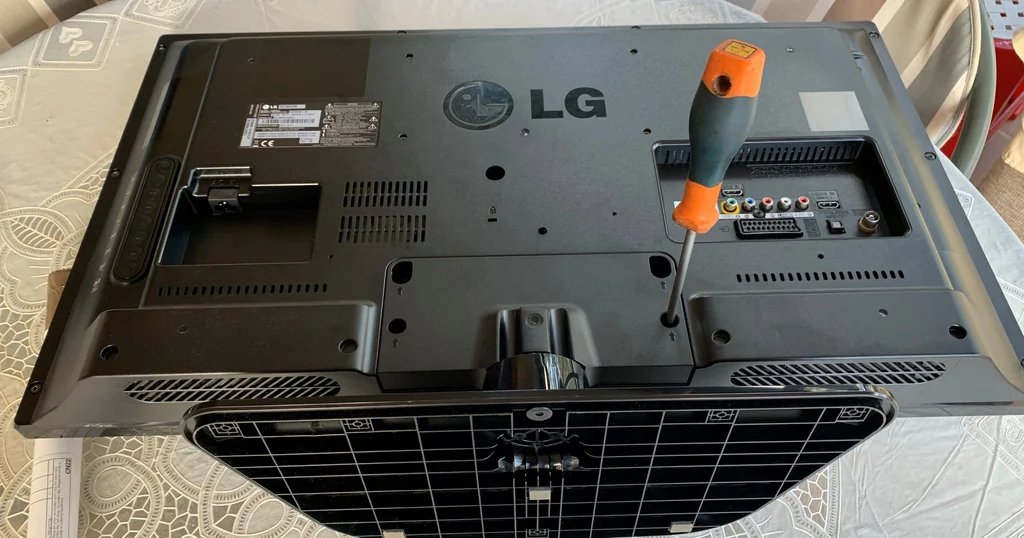
Place the TV face down on a flat surface.
Remove the back cover of the TV.
Look at the flat silver wires that come from the WiFi module at the base. If they are bent or folded over, straighten them out carefully.
Replace the back cover of the TV and try reconnecting to WiFi.
WiFi connection drops in and out
If your LG TV keeps losing the WiFi connection, try the following tips:
Move your wireless router closer to your TV for a stronger signal.
Consider using an Ethernet cable for a more stable connection.
Remove any nearby devices that could interfere with the WiFi signal, such as baby monitors or cordless phones.
Check if any external hard drives connected to the TV’s USB port are causing interference.
If these steps don’t fix the problem, you should call your internet service provider for more help.
Turn off Quick Start
The “Quick Start” feature on some LG TVs can sometimes cause connectivity issues. Follow these steps to turn it off:
Go to the Settings menu and select All Settings.
Choose General from the options.
Scroll down to the Quick Start option and turn it Off.
Make sure your TV is not plugged in and turn it off.
Press the power button on your TV for 30 seconds.
Plug the TV back in and turn it on. Try reconnecting to the WiFi network.
Your network doesn’t appear in the list
If your WiFi network doesn’t appear in the list of available networks on your LG TV, try the following:
Check that your WiFi router is turned on.
Ensure that the router is near the TV without any obstacles like walls in between.
Unplug both the TV and router, wait for 30 seconds, then plug them back in
Both devices should restart, and your network should appear in the list.
Software updates
Outdated software on your LG TV can sometimes cause WiFi connectivity issues. Check for software updates using the following steps:
Press the Settings menu on your remote.
Select All settings.
Choose General.
Select About this TV
Select Check for Updates.
If your TV requires an update, connect it to the WiFi using an Ethernet cable to download the updates.
Unable to join with an incorrect password
Double-check that you have entered the correct password for your WiFi network. Passwords are case-sensitive, so ensure you enter both uppercase and lowercase letters correctly. You can also choose the “show password” option to verify what you are typing. If the issue persists, contact your internet service provider for assistance.
In Closing
Connecting your LG TV to WiFi opens up a world of possibilities, including seamless streaming and access to a diverse choice of online entertainment. By following the steps in this tutorial, you can simply enable WiFi on your LG TV and troubleshoot typical connectivity issues. Remember to keep your TV’s software up to date, and if WiFi fails, consider alternative methods of connecting.
Digital Out of Home (DOOH) campaigns offer businesses looking for lasting impact and an engaging platform to make an impressionable statement in advertising. Crafting effective DOOH ads means crafting messages that not only grab attention but resonate with audiences as well. Join us as we journey into this realm where the magic lies in crafting content to fit seamlessly within its surroundings and bring an audience along on this fascinating adventure into DOOH advertising.
Understanding the DOOH Landscape
Digital out-of-home (DOOH) advertising goes beyond static billboards that once ruled the landscape. DOOH represents the digital evolution of outdoor advertising, strategically displayed across screens in different locations. DOOH advertising’s ubiquitous nature can be seen everywhere from city streets and malls, all the way through to rural countryside; every digital billboard strategically positioned to capture passersby’s attention is carefully placed for maximum engagement with audiences of different kinds.
What truly sets DOOH apart is its remarkable adaptability. DOOH media stands out by its versatility in being able to present different kinds of content at different times and places – an invaluable advantage for marketers. This adaptability ensures messaging remains contextually pertinent at every moment – be it the morning rush in a city or a leisurely shopping spree over a weekend getaway. DOOH makes an invaluable partner when navigating consumer attention shifts dynamically, helping businesses adapt to shifting consumer habits and attention spans.
Elements of Compelling DOOH Content
Visual Appeal
At the core of effective DOOH content lies visual appeal. In an age rife with distractions, captivating an audience’s interest requires more than simply passing a glance. High-quality visuals such as crisp images and bold designs combined with striking colors contribute significantly to creating lasting memories for viewers through DOOH campaigns. Visual aesthetics play a pivotal role in leaving an impactful and memorable mark with viewers.
Concise Messaging
Time is a valuable commodity in the DOOH realm. Viewers have limited moments to absorb the message conveyed. Therefore, concise messaging becomes paramount. Messages should be short, clear, and easily understandable at a glance. Given today’s digital environment where communication needs to take place quickly and succinctly, effective communications requires breaking complex topics down into bite-size chunks that leave an indelible mark in memory.
Storytelling Techniques
Direct Out-Of-Home advertising goes beyond mere product showcasing; rather, its aim should be to engage viewers emotionally by crafting captivating narratives for an emotional experience with brands’ target audiences.
Tailoring Content for DOOH Success
Context Matters
Imagine your message displayed on a digital billboard in the heart of a bustling city. Now, envision the same message on a screen nestled in a tranquil park. Context matters. Content that caters specifically to its location, time of day, and demographics ensures relevance and resonance with audiences. Contextual awareness allows brands to address audiences directly for maximum campaign efficiency.
Dynamic Creatives
Thanks to technological developments, DOOH campaigns can now be more dynamic and responsive than ever. By adapting real-time to weather patterns, events, or trending topics based on external influences like weather conditions or events affecting them – real-time adaptations enhance a campaign’s effectiveness, making DOOH unique from traditional billboard advertising in providing brands an agile yet responsive response in our constantly shifting world.
Case Studies: Successful DOOH Campaigns
Let’s delve into examples where businesses excelled in the art of DOOH advertising without succumbing to overt promotion. Consider a campaign in a bustling city center that utilized vibrant visuals and concise messages to promote a local event. The adaptability of DOOH allowed the same campaign to seamlessly switch to a more somber tone during a city-wide memorial, showcasing the versatility of the medium.
Another success story lies in a campaign that leveraged storytelling. By creating narratives around their brand’s journey, these case studies demonstrated how DOOH ads could transform from static advertisements into stories that engaged and resonated with audiences. Their approach demonstrated the diverse approaches available within this form of marketing – showing that effective content comes in various forms and may come from many directions.
Integration with Online Marketing
In an era where online and offline experiences coalesce, integrating DOOH with online marketing strategies can amplify a brand’s reach. Imagine a seamless transition from seeing a captivating DOOH ad to finding the brand on social media platforms or dedicated websites. This synergy creates a holistic brand experience for the audience, bridging the gap between physical and digital interactions.
Conclusion
Crafting compelling content for Digital Out of Home campaigns requires both art and science. Understanding visual appeal, concise messaging, and story is at the core of creating engaging DOOH ads; businesses looking into this space should aim for content that seamlessly blends in with its surroundings while adapting to changing dynamics.
Whether for research, assignments, or collaboration, a laptop is an indispensable student tool. If your laptop runs on Windows, protecting it is paramount, with many instruments requiring a fee. After checking out the unemployment rate for college graduates 2023, we’ve created this guide that will show you how to secure your device and safeguard your academic work for free since every penny counts when you’re a student.
Use Strong Passwords
Creating a robust password is the first line of defense for your laptop. Craft a unique combination of uppercase and lowercase letters, numbers, and symbols. Avoid easily guessable information, such as birthdays or names. Additionally, enable two-factor authentication for an added layer of security. Regularly update your password to enhance protection, and consider using a reputable password manager to generate and store complex passwords securely.
Keep Your Operating System Updated
Maintain the security of your Windows laptop by regularly updating the operating system. Microsoft frequently releases updates that address vulnerabilities. Staying current with these patches ensures your laptop has the latest defenses against potential cyber threats. Enable automatic updates or set regular reminders to check for updates manually. This proactive approach to system maintenance is fundamental to building a resilient security foundation.
Install Reliable Antivirus Software
Choose a reputable antivirus software and keep it updated. This software is a critical shield against malware, viruses, and other online threats. Schedule regular scans to ensure your laptop remains clean and secure from potential malicious attacks. Many antivirus programs offer additional features, such as real-time scanning and web protection, further enhancing your laptop’s security posture. Explore the settings of your antivirus software to customize its features according to your specific security needs.
Use a Firewall
Enable the built-in Windows Firewall or install a reliable third-party firewall. This tool monitors and controls incoming and outgoing network traffic, providing an additional layer of protection against unauthorized access and potential cyberattacks. Configure firewall settings to allow only necessary connections and block suspicious activities. Regularly review firewall logs to stay informed about network traffic, ensuring that your laptop’s defense mechanisms are actively preventing potential threats.
Be Cautious with Email Attachments
Exercise caution when dealing with email attachments, especially from unknown senders. Phishing emails often carry malware. Verify the sender’s authenticity before clicking on any links or downloading attachments to prevent falling victim to cyber threats. Be skeptical of unexpected emails requesting personal information or urgent action. Use an email filtering service to automatically detect and filter out suspicious emails, reducing the likelihood of encountering phishing attempts.
Secure Your Wi-Fi Connection
Protect your laptop by securing your Wi-Fi connection. Use a strong, unique password for your Wi-Fi network to prevent unauthorized access. Consider enabling WPA3 encryption if your router supports it. Avoid using public Wi-Fi networks for sensitive tasks unless you use a virtual private network (VPN) for added security. Regularly update your router’s firmware to address security vulnerabilities and ensure that your home network remains a secure environment for your online activities.
Backup Your Data
Safeguard your academic work by regularly backing up your important data. Utilize external hard drives or reliable cloud services to ensure that, even in the event of a lost or stolen laptop or hardware failure, your critical files remain safe and accessible. Automate the backup process to make it a seamless and consistent part of your laptop usage routine. Consider creating a backup schedule that aligns with your academic deadlines to ensure your most recent work is always protected.
Encrypt Your Laptop
Enhance your laptop’s security by encrypting the hard drive. Windows BitLocker, a built-in encryption tool, protects your data in case of laptop loss or theft. This adds an extra layer of security, ensuring your sensitive information remains inaccessible to unauthorized users. Configure BitLocker settings to suit your security preferences and recovery options. Regularly update your encryption keys and passwords to maintain the effectiveness of this protective measure.
Use a Standard User Account
Minimize security risks by avoiding everyday activities on an administrator account. Create a standard user account for routine tasks, limiting the impact of potential security threats, as many malware attacks require administrator privileges to install. Reserve administrator access for tasks requiring elevated permissions, implementing the principle of least privilege to enhance your laptop’s overall security posture.
Disable Unnecessary Services
Review the services and startup programs on your laptop, disabling any unnecessary ones. This not only improves performance but also reduces potential security risks associated with unnecessary services running in the background. Regularly audit your installed applications and remove any that are no longer needed. This proactive approach streamlines your laptop’s operation and ensures that only essential services are active, minimizing potential vulnerabilities.
Lock Your Laptop
Practice the habit of locking your laptop when stepping away. Set your laptop to automatically lock after a short period of inactivity or do it manually. This prevents unauthorized access and ensures the security of your device when you are not physically present. Implement additional authentication measures, such as a PIN or biometric verification, to strengthen your laptop’s defenses against unauthorized access attempts.
Educate Yourself on Cybersecurity Best Practices
Stay informed about the latest cybersecurity threats and best practices. Understand common scams and social engineering tactics to avoid falling victim to online fraud or phishing attempts. Ongoing education is crucial for maintaining a proactive approach to cybersecurity. Follow reputable cybersecurity blogs, attend webinars, and participate in forums to stay updated on emerging threats and effective security strategies. Share your knowledge with peers to create a collective awareness of cybersecurity practices within your academic community.
Conclusion
By implementing these comprehensive security measures, you can significantly reduce the risk of cyber threats and protect your Windows laptop as a student. Remember that cybersecurity is an ongoing process, so stay vigilant and regularly update your security measures to ensure a safe and secure digital academic journey. Consistent adherence to these practices will not only safeguard your academic work but also provide a strong foundation for responsible and secure digital citizenship.
Do you use an Apple AirTag? If so, you might be thinking about how to get a new battery when the old one dies. While Apple says that an AirTag’s battery should last about a year, it’s always smart to be safe than sorry. Today, we will show you how to replace AirTag battery in a quick way. This guide is simple to follow, no matter how tech-savvy you are or how new you are to it.
Why AirTag Batteries Need to be Changed?
Before we talk about how to replace the battery in AirTag, let’s talk about why it’s important to do so. The charge in your AirTag will run out on its own over time. You may notice that Bluetooth and UWB signal ranges get shorter as the battery level drops, and the Find My app’s precision finding feature may stop giving you correct distance information.
You may also get messages and alerts through the Find My app when your battery is low. It is suggested that you change the battery in your AirTag once a year to get the best performance and avoid any problems.
How to Replace AirTag Battery
If you want to safely change the battery in your AirTag, follow these steps:
Materials Needed
To replace the battery in your AirTag, you’ll need a few materials. Gather the following items before you begin:
A new CR2032 coin cell battery: This standard 3V lithium battery is commonly used in watches, remotes, and other small electronic devices. Make sure that you purchase an authentic battery from a reputable retailer.
A non-conductive pry tool: You’ll need a thin plastic pry bar or portable tool to safely open the AirTag casing. Avoid using metal tools, as they can damage the components.
A soft lint-free cloth: This will be used to clean the AirTag and remove any fingerprints or smudges on the surface.
Disposable gloves (optional): If you prefer, you can wear disposable gloves when handling used batteries to avoid skin exposure to battery acid.
Prepare the AirTag
Once you have these materials ready, we can proceed with the battery replacement process but before you begin the battery replacement process, remove the AirTag from any accessories it’s attached to, such as a keychain or luggage tag. This will give you direct access to the device.
Open the AirTag Casing
Locate the thin seam running along the edge of the AirTag casing. This seam is where you’ll pry open the casing.
Take your non-conductive pry tool and gently insert it into the seam gap. Slowly twist the tool to widen the gap.
Continue prying all the way around the perimeter of the AirTag until the plastic casing pops open. Be cautious not to use excessive force or bend the AirTag excessively.
Remove the Old Battery
Once the AirTag casing is open, you’ll see the old CR2032 battery inside. Gently lift the battery out of the holder, taking care not to damage any internal components. There are two options you can try if you come across a CR2032 battery that is treated in bitterant and might not work with AirTags:
Option 1: Look for a brand of battery known to be compatible with AirTags. Check the packaging for compatibility information.
Option 2: If you already have a bitterant-coated battery, you can slightly scratch off the coating using a sandpaper sheet. Ensure that the battery contacts are not damaged during this process.
Insert the New Battery
Check that the new battery you have is a CR2032 and that the positive side (marked “+”) is facing up.
Using disposable gloves (optional), carefully place the new battery into the holder, ensuring that it is firmly seated.
Double-check that the battery is properly aligned and securely in place. You should hear a click or chirping sound, indicating that the battery is recognized.
Reseal the AirTag
Align the front and back pieces of the AirTag casing.
Firmly press the casing shut with your hands, ensuring that it clicks back into place. Take care not to apply excessive force or damage the plastic casing.
Once the AirTag is resealed, reattach it to its accessory or item.
Test and Verify
Open the Find My app on your Apple device and check that the AirTag appears connected with a good battery level.
Navigate to the “Items” tab in the Find My app, select your AirTag, and look at the battery level indicator. If it shows a healthy battery level, the replacement was successful.
You may easily and quickly replace the battery in your AirTag so that your item tag continues to function properly. You can save yourself the trouble of dealing with a dead battery by keeping an eye on the level and replacing it annually. With the correct equipment, care, and following our guide, you can simply learn how to change AirTag battery and continue to track your assets. Do the right thing when you throw away old batteries and keep them out of children’s reach.
When you play games online, sometimes you just want to play by yourself, without friends or party invites getting in the way. Xbox has a tool that lets you look like you’re not online, so you can play games without anyone bothering you. This guide will show you how to appear offline on Xbox One, Xbox Series X, or Xbox Series S.
Why You Need to Appear Offline on Xbox One/Series X/S?
Before we get into the details of how to appear offline on Xbox, let’s explore why this feature is essential for many gamers. Appearing offline offers several benefits:
Privacy: Appearing offline allows you to maintain your privacy by concealing your online status from friends and other players.
Solo Gaming: Sometimes, you just want to enjoy a single-player game without any distractions or interruptions. Appearing offline ensures that you can focus on your gaming experience without any distractions.
Avoiding Invites: Appearing offline prevents you from receiving party chat or game invites, giving you the freedom to choose when and with whom you want to play.
Now that you understand the importance of appearing offline, let’s explore the step-by-step process for Xbox One, Xbox Series X, and Xbox Series S.
How to Appear Offline on Xbox One/Series X/S?
It has two ways, which we will talk about one at a time.
Method 1: Xbox Console
Xbox One
To appear offline on the Xbox One, follow these simple steps:
Sign into your Xbox account on the console.
Press the Home button twice or access the online/shortcuts panel.
Select the User Icon from the pop-up menu.
Choose “Shortcuts” and then “My Profile.”
Among the options presented, select “Appear Offline.
Xbox Series X/S
If you’re using an Xbox Series X or Xbox Series S, follow these steps to appear offline:
Access the Home Screen on your console.
Press the up arrow on the Xbox controller’s D-Pad to highlight your profile at the top of the page.
Select your Profile Picture.
Scroll down to find the “Appear Online” option.
Choose “Appear Offline” from the three available options (Appear Online, Appear Offline, and Do Not Disturb).
Exit the profile page to activate the offline status.
Method 2: Xbox Mobile App
If you prefer to manage your online status on the go, you can use the Xbox mobile app. Here’s how to appear offline on the mobile app:
Download and launch the Xbox mobile app on your smartphone.
Log in with the same credentials you use on your Xbox console.
Tap on your Profile Picture located at the bottom right side of the screen.
Select “Appear Offline” under the Profile Picture and Name.
Your Xbox status will change to “Offline.”
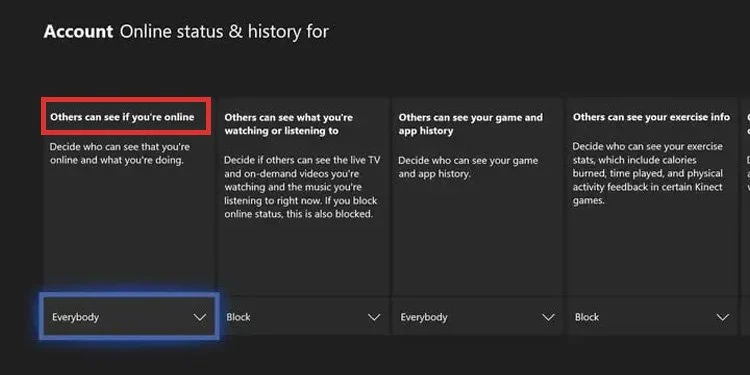
Who Can See Your Online Status? (Change It)
In addition to appearing offline, Xbox offers customization options for your online status. This allows you to control who can see your online presence and provides further privacy measures. Here’s how to customize your online status on Xbox One/Series X/S:
Press the Xbox button on your controller to open the quick menu.
Navigate to your profile, indicated by your gamer picture, and select it.
Click on “My Profile” to access your profile information.
On the right-hand side of the screen, you’ll see three options: Appear Offline, Customize Profile, and Privacy Settings.
Choose “Customize Profile” to access further customization options.
From here, you can adjust settings such as who can see your online status, what others can see on your profile, and your game/app history.
Additional Important Tips and Tricks
At this point, you undoubtedly have a decent understanding of the process of appearing offline on Xbox; however, it would be beneficial to acquire other recommendations.
Setting the Xbox to Offline vs. Appearing Offline: It’s important to know the difference between these two options. Friends won’t be able to tell that you’re online if you make it look like you’re not, but you can still play games and connect to Xbox services. However, if you set the Xbox to offline, it will no longer link to any Xbox services. Choose the right choice based on how private and useful you want it to be.
Privacy for Online Status: You can change your private settings to further control who can see that you are online. Go to Profile & System > Settings > Account > Privacy & online safety > Xbox Live privacy on your Xbox. Here, you can choose which people, including friends, can see if you’re online.
Making the Change Between Online and Offline: Just follow the steps above and choose the right choice based on your current preference if you want to change between looking online and offline.
You now have the ability to take charge of your online presence on Xbox One, Xbox Series X, and Xbox Series S thanks to the guidelines and suggestions that are provided here. You can choose when you wish to socialize with your pals and enjoy uninterrupted gaming sessions. Don’t forget that if you appear offline, you will have the flexibility to play games on your own terms.


![How to Replace AirTag Battery [Step-By-Step]](https://inosocial.com/wp-content/uploads/2024/01/How-to-Replace-AirTag-Battery.jpg)