These days, using pictures to communicate and market things has become really trend. Whether you’re a blogger, a person who handles social media, or someone who runs a small business, making attention-grabbing pictures is really important. That’s where Canva comes in. Canva is an easy-to-use tool for making pictures, even if you’re not a designer. In this step-by-step guide, we’ll look at how to use Canva and give simple instructions on how to use it well.
Why Canva is Great for Making Pictures?
Canva is great because it’s easy to use. Unlike other design tools, Canva lets you drag and drop things, so it’s not hard to make cool pictures even if you’re just starting out.
Another good thing about Canva is that it works for lots of things. You can make pictures for social media, like Instagram or Facebook. You can also make graphics for presentations, like in school or at work. Canva has a lot of different templates you can use, so it’s easy to find the right one for what you’re doing. Plus, Canva lets you work with other people, which is helpful if you’re part of a team or a group.
Now that you know why Canva is cool, let’s see how to use Canva:
Get a Canva Account: First, go to Canva’s website and sign up for a free account. If you want more features, you can pay for a subscription, but you don’t have to.
Learn How Canva Works: After signing up, take some time to explore Canva. Look at the menus, tools, and options. This will help you understand how to use Canva better.
Pick a Design: Once you’re familiar on how to use Canva, choose a design that matches what you want to make. Canva has lots of designs for different things, like social media posts or flyers. Look around and find one that looks good to you.
Make It Your Own: After picking a design, change things to make it how you like. You can change the colors, fonts, and pictures to match what you want. Canva has an easy editor, so you can do this without any problems.
Add Your Stuff: Now, put in your own stuff. This can be text, pictures, or other things you want in your picture. Just drag and drop them onto your design and put them where you want.
Save and Share: When you’re done, save your design. Canva lets you save in different ways, like as a picture. You can also share your design on social media or let other people work on it with you.
More About Canva’s Design Tools
Let’s look at some things you can do with Canva’s tools to make your pictures even better.
Editing Text: Canva has lots of fonts, sizes, and colors for your text. You can make your text look different by changing these things. You can also make your text stand out with things like shadows or outlines.
Editing Images: If you have a picture, you can change it in Canva. You can make it smaller, bigger, or turn it around. Canva also has filters and special effects you can put on your pictures to make them look cool.
Graphics and Stuff: Canva has a bunch of graphics you can use in your designs. There are icons, shapes, illustrations, and stickers you can add to your pictures to make them more interesting.
Backgrounds and Templates: Canva has different backgrounds and templates to choose from. You can pick a plain color background or use your own picture. There are also templates for things like holidays or birthdays that you can use.
Working Together: Canva is great for working with others. You can invite people to help you with your design or share it with them to get their thoughts. You can also save your designs as templates to use later.
Choosing the Right Template: When you’re picking a template, think about what you want to make. Look at the colors and how things are laid out. Make sure it fits what you’re trying to do.
Making It Yours: Even though Canva gives you templates, you should make them your own. Change the colors and fonts to match your style or brand.
Trying New Things: Don’t be afraid to try new things in your template. Add or remove things, move text around, or use different colors. The goal is to make your design look interesting.
Keeping It Simple: When you’re using Canva templates, don’t make things too complicated. Use a few things, not too many. Stick to the same colors and fonts to make everything look nice and neat.
How to Remove Backgrounds in Canva?
If you want to take out the background from a picture, you can do it in Canva. Here’s how:
Put in Your Picture: First, put your picture in Canva. You can drag it in or upload it from your computer.
Use the Background Remover: Click on your picture and go to the “Effects” tab. Find the “Background Remover” effect and use it.
Adjust Your Picture: Canva will remove the background, but you might need to fix it. You can erase parts that shouldn’t be there or bring back parts that got removed. You can also change the size of the eraser to make it more precise.
Save Your Picture: When you’re happy with how it looks, save your picture. You can download it or use it in your Canva designs.
Tips for Using Canva Like a Pro
To get really good at using Canva, here are some tips to help you make awesome designs:
Use Grids and Lines: Canva has grids and lines to help you make things straight and neat. Use them to keep your design looking good.
Try Different Fonts: Canva has lots of fonts to choose from. Experiment with different ones to see which looks best for your design.
Use Colors that Go Together: Canva has color palettes that work well together. Pick colors from these palettes to make your design look nice.
Learn from Canva’s Design School: Canva has lessons and tutorials to help you get better at design. Check them out to learn new things.
Stay Updated: Canva adds new stuff to make it better. Keep up with these changes so you can use everything Canva has to offer.
In Summary
To sum up, Canva is a powerful technology tool for making great pictures. It doesn’t matter if you’re new to design or if you’ve done it before. Canva has lots of tools to help you make awesome designs. By following the steps in this guide, you can learn how to use Canva well and make pictures that people will love. So, why wait? Get started with Canva now and make your pictures look amazing.
In the modern age we live in now, social media sites are an important part of our daily lives. One of these sites is Facebook, which has billions of people all over the world. Most people use Facebook to stay in touch with family and friends, but it also has a lot of other tools that can make your social life better. Tags is one of these features. In this piece, we’ll take you from someone who doesn’t know how to tag someone on Facebook to someone who does it all the time.
Understanding the Different Types of Tags on Facebook
Before we delve into the mechanics of tagging on Facebook, it’s crucial to grasp the various tag types. Firstly, there are tags in text-based posts. These manifest as clickable names that link to the person’s profile. Next, we have tags in photos.
Here, the tagged person’s name is displayed on the image and could be added to their “Photos of You” section. Lastly, we encounter tags in videos. Much like photo tags, video tags pinpoint individuals within the video. Being aware of these tag categories ensures that you use the right approach for different situations.
How to Tag Someone on Facebook
With a grasp of tagging’s significance and the tag variations, let’s get into the process on how to tag someone on Facebook
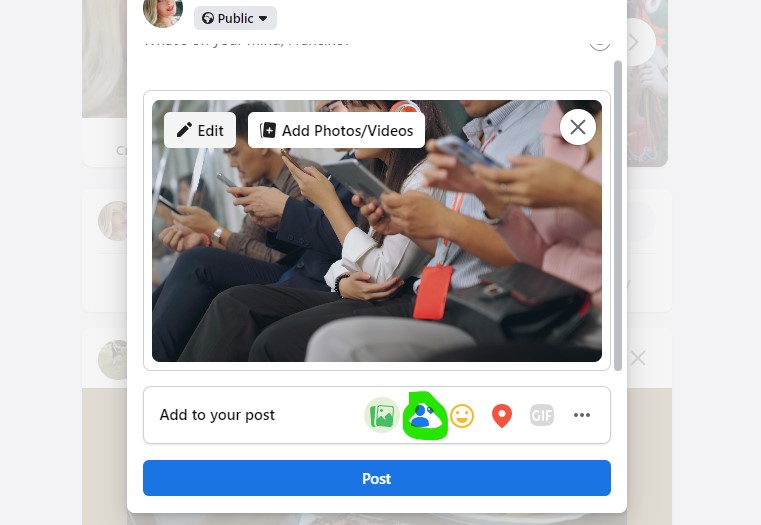
To begin, launch Facebook app or web and navigate to the post, photo, or video where tagging is in order. Look out for the tag icon, often a person silhouette or a small square with a plus sign.
Upon clicking, a text box appears.
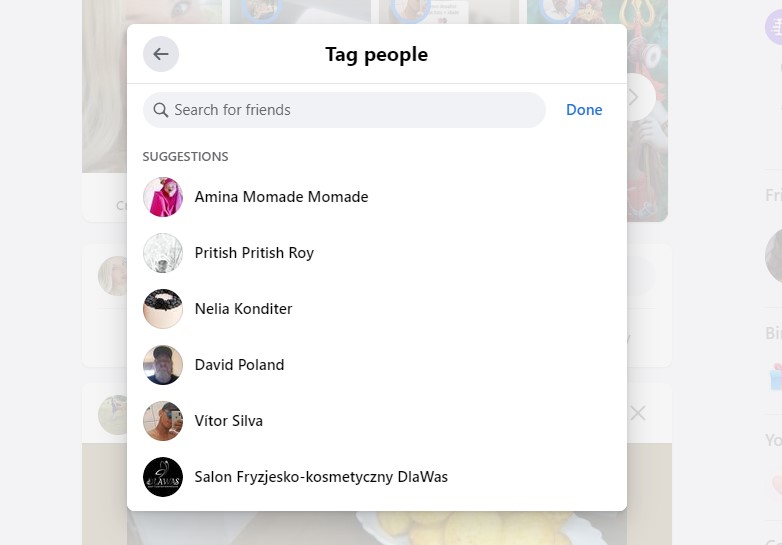
Type the person’s name you want to tag and Facebook’s auto-suggest feature will display matching names.
Select the correct person from the list
And voila! Their name becomes a hyperlink in your post, photo, or video.
Tagging in Photos
Now if you’re asking yourself how do I tag people on Facebook post under a photo, then the next sentence is for you. Tagging in photos adds a delightful touch to memories and emphasizes someone’s presence in a specific moment. Here’s how to tag in photos:
Open the desired photo.
On the photo’s right side, you’ll spot “Tag Photo.”
Select it, and your cursor transforms into a crosshair.
Click on the person’s face or body, and a text box materializes.
Type the person’s name, let Facebook’s auto-suggest assist, and choose the accurate name.
Their name embeds as a tag on the photo, and you can repeat this for multiple individuals in the same picture.
Tagging in Videos
Tagging in videos mirrors the photo tagging process. Open the video, find “Tag Video” below the video player, and click it. A text box emerges where you type the person’s name. Facebook’s auto-suggest offers name suggestions. Pick the right person, and their name tags the video. Remember, only friends on Facebook can be tagged. Upon tagging, a notification reaches the tagged person, allowing them to interact with the video on their profile.
Why Tagging is Important on Facebook
Tagging holds a powerful role on Facebook, allowing you to bring attention to people in your posts, photos, or videos. It’s a way of acknowledging others and involving them in your online activities. By tagging someone, you invite them to engage with a specific post or content, making it particularly handy for sharing updates, planning events, or showing gratitude. Additionally, tagging can broaden your reach as your post may appear on the tagged person’s timeline, reaching their friends and followers.
Tips for Effective Tagging on Facebook
Though tagging is straightforward, a few tips can make it more impactful. First, respect privacy settings. Ensure the person you tag is comfortable with the visibility of the post, photo, or video. Second, provide context in your tag. A brief description adds depth to the tag and prevents confusion. Lastly, use tagging judiciously. Excessive tagging can feel intrusive, so be selective and genuine in your tags.
Avoiding Common Tagging Mistakes
Tagging comes with a few pitfalls to sidestep. Firstly, avoid tagging people in irrelevant content. Ensure the tag fits the post to prevent confusion. Second, always seek consent before tagging. Respect privacy and ask permission before tagging someone. Lastly, go easy on mass tagging. While efficient, it can overwhelm everyone involved. Individual tags offer a more personal touch.
In Summary
Tagging holds the potential to enrich engagement, content sharing, and connections on Facebook. With an understanding of its importance and the diverse tag types, you can learn how to tag someone on Facebook. Follow the step-by-step tagging process and remember the tips and pitfalls to elevate your tagging experience. From friends to family to colleagues, tagging opens avenues for interactive and unforgettable online moments.
FAQ
Can you tag someone in a post after you post it?
Yes, you can tag someone in a post after it has been published. Simply click on the three dots in the top right corner of the post and select “Edit Post.” From there, follow the same steps as above to tag someone in the post.
How to mention everyone in a Facebook post
To mention everyone in a Facebook post, you can use the “@” symbol followed by the word “friends.” This will create a tag that includes all of your friends on Facebook. Keep in mind that this will only work if your post is set to be visible to your friends.
Why can’t I tag someone on Facebook?
If you’re unable to tag someone on Facebook, there could be several reasons why. First, make sure that you’re friends with the person you’re trying to tag. You can only tag your friends on Facebook. If you’re not friends with them, try sending them a friend request first.
Another reason why you might not be able to tag someone is if they’ve adjusted their privacy settings to prevent others from tagging them. In this case, there’s not much you can do other than respect their privacy and not tag them.
Doing our tasks and getting it done need some high-quality devices. In fact working with a reliable and high-performance 4K laptop can be a game-changer. 4K laptops belong to another world and by saying that I mean it. That technology world is where incredible possibilities await content creators and professional designers.
In this full guide, we’ll take a deep dive into any kind of 4K laptops, to search for the most remarkable benefits, provide top recommendations, and offer best tips to help you choose the perfect 4K laptop that matches your unique needs and budget.
Exploring the World of 4K Laptops
We all know it is a key point to understand what makes 4K laptops so special. A 4K laptop is a portable computer that improves your screen resolution in an incredible way. In terms of numbers, it’s four times the detail and clarity compared to a standard Full HD display. So it is safe to say the display experience is breathtaking and sounds amazing.
In recent period of time, everyone has started to realize the importance of high-resolution displays and thanks to the increasing popularity of multimedia content, gaming, and creative applications. This is where a 4K laptop truly shines. This technology satisfies the needs by giving an immersive visual experience in images, videos, and graphics.
Even if you’re watching 4K movies or editing high-rated projects, a 4K laptop will help your computing adventure. Now is the right time to improve your device and do yourself a favor to feel power and beauty of 4K technology.
How to Choose Best 4k Laptops (2024)
Choosing the perfect 4K laptop that fits both your needs and budget needs some reflection. If you’re having second thoughts, follow these steps:
Think What You Need
First make it clear for yourself that how you plan to use the laptop. Are you a gamer, content creator, or someone who needs a high-resolution display? If you understand your needs, your options will fit in your limits.
Budget Comes First!
Determine a comfortable budget range. 4K laptops come in various price ranges, so having a budget in mind will help you focus on models that fit your financial constraints.
Consider Screen Size and Display Quality
Decide on the screen size that suits your preferences and usage. 4K laptops are available in different sizes, typically ranging from 13 inches to 17 inches. Also, consider the display technology (e.g., OLED, IPS) and color accuracy for your specific needs.
Improve Processor and Performance
To enhance processor and performance, prioritize laptops with powerful processors like the Intel Core i7 or AMD Ryzen 7. These processors ensure smooth performance and efficient multitasking. When considering RAM and storage capacity, think about your multitasking requirements and storage needs. Opt for an adequate amount of RAM and storage to support your computing tasks effectively. Don’t forget to take a look at this helpful and updated article: “Upgrading Laptop RAM: A Simple Guide for Beginners“
Don’t Ignore Graphics Capabilities
If you’re a gamer or work with graphics-intensive applications, make the laptop has a dedicated graphics card, such as an NVIDIA GeForce RTX or AMD Radeon RX, to handle demanding tasks.
Read Reviews
Take the time to read reviews and user feedback to gain insights into the laptop’s performance, build quality, and customer satisfaction. This will help you make an informed decision and avoid potential issues.
Compare Your Options
Finally, the most common thing we do. Compare multiple laptops that meet your needs. Consider their features, specifications, and prices to find the best 4K laptop that offers the most value for your needs and budget.
By following these steps you’ll be well-equipped to choose the perfect 4K laptop that meets your needs and fits your budget in 2024. It is worth noting we didn’t mention other common ways, such as checking connectivity and ports or considering battery life and portability as these are the information you should take care of.
Top 5 Best 4K Laptops in 2024
Here are some of the best 4k Laptops you can but in this year. This paragraph provides information based on popular opinion at the time of writing and may not represent individual preferences or technological advancements in future releases.
Dell XPS 15 (2024)
The Dell XPS 15 is famous for its incredible 4K OLED display, which is delivering rich colors and sharp details. Powered by the latest Intel Core i7 processor and equipped with 16GB of RAM, it’s an excellent choice for both work and play.
HP Spectre x360 (2024)
This 2-in-1 laptop features a 4K OLED display that can rotate 360 degrees. It offers versatile usage options. With an Intel Core i7 processor, 16GB of RAM, and a 1TB SSD, it provides great power and storage capacity.
Lenovo Yoga 9i (2024)
The Lenovo Yoga 9i is an adaptable 2-in-1 laptop with a 4K IPS touchscreen. It’s powered by an Intel Core i7 processor and comes with 16GB of RAM and a 1TB SSD, offering a balance of performance and storage. It’s a perfect choice for ant task.
Razer Blade 15 Advanced (2024)
It’s pretty much designed for gamers. The Razer Blade 15 Advanced offers a 4K OLED display and is powered by an Intel Core i7 processor. With 16GB of RAM and a 1TB SSD, it provides the necessary power and storage for gaming enthusiasts.
Apple MacBook Pro 16-inch (2024)
The MacBook Pro features a gorgeous 16-inch Retina Display with True Tone technology. Powered by Apple’s M1 Pro or M1 Max chips, it offers impressive performance. With options for up to 64GB of RAM and up to 8TB of SSD storage, it caters to demanding tasks.
The Bottom Line
Choosing the perfect 4K laptop is an exhilarating endeavor that promises an unparalleled visual voyage. By exploring the captivating world of 4K laptops, understanding their benefits, and carefully considering your unique requirements, you’ll be equipped to make an informed decision.
Whether you’re a content creator, a gaming enthusiast, or a professional seeking the best visual experience, a 4K laptop undoubtedly elevates your computing journey to extraordinary heights of clarity and vibrancy. Embrace the power of 4K and indulge in a world of breathtaking visuals.
The issue of kids and social media is about creating an authentic culture as much as it is about a parental concern. You, as parents, can’t prevent kids from getting into new worlds and experiencing.
It is unfortunate that with every huge invention there doesn’t come an immediate proper culture for using it, and we, as millennials, were brought up in a world that faced the most significant innovation of the century, social media. Unequipped with the right culture and knowledge to use this magical tool, the millennials experienced the heaviest damage they could take on the Internet. Fortunately, during the few past years, people and organizations have made influential moves to form the right social media culture, and there is a long road ahead of us to this end. What might concern us the most as parents now, is how to act when it comes to kids and social media.
Yes, we as the generation Y (a.k.a. millennials) and our parents, the generation X, are responsible for our generation Z and Generation Alpha children. These children are the ones whose earliest years of life have coincided with the birth of concepts such as apps, likes, shares, virtual relationships, etc.
Therefore, it is almost impossible to separate them from social media. So, when it comes to kids and social media, parents get more concerned with following or even forming an authentic social media culture, firstly for themselves, and secondly for their children.
Should children use social media?
Children are most likely to request to join the social media between the ages of 9 to 16, and these years form the period in which kids are best prepared to carry out your commands and follow your rules.
So, stop worrying about what will happen with your kids and social media and begin to think strategically. If carried out properly, your children will understand that you attempt to keep them safe and protect their privacy.
What should parents consider before their children join social media?
Before worrying about whether or not you should let your child join social media, consider these:
What generation does your child belong to? Z or Alpha?
Although a little bit too abstract, it matters to know this fact, because they are different from us in terms of recognition and brain functioning mechanisms. Generation Z kids are those who were born between 1995 to 2010; so the youngest of these kids are now (in 2019) 9 years old. They are more risk-averse, more reasonable, logical, and self-steamed people than their parents.
Generation alpha includes kids born after 2010, so the oldest of all in this generation (in 2019) is 8. These children are brought up by millennials, who have failed the traditional marketing strategies and are blamed by many companies and businesses for their decreased annual sales!
So, the generation Alpha kids are likely to inherit the skeptic minds of their parents, and thus are less likely to be influenced easily. Knowing these facts might give parents a bit of relief regarding kids and social media safety matters.
When should your kid get their own smartphone?
To be able to answer this question, there are some sub-questions you need to consider:
is your kid ready to take care of an expensive device such as a smartphone?
Are they in age to be immune against smartphone waves and blue light of screen? (children under ten must not be exposed to the blue light of the screen).
Are they mature enough (in terms of mind and recognition) to understand and follow the rules set by you regarding the smartphone’s usage?
Are they ready to protect their device from outdoor theft?
Are they mature enough to prevent themselves from showing their device off to their peers?
Have they ever shown addictive behaviors towards their other toys and tools?
Is your kid ready to enter social media?
It is a question of both age and intellect. Kids gain a concrete understanding of the world between 7 to 11 years old, and they start to develop an abstract understanding of the world when they are 12. So, it means that your 7 to 11 years old kid might experience trouble understanding the abstract meaning behind social media events.
For example, when the Tide Pod Challenge was started on the Internet, mostly children under 12 participated in the challenge. The event didn’t mean to become a challenge in the first place, and it was only a joke made by an adult man. But children (and surprisingly, some few grown-ups) took the challenge seriously by eating and chewing Tide Pods, without thinking of it solely as a joke, which left many children in the emergency wards of US hospitals.
Set rules regarding social media and smartphone usage:
Regarding social media, make your kids understand that they should only follow the ones they know in real life. You must also be a follower of your children, so you will know what they post on their pages.
Another thing to point out is that your kids must know what they shouldn’t post on their social media pages. These include personal IDs and information, their mailing and home addresses, their medical history, your future family plans, any problem they have with people and in the household, improper photos and videos and their nude images and videos.
They should also never mention the location of their posts and pictures on social media. Most importantly, you must have access to your children social media accounts usernames and passwords. About phone usage, you must tell your kids in what hours they can use it, where they can take it with them, ask them to make sure that the location service of their mobile phone is always off, and never reply to calls and messages from strangers.
Set rules for your children as to how to use social media
Now that you have taken the preparation steps to deal with kids and social media let’s review some apps that are suitable for the use of your children.
Best social media apps for kids
In this section, we will introduce Facebook and Instagram alternatives for children.
Kudos
For: +8 kids
Platform: Android and iOS
Cost: free
Kudos is a child-friendly application that teaches children how to use social media and behave appropriately on the Internet. It is a safe photo and video sharing application that doesn’t offer any location services, so the location of your children won’t be shared with anyone. Kudos is one of the safest apps regarding kids and social media. The platform mostly focuses on spreading and teaching positive behaviors and treatments towards other kids and social media users. So, you can safely let your children enter Kudos and monitor their activities through accessibilities the app provides for parents.
PlayKids Talk
For: +7 kids
Platform: Android and iOS
Cost: free
This is a chat application in which children can send messages to their friends and family under the supervision of their parents. They can also like the messages they receive. Parents can have access to their children’s PlayKids account on their phones and monitor what is shared.
KidsWorld
For: +11 kids
Platform: Android and iOS
Cost: free
KidsWorld is a platform for children to express themselves through posting blogs and artworks. They can also play games and read blogs and articles based on what they have checked as to their interests. This is a great social media app for creative and active children.
Popham
For: +13 kids
Platform: Android and iOS
Cost: free
Kids can have their own pages and build up their community of friends and followers through creating content. They can also join groups and communities to earn new things and new languages. Moderators check all pots 24 hours a day and will stop accounts that appear to be posting and acting like spam.
Grom
For: +14 kids
Platform: Android and iOS
Cost: free
This is a place kids can experience real social media activities like getting in touch with their friends, getting help with homework, chatting, sharing photos and videos, etc. all under the supervision of their parents and the moderators of Grom.
Pros and Cons of integrating kids and social media
pros:
Children will learn group interaction through social media;
Social media provides online learning and education for kids;
Kids will have ready access to news on social media and be aware of the world around;
On social media children have the freedom to express themselves more truly;
Kids can build a solid base of knowledge about the digital world on social media.
cons:
Social media can offer inappropriate content to your kids;
Bullying and getting bullied is a typical treat in social media;
Social media is addictive and can damage the education and behavior of your children;
Some social media contents present distorted images of reality and might deceive your kid’s perception of reality;
Identity theft happens commonly in social media.
Social media can be quite addictive
It’s all about forming the right social media culture…
The issue of kids and social media is about creating an authentic culture as much as it is about a parental concern. You, as parents, can’t prevent kids from getting into new worlds and experiencing. Instead, this is an excellent chance for us to take steps towards the betterment of society through teaching our children how to enhance the social media culture. It’s all about taking the right steps and believing in our children.
Advertising on Google is an exceptional opportunity for you to easily and at a reasonable cost, place your ad on the first page of related searches and attract real customers. If you have tried various ads for your online business and have not come to a conclusion, we recommend that you try Google ads.
Cheaper, more targeted, and more professional, they can use these tools and try to expand their business and gain a share of the vast Internet market by creating and pursuing powerful advertising campaigns.
Advertising on Google or Google AdWords is a tool that Google has provided to site owners to place their site ads on the first page of Google for a relatively low fee and as a result be seen more with Google ads, increase their traffic and sales. Google Adsense is a new method of advertising and is much more efficient and cheaper than other methods.
In Google ads, you only pay when someone is really interested in your product and clicks on it. So do not worry about the cost of advertising.
How much you want to spend on Google advertising is up to you, you can start with low-cost AdWords plans and increase your advertising budget after seeing success.
In the method of advertising in Google, you do not need to pay exorbitant costs, especially when you work with specialists in Google Ads for Brisbane businesses. You can start your work by choosing low-cost packages tailored to your needs and objectives. This approach allows you to allocate your budget efficiently while still achieving effective results in a short time.
Why Google Ads Are Important
Google is the most popular site and people search for their needs on Google, so a lot of traffic from the needs goes to the first page of Google.
If we put our site in the path of this huge traffic, ie the initial rankings of Google, with advertisements in Google, it will be an important part of our internet customers.
Success of high ranking sites
The results show that sites that rank high on Google are much more successful than other sites. It is rare for customers to go to low-level sites, and they meet their needs in the same basic Google results. Thus, the method of advertising in Google will be very useful and targeted.
Ads on Google
In 2016, Google earned about $ 79.38 billion from advertising. This statistic shows that many people use Google ads as one of the most effective and fast advertising methods due to their effectiveness in their business.
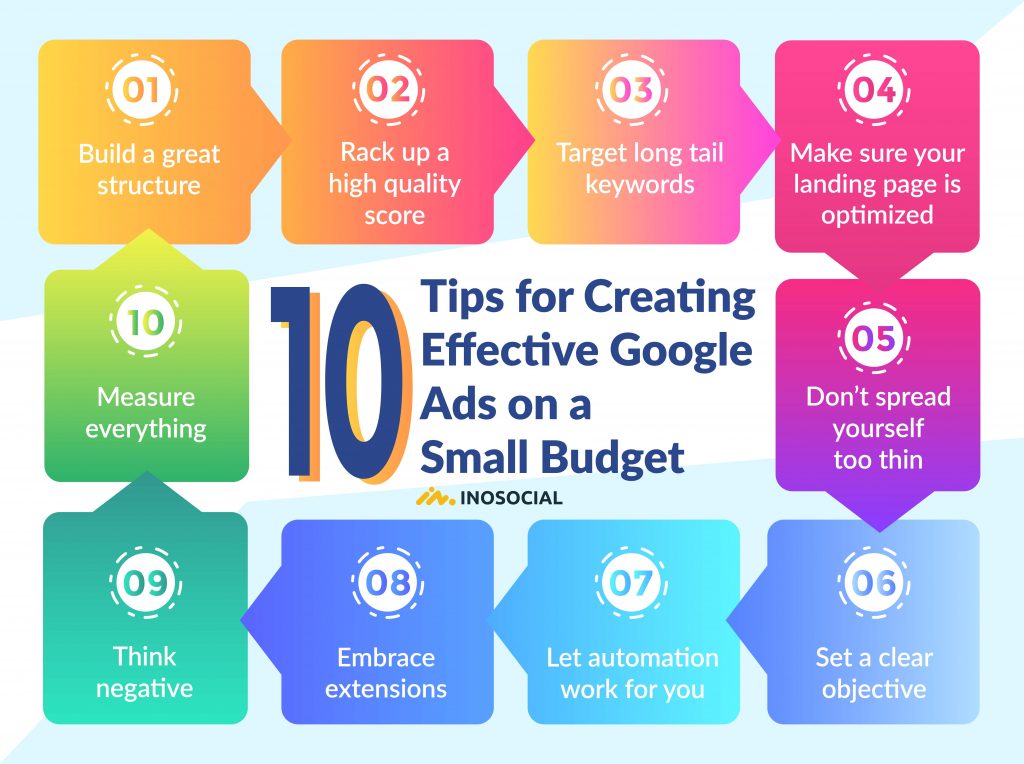
Google Ads on small budget
Here is the infographic to explain how you can advertise on Google on a small budget.
The Benefits of Google Advertising
Targeted advertising
Your ads will only be displayed to the customer when they need your goods and services at exactly the same time, and the cost of advertising on Google is much lower than traditional methods, and the cost per click starts from one cent, and the relevant bank account balance Ads on Google will only be reduced when your site is opened by a customer.
Fast return
As soon as your advertising campaign is ordered and launched by internet advertising experts on Google, your ads on Google will be displayed to users who are looking for your product or service.
Full transparency in AdWords reports
You will be able to see how many people have clicked on your ad and viewed it. This way you can make important decisions about your business.
Customer attraction
About 90% of people use Google search engine to find the product or service they need. Your competitors are displayed in Google results, so your presence in these results is very important. Internet advertising experts at Google will improve your site’s ranking in competition with your competitors in regular search results and Google AdWords by providing expert advice on launching an advertising campaign and its professional management, as well as search engine optimization (SEO). We recommend that you use both optimization and advertising on Google for maximum impact. This is especially true for newly launched websites and small businesses.
Quick and easy cancellation and restitution of the remaining funds
You do not need to write a letter or object to the terms and conditions of advertising on Google. If you want to cancel your ads, the online ads will calculate the cost and return the rest of your payment.
No cost restrictions
If you want, you can reduce your daily advertising budget on Google to even SEK 1. This cost may not be an acceptable result, but the good part is that it is your choice.
Return on investment in Google ads
Google AdWords is known for its huge return on investment because you can pay per click and all clicks can be tracked. However, achieving the return on investment you want requires a lot of skill, analysis and time. If you are looking for fast results, use Google internet advertising services in this field.
Targeting customers based on location
If you are an architect in a particular city and your target is customers who are within 30 kilometers of your city and are looking for an “architect”, Google AdWords provides this option for you. You can also target any language anywhere in the world.
Pay per click
Google AdWords has a Pay Per Click system, so you only pay when a user clicks on your Google ads and hits your website. In fact, this means that users will see your ad without paying, and you will only pay if they click on your ad and enter your site.
Advertising on Google is the most appropriate and effective method of Internet advertising.
It is very obvious that when you want to switch phones, and you have bought an iPhone to use, you will need the data on your previous phone. One of the most important data that you’ll need to transfer to the new phone is your contacts.
Transferring contacts from Android to iPhone is a bit challenging; meanwhile, if your previous phone was an iPhone as well, it would not be a tough task to do.
I am here to teach you how to transfer contacts from Android to iPhone and take your data and contacts when you switch to an iPhone. Before heading to the next section, take a look at this guide and fix “iPhone Keeps Restarting” if you have the same issue with your device.
Steps to transfer contacts from Android to iPhone
As I mentioned above, transferring contacts from Android to iPhone can be a little time-consuming and challenging, unlike upgrading from one Android device to another (or an iPhone to another iPhone). But that does not mean it is difficult to do. On that note, I have gathered all the methods on how to transfer contacts from Android to iPhone here in this section.
Use Google sync
Google is there to help you in transferring contacts from Android to iPhone. It works with both a new iPhone and one that’s already set up. All you need to do is to add your Android’s Google account information to the iPhone.
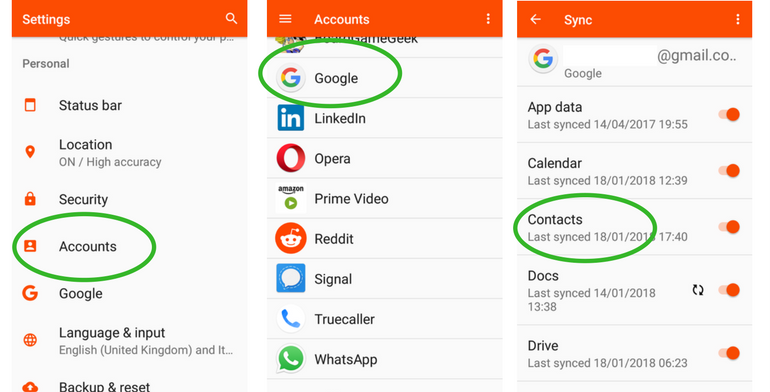
Note that the first thing you need to do is to back up your data on the android device. So before heading to your iPhone, tap Settings > Account, the Google account you want to sync to, and then toggle Sync Contacts to on.
Go to the iPhone settings.
Tap “Passwords & Accounts.”
Tap “Add Account” and then tap “Google.”
Follow the instructions to add your Google account to the iPhone.
It’ll automatically sync all your Google info, including contacts.
Use the Move to iOS app
A very easy method to transfer contacts from Android to iPhone is by using an app provided by Apple. This application’s name is “Move to iOS app” for Android devices, which is available in the Google Play store.
Using this app, you can transfer almost all your data to the new iPhone device. This app pulls together all the data on your Android device—contacts, text messages, photos and videos, calendar, email accounts, website bookmarks—and then imports them to your new iPhone over Wi-Fi.
Here is How to transfer contacts from Android to a new iPhone with the Move to iOS app:
Head to Google play store and Install the Move to iOS app on the Android device.
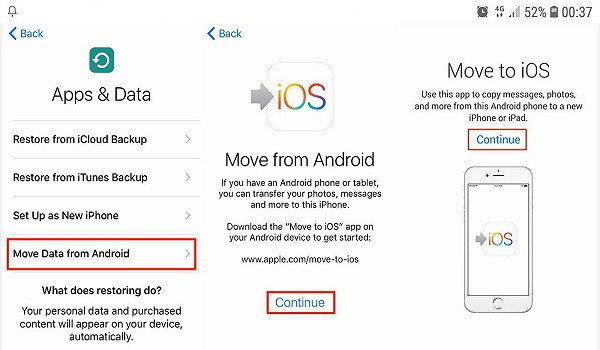
Follow the setup process on your new iPhone until you reach the “Apps & Data” screen.
Tap on “Move Data from Android.”
Start the Move to iOS app on Android.
Choose to Continue on both devices and agree to the terms and conditions in Move to iOS,
Tap “Next” to move to the next step
Type the code that’s displayed on the iPhone to the Move to iOS app.
Follow the instructions to complete the transfer.
Use a VCF file
If you cannot use the Google sync for any reason, or you just like to sync a few contacts or any other reason, there is another method to transfer contacts from Android to iPhone. You can make a VCF file, transfer it over to the iPhone and then simply open it to grab all your contact data. Here is how to do this:
Open contacts on the android device.
Tap the three dots at the top right of the screen to open the menu and then tap “Share.”
Choose the contacts you want to transfer or all of your contacts.
Tap “Share” when you are finished.
If you only selected one contact, you’ll need to select “VCF file.” If you selected multiple contacts, VCF is your only choice.
Choose how you want to get the VCF file to iPhone. (The best option is email or text message)
Open the VCF file on your iPhone and choose to add the contacts to your iPhone.
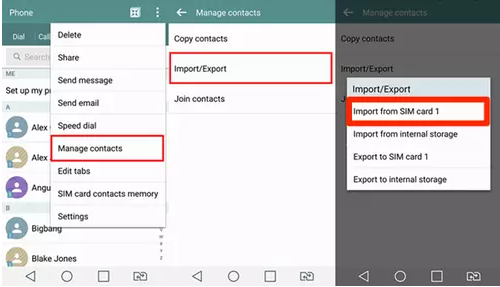
Use your SIM card
One of the other methods to transfer your contacts from Android to iOS is to use your smartphone’s nano-SIM card. This method is the worst of all because it requires you to physically swap SIM cards around between the phones. Anyways, if you’d like to proceed with this method, here is how it works:
Open your contacts on the android phone.
Tap the three horizontal lines (the hamburger menu).
Look for “Manage contacts” and tap on it.
Choose “Import/export contacts.”
Tap “Export.”
Choose where the contacts will be exported to
Tap “SIM card.”
Choose your desired contacts, or all of them for transfer and tap “Done.”
Tap “Export.” (You might need to confirm this selection.)
Now you will have to remove the SIM card from the android device and insert it into the iPhone to complete the process of transferring contacts from Android to iPhone.
Go to settings on the iPhone.
Choose “Contacts.”
Choose “Import SIM Contacts.”
Choose the account on which you want to store the contacts.
Use a third-party app
If, for any reason, you did not like to apply any of the methods above, or you were not able to, there is a last option on how to transfer contacts from Android to iPhone, which is the least recommended one. There are a number of third-party apps that can facilitate the process of switching to an iPhone. Such as Copy My Data (Android/iOS).
iPhone devices are currently very popular and expensive at the same time. Many iPhone users worldwide are reporting a common problem with their phones, which keep restarting, and they are looking for solutions to this problem.
If your iPhone keeps restarting as well, you have come to the right spot in a technology and social media tips website to find out what causes this issue and how to fix iPhone keeps restoring. Stay with me, put everything in order again.
PS: If by any chance this article doesn’t help you, we can suggest you go online and search for online manuals like Manualsnet.com. Online manuals are very popular these days since they are free and easy to use and have a lot of useful information on how to fix your device.
Why Does My iPhone Keep Restarting?
I searched a lot on why an iPhone keeps restarting, and I found out that there are two general categories of the iPhones that keep restarting.
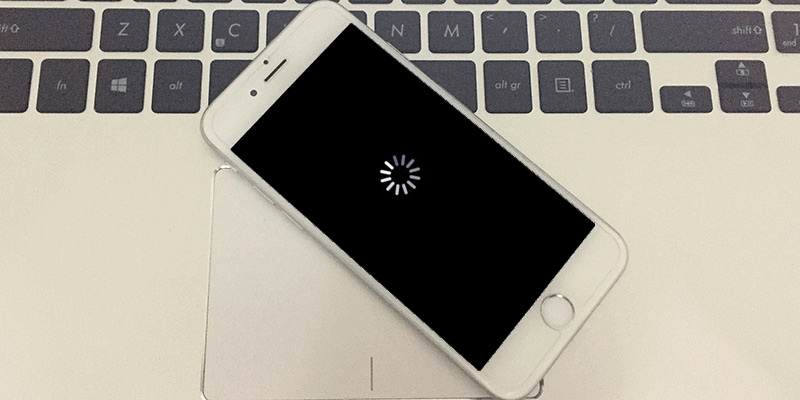
iPhones that restart over and over again
This is a very frustrating condition when an iPhone keeps restarting in a loop and one time after another. This makes the iPhone totally unusable, and the Apple logo appears and disappears on the screen, over and over again.
iPhones that restart all of a sudden
In this case, your iPhone is working properly, and it suddenly restarts, for example, every few minutes/seconds. An iPhone that keeps restarting this way is easier to fix.
Note: If your phone falls in the first category, it is impossible to do some of the steps (the first seven steps), so if you are unable to use the software on your iPhone and you need to do the solutions which do not need your phone to stay on.
How to fix iPhone Keeps Restarting?
The first thing before trying to fix iPhone keeps restarting, make sure your data is backed up. If your iPhone has a hardware problem, this could be your last chance to back up your data. To learn how to back up your iPhone data, Apple support has provided a complete article on backing up iPhone data.
Now it’s time to learn how to fix iPhone keeps restarting, so here we go.
Update the iPhone’s software (iOS)
iOS is your phone’s operating system, like Windows for PCs, and it needs consistent updates because iOS updates always contain lots of fixes for software bugs and other problems. To check if any software updates are available, go to Settings -> General -> Software Update. If an update is available, install it, and you can hope that’d fix an iPhone keeps restarting.
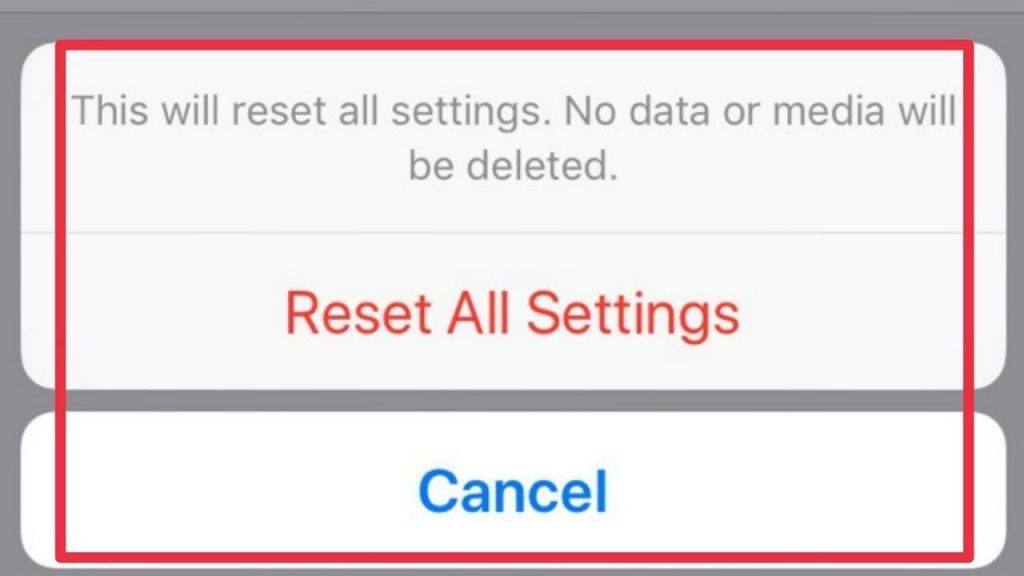
Reset all settings
Resetting a iPhone’s settings to its factory condition can be another possible solution for an iPhone that keeps restarting. Go to Settings -> General -> Reset -> Reset All Settings to restore your iPhone’s settings to factory defaults.
Look for faulty apps
It is not very common for an app to cause the iPhone to randomly keep restarting, but that can be another reason why your iPhone might be facing issues. App failure can cause the iPhone or iPad to restart and crash frequently.
If you installed an app just before your iPhone entered a restart loop, uninstall that app and see if the problem resolves itself.
Settings -> Privacy -> Analytics -> Analytics Data is another place to check for problem apps. It’s normal to see several entries in this list. Quickly scroll through the list and look for any apps that are listed over and over again. If you find one, uninstalling that app may fix your iPhone.
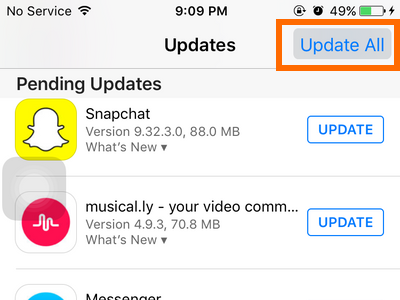
Update Apps to the Latest Version
If the installed apps are the reasons why an iPhone keeps restarting, updating them might fix the issue. So go on and check or any app updates.
Open the App Store.
Tap the Updates section in the bottom left corner of the iPhone.
To update all the installed apps, tap Update All. Or choose the ones you want to update.
Set the Date to December 1st
This one is a bit awkward, but some iPhone users reported that they could actually solve an iPhone that randomly restarts using this method, so give it a try.
Settings > General > Date & Time, set the date to December 1.
Free up some Internal Storage
Another cause of your iPhone that randomly keeps restarting might simply be a lack of sufficient space. Selectively remove unnecessary applications and data to save space.
Check the available storage: Settings > General > Usage, so you can see the remaining free space.
Remove Your SIM Card
Yes, that is right; your iPhone’s connection to the wireless carrier can be one of the reasons for an iPhone keeps restarting. Your SIM card connects your iPhone to your wireless carrier, so removing it is the best way to troubleshoot issues where your iPhone keeps restarting.
Note: If it did not solve the random iPhone restarting issue, do not plug the SIM card in until the end of step 8.
Hard Reset
This solution should not be used often, and you need to do it only in emergency situations, such as having a restart loop. Doing a hard reset is not hard; all you need to do is to hold the power button and Home button (the circular button below the screen) at the same time until your iPhone screen goes blank and the Apple logo reappears.
Clean iPhone’s Charging Port
If your iPhone keeps restarting when plugging the charger or headphones, you will need to do this fix. Try to clean the lightning port of your iPhone since the lint or dust in the port can result in charging or electrical connection problems.
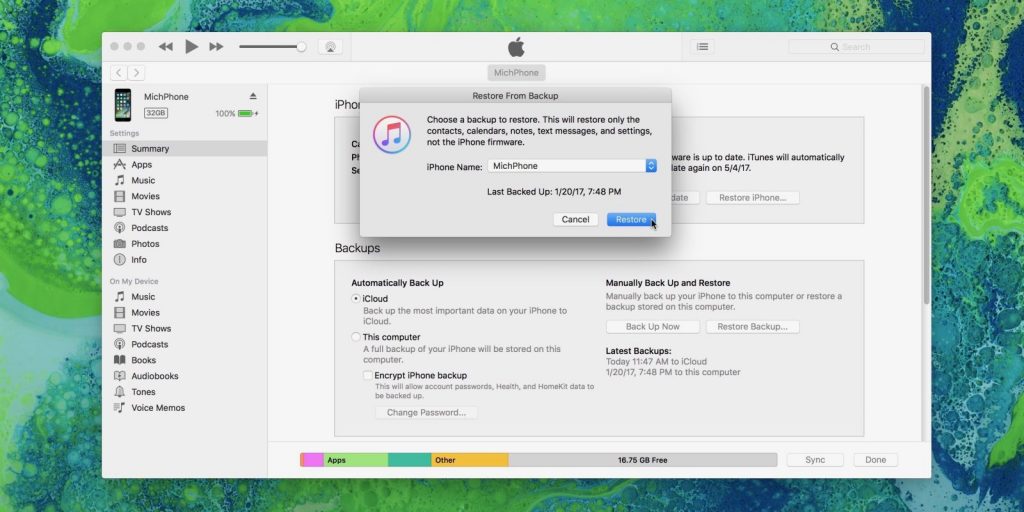
Restore your iPhone Using iTunes
This solution for an iPhone that randomly keeps restarting is recommended by “payetteforward. ”
Restoring your iPhone completely erases and reloads the iPhone’s software (iOS), and it can eliminate a slew of software issues at the same time. When we restore your iPhone, we’ll eliminate the possibility that a software issue may be causing your iPhone to restart — that’s why Apple techs do it so often.
Your iPhone needs to be connected to a computer to restore. I recommend doing a special type of restore that Apple techs do called a DFU Restore, which goes deeper than a regular restore and can solve more problems.
After the restore finishes, you’ll be able to reload all your personal information from your iPhone backup in iTunes or iCloud. If you still have a problem, come back here and keep reading.
Repair your iPhone
I have tried to gather almost every solution on how to fix an iPhone keeps restarting in my guide; if none of the above fixes helped, your iPhone needs to be repaired by a technician for any other hardware or major software issues.
An iPhone that keeps restarting is one of the very common problems apple users have with their iPhones, but this issue can be fixed using some simple fixes, which are all listed in this blog, and if we failed to get your iPhone restart loop fixed, take your iPhone to a local Apple Store, or a technician t get it repaired.
Some users complain about the problem of not recognizing their Apple phone by the computer and the iTunes application (iTunes). This happens when the phone is not detected by connecting the phone to the computer and running the iTunes application. But what is the solution to this problem?
In this article, we want to teach you to step by step how to solve the problem of not recognizing the iPhone by iTunes. If you need more articles you can check the home page to find all technology and social media tips.
How to fix iPhone is disabled connect to iTunes?
iTunes is Apple’s proprietary software for interacting with the company’s phones and tablets with Windows computers and Apple MacBook. Using this program, you can connect your Apple phone to your computer and save the backup file (Backup) or restore an old backup file on it (Restore) or other actions such as iPhone flash, iOS update, Transfer music, photos, videos, etc.
But to be able to use these features, your iPhone must be connected to a computer with a suitable interface cable. Now imagine that after connecting the phone to the computer and running iTunes, your mobile phone will not be recognized by this software and system!
Step 1: Make sure the interface cable is secure
Naturally, you use an interface cable to connect your iPhone to the computer. This cable is called Lightening on Apple iPhones. If the cable is malfunctioning and not working properly, it may be difficult to identify the iPhone through the computer. So first you need to make sure the iPhone interface cable is safe. There are several ways to do this, depending on your circumstances.
The easiest way to test the health of the cable is to connect it to another computer and check the identification of your iPhone in it, or connect one end of the cable to the iPhone charger adapter and install the other end to the iPhone socket. Of course, if the phone is charging, there is no problem with the cable. Therefore, in the first step, make sure that the charging cable is safe and replace it if necessary.
Step 2: Replace the computer’s USB port
If you are sure that your phone cable is safe, you should also make sure that the socket or USB port of your computer or laptop is safe. In many cases, it has been observed that the malfunction of the USB port of the computers leads to the problem of not recognizing the iPhone by iTunes. So connect the phone cable socket to another USB port installed on the body of the computer or laptop. Try to carefully check all the computer USB ports and their performance. To do this and ensure the USB ports of the computer are safe, just connect other gadgets such as external hard drive or flash memory to them. If these components are detected by the computer’s USB port, then the port is safe and you should seek help from the following solutions.
Step 3: Make sure the phone’s charging port is safe
Now that you are safe, you have made sure of the interface wire as well as the USB port of the computer, you should also make sure of the health of the charger socket or the lightning port of your iPhone. All you have to do is charge the phone, and if the charging process starts, it can be concluded that your phone’s charging socket is healthy and the problem is coming from somewhere else. Naturally, if the phone also fails in the charging process, it is likely that its socket will have a problem and will need to be replaced or repaired.
Step 4: Clean the iPhone charging socket and the computer’s USB port
After ensuring that the three main members are safe, who can play a key role in the problem of iTunes not recognizing the iPhone, it is time for the next solutions to be tested. At this stage, we recommend that you thoroughly clean your iPhone’s charging sockets and USB port. To do this, it is better to use alcohol and an ear swab or cotton. You can also use a toothbrush to clean the phone’s charging socket and the computer’s USB port. In many cases, this simple action solves problems such as the Apple phone not being recognized by the computer.
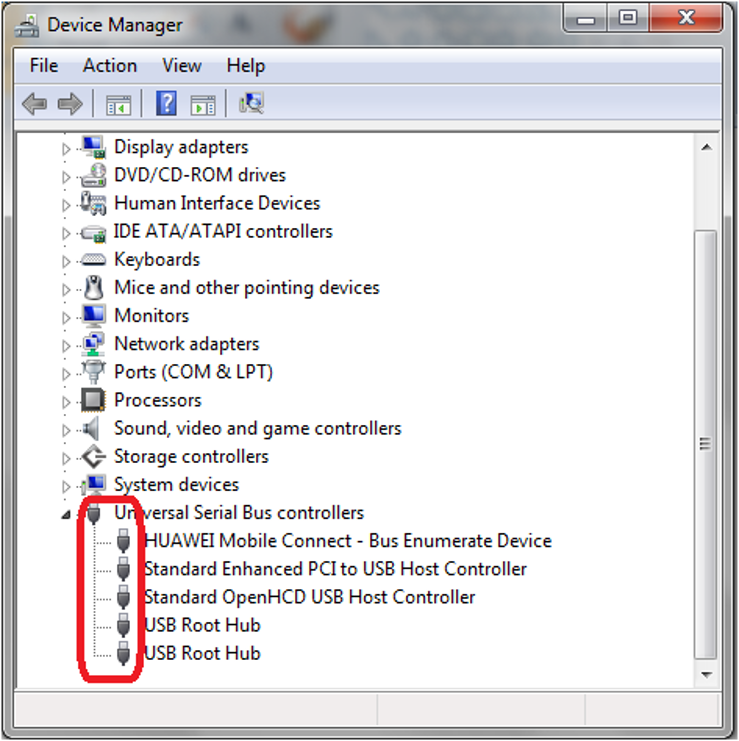
Step 5: Make sure the computer’s USB driver is installed
In order for your computer’s USB ports to work properly, you must have their drivers installed and these ports must be active. Otherwise, it would be normal for iTunes to have trouble recognizing the iPhone. If you doubt whether your computer’s USB drivers are installed or updated, in the Windows operating system environment, go to the Device Manager section and click the Universal Bus Controllers option, and right-click on any of the items related to the system’s USB ports and select Update Driver.
Make sure your computer is connected to a suitable Internet network, then select Search automatically for updated driver software and allow the system to perform the necessary checks and update the computer’s USB port driver if necessary. If updating the USB driver does not solve the problem of iPhone not being detected, use the following solutions, because it is certainly not a problem with the USB port of the computer and its drivers.
Step 6: Close and run iTunes again
It has been seen in many cases that closing and re-launching the iTunes application also leads to the problem of not recognizing the Apple phone. To do this, do not disconnect the iPhone to the computer and just close the iTunes application in the PC operating system environment. Then run the program again as Run as administrator. To do this on Windows computers, right-click on the iTunes application icon and click on Run as administrator. Most likely, the phone will be detected by iTunes, if not, you should get help from the next solutions.
Step 7: Disconnect and reconnect the cable from the iPhone
If the previous methods did not solve the problem of iTunes not recognizing the iPhone, we recommend that while your phone is connected to the computer and you have run iTunes software, disconnect the Lightning cable from your iPhone once and after 10 seconds Reconnect it. In many cases, doing this simple task can solve the problem of not recognizing the Apple phone by the computer. Keep in mind that what happens when the phone is connected to the computer is of particular importance. If an option appears on your mobile screen or you see a warning on your computer screen, the options offered for selection are especially important and can be troublesome if you make the wrong choice. So pay attention to this issue.
Step 8: Update the iTunes application
Failure to install the latest iTunes application on your computer can also lead to bugs and malfunctions. Therefore, we recommend that you make sure that this software is updated. To do this, just after running the program, click on Help and then select Check for Updates. Wait a few moments for the search to find app updates.
If an update is available for the iTunes application, the download window will appear and you can click on Download iTunes to update it. Once the iTunes update has been downloaded, the installation will start automatically. Follow the simple steps to install the program and finally run the program with the latest downloaded version. Disconnect the phone from the computer and reconnect. Most likely, your Apple phone will be detected by iTunes this time.
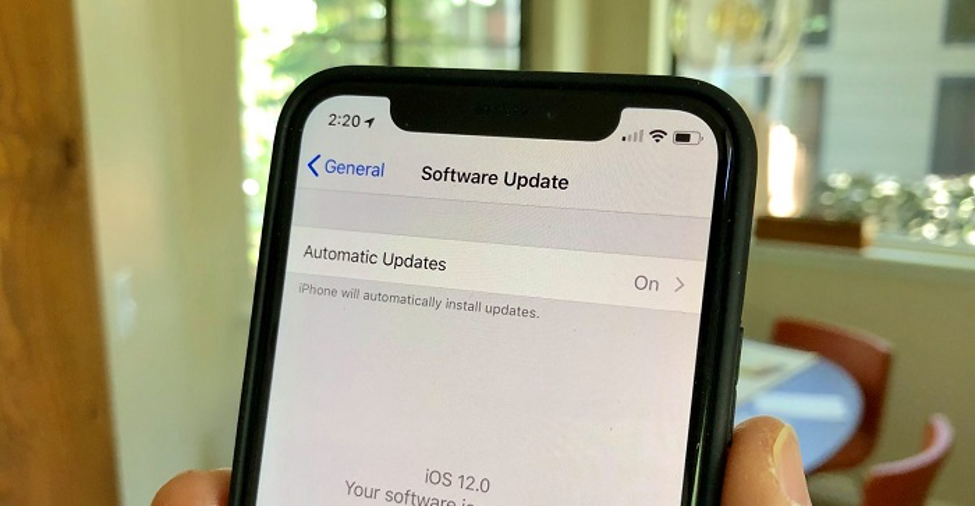
Step 9: Update the iPhone operating system
Failure to update the iPhone’s iOS operating system can sometimes lead to problems such as iTunes not recognizing the iPhone. Therefore, we recommend that you also update your iPhone operating system. To do this, first make sure that the phone is connected to a stable and convenient Internet network, and preferably use a Wi-Fi Internet network. Disconnect the phone from the computer as well. Then go to Settings> General> Software Updates and if there is an update to download and install, select the Download and Install option and wait for the update to be done and your iPhone to restart. After doing this, reconnect the phone to the computer and evaluate its detection by iTunes. Most likely, the problem of iTunes not recognizing the device will be fixed.
Step 10: Force Restart
Force restart actually performs a hardware restart, causing the battery to stop connecting to the phone’s components for a moment and blocking the transfer of energy to them. This causes a hardware boot and as a result many problems and temporary bugs of the device may be fixed. In many cases, doing this solves the problem of iTunes not recognizing the iPhone. But how to force restart Apple iPhones?
To do this on iPhone 8 and newer models, do the following:
Press and release the Volume Up button once.
Press and release the Volume Down button once.
Press and hold the Power button until the Apple logo appears.
In iPhone 7 and 7 Plus, to do a force restart, the following should be done:
Press and hold the Volume Down and Sleep buttons at the same time to make the Apple logo appear.
Older Apple iPhones also require the following steps to perform a force restart:
Press and hold the Home and Sleep buttons at the same time until the Apple logo appears.
After the phone is restarted, let it boot again. Then connect it to the computer with a suitable cable. Most likely, the phone is detected by iTunes software. If not, you should use the following solutions.
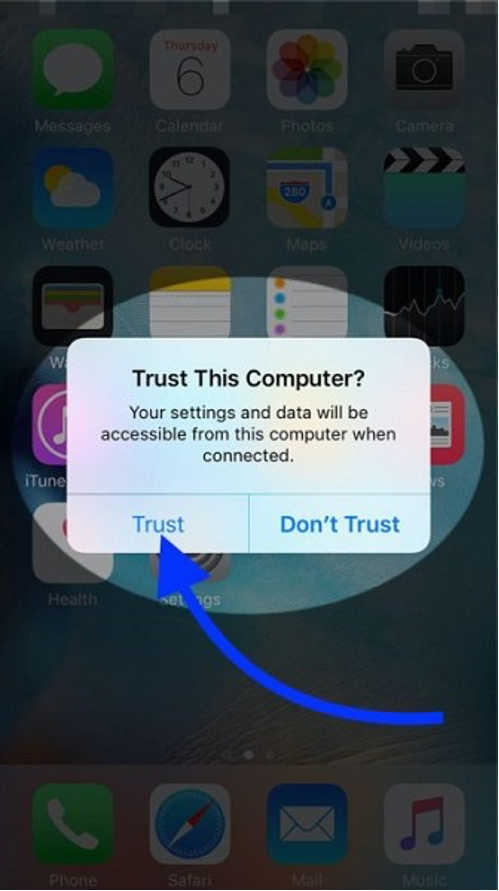
Step 11: Reset Privacy Settings
When you first connect an iPhone to a specific computer, a message appears on the phone screen asking you to specify whether that computer is a trusted device! The content of this message is as you can see in the picture below. If the user selects the Trust option, the connection between the phone and the computer will be done without any problems, but if the user selects the Don’t Trust option for any reason, the connection between the Apple phone and that computer will not be established! So maybe you chose this option by mistake and now there is a problem with iTunes not recognizing the iPhone! To resolve this issue, you must reset the Location & Privacy settings of your Apple phone. To do this, follow these steps:
First disconnect the Apple phone from the computer.
Enter the iPhone Settings section.
Select the General option.
Select the Reset option.
Select the Reset Location & Privacy option.
Confirm the reset of the mentioned settings.
Within a few seconds, all settings related to location service and user privacy will be reset on the Apple phone. Now restart your phone and after booting, reconnect it to the computer. Most likely, your iPhone will be detected by your computer and iTunes application.
Step 12: Restart the computer
This simple solution often fixes small bugs in a computer or laptop operating system, so it’s a good idea to try it out. So close all programs running on your computer and restart it. Then run iTunes again and connect your Apple phone to it. It is possible that the previous problem will be solved and the phone will be identified by the computer successfully. We strongly recommend that you do not ignore this method and solution and do not think that restarting the computer can not be a solution for you!
Step 13: Disable the antivirus
If you use security software such as antivirus on your computer, you are more likely to encounter problems such as the cell phone not being detected by the PC. Therefore, we recommend that you stop these security software completely on your computer operating system. Of course, every antivirus program has a simple option to do this. We recommend that you temporarily disable even the firewall and other security platforms of your computer. Do not worry because doing this temporarily will not cause you any problems. After disabling the mentioned tools, run the iTunes program again and connect your iPhone to the computer with the appropriate cable. Most likely, the problem of not recognizing the iPhone by iTunes will be solved and your Apple phone will be detected by the system.
Step 14: Remove and reinstall iTunes
The next solution you can use is to uninstall and reinstall the iTunes application. To uninstall a program in Windows, enter the Uninstall a program section from the Control Panel menu. After you remove iTunes from your system, download the latest version by clicking on this section and install it on the system. Then check the connection of the Apple phone to the computer again and identify it by iTunes.
Step 15: Factory reset iPhone
If none of the previous solutions work, you can be sure that the problem is not with your computer (to ensure this, you can connect your Apple phone to other computers and check that the phone is detected by them) Factory reset can be the last software solution in front of you. Note that doing so will delete all your data from the iPhone. To do this, go to Settings> General> Reset on your iPhone and select Erase All Content and Settings and agree to do so.
Conclusion
As you can see, in this article we have taught you the methods and solutions that you can use to solve the problem of iTunes not recognizing the iPhone. If these software solutions do not fix the problem and you are sure that your computer is not experiencing any problems in identifying other iPhones, there is probably a hardware problem in your iPhone and should be troubleshot and fixed.
If you have ever been called from an international number that you did not recognize, it may be a scam called Wangiri Fraud; A type of scam that can cost you dearly.
According to ISNA, the Wangiri scam works in such a way that the scammer puts a robot or a calling robot on a number and hangs up after one or two beeps. These robots may even call a number several times. The idea of this scam is for the person who received the missed call to call the number.
In this type of scam, the attacker generates a series of special or premium numbers. (Premium numbers are numbers that have been created to provide a special service and the cost of calling them is more than usual) and from them randomly make calls to numbers around the world and immediately hang up to miss a call (Missed Call) on the phone See the victim.
If the victim attempts to call back to the attacker, a recorded message is played to him and he is involved in high bills without the person noticing; Most attackers try to persuade the victim to talk more and impose more costs by raising interesting topics such as winning the lottery, etc.
Here in inosocial, you can find the latest socialmedia and technology news, tuturial, tips and error fixes, so make sure you always keep up with our updates.
Wangiri calls are common all over the world
The Wangiri scam has several years of origins and first appeared in the United States in 2013, and over the years, while many Americans have been involved in the scam, it has gained worldwide fame and spread to countries such as Ireland, Scotland and Germany. . Also, since the beginning of the year, this method of fraud has returned to the United States, and Americans have recently witnessed a sharp increase in contacts with this method from West Africa.
These contacts mainly come from small or developing countries. These countries may have originated in Botswana, Guinea and Guyana. These countries have codes that start with +267, +2424 and +592, respectively. Of course, these numbers may be from anywhere in the world.
Unfortunately, a person who has been scammed in this way may not realize what has happened to him or her until he or she receives his or her bill and sees the premium service on the bill. So if you receive an unexpected call from an unknown international or unusual number, there are simple steps you can take to protect yourself against Wangiri scams.
First, do not respond to unexpected calls from international or unusual numbers; second, if you receive a missed call from an international or unusual number, do not be tempted to call again. You can also block unfamiliar numbers abroad and premium services and share these numbers with your operator so they can research them.
What if you fall into the trap of telephone fraud? Do not forget that the calls you receive are all made with special numbers that are provided for specific services, so the cost of answering or calling them from any line is much more expensive than usual for you.
If you answer them, you have given them the initial feed – but it is worse to wait behind the line; Don’t expect, no human will answer you – those calls are made by computer robots, which only make you hear beeps, music, and misleading messages. The longer you stay behind the line, the more it costs you, and the more money they make.
How to protect yourself
There is no choice but to refuse to respond to anonymous calls made by people fleeing the community – especially when the call is “international”.
Check the number and number of calls received – do not answer if they are not internal.
If you find yourself receiving a backlog of anonymous numbers, changing your phone line may be an easy way out, but it will definitely cost you dearly, as many friends, colleagues, family, and people will contact you regularly. They will lose temporarily, and you should try to let them know about your new line, apart from the money you have to pay for it.
How they got your information
If you are wondering how fraudsters got to your number, you should know that when you enter your number on a website or application for any purpose and provide it to the service provider, opportunists seek to obtain or steal databases, either legally or illegally. Sites, which contain all the information of users, including their phone number – a disaster that has always occurred on users’ emails.
Over the years, millions of people around the world have been leaking sensitive information on the Internet due to the inefficiency and irresponsibility of many providers in maintaining system security issues.
Earlier this year, we saw people gain unauthorized access to a company database called People Data Labs, which contained more than 1.2 billion user information records such as emails, Social Security numbers, and contact numbers.
There are also websites that search for your information by taking your email or phone number and notifying you in a message if it leaks or does not leak on the Internet – do not even trust them.
Under no circumstances should you trust external websites, and unknown internal websites.
You can ask your operator to block all “international” calls to eliminate the problem.
Your phone may have the ability to neutralize all unknown calls that you can use.
What if you fall into their trap?
If you answer one of the vanguard calls and wait behind the line, we suggest that you contact your operator and discuss this with them so that they may ignore the amount deducted from the account, or added to the monthly bill.
Your carelessness in dealing with such issues, and not reporting your problem to the relevant institutions, not only catches you, but also brings the swindlers one step closer to victory.
Before getting into trouble, be careful not to leave emails, phone numbers, user information, citizenship information, and anything else important to unknown and irrelevant people and websites.
Never sign up for websites you do not know. Set a password for your browser and clear the information in cookies once a day, do not use unofficial software on your computer and phone, never reveal your account information in the comments (and even private messages) to others.
These are just a few of the things you need to do, and the rest is up to the service providers to take care of your information.
No feeling is more pleasant than enjoying hobbies and feeling at home, and to a blogger, no other social media is more pleasing and home-like as Tumblr. But, bloggers! Ever thought that you can make money on Tumblr through likes and also feeling at home? Yes, it is quite possible, and here is how.
How to make money on Tumblr?
Nowadays, people are increasingly exploring unique ways to invest and make money, and one such avenue is through platforms like Tumblr. If you want to make money on Tumblr, you should get more fans and increase the profile visits first. Then make money using affiliate programs or sponsored posts. Here is the detailed instruction on how you can make money on Tumblr.
1. Consider affiliate programs for making money on Tumblr
Affiliate programs are one of the most influential and profitable ways to make money on Tumblr. There are no costs to put those affiliate links in blogs and wait for people to click on them. The only thing needed to do is to create a high-quality blog (related to the service or product the link is trying to sell). Your blog must be engaging and easy to read, and it should as well provide valuable information to the reader.
For example, if you write on educational topics and offer helpful tips to students in your blog, it makes sense to put affiliate links to services and products that are of value to students. These can be links to memorization and time management apps, tutors’ profiles, career advice platforms, writing services from different countries, like Canada essayservice.com, etc. The latter would fit perfectly in articles that offer essay writing tips, and links to tutor’s profiles would look natural in articles that explain a particular topic in a certain discipline (e.g., article on history that talks about reasons for Napoleon’s defeat at Waterloo).
Always remember that the value a blog adds to the readers is the main reason they will click on those affiliate links. Readers are aware and smart and can distinguish between an excellent blog and a spam one (that is stuffed with links to this and that company’s website).
2. Build your target audience
First, let’s distinguish between the viewers and the audience of blogs:
“Viewers” are those who view the content and may or may not click on the links provided in the text. They come to the Tumblr profile accidentally, maybe through search and other means. Only 10 percent of the viewers will finally turn into the “audience.”
On the other hand, and as indicated above, the audience is the people who interact with the content, follow the feed and wait for your blogs to be published. They are the most likely users on Tumblr that will click on your targeted links.
To turn viewers to the audience in order to be able to make money on Tumblr, define the target audience. Answer these questions:
What do the affiliate links in your blog provide the audience with? What are the services and products they try to sell?
Who is the target audience of the blogs that need these services and products?
How will the services and products help the audience and give them the added value?
How can the content and blogs help people know more about services and products? What are some strategies for convincing them to purchase?
You need to monitor your viewers and turn them into your target audience
3. Use ads on your page
Using advertisements, especially Google AdSense is the most common way to make money on Tumblr. Let the page include some ads from affiliate companies, and they will pay per click.
Note: Most of the companies prefer to work with a blogger who has their own domain name. So try to register a personal domain name to seem more authentic to affiliate companies.
4. Mind the looks
The looks of your Tumblr profile is the personality of your career. Use Tumblr themes to create a professional look for the page. A page that looks prestigious will persuade more viewers to become your audience and read your blogs and convince more companies to work with you.
Try to visit other professional Tumblr profiles and get inspired. They will have tips you will come across in no other places. Also, try to know the psychology of colors so that you will choose a theme that fits the personality of the target audience to impact them more easily.
Different Tumblr themes
5. Upload pictures
This is a great way to readily make money on Tumblr. Upload some photos to your Tumblr profile and link it to another source that will pay per click. Images are fun and easy to comprehend. So try to choose a picture that visually impacts the behaviors of the audience and convinces them to click. Remember the pictures should be in line with the general theme and subject of your profile. An unrelated and improper image will result in a loss of followers and partnering companies.
6. Upload files
Some servers will pay ready money if you upload useful files to them. If you have helpful files, then try to turn them into cash. These files will later get downloaded by ordinary people, and for each download, you will be paid again. Just put the link to those files in your Tumblr, and you start to make money!
In the end, you can see the summary of making money on Tumblr on an infographic.
Conclusion
These are only a few tips for making money on Tumblr. Always remember that there are infinite ways to promote and monetize a Tumblr page, and this is possible to turn it to an unlimited source of income. Hands-on the keyboard and create!