How to Destroy a Hard Drive [The Best Ways Explained]

It makes sense to need to get rid of our info sometimes. This post will tell you how to destroy a hard drive so that your important data can’t be recovered. It’s important to properly destroy your hard drive to protect your personal and sensitive information, whether you’re updating your computer, getting rid of old gear, or just worried about data security.

The Reasons to Destroy Your Hard Drive

Before we talk about the different ways to destroy a hard drive, let’s talk about why it’s important to do so. A normal hard drive has a lot of private data on it, like credit card numbers, social security numbers, bank account information, and website logins.

With the right tools, you can get back the data even if you think you removed it or formatted the hard drive. Your personal information will stay safe because you destroyed your hard drive, removing the chance of data stealing.

Furthermore, it is very important to create a backup of any sensitive files on your hard drive, such as music, photos, or important papers, before you destroy them. Because of this, you won’t lose any important info when you destroy it.

Different Methods of Destroying a Hard Drive

Destruction of a hard drive is an important step in getting rid of private data for good. You can do these things in different ways:

Method 1: Shredding

One of the best ways to destroy a hard drive is to shred it. The process involves breaking the drive up into tiny pieces that can’t be put back together. This makes the data completely unavailable. Burning may not be something that everyone can do at home, but there are services that specialize in hard drive burning that can do it for you.

Method 2: Degaussing

A strong magnetic pulse is used in degaussing to remove the information on a hard drive. The magnetic fields on the drive are turned off by this process, so no data can be recovered. Degaussing, on the other hand, needs special tools and is usually done by experts.

Method 3: Wiping the Data

The data on a hard drive can also be erased. This entails overwriting all drive data with random patterns using data wiping software. This procedure may not completely erase data, but it can be effective. Advanced data recovery methods may recover some pieces. Thus, if your hard drive contains sensitive data, data wiping and physical destruction are preferable for protection.

How to Physically Destroy a Hard Drive

Now that we know why it’s important to destroy a hard drive and the different ways we can do it, let’s look at how to do it physically. Carefully following these steps is important to make sure that all of your data is erased and safe.

  • Make a copy of your data: Before you destroy anything, make a copy of any important information or data that you want to keep. You won’t lose any important data during the destruction process if you do this.
  • Find the hard drive: The first thing you need to do is find the hard drive in your computer or laptop. You can check the owner’s manual or look online for specific directions for your device model if you’re not sure where to check.
  • Take off the case: Once you’ve found the hard drive, you’ll need to open the case to get to the electronic parts inside. Usually, this means taking out screws and maybe cutting through tape or labels that are covering the nuts. During this process, be careful not to hurt any other parts.
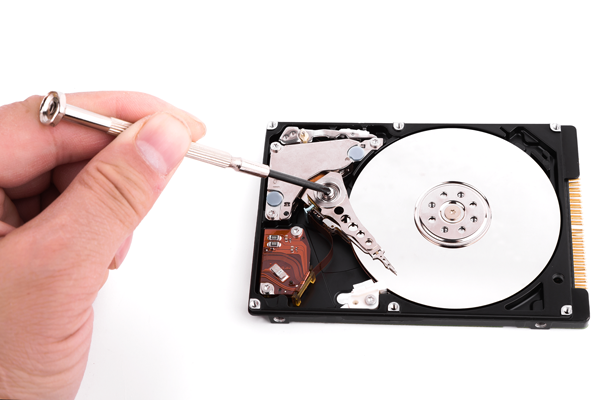
  • Remove the platter: The platter is the round silver disk inside the hard drive that stores the data. To destroy the hard drive, you’ll need to remove this platter. Unscrew any screws holding it in place and carefully maneuver it out of the casing.
  • Destroy the platter: There are several methods you can use to destroy the platter. One option is to use a hammer and repeatedly strike the platter on various sides until it becomes damaged beyond recovery. Another method is to use a secure data destruction service that can incinerate the platter, ensuring complete destruction.
  • Get rid of the pieces: Once you’ve broken the platter, it’s important to get rid of the pieces the right way. Put the broken pieces in different bags and throw them away separately so that no one can put them back together. To have less of an effect on the environment, you could also recycle the rest of the parts at an electronics recycling site.

Extra Tips on How to Destroy a Hard Drive Safely

When you want to destroy multiple hard drives, it’s best to do it one at a time so that you can be sure that they are all destroyed and that no drive is missed. When physically breaking a hard drive, you should always wear safety gear like safety glasses and gloves to keep yourself from getting hurt.

You might want to use a professional data destruction service that specializes in destroying hard drives. These services have the knowledge and tools to make sure that your hard drives are completely and safely destroyed.

When you get rid of a computer, make sure to take out the hard drive and destroy it separately from the other parts. So, even if the rest of the computer is recycled or given away, your info will still be safe. Don’t forget to safely delete any data that might be sensitive from any USB drives or external hard drives. The same rules about destroying these gadgets physically or wiping their data apply to them too.

In Closing

Making sure that your private and secret data doesn’t get into the wrong hands is essential when you destroy a hard drive. It’s important to do things the right way and be careful to destroy the drive fully, whether you cut it, degauss it, or break it physically. “How to destroy a hard drive” has always been an issue for many and If you carefully follow the steps in this piece, you can get rid of your old hard drives without worrying about your data.

Why Is My Face ID Not Working? [Ways to Fix It]

Face ID is a useful feature on iPhones that uses facial recognition technology to let you open your phone, verify purchases, and sign in to apps. But Face ID might not work all the time, which would be annoying and frustrating. To answer the question “Why Is My Face ID Not Working? ” This in-depth guide will look at the different reasons this could happen and show you how to fix it so that your Face ID works again.

Why Is My Face ID Not Working? Possible Reasons

To help you figure out what’s wrong, let’s look at some of the possible reasons your Face ID might not be working right:

  • Incompatible iPhone Model: Face ID is only available on iPhone X and later models. If you have an older iPhone model, Face ID will not be supported.
  • iOS Update Required: It’s essential to keep your iPhone’s software up to date. If you haven’t installed the latest iOS update, it could be causing compatibility issues with Face ID.
  • Camera Obstruction: Face ID relies on the TrueDepth camera located on the front of your iPhone. If anything is blocking the camera, such as a screen protector or debris, it may hinder the facial recognition process.
  • Multiple Failed Attempts: If you have made five unsuccessful attempts to match your face, Face ID will temporarily disable itself as a security measure.
  • Inactive Usage: If your device hasn’t been unlocked for more than 48 hours or if you haven’t used your passcode to unlock your iPhone in the last six and a half days, Face ID may not work until you enter your passcode.
  • Remote Lock Command: If your iPhone has received a remote lock command, Face ID will be disabled until you unlock your device with your passcode.
  • Power Off/Emergency SOS Screen: Pressing and holding either Volume button and the Side button simultaneously for two seconds triggers the power off/Emergency SOS screen. If this screen is active, Face ID will not function until you unlock your device with your passcode.

Now that we better understand the possible reasons behind Face ID not working, let’s move on to the troubleshooting steps to fix the issue.

Also Read: “Why is Chat GPT Not Working?”

What to Do to Fix Problems with Face ID

If you’re having trouble with Face ID, your device’s face recognition technology, there are a few things you can try to see if they help. To fix problems with Face ID, do these things:

Restart Your iPhone

Restarting your iPhone is a simple yet effective way to resolve minor software glitches that may be causing Face ID to malfunction. Try these very best steps to restart your device:

  • Press and hold the power button (Side button on iPhone X and later models or top button on iPhone SE 1st generation and earlier models) until the power off slider appears.
  • Drag the power off slider to turn off your iPhone. Once your iPhone is turned off, press and hold the power button again until the Apple logo appears, indicating that your device is restarting.
  • After your iPhone has restarted, enter your passcode and try using Face ID to see if the issue has been resolved.

Check for iOS Updates

Ensuring that your iPhone has the latest iOS update is crucial for optimal performance, including Face ID functionality. Once the update is installed, restart your iPhone and check if Face ID is functioning properly.

Check Face ID Settings

If your iPhone is updated to the latest iOS version and your Face ID is still not working, it’s essential to verify that the Face ID settings are correctly configured. Follow these steps to check your Face ID settings:

  • On the home screen of your iPhone, go to Settings.
  • Find Face ID & Passcode and tap on it.
  • To get to the Face ID options, enter your passcode.
  • Make sure that the Face ID toggle is turned on.
  • Scroll through the list of available options (iPhone Unlock, iTunes & App Store, Wallet and Apple Pay, Password AutoFill, and Other Apps) and ensure that all the features and apps you want to use with Face ID are turned on.
  • If any of the options were turned off, toggle them on.
  • Exit the settings and try using Face ID to see if it is now functioning properly.

Set Up an Alternate Appearance

If you have made significant changes to your facial appearance, such as growing or shaving a beard, you may need to set up an alternate appearance for Face ID to recognize you accurately. Test Face ID to see if the issue has been resolved.

Reset Face ID

If none of the previous steps have resolved the Face ID issue, you can try resetting Face ID and setting it up again from scratch. Try these steps to reset Face ID:

  • Go to Settings on your iPhone’s home screen.
  • Scroll down and tap on Face ID & Passcode.
  • Enter your passcode to access the Face ID settings.
  • Tap on Reset Face ID, then tap on Set Up Face ID to begin the setup process.
  • Hold your device in portrait position and tap on Get Started.
  • Slowly move your head to complete the circle within the frame.
  • If you cannot move your head, tap on Accessibility Options and follow the instructions.
  • After the first Face ID scan is complete, tap on Continue.
  • Slowly move your head again to complete the circle.
  • Once the Face ID setup is complete, tap on Done.

Reset Your iPhone to Factory Settings

Face ID might not work right after resetting your iPhone to its factory settings if nothing else works. It’s important to remember that this step will erase everything on your computer, so save a copy of your important files first.

In the event that none of the steps above have fixed the problem with your iPhone’s Face ID, there may be a physical issue with the device. This is when you should go to an Apple Store or talk to a trained repair professional to help you figure out what’s wrong and fix it.

Conclusion

This complete guide should have helped you figure out and fix any problems with your iPhone’s Face ID, including the common one, ‘Why Is My Face ID Not Working.’ After following the steps above, you should be able to resolve most issues and restore your device’s face recognition feature to full functionality. If you encounter persistent problems that won’t go away, seeking professional help is advisable to ensure they are addressed correctly.

How to Reset Apple TV Remote? (+Fix Apple TV Remote Not working)

The Apple TV remote is a critical component for controlling your Apple TV experience. However, there may be instances when it stops working correctly. In such cases, resetting the remote can help resolve functionality issues, connectivity problems, and even pair it with a new device. In this guide, we will walk you through the step-by-step process of how to reset Apple TV remote.

How to Reset Apple TV Remote?

The reset process for the Apple TV remote is relatively straightforward and remains consistent across different models. Follow the steps below to reset your Apple TV remote:

  • Step 1: Press and Hold Buttons: Press and hold the TV and Volume Down buttons simultaneously for about 5 seconds. You will notice the status light on your Apple TV turning off and on again.
  • Step 2: Release Buttons: After holding the buttons, release them and wait for 5 to 10 seconds. At this point, a “Connection Lost” notification will appear on your TV screen.
  • Step 3: Completion of Reset: The reset process is complete when a “Connected” notification appears on the screen. Now, try using the remote to check if the issues have been resolved.

How to Fix Apple TV Remote (If The Resetting Process Doesn’t Work)

If your remote malfunctions, you may need to recharge, repair, or reset it. You may need to reset your Apple TV box or use the remote app to fix it. However, rule out the most obvious causes first, as they may be effective. Then try more complicated methods like replacing your HDMI cable or controller.

  • Get the Remote Closer to Apple TV

The quickest way to fix Apple TV remote signal issues is to move closer. The remote Bluetooth range ranges from 10 to 40 meters by model. Try calling the Apple TV box from around the room to make it respond to the remote.

  • Charge Your Remote

Check the battery charge first if you’re wondering why my Apple TV remote won’t function. If it’s 20% or less, plug it in to see if it fixes it.

  • Reset Apple TV Remote

If charging the battery didn’t fix the Apple TV remote, reset it. Simple steps to reset Apple TV remote:

  1. Hold Volume Down and the TV/Control Center button (a box with a line underneath) for five seconds.
  2. Let go of the buttons and watch your TV display Connection Lost.
  3. Wait for remote restart.
  4. Wait for the TV to show Connected.
  5. Your remote should work after the reset.

Unpair and Repair Apple TV Remote

If your Apple remote still doesn’t function after following all the above steps, link it with your Apple TV again.

  • Try pointing your Apple TV remote three inches away.
  • Hold Back (or Menu, depending on model) and Volume Up for five seconds.
  • Pair Apple TV by placing your remote on top if requested.
  • Install the latest tvOS if your Apple TV remote won’t pair.

Also Read: “How to Unpair Apple Watch?

Shielded HDMI cable

Your remote communicates with Apple TV via Bluetooth. Bluetooth interference may occur from your Apple TV box’s cord to your TV. It may transmit electromagnetic radiation as an antenna if not insulated. Consider replacing your cable connection with a shielded HDMI cable to rule out the cause of your Apple TV remote not working.

Download Apple TV Remote

The Apple TV Remote app on your iPhone or iPad controls your Apple TV. It should be added to Control Center automatically, but you may add it from Settings in a few clicks:

  • Visit Settings > Control Center.
  • Scroll down to Apple TV Remote and tap add.
  • These methods will set up the Apple TV Remote on your iPhone if you constantly ask why my Apple TV remote doesn’t work:
  • Open Control Center by swiping down from the upper right corner.
  • Tap the Apple TV Remote icon.
  • Select a TV from the top drop-down.
  • Enter a four-digit passcode as instructed onscreen.

Buy a New Remote if Nothing Works

If you can operate your TV from your iPhone but not your Apple TV remote, the hardware may be broken. Consider changing it or contacting Apple support.

Also Read: What Are The Most Popular Live TV Streaming Services Of 2023?

Conclusion

Knowing how to reset Apple TV remote, can be a simple and effective solution to resolve functionality issues and connectivity problems. By following the step-by-step process outlined in this guide, you can easily reset your Apple TV remote and get it back up and running smoothly. Remember to try the troubleshooting tips mentioned earlier before proceeding with the reset process.

How to Add Friends On PS5 (Or Remove Friends) [Updated 2024]

The PS5 has revolutionized the gaming experience, allowing players to connect and play with friends all over the world. Adding friends on the PS5 is a simple process that can be done directly from your console. In this guide, we will walk you through the steps on how to add friends on PS5, as well as provide some tips and tricks to improve your gaming experience.

How to Add Friends on PS5 with Some Simple Steps?

Adding friends on the PS5 is a straightforward process that can be done in just a few simple steps. Here’s a step-by-step guide to help you add friends on your PS5 console:

  • Step 1: Turn on your PS5 and log in to your account

Before you can start adding friends, ensure that your PS5 is turned on and you are logged in to your PlayStation Network (PSN) account. If you don’t have an account, you will need to create one before proceeding.

  • Step 2: Access the Game Base menu

Once you are logged in, press the PlayStation button on your DualSense controller to access the Control Center. From the Control Center, navigate to the Game Base menu by tapping down on the controller. The Game Base menu is where you can manage your friends list and access various communication features.

  • Step 3: Search for players

In the Game Base menu, select the “View All Friends” option to see your current friends list. To add a new friend, click on the “Search” tab. From here, you can search for players by entering their name or nickname.

  • Step 4: Send a friend request

After typing the name or nickname of the player you want to add, select their profile image from the search results. Once you are on their profile page, click on the “Add Friend” button to send them a friend request. The player will then receive the request and can choose to accept or decline it.

How to Remove Friends on PS5

Managing your friends list is just as important as adding friends. If you want to remove a friend from your PS5, follow these steps:

  • Press the PlayStation button on your DualSense controller to bring up the Control Center.
  • Navigate to the Game Base menu by tapping down on the controller.
  • Select the “View All Friends” option to access your friends list.
  • Scroll through the list and find the friend you want to remove.
  • Press the Options button on the controller to bring up the additional options.
  • Choose the option to remove the friend from your list.

Tips for Managing Your Friends List on PS5

Another important part in knowing how to add friends on PS5, is managing your friends list effectively. Here are some tips to help you make the most of your friends list:

  • Setting online status and availability

The PS5 allows you to set your online status and availability, giving your friends an idea of when you are available to play. You can choose to appear online, offline, or appear as busy. Adjusting your online status and availability can help your friends know when to invite you to play.

  • Creating and joining parties

Parties on the PS5 allow you to voice chat with your friends while playing games together. You can create a party and invite your friends to join, or you can join a party created by one of your friends. Parties are a great way to communicate and coordinate gameplay strategies.

  • Sending messages and voice chats

In addition to parties, you can also send messages and voice chats to your friends directly. The PS5 messaging system allows you to have private conversations with your friends, share game tips, or simply catch up. Voice chats enable real-time communication during gameplay, making it easier to coordinate your actions.

  • Connecting with Friends on Other Platforms

The PS5 also offers cross-platform functionality, allowing you to connect with friends who are playing on different platforms. Through services like cross-play, you can play games with friends who are using different consoles or gaming platforms. This feature expands your gaming network and enables you to connect with a wider community of players.

Also Read: How to Clean PS5? (The Best Applicable Ways)

In Closing

Now you’ve learned how to add friends on PS5; you know that adding friends on PS5 opens up a world of possibilities for cooperative and competitive gameplay. By following the simple steps outlined in this guide, you can easily connect with friends, join parties, and enjoy a more immersive gaming experience.

FAQ

  • Can I add Friends from Previous PlayStation Consoles?

If you have used the same PSN account on previous PlayStation consoles, your friends list will be carried over to the PS5.

  • Is There a Limit to the Number of Friends I Can Have on PS5?

Yes, there is a limit to the number of friends you can have on your PS5 friends list. The exact limit may vary depending on factors such as your account status and PlayStation Network policies.

  • Can I Remove a Friend Without Them Knowing?

When you remove a friend from your PS5 friends list, they will receive a notification informing them that they have been removed.

How to Allow Pop Ups on Chrome? (The Latest Update)

Are you frustrated with your browser blocking pop ups that you actually need? Pop ups can serve important functions and provide valuable information, but sometimes they can be annoying. If you’re using Google Chrome and want to enable pop-ups, you’ve come to the right place. In this guide, we’ll walk you through the steps on how to allow pop ups on Chrome, whether you want to enable them for all websites or only for specific sites.

Why Most Pop Ups Are Blocked by Default?

Before we get into the steps on how to allow pop ups on Chrome, let’s understand why they are blocked in the first place. Google Chrome blocks pop-ups as a security measure to prevent malicious websites from opening unwanted windows or displaying deceptive content.

This helps protect your computer from malware, phishing attempts, and other potential threats. While this feature is beneficial, it can also block legitimate pop-ups that you may want to see.

How to Allow Pop Ups on Chrome?(Easy Steps)

If you want to allow pop-ups for all websites you visit, follow these steps:

  • Open Google Chrome on your computer.
  • Click on the three-dot menu icon in the top-right corner of the window.
  • From the drop-down menu, select “Settings.”
  • Scroll down and click on “Privacy and security” in the left sidebar.
  • Under the “Privacy and security” section, click on “Site settings.”
  • Scroll down and or find “pop-ups”, in “site settings)
  • click on “Pop-ups and redirects.”
  • Toggle the switch next to “Blocked” to turn it off.
  • The switch should now say “Allowed.” Pop-ups will now be enabled for all websites you visit.

Allowing Pop-ups from a Specific Site

If you only want to allow pop-ups for a specific website, follow these steps:

  • Open Google Chrome on your computer.
  • Visit the website for which you want to allow pop-ups.
  • Click on the lock icon located to the left of the website address in the address bar.
  • In the drop-down menu, click on “Site settings.”
  • Scroll down and click on “Pop-ups and redirects.”
  • In the pop-up settings, select “Allow” from the drop-down menu next to “Pop-ups and redirects.”
  • Reload the website for the changes to take effect. Pop-ups will now be enabled for that specific site.

How to Allow Pop Ups on Chrome in Mobile App?

You can accept pop-ups on your iOS or Android device using the Google Chrome mobile app.

Allow all pop ups on iPhone or iPad

  • Open the Google Chrome app for your phone or tablet.
  • Tap the ellipsis-shaped “More” button in the bottom-right area.
  • Tap Settings in the box that appears.
  • Move down the page and click on Content Settings.
  • On the page where you set up the content, click Block Pop-ups.
  • Tap the toggle switch next to Block Pop-ups to turn it from blue to grey. This will stop stopping pop-ups.

Allow all pop-ups on Android:

  • Open the Google Chrome app for your phone or tablet.
  • Tap the More icon, which looks like three vertical dots, in the top-right spot, and then tap Settings in the box that appears.
  • Then click Site Settings.
  • Tap Pop-ups and redirects on the Site Settings page.
  • Move the switch to the left to stop stopping pop-ups.

Tips to Deal with Unwanted Pop-ups

While enabling pop-ups can be useful, it’s important to be cautious and avoid potential risks. Here are some tips to help you deal with unwanted pop-ups:

  • Install a reputable ad-blocker extension: Ad-blockers can effectively block most pop-ups and ads, enhancing your browsing experience.
  • Keep your browser and security software up to date: Regularly updating your browser and security software ensures you have the latest protection against pop-up-related threats.
  • Be cautious when clicking on pop-ups: Avoid clicking on pop-ups that seem suspicious or offer unrealistic promises. These can lead to malware infections or other security issues.

Also Read: “How to Install Chrome on Ubuntu?”

In Closing

Enabling pop-ups on Google Chrome can enhance your browsing experience and allow you to access important information on various websites. Whether you want to allow pop-ups for all sites or specific ones, the steps outlined in this guide will help you customize your browser settings accordingly. Just remember to exercise caution and be mindful of potential security risks associated with pop-ups.

How to Uninstall League of Legends? (Step-by-Step)

League of Legends, also known as LoL, is a popular online team game that has gained a huge number of fans over the years. But there are many reasons why you might want to remove the game at some point. It’s easy to get rid of League of Legends if you want to free up room on your computer or take a break from the game’s competitive grind. We’ll show you how to uninstall League of Legends on both Windows and MacOS in this detailed guide.

How to Uninstall League of Legends on All Devices

To uninstall League of Legends from all devices, follow these general steps.

Uninstalling League of Legends on Windows PC

Uninstalling League of Legends on a Windows PC involves accessing the Control Panel and removing both League of Legends and the Riot Client. Follow these steps:

  • Accessing the Control Panel: To begin the uninstallation process, go to the Start menu and type “Control Panel” in the search bar. Click on “Control Panel” or navigate to the settings and select “Apps” to access the list of installed programs.
  • Removing League of Legends and Riot Client: Scroll through the list of installed applications until you find “League of Legends.” Right-click on the icon and select “Uninstall.” A pop-up window for the Riot Client will appear, confirming that you want to uninstall the game. Click “Yes” to proceed with the uninstallation process.
  • Restarting Your Computer: After uninstalling League of Legends, it is recommended to restart your computer to ensure any temporary files are fully deleted.

Uninstalling League of Legends on MacOS

If you are using a Mac and want to uninstall League of Legends, follow these steps:

  • Navigating to the Application Folder: Press Command+Shift+G to open the “Go to Folder” window. Type “/Applications/” and click “Go” to access the Application folder.
  • Deleting League of Legends and Riot Client: Locate the League of Legends application in the Application folder and drag it to the Trash Can icon on your dock. Next, press Command+Shift+C to navigate to “MacintoshHD/Users/Shared/Riot Games.” Find the Riot Games folder and drag it to the Trash Can. To permanently delete the files, click on the Trash Can and select “Empty Trash” from the dropdown menu.
  • Restarting Your Computer: After emptying the Trash, it is recommended to restart your computer to ensure any temporary files are fully deleted.

Can I Reinstall League of Legends Without Uninstalling It First?

You can reinstall League of Legends without uninstalling it first. However, if you are experiencing issues with the game, such as bugs or performance problems, it is recommended to perform a clean reinstall by uninstalling the game before reinstalling it.

How to Reinstall League of Legends

Now that you know how to uninstall League of Legends, you should also be capable of reinstalling it. If you decide to reinstall League of Legends after uninstalling it, follow these steps:

  • Visiting the Official League of Legends Website: Open your web browser and go to the official League of Legends website at www.leagueoflegends.com.
  • Downloading the Riot Client: On the League of Legends website, navigate to the download section and click on the download link for the Riot Client. Follow the on-screen instructions to download and install the Riot Client on your computer.
  • Installing League of Legends: Once the Riot Client is installed, launch it and log in using your League of Legends account credentials. In the Riot Client, navigate to the League of Legends section and click on the “Install” button. Follow the prompts to install the game on your computer.

Also Read: Gaming PC Buying 101: What Every Gamer Needs to Know

In Closing

Uninstalling League of Legends can be a simple process if you follow the steps outlined in this guide. Whether you need to free up space on your computer or take a break from the game, knowing how to uninstall League of Legends is a viable option. Remember to back up your game settings, delete residual files, and restart your computer to ensure a thorough uninstallation. If you decide to reinstall the game in the future, you can easily do so by visiting the official League of Legends website and following the installation instructions.

FAQ

  • Will Uninstalling League of Legends Delete My Account?

No, uninstalling League of Legends will not delete your account. Your account information, including progress and purchases, is stored on the server and will remain intact even if you uninstall the game.

  • How Long Does It Take to Uninstall League of Legends?

The time it takes to uninstall League of Legends can vary depending on your computer’s processing speed and the size of the game files. Typically, the uninstallation process should only take a few minutes.

What Does AFK Mean in Gaming? (Explained)

In the vast and dynamic world of online gaming, a subculture of language and communication has evolved, complete with its own unique set of slang and acronyms. One of the most widely recognized and frequently used terms in this lexicon is “AFK.” In this guide, we’ll explore what does AFK mean in gaming and how to use it properly.

What Does AFK Mean in Gaming?

If you’re curious to know what does AFK mean in gaming, “away from keyboard” is what the word “AFK” stands for. It is used all the time in games. The term was first used in chat rooms and blogs, but it is now widely used in the gaming world to describe when a player is not actively playing the game, either because they are not at their computer or because they are just not doing anything.

When a gamer announces that they are going “AFK,” they are essentially signaling their temporary departure from active gameplay.

How Does “AFK” Work in Games? (Use it in the Best Way)

AFK can be used in different ways in games, based on what is going on. Some of the most popular ways to use “AFK” are as follows:

  • AFK in Chat

AFK is used in chat rooms, forums, and other social networks to let people know that a user is currently offline. For example, a user might say “BRB, AFK” to say that they need to step away from the chat for a few minutes and will not be at their computer.

  • AFK in Massively Multiplayer Online Games

AFK is a term used in massively multiplayer online role-playing games like World of Warcraft to describe people who are not actively playing but are still in the game world. This could be because they are not doing anything or because they are doing something that doesn’t need their full attention, like crafting or fishing.

  • AFK in MOBAs

In multiplayer online battle arena games (MOBAs), “away from keyboard” (AFK) players can be a big problem because their absence can hurt their team a lot. Players in MOBAs are expected to work together to reach their goals, and a player who is not actively playing can leave their team short-handed at a crucial time.

How Can AFK Change the Way You Play Video Games?

AFK players can make your gaming experience a lot worse, especially in online games. AFK players can leave their team short-handed, which can make it hard to finish goals or win matches.

Some players who are inactive for an extended period of time may even be penalized for their behavior, such as being expelled from the game or having their account deleted. Additionally, friends of this sort of user will typically curse at them when they lose as a result of the user.

Why It Is Crucial to Understand AFK?

Let’s dive deeper into why understanding AFK matters in the context of online gaming.

  • Maintaining Good Sportsmanship

Understanding and respecting the concept of AFK is crucial for maintaining good sportsmanship in the gaming community. It’s about being considerate of your teammates and opponents and ensuring that everyone has a fair and enjoyable gaming experience.

  • Avoiding Penalties

In some online games, going AFK without warning can lead to penalties. These penalties can range from loss of in-game currency to temporary suspensions or even permanent bans. Knowing when and how to go AFK responsibly can help you avoid these consequences.

  • Improving Communication

Clear communication is key in online gaming, and using AFK as intended can enhance your ability to communicate effectively with your gaming peers. It’s a way of saying, “I’ll be back shortly” or “Please hold on a moment” without disrupting the game.

In Closing

What does AFK mean in gaming is a frequent expression that is used in the gaming industry to describe when a player is not actively engaging in the game. In conclusion, AFK is an abbreviation for “away from keyboard.”

It is vital to be aware of the influence that AFK players may have on your gaming experience, whether you are playing a MOBA, MMORPG, or any other form of game, and to try your best to avoid being an AFK player yourself. This is true regardless of the type of game you are playing.

Swing Trading vs Day Trading: A Comprehensive Analysis of the Differences

In the world of active trading, swing trading and day trading are two tactics that stand out. Both strategies try to profit from short-term changes in the market, but they vary in how long and how often they trade. Traders who want to make good choices and make the most money possible need to know the details of each strategy. In this piece, we’ll look at swing trading vs day trading, including their pros, cons, and ways of analyzing the market.

All About Swing Trading (Advantages, Disadvantages)

Swing trading involves taking positions in stocks, commodities, or currencies with the intention of capturing medium-term price fluctuations. Swing traders aim to profit from the “swings” or trends that occur over a period of several days to weeks.

Advantages of Swing Trading

Greater Profit Potential: As swing trades are held for a longer duration, there is a higher potential for capturing larger price moves and generating substantial profits compared to day trading.

Reduced Stress: Swing trading allows for more relaxed decision-making as traders are not constantly monitoring the markets throughout the day. This can lead to reduced stress levels and better overall mental well-being.

Less Time-Intensive: Unlike day trading, swing trading does not require traders to constantly monitor the markets. This makes it a more suitable strategy for those with limited time availability or other commitments.

Disadvantages of Swing Trading

Overnight Risk: Holding positions overnight exposes swing traders to the risk of adverse price movements that may occur outside of regular trading hours. This can result in significant losses if the market moves against their positions.

Delayed Execution: Due to the longer holding period, swing traders may experience delays in entering or exiting trades, especially during periods of high market volatility. This can impact trade execution and potentially lead to missed opportunities or unfavorable prices.

Potentially Lower Trade Frequency: Swing trading typically involves fewer trades compared to day trading. This may result in reduced trading activity and potentially lower overall profitability, particularly in markets with limited opportunities for swing trades.

All About Day Trading (Advantages, Disadvantages)

Day trading involves making multiple trades within a single day, with the aim of profiting from intraday price movements. Day traders seek to capitalize on short-term volatility and typically close all their positions by the end of the trading day, avoiding the risks associated with overnight positions.

Advantages of Day Trading

Quick Profits: Day traders aim to capture small price movements and generate profits within a short period. By making multiple trades, they can potentially accumulate significant gains throughout the day.

Avoiding Overnight Risks: Day traders close all their positions before the end of the trading day, eliminating the risk of adverse price movements that may occur outside regular trading hours.

Increased Trade Frequency: Day trading involves frequent trades, allowing traders to take advantage of numerous opportunities presented by intraday price fluctuations. This potentially increases the overall profitability of their trading activities.

Disadvantages of Day Trading

High Stress Levels: Day trading requires constant attention and quick decision-making. Traders must closely monitor the markets, analyze price movements, and execute trades promptly. This can lead to high stress levels and increased pressure to make accurate and timely decisions.

Greater Emotion-Based Trading: The fast-paced nature of day trading can make traders more susceptible to emotional decision-making. Fear, greed, and impatience can influence trading decisions, potentially leading to impulsive trades and poor risk management.

Limited Profit Potential: Day traders typically aim for small, incremental gains on each trade. While these gains can accumulate throughout the day, the profit potential of individual trades is generally lower compared to swing trading, where larger price moves can be captured.

Key Differences in Swing Trading vs Day Trading (The Best Guide)

Swing trading and day trading differ in terms of trade duration, frequency, and the psychological demands placed on traders.

  • Trade Duration

Swing trading involves holding positions for a medium-term duration, typically ranging from a few days to several weeks. This allows swing traders to capture larger price moves and potentially generate higher profits. In contrast, day trading involves making multiple trades within a single day, with all positions typically closed before the market closes. Day traders aim to profit from small intraday price fluctuations.

  • Frequency of Trades

Day traders engage in frequent trading, making multiple trades throughout the day to take advantage of short-term price movements. They actively monitor the markets and execute trades promptly. In contrast, swing traders make fewer trades, as they focus on capturing medium-term trends. Swing trades require more patience and may not present as many trading opportunities as day trading.

  • Psychological Demands

Day trading takes a lot of focus, the ability to make quick decisions, and the ability to deal with a lot of stress. Day traders must always keep an eye on the markets, look at how prices are changing, and make moves quickly. This fast-paced setting can be hard on your mind and heart.

Swing trading, on the other hand, is a less stressful way to trade. Traders have more time to plan their trades, look at market trends, and make choices based on what they know. Day traders might feel more stress and pressure than swing traders.

Which Strategy is Right for You?

Choosing the right trading strategy in swing trading vs day trading, depends on various factors, including your trading goals, time availability, risk tolerance, and personal preferences. Consider the following points when deciding between swing trading and day trading:

  • Time Commitment: Day trading requires constant attention throughout the trading day, while swing trading allows for more flexibility and may be suitable for those with limited time availability.
  • Risk Tolerance: Day trading involves higher levels of risk due to the fast-paced nature and potential for significant intraday price fluctuations. Swing trading carries overnight risk but may be less volatile overall.
  • Psychological Factors: Assess your ability to handle stress, make quick decisions, and manage emotions. Day trading requires a high level of mental discipline, while swing trading offers a more relaxed trading experience.
  • Profit Potential: Consider your profit goals and assess which strategy aligns with your expectations. Day trading offers the potential for quick profits, while swing trading allows for capturing larger price moves.

It’s important to note that both swing trading and day trading require a solid understanding of technical analysis, risk management, and trading discipline. Developing a trading plan, sticking to it, and continuously honing your skills are key to success in either strategy.

Final Thoughts

Swing trading and day trading are two different ways to trade that are good for traders with different styles and tastes. When comparing swing trading vs day trading, you should think about your trading goals, how much time you have, how comfortable you are with risk, and how you feel about trade. Make sure you have a good trading plan, follow strict risk management rules, and keep learning to improve your trade skills.

10 Best Day Trading Stocks in 2024 (Latest Updated)

Finding the best stocks to trade as a day trader can be the key to making the most money. With the right picks, you can take advantage of short-term price changes and make quick gains. But there are so many stocks to choose from, how do you know which ones are the best for day trading? This guide will give you the information you need to succeed in the fast-paced world of day trading and introduce the best day trading stocks in 2024.

Is Day Trading Profitable?

Day trading can be profitable for traders who are skilled, disciplined, and know a lot about the markets and use good trading techniques. But it’s important to remember that day trading isn’t always a way to get rich. To be consistently profitable, you need to do a lot of study, analysis, and risk management.

Many day traders have trades that both make money and lose money. Day traders who are good at what they do usually focus on managing risk, making reasonable profit goals, and sticking to a disciplined trading plan. They also keep learning new things, adjust to changes in the market, and improve their trading methods.

When day trading, it’s important to be practical and think about the long term. For day dealing to be profitable, you have to be consistent and keep learning.

Also Read: “How the Market Works

Best Stocks for Day Trading (2024 Updated)

To kick off our exploration of the best day trading stocks in 2024, let’s take a look at some top picks. These stocks have shown promising performance and volatility, making them attractive options for day traders. Here are some of the best stocks for day trading to think about in 2024.

Carvana Co (CVNA)

Carvana Co is a company based in Arizona that runs an online marketplace where people can buy and sell used cars. Carvana Co’s all-in-one rental service makes it easy for renters to find, inspect, finance, and set up a time to pick up or drop off their chosen car. In the past few months, the price has been very volatile, with a 52-week range from $3.55 to $163.18 and a beta of 2.83.

Meta Platforms Inc. (META)

The company that owns Facebook is called Meta and is one of the best day trading stocks out there. This stock won’t make as much money for day traders as it did in the beginning, but there may still be some upside. The beta of the company is 1.23. Out of the 2.58 billion shares that are out there, 23.77 million are traded on average. In the past 52 weeks, the price of the stock has been anywhere from $88.09 to $326.20.

Apple Inc. (AAPL)

Like Meta, Apple day traders probably won’t see the early gains they made. Still, this stock is worth keeping an eye on because of its recent instability. Apple trades an average of 56.25 million shares per day, and the company has 15.63 billion shares out in the market. The beta of the company is 1.27. The 52-week range, from $124.17 to $198.23 per share, is smaller than some of the others on this list.

Amazon.com, Inc. (AMZN)

This list concludes with Amazon, the third “big three” company. It shares version 1.24 with both Meta and Apple. On average, 53.28 million shares out of a total of 10.32 billion are exchanged. Prices for Amazon shares have fluctuated between $81.43 and $143.63 over the past 52 weeks.

Tesla Inc. (TSLA)

Tesla Inc. is a renowned electric vehicle manufacturer and clean energy company. With a market cap of $819.9 billion and an average trading volume of 132,976,642, Tesla Inc. remains a popular stock choice among day traders.

NVIDIA Corporation (NVDA)

NVIDIA Corporation is a renowned technology company specializing in graphics processing units (GPUs) and artificial intelligence (AI) computing. With a market cap of $1.013 trillion and an average trading volume of 47,705,385, NVIDIA Corporation offers day traders exposure to the rapidly evolving tech industry.

Xpeng Inc. (XPEV)

Xpeng Inc. is a leading Chinese electric vehicle manufacturer. With the increased global demand for electric vehicles, Xpeng Inc. has gained significant attention in the market. The stock has a market cap of $8.892 billion and an average trading volume of 13,143,498, making it an attractive option for day traders looking to capitalize on the growing electric vehicle industry.

Advanced Micro Devices, Inc. (AMD)

Advanced Micro Devices, Inc. is a leading semiconductor company known for its innovative processors and graphics cards. With a market cap of $200.538 billion and an average trading volume of 69,289,739, AMD presents day traders with an opportunity to capitalize on the ever-growing demand for technology products.

Palantir Technologies Inc. (PLTR)

Palantir Technologies Inc. is a software company specializing in data analysis and artificial intelligence. With a market cap of $18.701 billion and an average trading volume of 33,243,483, Palantir Technologies Inc. offers day traders exposure to the booming tech sector.

Transocean LTD (RIG)

Transocean LTD is a leading global provider of offshore contract drilling services for oil and gas wells. With a market cap of $4.4 billion and an average trading volume of 17,242,709, Transocean LTD offers day traders exposure to the energy sector.

In Closing

To find the best day trading stocks in 2024, you need to do a lot of study and analysis. You can find chances for short-term gains by looking at things like price volatility, trading volume, and market trends. Day trading is a very risky thing to do, so it’s important to be disciplined, use risk management techniques, and keep learning. Day trading can be a rewarding and successful business if you know what you’re doing and have a good trading plan.

FAQs

  • Is day trading the same as investing?

There are two different ways to deal with the financial markets: day trading and investment. Day trading is a way to take advantage of short-term price changes by buying and selling securities within the same trade day. Investing, on the other hand, usually means buying and keeping securities for a long time, with the goal of long-term growth and income.

  • What are the risks of day trading?

Day trading carries several risks, including market volatility, liquidity risks, and behavioral biases. The fast-paced nature of day trading can lead to significant financial losses if trades are not executed carefully. It’s important to understand and manage these risks through proper risk management techniques and adherence to trading strategies.

  • Can I day trade with a small account?

Yes, it is possible to day trade with a small account. However, having a small account size can limit your trading options and increase the impact of trading costs on your overall returns. It’s crucial to focus on low-cost trading strategies, manage risk effectively, and gradually grow your account over time.

Trading for a Living: Is It Possible?

Trading is exciting for those who want financial independence and a flexible work schedule. It’s about buying and selling things like stocks, currencies, and commodities from your computer. Many people wonder if trading for a living is possible. Well, the truth is, it’s possible, but it’s not a guaranteed way to get rich quickly. To succeed, you need to understand what trading involves and what it takes to be successful.

Can You Make a Living from Trading?

After getting into the world of trading, one question remains: Can you really make a living by trading? The answer is yes, but it comes with some conditions. To make a living from trading, you must be ready to learn continuously, improve your skills, and be disciplined.

It’s not a journey for those looking to get rich overnight. However, for those willing to put in the effort and develop the necessary skills, trading can provide financial freedom and the flexibility to work on your terms. Here, we will discuss the requirements of trading for a living:

Don’t forget to read the related article “How to Use Tradingview Desktop? (Complete Guide)“.

The requirements of trading for a living

  • The Power of Education and Learning

Learning is a key part of successful trading. If you want to make a living from it, you need to understand financial markets, different strategies, and how technical analysis works. Learning equips you with the knowledge and tools you need to make smart decisions. You can find resources like books, online courses, mentors, and communities to help you learn.

  • Developing a Trading Strategy

To make a living from trading, you need a solid plan. This plan sets the rules for your decisions, helps you spot good opportunities, and manages your risks. Creating a plan means looking at past data, testing different approaches, and making your strategy fit your goals and how much risk you can handle.

  • Managing Risk and Money

Managing risks is crucial in trading because it helps protect your money. You should never put more money into one trade than you can afford to lose. There are techniques like using stop-loss orders and spreading your investments that can help lower your losses. You should also understand how much risk you’re comfortable with and adjust your investment sizes accordingly.

  • Finding the Right Trading Platform

Choosing the right trading platform is essential for efficient trading. A reliable, user-friendly platform enhances the experience, offering access to various financial instruments. Consider reliability, speed, charting, analytical tools, pricing, and customer support when evaluating platforms. Finding the ideal platform streamlines trading activities for success.

Some Proven Tips for Success in Trading: Dream Big, Live in Reality

Success in trading is not solely dependent on luck or chance. It needs a disciplined approach and adherence to certain principles. Here are some tips that can increase the likelihood of success in trading:

  • Keep Learning: The markets change, so you need to stay updated with the latest trends. Learning helps you adjust to these changes and improve your strategies.
  • Emotional Control: Emotions can cloud judgment and lead to impulsive decisions. Successful traders exercise emotional control and avoid making decisions based on fear or greed.
  • Patience: Trading is not a race; it is a marathon. Traders must exercise patience and wait for high-probability setups before executing trades.
  • Record-Keeping: Maintaining a trading journal helps track performance, identify patterns, and learn from past mistakes. It provides valuable insights that can be used to refine trading strategies.
  • Manage Risks: We’ve mentioned this before, but it’s important. Don’t risk more money than you can afford to lose on a single trade.

By applying these tips to their trading routine, aspiring traders can increase their chances of success in trading for a living.

Breakthrough to Success in Trading for a Living

You might be wondering if you can leave your regular job and become a full-time trader. Well, the first thing we can say is that it’s not just about having the right skills. Your mindset and discipline play a big role and trading isn’t just about numbers, it’s also a mental game.

Traders who succeed have a growth mindset. They see failure as an opportunity to learn and improve. They understand that losing sometimes is part of trading and see it as a chance to get better. Discipline is also crucial. It helps traders stick to their plans and rules, avoiding sudden decisions.

In Summary

For those looking for an alternative to a regular job, trading is full of potential. The idea of making a living with trading is exciting, but you should approach it realistically. If you’re ready to put in the effort and learn, you can make a living from trading. So, explore the opportunities trading offers, but do it wisely and think long-term.

Exit mobile version