How to get the App Store back? (Why is the App Store Missing)

The App Store is an important part of iOS because it makes it easy to buy and update apps. There are times, though, when the App Store might not show up on your iPhone or iPad. However, don’t worry; there are easy ways to learn how to get the App Store back and get to the huge library of apps again. We will look at a lot of different ways to help you get the App Store icon back on your device’s home screen in this detailed guide.

Why is the App Store Missing on Your iPhone?

Before we get into the solutions, it’s essential to understand why the App Store may seem to be missing from your iPhone/iPad. Contrary to popular belief, it is impossible to delete the App Store as it is an integral part of iOS. However, there are a few scenarios that may lead to the App Store disappearing from your device.

One possibility is that the installation of new apps has been restricted to your iPhone. This limitation can be set by you, your parents, or someone else who has access to your device. When apps are restricted, the App Store icon is automatically removed from the home screen, app library, and even the spotlight search. In such cases, it may appear as though the App Store has been deleted.

Another reason for the App Store’s absence could be the removal of its app icon from the home screen. This can happen if someone intentionally removes it or accidentally moves it to a different location.

How to get the App Store back on iPhone and iPad?

Now that we understand the possible causes, let’s explore the solutions to restore the App Store on your iPhone or iPad.

  • Solution 1: Unrestrict App Store from iPhone Settings

The first solution involves checking and modifying the app restrictions settings on your iPhone. Follow these steps to restore the App Store:

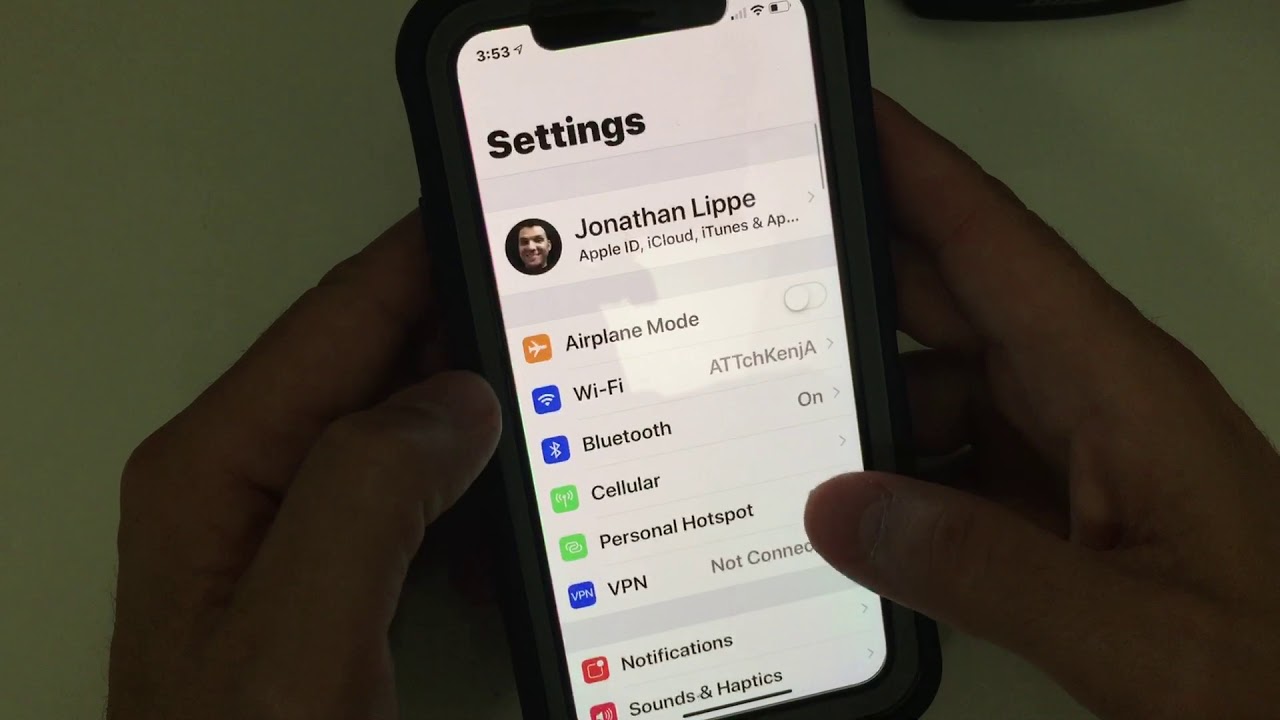
  1. Open the Settings app on your iPhone or iPad.
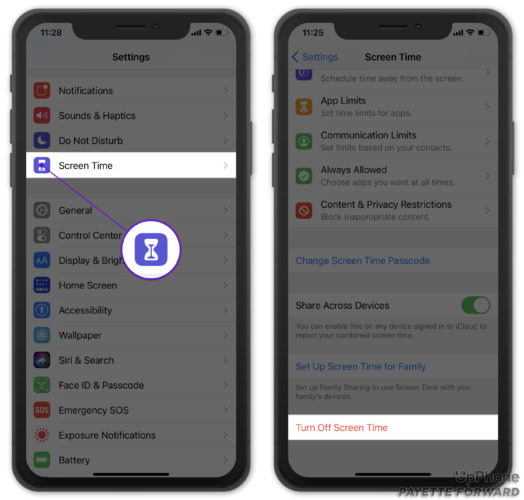
  2. Tap Screen Time.
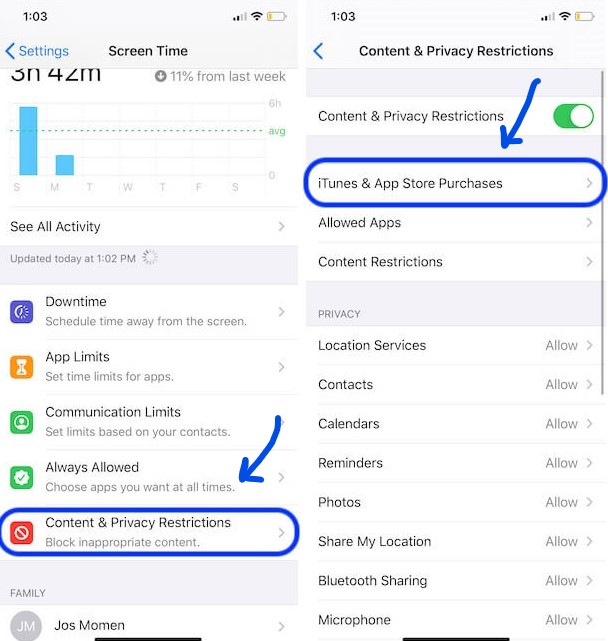
  3. Select Content & Privacy Restrictions.
  4. Choose iTunes & App Store Purchases.
  5. If prompted, enter the Screen Time passcode.
  6. Tap Installing Apps and select Allow.

After completing these steps, exit the Settings app and look for the App Store icon on your home screen. If the icon is still not visible, try pulling down the home screen to access the spotlight search and search for “App Store.”

  • Solution 2: How to get the App Store back

If you notice a small hourglass icon next to the App Store icon, it indicates that app limits have been set on your device. These limits can restrict the usage of apps, including the App Store, until a specified time. Here’s how you can address this issue:

  1. Tap the App Store icon, and if it displays “Time Limit,” proceed to the next step.
  2. Tap Ask For More Time and wait for your parents or guardians to grant additional time. Alternatively, if you know the Screen Time passcode, enter it to bypass the time limit.
  3. To permanently remove the app limit, go to Settings > Screen Time > App Limits and turn off the app limits or delete the limit for the App Store.
  • Solution 3: Use Spotlight Search to Locate the App Store

If the App Store icon is still missing, you can try using the spotlight search feature to locate and launch the App Store. Here’s what you need to do:

  1. From your home screen, swipe down to open the spotlight search.
  2. Type “App Store” in the search bar
  3. Tap the App Store app icon in the search results to open it.
  4. Alternatively, press and hold the App Store app icon and drag it down to add it to your home screen.
  • Solution 4: Find the App Store in the App Library

If you were unable to locate the App Store using the spotlight search, you can try finding it in the App Library. Here’s how:

  1. Swipe left on the last home screen page to access the App Library.
  2. Look for the Utilities folder in the App Library.
  3. The App Store should be located within the Utilities folder.
  4. Alternatively, swipe down on the App Library screen to see all apps in alphabetical order. Since the App Store starts with the letter “A,” it should be listed near the top.
  5. To add the App Store to your home screen, press the app icon and drag it to the left.

Also Read: “How To Restore IPad Unavailable?”

In Closing

It can be annoying to lose access to the App Store on your iPhone or iPad, but this guide will show you How to get the App Store back so you can download and update your favorite apps again. Remember that the App Store is an important part of iOS, and just because it’s not on your device doesn’t mean that you can’t get it again.

You now have the tools to bring back the App Store icon and enjoy the huge number of apps that are available, whether you want to change app limits, use spotlight search, or look through the app library.

How to Delete a Cash App Account in 2024

Cash App, founded in 2013 by Twitter founder Jack Dorsey, has become one of the leading peer-to-peer payment and mobile banking apps in the market. With millions of users and exciting investors, Cash App offers a convenient way to send and receive money using your bank account. However, if you no longer need or want to use the app, you may be thinking about how to delete a Cash App account. If you want to delete your Cash App account for good, this detailed guide will show you how to do it step by step.

How to Delete a Cash App Account?(Step-by-Step)

Deleting your Cash App account is a straightforward process. Follow these step-by-step instructions to permanently delete your Cash App account:

  • Access the account settings: Launch the Cash App on your mobile device and log in to your account. On the home screen, tap on the profile icon to access your account settings.
  • Navigate to the support section: Within the account settings, locate the “Support” option and tap on it to access the support center.
  • Select “Something Else”: In the support center, scroll down and tap on the “Something Else” option to explore additional account options.
  • Find the account settings: Within the list of additional account options, look for the “Account Settings” option and tap on it to proceed.
  • Initiate the account deletion process: On the account settings page, locate the “Close Account” option and tap on it to initiate the account deletion process.
  • Read the account closure details: Cash App will provide you with information about what happens when you delete your account. Take a few moments to read through the details and understand the consequences of deleting your account.
  • Confirm the account closure: If you are certain that you want to delete your Cash App account, tap on the “Confirm Closing Account” button at the bottom of the page to confirm your decision.
  • Contact customer support: In some cases, Cash App may require you to contact customer support to finalize the account closure process. If prompted to do so, follow the instructions provided and communicate your request to close your account permanently.
  • Receive confirmation: Once your account closure request is processed, you will receive a confirmation notification from Cash App.

How to Delete Cash App from Your Mobile Device?

After deleting your Cash App account, you may also want to learn how to delete a Cash App account from your mobile device. Here’s how you can do it:

For Android devices:

  • Press and hold the Cash App icon on your home screen or app drawer.
  • Drag the icon to the “Uninstall” or “Remove” option that appears at the top of the screen.
  • Confirm the uninstallation when prompted.

For iOS devices:

  • Press and hold the Cash App icon on your home screen until the icons start to wiggle.
  • Tap the “X” symbol on the top-left corner of the Cash App icon.
  • Confirm the deletion when prompted.

By following these steps, you can remove the Cash App from your mobile device and declutter your apps.

Why Would You Want to Delete Your Cash App Account?

Allow us to talk about some reasons why you might want to delete your Cash App account before we get into how to do it. Cash App makes it easy to send and receive money and bank, but it might not meet everyone’s long-term financial needs. These are some common reasons people delete their Cash App account:

  • Changing financial needs: As your financial situation evolves, you may require more advanced banking features and services that Cash App does not offer.
  • Privacy concerns: If you have concerns about the privacy and security of your personal information on Cash App, you may decide to delete your account.
  • Switching to a different payment app: There are numerous peer-to-peer payment apps available in the market, and you may find that another app better suits your needs.
  • Reducing app clutter: If you have multiple payment apps on your device and want to streamline your digital wallet, deleting your Cash App account can help declutter your apps.

Now that you have a better understanding of why someone might choose to delete their Cash App account, let’s proceed to the next section to ensure you have everything in order before deleting your account.

Things to Do Before Deleting Your Cash App Account

Before you delete your Cash App account, it is important to take a few preparatory steps to ensure a smooth transition. Here’s what you need to do:

  • Transfer your funds: Make sure to transfer any remaining funds in your Cash App account to your linked bank account. This ensures that you don’t lose any money during the account deletion process.
  • Cancel any subscriptions: If you have any active subscriptions tied to your Cash App account, such as Cash Boost or Cash Card Direct Deposit, make sure to cancel them before deleting your account. Failure to do so may result in continued charges or disruption of services.
  • Review your transaction history: Take a few moments to review your transaction history and ensure there are no pending or unresolved transactions. If there are any issues, it is best to resolve them before proceeding with the account deletion.

In Closing

Getting rid of a Cash App account is easy, but you need to plan ahead and follow a few steps to make sure everything goes smoothly. You can learn how to delete a Cash App account if you follow the step-by-step instructions in this piece. Then you can move on to other money-saving options that are better for you. Don’t forget to move your money, cancel your subscriptions, and look over your transaction records before you delete your account.

How to Add Friends On PS5 (Or Remove Friends) [Updated 2024]

The PS5 has revolutionized the gaming experience, allowing players to connect and play with friends all over the world. Adding friends on the PS5 is a simple process that can be done directly from your console. In this guide, we will walk you through the steps on how to add friends on PS5, as well as provide some tips and tricks to improve your gaming experience.

How to Add Friends on PS5 with Some Simple Steps?

Adding friends on the PS5 is a straightforward process that can be done in just a few simple steps. Here’s a step-by-step guide to help you add friends on your PS5 console:

  • Step 1: Turn on your PS5 and log in to your account

Before you can start adding friends, ensure that your PS5 is turned on and you are logged in to your PlayStation Network (PSN) account. If you don’t have an account, you will need to create one before proceeding.

  • Step 2: Access the Game Base menu

Once you are logged in, press the PlayStation button on your DualSense controller to access the Control Center. From the Control Center, navigate to the Game Base menu by tapping down on the controller. The Game Base menu is where you can manage your friends list and access various communication features.

  • Step 3: Search for players

In the Game Base menu, select the “View All Friends” option to see your current friends list. To add a new friend, click on the “Search” tab. From here, you can search for players by entering their name or nickname.

  • Step 4: Send a friend request

After typing the name or nickname of the player you want to add, select their profile image from the search results. Once you are on their profile page, click on the “Add Friend” button to send them a friend request. The player will then receive the request and can choose to accept or decline it.

How to Remove Friends on PS5

Managing your friends list is just as important as adding friends. If you want to remove a friend from your PS5, follow these steps:

  • Press the PlayStation button on your DualSense controller to bring up the Control Center.
  • Navigate to the Game Base menu by tapping down on the controller.
  • Select the “View All Friends” option to access your friends list.
  • Scroll through the list and find the friend you want to remove.
  • Press the Options button on the controller to bring up the additional options.
  • Choose the option to remove the friend from your list.

Tips for Managing Your Friends List on PS5

Another important part in knowing how to add friends on PS5, is managing your friends list effectively. Here are some tips to help you make the most of your friends list:

  • Setting online status and availability

The PS5 allows you to set your online status and availability, giving your friends an idea of when you are available to play. You can choose to appear online, offline, or appear as busy. Adjusting your online status and availability can help your friends know when to invite you to play.

  • Creating and joining parties

Parties on the PS5 allow you to voice chat with your friends while playing games together. You can create a party and invite your friends to join, or you can join a party created by one of your friends. Parties are a great way to communicate and coordinate gameplay strategies.

  • Sending messages and voice chats

In addition to parties, you can also send messages and voice chats to your friends directly. The PS5 messaging system allows you to have private conversations with your friends, share game tips, or simply catch up. Voice chats enable real-time communication during gameplay, making it easier to coordinate your actions.

  • Connecting with Friends on Other Platforms

The PS5 also offers cross-platform functionality, allowing you to connect with friends who are playing on different platforms. Through services like cross-play, you can play games with friends who are using different consoles or gaming platforms. This feature expands your gaming network and enables you to connect with a wider community of players.

Also Read: How to Clean PS5? (The Best Applicable Ways)

In Closing

Now you’ve learned how to add friends on PS5; you know that adding friends on PS5 opens up a world of possibilities for cooperative and competitive gameplay. By following the simple steps outlined in this guide, you can easily connect with friends, join parties, and enjoy a more immersive gaming experience.

FAQ

  • Can I add Friends from Previous PlayStation Consoles?

If you have used the same PSN account on previous PlayStation consoles, your friends list will be carried over to the PS5.

  • Is There a Limit to the Number of Friends I Can Have on PS5?

Yes, there is a limit to the number of friends you can have on your PS5 friends list. The exact limit may vary depending on factors such as your account status and PlayStation Network policies.

  • Can I Remove a Friend Without Them Knowing?

When you remove a friend from your PS5 friends list, they will receive a notification informing them that they have been removed.

How to Allow Pop Ups on Chrome? (The Latest Update)

Are you frustrated with your browser blocking pop ups that you actually need? Pop ups can serve important functions and provide valuable information, but sometimes they can be annoying. If you’re using Google Chrome and want to enable pop-ups, you’ve come to the right place. In this guide, we’ll walk you through the steps on how to allow pop ups on Chrome, whether you want to enable them for all websites or only for specific sites.

Why Most Pop Ups Are Blocked by Default?

Before we get into the steps on how to allow pop ups on Chrome, let’s understand why they are blocked in the first place. Google Chrome blocks pop-ups as a security measure to prevent malicious websites from opening unwanted windows or displaying deceptive content.

This helps protect your computer from malware, phishing attempts, and other potential threats. While this feature is beneficial, it can also block legitimate pop-ups that you may want to see.

How to Allow Pop Ups on Chrome?(Easy Steps)

If you want to allow pop-ups for all websites you visit, follow these steps:

  • Open Google Chrome on your computer.
  • Click on the three-dot menu icon in the top-right corner of the window.
  • From the drop-down menu, select “Settings.”
  • Scroll down and click on “Privacy and security” in the left sidebar.
  • Under the “Privacy and security” section, click on “Site settings.”
  • Scroll down and or find “pop-ups”, in “site settings)
  • click on “Pop-ups and redirects.”
  • Toggle the switch next to “Blocked” to turn it off.
  • The switch should now say “Allowed.” Pop-ups will now be enabled for all websites you visit.

Allowing Pop-ups from a Specific Site

If you only want to allow pop-ups for a specific website, follow these steps:

  • Open Google Chrome on your computer.
  • Visit the website for which you want to allow pop-ups.
  • Click on the lock icon located to the left of the website address in the address bar.
  • In the drop-down menu, click on “Site settings.”
  • Scroll down and click on “Pop-ups and redirects.”
  • In the pop-up settings, select “Allow” from the drop-down menu next to “Pop-ups and redirects.”
  • Reload the website for the changes to take effect. Pop-ups will now be enabled for that specific site.

How to Allow Pop Ups on Chrome in Mobile App?

You can accept pop-ups on your iOS or Android device using the Google Chrome mobile app.

Allow all pop ups on iPhone or iPad

  • Open the Google Chrome app for your phone or tablet.
  • Tap the ellipsis-shaped “More” button in the bottom-right area.
  • Tap Settings in the box that appears.
  • Move down the page and click on Content Settings.
  • On the page where you set up the content, click Block Pop-ups.
  • Tap the toggle switch next to Block Pop-ups to turn it from blue to grey. This will stop stopping pop-ups.

Allow all pop-ups on Android:

  • Open the Google Chrome app for your phone or tablet.
  • Tap the More icon, which looks like three vertical dots, in the top-right spot, and then tap Settings in the box that appears.
  • Then click Site Settings.
  • Tap Pop-ups and redirects on the Site Settings page.
  • Move the switch to the left to stop stopping pop-ups.

Tips to Deal with Unwanted Pop-ups

While enabling pop-ups can be useful, it’s important to be cautious and avoid potential risks. Here are some tips to help you deal with unwanted pop-ups:

  • Install a reputable ad-blocker extension: Ad-blockers can effectively block most pop-ups and ads, enhancing your browsing experience.
  • Keep your browser and security software up to date: Regularly updating your browser and security software ensures you have the latest protection against pop-up-related threats.
  • Be cautious when clicking on pop-ups: Avoid clicking on pop-ups that seem suspicious or offer unrealistic promises. These can lead to malware infections or other security issues.

Also Read: “How to Install Chrome on Ubuntu?”

In Closing

Enabling pop-ups on Google Chrome can enhance your browsing experience and allow you to access important information on various websites. Whether you want to allow pop-ups for all sites or specific ones, the steps outlined in this guide will help you customize your browser settings accordingly. Just remember to exercise caution and be mindful of potential security risks associated with pop-ups.

How to Uninstall League of Legends? (Step-by-Step)

League of Legends, also known as LoL, is a popular online team game that has gained a huge number of fans over the years. But there are many reasons why you might want to remove the game at some point. It’s easy to get rid of League of Legends if you want to free up room on your computer or take a break from the game’s competitive grind. We’ll show you how to uninstall League of Legends on both Windows and MacOS in this detailed guide.

How to Uninstall League of Legends on All Devices

To uninstall League of Legends from all devices, follow these general steps.

Uninstalling League of Legends on Windows PC

Uninstalling League of Legends on a Windows PC involves accessing the Control Panel and removing both League of Legends and the Riot Client. Follow these steps:

  • Accessing the Control Panel: To begin the uninstallation process, go to the Start menu and type “Control Panel” in the search bar. Click on “Control Panel” or navigate to the settings and select “Apps” to access the list of installed programs.
  • Removing League of Legends and Riot Client: Scroll through the list of installed applications until you find “League of Legends.” Right-click on the icon and select “Uninstall.” A pop-up window for the Riot Client will appear, confirming that you want to uninstall the game. Click “Yes” to proceed with the uninstallation process.
  • Restarting Your Computer: After uninstalling League of Legends, it is recommended to restart your computer to ensure any temporary files are fully deleted.

Uninstalling League of Legends on MacOS

If you are using a Mac and want to uninstall League of Legends, follow these steps:

  • Navigating to the Application Folder: Press Command+Shift+G to open the “Go to Folder” window. Type “/Applications/” and click “Go” to access the Application folder.
  • Deleting League of Legends and Riot Client: Locate the League of Legends application in the Application folder and drag it to the Trash Can icon on your dock. Next, press Command+Shift+C to navigate to “MacintoshHD/Users/Shared/Riot Games.” Find the Riot Games folder and drag it to the Trash Can. To permanently delete the files, click on the Trash Can and select “Empty Trash” from the dropdown menu.
  • Restarting Your Computer: After emptying the Trash, it is recommended to restart your computer to ensure any temporary files are fully deleted.

Can I Reinstall League of Legends Without Uninstalling It First?

You can reinstall League of Legends without uninstalling it first. However, if you are experiencing issues with the game, such as bugs or performance problems, it is recommended to perform a clean reinstall by uninstalling the game before reinstalling it.

How to Reinstall League of Legends

Now that you know how to uninstall League of Legends, you should also be capable of reinstalling it. If you decide to reinstall League of Legends after uninstalling it, follow these steps:

  • Visiting the Official League of Legends Website: Open your web browser and go to the official League of Legends website at www.leagueoflegends.com.
  • Downloading the Riot Client: On the League of Legends website, navigate to the download section and click on the download link for the Riot Client. Follow the on-screen instructions to download and install the Riot Client on your computer.
  • Installing League of Legends: Once the Riot Client is installed, launch it and log in using your League of Legends account credentials. In the Riot Client, navigate to the League of Legends section and click on the “Install” button. Follow the prompts to install the game on your computer.

Also Read: Gaming PC Buying 101: What Every Gamer Needs to Know

In Closing

Uninstalling League of Legends can be a simple process if you follow the steps outlined in this guide. Whether you need to free up space on your computer or take a break from the game, knowing how to uninstall League of Legends is a viable option. Remember to back up your game settings, delete residual files, and restart your computer to ensure a thorough uninstallation. If you decide to reinstall the game in the future, you can easily do so by visiting the official League of Legends website and following the installation instructions.

FAQ

  • Will Uninstalling League of Legends Delete My Account?

No, uninstalling League of Legends will not delete your account. Your account information, including progress and purchases, is stored on the server and will remain intact even if you uninstall the game.

  • How Long Does It Take to Uninstall League of Legends?

The time it takes to uninstall League of Legends can vary depending on your computer’s processing speed and the size of the game files. Typically, the uninstallation process should only take a few minutes.

How to Get Trading Tokens in Clash Royale? (The Ultimate Guide)

Clash Royale is a famous strategy game made by Supercell. Players collect and level up cards with troops, spells, and defenses from Clash of Clans. One of the most important parts of the game is that players can use trade coins to trade cards with each other. This guide will tell you everything you need to know about how to get trading tokens in Clash Royale, including how to get them and how to use them well.

What are Trade Tokens in Clash Royale?

Trade tokens are specific items that players can use to trade cards with other players. They come in four different rarities: Common, Rare, Epic, and Legendary, corresponding to the different card rarities in the game. Each trade token allows players to trade a certain number of cards based on their rarity.

Different Types of Trade Tokens and Their Uses

In Clash Royale, there are four types of trade tokens, each with its own specific use:

  • Common Tokens: These tokens allow players to trade 250 common cards.
  • Rare Tokens: Rare tokens enable players to trade 50 rare cards.
  • Epic Tokens: Epic tokens enable players to trade 10 epic cards.
  • Legendary Tokens: Legendary tokens enable players to trade 1 legendary card.

How to Get Trading Tokens in Clash Royale (Step-by-Step)

There are several ways how to get trading tokens in Clash Royale. Let’s explore each method in detail:

  • Chest Rewards

Players can earn trade tokens as rewards from various chests, including Crown Chests, Clan War Chests, and Trophy Road Chests. The higher the chest’s rarity, the greater the chances of receiving a trade token as a reward.

  • Trophy Road

As players progress through the Trophy Road, they can unlock trade tokens as rewards at specific trophy milestones. These milestones are reached by accumulating trophies from ladder matches.

  • Shop Offers

The in-game shop periodically offers trade tokens as part of special deals or packages. Players can purchase these offers using gems or real currency.

  • Special Challenges

Supercell frequently introduces special challenges in Clash Royale that provide players with the opportunity to earn trade tokens as rewards. These challenges usually require players to complete certain objectives or win a specific number of matches.

How to Use Trade Tokens in Clash Royale?

To use a trade token in Clash Royale, follow these steps:

  • Initiating a Trade
  1. Go to the clan menu in Clash Royale.
  2. Tap on the “Request Card” button.
  3. Select the “Trade” option.
  4. Choose the card you want to receive in the trade.
  5. Select up to four cards that you are willing to offer in exchange.
  6. Initiate the trade and wait for other players to accept or decline the offer.
  • Participating in a Trade
  1. Check the clan chat for trade requests from other players.
  2. Review the cards they are offering and the card they want in return.
  3. Decide if you want to accept or decline the trade.
  4. If you accept the trade, the trade token and the selected card will be consumed, and you will receive the card you requested.
  • Cancelling a Trade
  1. If you change your mind or no longer want to proceed with a trade, you can cancel it.
  2. Cancelling a trade will return the trade token and the cards that were put up for trade to your account.

Strategies for Trading Efficiently in Clash Royale

To trade efficiently in Clash Royale, consider the following strategies:

  • Focus on Cards You Need: Prioritize trading for cards that you need to upgrade or complete your collection. Avoid trading for cards that are not useful to your playstyle or deck composition.
  • Communicate with Clan Members: Coordinate with your clan members to ensure mutually beneficial trades. Communicate your needs and be willing to help others in return.
  • Be Patient: Sometimes, it may take time to find the right trade partner. Don’t rush into trades unless you are confident it benefits your progress in the game.
  • Maximize Token Usage: Try to use your trade tokens regularly to avoid reaching the maximum limit. Unused trade tokens are wasted resources that could have been used to acquire valuable cards.

Also Read: How to Trade in Roblox? (The Full Guide in 2023)

In Closing

Knowing how to get trading tokens in Clash Royale is very important because they let players trade cards with other clan members and fill out their card collections. By using the methods and tips in this guide, you can get the most out of your trade tokens and make trades that are good for your game. Be sure to talk to your clan members, focus on the cards you need, and avoid making common mistakes when dealing. Have fun making trades in Clash Royale.

How to Crop in Illustrator (Ultimate Guide in 2024)

Illustrator is a strong piece of software for making graphics that lets you make stunning images. One of the most important things for an artist to know is how to crop images in Illustrator. Cropping a picture lets you cut out parts you don’t want, zoom in on certain details, or change the shape or size of an image. In this guide, we’ll go over all the different ways to crop pictures in Illustrator. This guide will give you the information and skills you need on how to crop in Illustrator.

How to Crop Images in Illustrator?

Cropping in Adobe Illustrator is slightly different from traditional image cropping in raster-based programs like Photoshop. Here’s how to do it:

Method 1: Using the Crop Tool

The Crop Tool in Illustrator is a quick and straightforward way to trim an image in a rectangular shape. Let’s walk through the step-by-step process of using the Crop Tool to crop an image.

  • Step 1: Open or Create a Document in Illustrator

To begin, open Adobe Illustrator and either create a new document or open an existing one. You can create a new document by clicking on “File” in the menu bar, selecting “New,” and choosing the desired settings for your document, such as size, orientation, and color mode. If you already have a document, open it by clicking on “File” and selecting “Open.”

  • Step 2: Place an Image in Illustrator

Next, you need to import the image you want to crop into Illustrator. To do this, click on “File” in the menu bar, select “Place,” and navigate to the location of the image on your computer. Select the image file and click “Place” to import it into your document. You can then click and drag to position the image within the document.

  • Step 3: Select the Image

Once the image is placed in the document, click on it to select it. You will see a bounding box around the image, indicating that it is selected and ready to be edited.

  • Step 4: Access the Crop Image Option

To access the Crop Image option, go to the Control Panel at the top of the screen. Look for the Crop Image button, which is represented by a square with diagonal lines inside. Click on the Crop Image button to activate the cropping functionality.

  • Step 5: Crop the Image

When you use the Crop Image function, a horizontal crop area box will appear on top of the image. To change how big and where the crop is, click and drag the handles of the crop area box. You can also hold down the Shift key while pulling to keep the crop’s proportions. Then hit the Apply button in the Control Panel to finish cropping.

Method 2: Using a Clipping Mask

Another method on how to crop in Illustrator is by using a Clipping Mask. This method allows you to crop an image into any shape or size you desire. Let’s dive into the step-by-step process of using a Clipping Mask to crop an image.

  • Step 1: Create a Shape

To begin, create the shape that you want to use as the cropping frame. You can use Illustrator’s shape tools, such as the Rectangle Tool, Ellipse Tool, or Polygon Tool, to create a shape. Select the desired shape tool from the toolbar, click and drag on the canvas to draw the shape, and adjust its size and position as needed.

  • Step 2: Place the Image and the Shape

Next, place the image you want to crop on top of the shape you created. To do this, click on “File” in the menu bar, select “Place,” and choose the image file from your computer. Position the image above the shape, making sure it covers the entire shape.

  • Step 3: Create a Clipping Mask

With both the image and the shape selected, right-click on the canvas and choose “Make Clipping Mask” from the context menu. Alternatively, you can go to the Object menu, select Clipping Mask, and choose Make. The image will be cropped according to the shape you created, revealing only the portion that overlaps with the shape.

Why Can’t I Crop My Image in Illustrator?

If you are unable to crop your image in Illustrator, ensure that you have selected both the image and the cropping tool or method correctly. For example, when using the Crop Tool, make sure the image is selected before accessing the Crop Image option. If you are using a Clipping Mask or an Opacity Mask, ensure that both the image and the mask shape are selected before creating the mask.

How do I Crop an Image Without Losing Quality in Illustrator?

To crop an image without losing quality in Illustrator, it is crucial to start with a high-resolution image. When cropping, make sure to maintain the aspect ratio or resize proportionally by holding down the Shift key while dragging the handles of the crop area. This helps preserve the image’s quality and prevents distortion. Additionally, saving a copy of the original image before cropping ensures you always have the original file if needed.

In Closing

Knowing how to crop in Illustrator is an essential skill for any designer. Cropping is a great way to improve your designs, whether you want to get rid of unwanted parts, focus on certain details, or fit a picture into a certain shape or size. If you follow the methods in this guide, you can crop images in Illustrator in a precise and creative way.

How to Print on Canva? (+Fix Common Printing Problems)

Canva is a powerful platform for graphic design that gives people and companies the tools they need to make beautiful visual content. Canva has become a popular choice for both newbies and professionals in the creative industry because it is easy to use and has a lot of design tools. In this complete guide, first, you will get familiar with Canva and then it will be time to learn how to print on Canva with simple and easy steps.

Why Should You Learn to Print on Canva?

If you want to be a designer or creative professional, learning how to print on Canva can help you get there and give you more chances. Printing your designs gives you a physical way to show off your work, whether it’s for your own use, to show it to clients, or even to sell it.

By learning how to print on Canva, you can make your ideas come to life and really enjoy them in real life. It gives your creativity a new level and lets you try out different ways to print, materials, and finishes. If you know how to print on Canva, your work will look more professional, whether you’re making signs, business cards, or invitations.

Step-by-Step Guide on How to Print on Canva

Now that you’re familiar with Canva’s interface, let’s get into the step-by-step process of printing your designs:

  • Prepare your design: Before printing, ensure that your design is properly optimized for print. Make sure the resolution is set to a suitable level (usually 300 DPI) and that the colors are in the CMYK color mode for accurate printing.
  • Choose the right paper: Selecting the right paper for your design is crucial. Consider factors such as thickness, texture, and finish to achieve the desired look and feel.
  • Set up your printer: Ensure that your printer is set up correctly and has sufficient ink and paper. Check the printer settings to match the paper size and type you’re using.
  • Print a test page: Before printing the final design, it’s always a good idea to print a test page. This allows you to check for any issues or adjustments needed before wasting valuable resources.
  • Print your design: Once you’re satisfied with the test print, proceed to print the final design. Ensure that the settings are correct, and carefully load the paper into the printer.
  • Inspect the print: After printing, carefully inspect the print for any errors or imperfections. Make any necessary adjustments and reprint if needed.

How to Fix Common Printing Problems in Canva?

Printing can sometimes be a challenging process, and you may encounter common issues along the way. Here are some troubleshooting tips to help you overcome these obstacles:

  • Blurred or pixelated prints: If your prints appear blurry or pixelated, it’s likely due to a low-resolution image. Ensure that your design elements are of high quality and set the resolution to 300 DPI.
  • Colors don’t match: If the colors on your printed design don’t match what you see on the screen, it could be because of a color mode mismatch. Make sure your design is in the CMYK color mode for accurate printing.
  • Paper jams: Paper jams can be frustrating, but they can be avoided by using the correct paper size and type, ensuring the paper is loaded correctly, and keeping the printer clean and well-maintained.
  • Ink smudging: To prevent ink smudging, allow your prints to dry completely before handling them. If the issue persists, check your printer settings to ensure the correct paper type is selected.
  • Uneven borders or cropping: If your prints have uneven borders or are cropped incorrectly, review your printer settings and ensure that the paper is properly aligned and centered.

How to Use Canva for the First Time?

Before you start printing, you should spend some time getting to know how to use Canva and its features. Canva has a variety of templates, fonts, images, and design features that you can use to make your own masterpieces. Here are some ways to start:

  • Create an account: Visit Canva’s website and sign up for a free account. You can also choose to upgrade to a paid plan for additional features and benefits.
  • Choose a template: Canva provides a wide selection of templates for various design categories. Browse through the options and select a template that suits your project.
  • Customize your design: Once you’ve chosen a template, you can start customizing it to fit your vision. Change the colors, fonts, and layout to make it truly unique.
  • Add your content: Whether it’s text, images, or graphics, Canva allows you to easily add and edit your content. Upload your own images or choose from Canva’s extensive library.
  • Save and export: Once you’re satisfied with your design, save it and export it in the desired format. Canva provides options for both digital and print formats.

In Summary

Learning how to print on Canva is a valuable skill that can take your designs to the next level. By understanding the printing process, troubleshooting common issues, and optimizing your designs for print, you can create professional-quality prints that showcase your creativity. Whether you’re printing for personal or professional purposes, Canva provides the tools and knowledge to improve your print quality.

How to Download Music from YouTube? (3 Working Ways)

YouTube has become a popular platform for streaming and discovering music. From official music videos to live performances and covers, YouTube offers a vast library of songs for users to enjoy. However, not everyone has access to a stable internet connection or wants to rely on streaming services. That’s where downloading music from YouTube comes in handy. In this guide, we will explore various methods on how to download music from YouTube on your computer, Android device, iPhone, and more.

How to Download Music from YouTube?

If you’re a music enthusiast who loves discovering new tracks or wants to enjoy your favorite songs offline, then learning how to download music from YouTube can be quite useful. 

Method 1: Using Online Video Converters

The first method in the process of how to download music from YouTube, is using online video converter. Online video converters are a popular choice for downloading music from YouTube. These web-based tools allow you to convert YouTube videos into audio files that can be downloaded to your device. Here are two reliable online video converters: Converto and YTmp3.

  • Step 1: Find the Music Video on YouTube

Start by finding the music video you want to download on YouTube. Copy the URL of the video from the address bar.

  • Step 2: Open the Online Video Converter

Open your web browser and visit either Converto or YTmp3. These websites offer a user-friendly interface and are free to use.

  • Step 3: Paste the YouTube Video URL

In the online video converter, you’ll find a text box where you can paste the YouTube video URL. Paste the URL and proceed to the next step.

  • Step 4: Choose the Audio Format

Once you’ve pasted the YouTube video URL, you’ll have the option to choose the audio format for the downloaded file. Select the desired format, such as MP3 or M4A.

  • Step 5: Start the Conversion and Download

After selecting the audio format, click on the “Convert” or “Start” button to initiate the conversion process. The online converter will process the video and generate a download link for the audio file.

  • Step 6: Download the Music

Once the conversion is complete, you’ll be provided with a download link. Click on the link to download the music file to your device. You can then transfer the downloaded music to your preferred media player or music library.

Method 2: Using Third-Party Software

If you prefer a more robust solution for downloading music from YouTube, you can consider using third-party software. These programs offer additional features and customization options. One popular software for downloading YouTube music is WinX YouTube Downloader.

  • Step 1: Install WinX YouTube Downloader

Visit the official website of WinX YouTube Downloader and download the installation file. Once downloaded, run the installer and follow the on-screen instructions to install the software on your computer.

  • Step 2: Copy the YouTube Video URL

Open YouTube in your web browser and find the music video you want to download. Copy the URL of the video from the address bar.

  • Step 3: Launch WinX YouTube Downloader

Launch WinX YouTube Downloader on your computer. You’ll see a user-friendly interface with a text box labeled “Enter URL.” Paste the YouTube video URL into this box.

  • Step 4: Choose the Output Format

In WinX YouTube Downloader, you have the option to choose the output format for the downloaded music. Select the desired audio format, such as MP3 or WAV.

  • Step 5: Start the Download

After selecting the output format, click on the “Download” button to start the download process. WinX YouTube Downloader will retrieve the video and convert it into an audio file in the chosen format.

  • Step 6: Access Your Downloaded Music

Once the download is complete, you can access your downloaded music by clicking on the “Finished” tab in WinX YouTube Downloader. From there, you can play the music or transfer it to your preferred music player or library.

Method 3: Using Mobile Apps (Android, IOS)

If you prefer to download music from YouTube on your Android or iOS device, there are several apps available that make the process easy. One popular app for Android is MP3 Juices, while Vidmate is a reliable option for both Android and iOS devices.

  • Step 1: Install the App

Search for the app in your device’s app store and install it. Ensure that you download the app from a trusted source to avoid any potential security risks.

  • Step 2: Copy the YouTube Video URL

Open the YouTube app on your device and find the music video you want to download. Tap on the share button and copy the video URL.

  • Step 3: Launch the App and Paste the URL

Launch the downloaded app on your device. Look for a text box or a dedicated section where you can paste the YouTube video URL. Paste the URL and proceed to the next step.

  • Step 4: Choose the Output Format

In the app, you’ll have the option to choose the output format for the downloaded music. Select the desired audio format, such as MP3 or M4A.

  • Step 5: Start the Download

After selecting the output format, tap on the “Download” or “Start” button to initiate the download process. The app will retrieve the video and convert it into an audio file in the chosen format.

  • Step 6: Access Your Downloaded Music

Once the download is complete, you can access your downloaded music within the app. Some apps may provide additional options for managing your downloaded music, such as creating playlists or transferring the files to your music library.

Downloading Music from YouTube: The Benefits

Let’s explore how to download music from YouTube in the first place. Here are a few reasons why it can be beneficial:

  • Offline Listening: By downloading music from YouTube, you can enjoy your favorite songs even when you’re offline or in areas with limited internet connectivity.
  • Avoiding Ads: YouTube is known for its ads, which can be disruptive and interrupt your music listening experience. Downloading music allows you to bypass these ads and enjoy uninterrupted playback.
  • Customization: Downloaded music can be easily organized and added to your personal music library. You can create playlists, edit metadata, and customize your listening experience.

Now that we understand the advantages of downloading music from YouTube, let’s explore the different methods available.

In Summary

the moment you learn how to download music from YouTube, you will never use any other method to access your favorite songs. We explored various methods, including online video converters, third-party software, and mobile apps, that allow you to download music from YouTube.

Each method offers its own advantages and options. Remember to follow copyright laws and use these methods responsibly. Now, you can create your own offline music library and enjoy your favorite tunes anytime, anywhere.

How to Trade in Roblox? (The Full Guide in 2024)

A variety of games and virtual experiences are available on the flourishing platform known as Roblox. The Roblox community has a thriving economy because of its large marketplace, which gives users the chance to collect and exchange a variety of in-game products. If you’ve ever wondered how to trade in Roblox, this guide will take you step-by-step through the procedure.

Trading in Roblox

Roblox’s trading system allows players to exchange in-game items with one another. This feature provides an exciting opportunity to acquire rare and valuable items that may not be available in the Avatar Shop. Trading in Roblox requires both parties to have a Roblox Premium Membership, which is a monthly subscription that offers various benefits beyond trading, such as monthly Robux allowances and access to exclusive items.

How to trade in Roblox?

To begin trading in Roblox, you’ll need to have a Roblox Premium Membership. This membership is a paid subscription that grants you access to exclusive features and bonuses.

Step 1: Roblox Premium Membership

There are three tiers of Premium Membership available: Premium 450, Premium 1000, and Premium 2200. Each tier offers a different monthly Robux allowance, with Premium 2200 providing the highest amount. However, even the lowest tier, Premium 450, allows you to trade in Roblox. To purchase a Premium Membership, follow these steps:

  • Visit the official Roblox website and log in to your account
  • Click on the three lines at the top-left corner of the page to open the menu.
  • Select “Get Premium” and choose your desired membership tier.
  • Follow the prompts to select your payment method and enter your payment details.
  • Complete the payment process and wait for your account to be upgraded to a Premium Membership.

Step 2: Enabling Trading on Your Account in Roblox

After obtaining a Roblox Premium Membership, you need to enable trading on your account. Without enabling this feature, you won’t be able to initiate or accept trades. Follow these steps to enable trading:

  • Log in to your Roblox account and navigate to the settings menu.
  • Click on the cogwheel icon at the top-right corner of the page to access your account settings.
  • Find the “Privacy” section and locate the trading option.
  • Enable trading and allow everyone to see your inventory.
  • Remove any account restrictions that might prevent trading.

Step 3: Sending and Accepting Friend Requests

In order to trade with another player, you need to be friends on Roblox. Sending and accepting friend requests is a crucial step before initiating a trade. Here’s how to send and accept friend requests:

  • Search for the player you want to trade with by entering their username in the search bar.
  • Open their profile and click on the “Add Friend” button.
  • Wait for the player to accept your friend request.
  • Once the friend request is accepted, you can proceed to initiate a trade.

Step 4: Initiating a Trade

In this step of learning how to trade in Roblox, you initiate a trade. To initiate a trade with a friend on Roblox, follow these steps:

  • Go to your friend’s profile page.
  • Click on the three dots in the upper right-hand corner of the section with their username and friends.
  • Select the “Trade Items” option from the drop-down menu.
  • A new menu will open, displaying the available items for trade from both inventories.

Step 5: Selecting Items to Trade

In the trade menu, you’ll see a list of items that you and your friend have available for trading. To select items for trade, follow these steps:

  • Review the items in both your inventory and your friend’s inventory.
  • Choose the items you want to trade from your inventory and add them to the “Your Offers” list.
  • Select the items you want to receive from your friend and add them to the “Your Request” list.
  • Ensure that the items you’ve selected are correct, as trades cannot be undone once completed.

Step 6: How to Include Robux in Your Trade Offer

If you wish to include Robux in your trade offer, you can do so by following these steps:

  • Determine the amount of Robux you want to include in your trade offer.
  • Enter the desired Robux amount in the appropriate field.
  • Keep in mind that there is a 30% transaction fee for including Robux in a trade offer.

Consider the value of the items you’re trading and the Robux amount you’re offering to ensure a fair trade.

Step 7: Confirming and Finalizing the Trade in Roblox

Once you’ve selected the items and, if applicable, included Robux in your trade offer, it’s time to confirm and finalize the trade. Follow these steps to complete the trade:

  • Review your trade offer to ensure all details are correct.
  • Click the “Make Offer” button to initiate the trade.
  • A confirmation pop-up will appear, asking you to confirm the trade.
  • Once you confirm the trade, the offer will be sent to the other player for their review and acceptance.
  • You will be notified once the other player accepts or declines the trade offer.

Trading on the Roblox Mobile App

Curious on how to trade in Roblox mobile app? Currently, trading in Roblox is not available on the mobile app. To trade, you must access Roblox through a web browser on a desktop or mobile device. If you need to trade on the go, you can use the browser on your mobile device and request the desktop version of the Roblox website.

Why Can’t I Trade in Roblox?

If you face any issues with trading on Roblox, consider these troubleshooting tips:

  • Ensure that both you and the player you want to trade with have a Roblox Premium Membership.
  • Check your account settings to ensure that trading is enabled.
  • Verify that you are friends with the player you want to trade with.
  • If trading is still not working, the other player may have trading disabled in their account settings.
  • If you’re using the Roblox mobile app, remember that trading is only available on the desktop version of the website.

In Closing

Now that you know how to trade in Roblox, trading in Roblox seems so easy. It is an exciting way to acquire unique items and expand your collection. By following the steps outlined in this guide, you can navigate the trading system with ease and engage in successful trades with your friends. Remember to have a Roblox Premium Membership, enable trading on your account, and ensure that you and the other player are friends on Roblox. With these considerations in mind, you’ll be well-equipped to dive into the bustling world of trading in Roblox.

Exit mobile version