We know that streaming platforms have totally changed how people watch their beloved TV shows, movies, and live events. YouTube TV, which is a top player in the streaming world, comes with loads of cool features that amp up your viewing experience. One of these cool features is the ability to record stuff you like, so you never miss out. Whether it’s a thrilling sports game, an awesome series, or a mind-blowing documentary, knowing how to record on YouTube TV will come handy in your project.
How Recording Works on YouTube TV?
YouTube TV gives you different ways to record, so you can pick what works best for you. One way is recording individual episodes of a TV series. This is awesome if you’re hooked on a show and don’t want to miss any episodes. YouTube TV will automatically record new episodes as they come out.
You can also record whole series. So, you don’t have to manually record every single episode. Once you say you want to record a series, YouTube TV will handle recording all the new episodes as they’re released. This is perfect for binge-watchers who want to keep up with their fave shows.
And guess what? You can even record movies! This way, you never miss the latest flicks. With the ability to record movies, you can build your own collection of films to enjoy whenever.
Step-by-step guide on How to Record on YouTube TV
Now that you know why recording on YouTube TV is great, let’s get into the details how to record on YouTube TV.
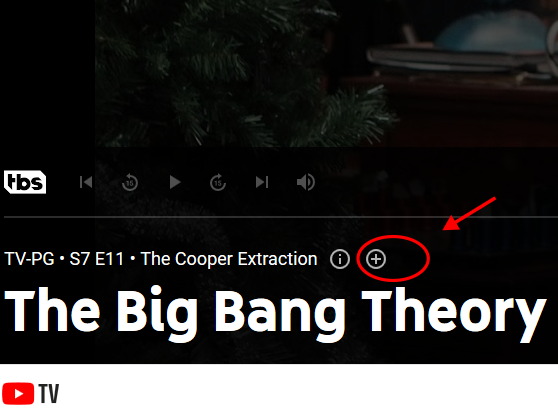
Open the YouTube TV App: First, fire up the YouTube TV app on your device or visit the website.
Find What You Want: Browse through the channels and find the show, event, or movie you want to record.
Hit Record: Once you’ve got what you want, hit the “Record” button. This adds it to your library for later.
Manage Your Stuff: To find your recorded content, go to the “Library” section in the YouTube TV app. From there, you can organize and watch your recordings.
By following these easy steps, you’ll be a YouTube TV recording pro in no time.
Recording Hacks for YouTube TV Like a Boss
It’s not enough just to learn how to record on YouTube TV. It isn’t just about clicking a button. You need to do better. With a few smart tricks, you can level up your YouTube TV recording game and get the most out of the features.
Use All That Storage: YouTube TV gives you unlimited cloud DVR storage. So, record away! Make the most of it and build a sweet collection of shows, movies, and events.
Keep It Neat: Keep your recorded stuff tidy. Regularly review and organize your recordings. Delete stuff you’ve watched to make room for new things.
Prioritize Your Picks: If you’ve got shows or events happening at the same time, set recording priorities. This way, you never miss out on what matters most.
By following these tricks, you can totally rock recording on YouTube TV and have a slick collection of content to enjoy.
Fixing Common Recording Issues on YouTube TV
Even though YouTube TV aims to make recording easy, sometimes things might not go smoothly. Here are some common problems and how to fix them:
Recording Fails: If a recording fails, check your internet connection and make sure your cloud DVR has enough space. Restarting the app or device might help too.
Lost Recordings: If you can’t find a recording, double-check that you selected the right show or event to record. Also, make sure you didn’t accidentally delete it.
Playback Problems: If you face issues like buffering or freezing, it could be your internet speed. You might need to tweak your network settings or try another device.
If you hit a snag while recording on YouTube TV, check the support info or contact customer service for help.
In Summary
Recording on YouTube TV is a big deal for streamers who want more freedom and ease of use. YouTube TV is better for recording than other video platforms because it has more ways to record, more advanced features, and unlimited storage. By using the tips and tricks in this piece and following the step-by-step guide, you can learn how to record on YouTube TV like a pro. So, grab some popcorn, kick back, and enjoy the freedom of being able to record your favorite YouTube TV shows and movies.
Learning how to mount a TV on the wall can give any room a cool and modern vibe in no time. It’s not just about saving space – it also makes your viewing experience super awesome. With the TV at your eye level, watching shows and movies becomes way more comfortable. Plus, no need for those big entertainment centers anymore – your room looks neat and tidy.
What You Need to Get Your TV on the Wall?
Before you start to take action on how to mount a TV on the wall, make sure you’ve got all the stuff you need. Here’s what you’ll want:
A wall mount: There are different types, like the fixed ones, tilting ones, and the full-motion ones. Pick what fits your TV and your style.
A stud finder: This handy tool helps you find the studs in your wall, which you need to securely put up the TV.
A drill and drill bits: You’re gonna need a drill to make holes for the mounting stuff.
A level: This is a must to make sure your TV sits nice and straight.
A screwdriver: Depending on the wall mount, you might need one to attach the bracket to the wall.
A measuring tape: Accurate measuring is key to finding the perfect spot for your TV and keeping it right in the middle.
Cable holders: To keep cable TV and wires tidy and out of sight, you might wanna get some of these.
How to Mount a TV on the Wall?
whether you’re a DIY enthusiast or simply looking for expert tips, get ready to learn how to mount a TV on the wall like a pro – no more compromises on style or comfort!
Picking the Right Wall Mount
Choosing the right wall mount is kind of a big deal. Here’s what to think on how to mount a TV on the wall:
VESA pattern: Check the back of your TV for the VESA pattern – it’s like the space between the mounting holes. Most TVs are standard, but check the manual or the maker’s site to be sure.
TV weight and size: Wall mounts are made to hold specific TV weights and sizes. So make sure your wall mount fits your TV.
Adjustability: Some mounts let your TV stay put, while others let you tilt or swivel it. Pick what you like!
Finding the Perfect Wall Spot for Your TV
Before you start hanging stuff, find the perfect spot for your TV. Keep these things in mind:
Height: Your TV should be at eye level when you’re sitting. Measure your seat height and hang the TV right there.
Viewing angle: Think about how it looks from different parts of the room. Make sure everyone gets a good view.
Light: Don’t put your TV where sunlight hits or where you see reflections. Glare can mess up your watching fun.
Wall: Find the studs in the wall – they’ll help hold your TV up nice and sturdy.
Getting Your Wall Ready
Don’t go drilling just yet. Prepare the wall first with these steps:
Clear up: Take down any art or stuff on the wall. Make it clean and ready for your TV.
Mark the studs: Use the stud finder to find where the studs are. Put a mark there with a pencil or tape.
Measure and mark: Measure how high and where you want the TV, then mark it on the wall.
Check for stuff: Look out for wires or pipes behind the wall. You don’t wanna drill into those.
Mounting Your TV Step by Step
Okay, now that you’ve got everything ready, let’s mount that TV!
Bracket time: Attach the mounting bracket to the back of your TV with the screws they gave you. Make sure it’s nice and tight.
Stud spot: Use the stud finder to find the studs again. Put marks where they are.
Hole drill: With the drill and the right bit, make holes where you marked the studs. These holes help you put the bracket up.
Bracket up: Line the bracket up with the holes and use screws to put it on the wall. Make sure it’s level and steady.
TV hang time: Get a friend to help you lift the TV and hang it on the bracket. Check that it’s nice and secure.
Hide the wires: Use those cable holders to keep the cables neat and hidden.
Test it: Give the TV a little nudge and pull to make sure it’s solid.
Keeping Those Wires in Check
Don’t fall into the trap if you think everything is done. This part is vital if you want to learn how to mount a TV on the wall. To make everything look super cool, you gotta hide those wires. Here’s how:
Cable cover: You can put a plastic or metal channel on the wall to hide the cables. It’s tidy and neat.
In-wall power: If your TV’s near an outlet, use an in-wall power kit. This hides the power cord inside the wall.
Cable clips: Stick these clips on the TV or wall to keep the cables in place and looking nice.
Go wireless: If you can, go for wireless. No cables, no fuss. You can do this with wireless HDMI or streaming gadgets.
How to Mount a TV on the Wall: Mistakes to Avoid
Mounting a TV isn’t too tough, but watch out for these blunders:
No stud: Always use a stud – that’s where the TV gets its strength from.
Wrong bracket size: Get a bracket that fits your TV’s weight and size. Don’t mess this up or you’ll risk breaking stuff.
Messy cables: Don’t let those cables hang around. Keep them neat for that modern look.
Rushing: Take your time and do it right. Rushing leads to mistakes.
In Closing
Wall-mounting your TV is a genius move to make your space modern and sleek. With the guide, tools, and patience, you’ll turn your wall into a cool TV display. Remember to pick the right wall mount, find the perfect spot, and get your wall ready. And don’t forget to hide those cables for the clean look you want. Add some decor and you’ve got a stylish room that’s ready for some serious TV time. Ready to make the change? Get that TV on the wall and enjoy the modern transformation in your home.
These days, using pictures to communicate and market things has become really trend. Whether you’re a blogger, a person who handles social media, or someone who runs a small business, making attention-grabbing pictures is really important. That’s where Canva comes in. Canva is an easy-to-use tool for making pictures, even if you’re not a designer. In this step-by-step guide, we’ll look at how to use Canva and give simple instructions on how to use it well.
Why Canva is Great for Making Pictures?
Canva is great because it’s easy to use. Unlike other design tools, Canva lets you drag and drop things, so it’s not hard to make cool pictures even if you’re just starting out.
Another good thing about Canva is that it works for lots of things. You can make pictures for social media, like Instagram or Facebook. You can also make graphics for presentations, like in school or at work. Canva has a lot of different templates you can use, so it’s easy to find the right one for what you’re doing. Plus, Canva lets you work with other people, which is helpful if you’re part of a team or a group.
Now that you know why Canva is cool, let’s see how to use Canva:
Get a Canva Account: First, go to Canva’s website and sign up for a free account. If you want more features, you can pay for a subscription, but you don’t have to.
Learn How Canva Works: After signing up, take some time to explore Canva. Look at the menus, tools, and options. This will help you understand how to use Canva better.
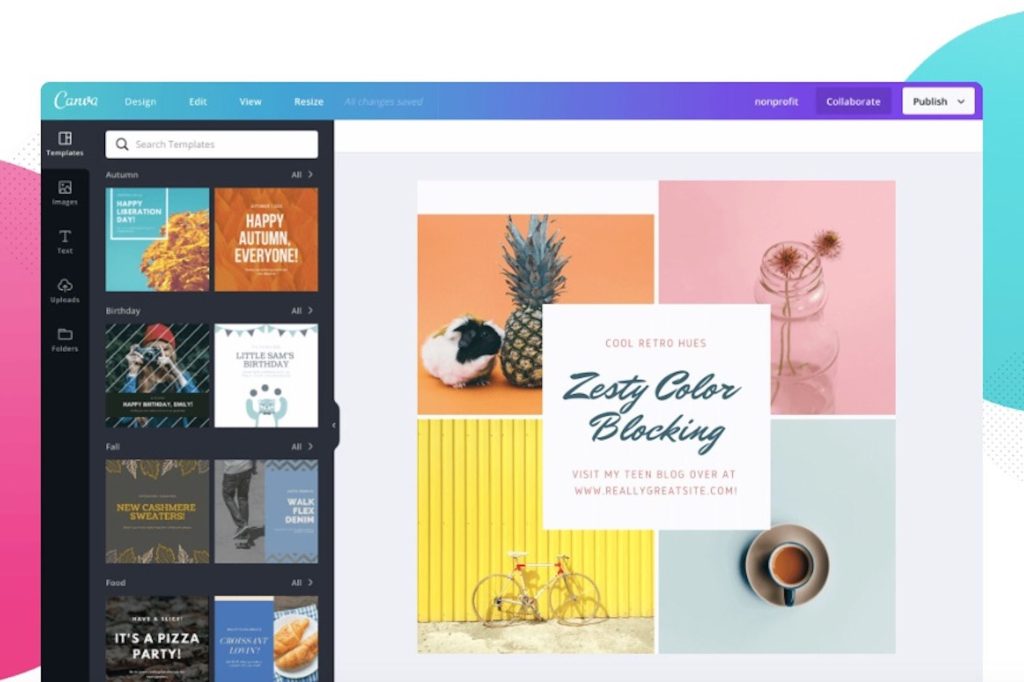
Pick a Design: Once you’re familiar on how to use Canva, choose a design that matches what you want to make. Canva has lots of designs for different things, like social media posts or flyers. Look around and find one that looks good to you.
Make It Your Own: After picking a design, change things to make it how you like. You can change the colors, fonts, and pictures to match what you want. Canva has an easy editor, so you can do this without any problems.
Add Your Stuff: Now, put in your own stuff. This can be text, pictures, or other things you want in your picture. Just drag and drop them onto your design and put them where you want.
Save and Share: When you’re done, save your design. Canva lets you save in different ways, like as a picture. You can also share your design on social media or let other people work on it with you.
More About Canva’s Design Tools
Let’s look at some things you can do with Canva’s tools to make your pictures even better.
Editing Text: Canva has lots of fonts, sizes, and colors for your text. You can make your text look different by changing these things. You can also make your text stand out with things like shadows or outlines.
Editing Images: If you have a picture, you can change it in Canva. You can make it smaller, bigger, or turn it around. Canva also has filters and special effects you can put on your pictures to make them look cool.
Graphics and Stuff: Canva has a bunch of graphics you can use in your designs. There are icons, shapes, illustrations, and stickers you can add to your pictures to make them more interesting.
Backgrounds and Templates: Canva has different backgrounds and templates to choose from. You can pick a plain color background or use your own picture. There are also templates for things like holidays or birthdays that you can use.
Working Together: Canva is great for working with others. You can invite people to help you with your design or share it with them to get their thoughts. You can also save your designs as templates to use later.
Choosing the Right Template: When you’re picking a template, think about what you want to make. Look at the colors and how things are laid out. Make sure it fits what you’re trying to do.
Making It Yours: Even though Canva gives you templates, you should make them your own. Change the colors and fonts to match your style or brand.
Trying New Things: Don’t be afraid to try new things in your template. Add or remove things, move text around, or use different colors. The goal is to make your design look interesting.
Keeping It Simple: When you’re using Canva templates, don’t make things too complicated. Use a few things, not too many. Stick to the same colors and fonts to make everything look nice and neat.
How to Remove Backgrounds in Canva?
If you want to take out the background from a picture, you can do it in Canva. Here’s how:
Put in Your Picture: First, put your picture in Canva. You can drag it in or upload it from your computer.
Use the Background Remover: Click on your picture and go to the “Effects” tab. Find the “Background Remover” effect and use it.
Adjust Your Picture: Canva will remove the background, but you might need to fix it. You can erase parts that shouldn’t be there or bring back parts that got removed. You can also change the size of the eraser to make it more precise.
Save Your Picture: When you’re happy with how it looks, save your picture. You can download it or use it in your Canva designs.
Tips for Using Canva Like a Pro
To get really good at using Canva, here are some tips to help you make awesome designs:
Use Grids and Lines: Canva has grids and lines to help you make things straight and neat. Use them to keep your design looking good.
Try Different Fonts: Canva has lots of fonts to choose from. Experiment with different ones to see which looks best for your design.
Use Colors that Go Together: Canva has color palettes that work well together. Pick colors from these palettes to make your design look nice.
Learn from Canva’s Design School: Canva has lessons and tutorials to help you get better at design. Check them out to learn new things.
Stay Updated: Canva adds new stuff to make it better. Keep up with these changes so you can use everything Canva has to offer.
In Summary
To sum up, Canva is a powerful technology tool for making great pictures. It doesn’t matter if you’re new to design or if you’ve done it before. Canva has lots of tools to help you make awesome designs. By following the steps in this guide, you can learn how to use Canva well and make pictures that people will love. So, why wait? Get started with Canva now and make your pictures look amazing.
In this digital age, social media has become an integral part of our lives. It allows us to connect with friends, family, and people from all over the world. However, there may come a time when you find yourself needing to learn how to unblock someone on Facebook. But why would you want to do that?
How to Unblock Someone on Facebook on mobile phones?
To unblock someone on Facebook using a mobile phone, follow these steps:
Open the Facebook app on your phone and tap the three horizontal lines in the bottom right corner.
Scroll down and tap “Settings & Privacy,” then tap “Settings.”
Scroll down and tap “Blocking” under the “Privacy” section.
Find the person you want to unblock in the list of blocked users and tap “Unblock” next to their name.
Confirm that you want to unblock the person by tapping “Unblock” again.
How to Unblock Someone on Facebook on Facebook desktop?
To unblock someone on Facebook using a desktop computer, follow these steps:
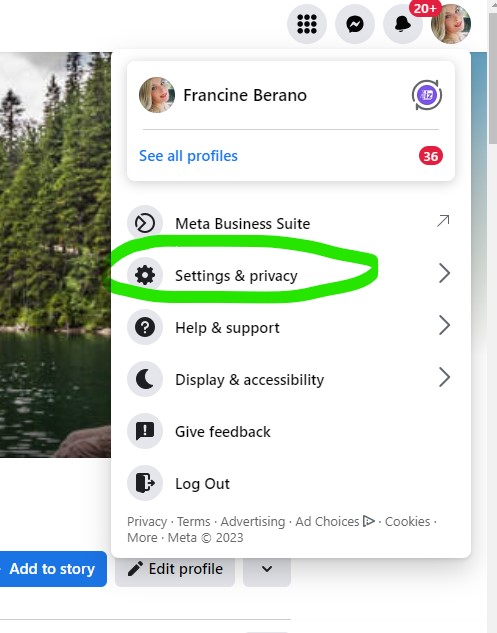
Click the downward arrow, or your profile photo in the top right corner of the page and select “Settings & Privacy,” then click “Settings.”
Click “Privacy” and then, Click “Blocking” in the left sidebar.
Find the person you want to unblock in the list of blocked users and click “Unblock” next to their name.
Confirm that you want to unblock the person by clicking “Confirm.”
Understanding the Consequences of Unblocking Someone
While unblocking someone can mend relationships, it’s vital to recognize its potential impact:
Stirring Old Emotions: By unblocking, you allow the return of content that could remind you of past conflicts. Emotional readiness to confront these memories is crucial.
Unwanted Contact: Unblocking reinstates their access to your profile, opening the door for unwanted messages. Prepare for such interactions and learn how to manage them effectively.
Rebuilding Trust: Unblocking signifies an attempt to rebuild trust. However, it’s essential to acknowledge that trust takes time to nurture, and challenges may arise during the process.
Tips for Maintaining Healthy Boundaries on Social media
Unblocking doesn’t imply discarding caution. Maintaining healthy boundaries is pivotal for a positive online experience. Here are pointers to aid you:
Intention Assessment: Reflect on your motives before unblocking. Ensure your reasons are genuine and positive.
Set Clear Limits: Communicate your boundaries to the unblocked individual. Make it known what type of contact is acceptable, and be ready to enforce these boundaries if needed.
Regular Reevaluation: Periodically assess the progress of the rekindled relationship. If negativity persists, reassess its value in your life.
How to Prevent the Need for Unblocking in the Future
Learning from past experiences can prevent future unblocks:
Thoughtful Blocking: Before blocking, consider alternative ways to address conflicts.
Effective Communication: Open dialogue can prevent issues from escalating to the point of blocking.
Establishing Boundaries: Clear boundaries set from the outset can minimize misunderstandings.
In Closing
Unblocking on Facebook can be a powerful way to rejuvenate connections and reconcile conflicts. By following the steps outlined in this article and maintaining healthy boundaries, you can navigate the world of social media with confidence and grace. Remember, forgiveness and understanding are key to moving forward and building healthier relationships both online and offline. So, embrace the secret to rekindling connections and unblock someone on Facebook like a pro.
FAQ
How do I find my blocked list on Facebook?
To find your blocked list on Facebook, follow these steps:
Open the Facebook app or go to the Facebook website and log in to your account.
Go to “Settings & Privacy,” then select “Settings.”
Click or tap “Blocking” in the left sidebar or under the “Privacy” section.
You will see a list of all the users you have blocked.
How many times can you block and unblock someone on Facebook?
There is no limit to how many times you can block and unblock someone on Facebook. However, keep in mind that blocking someone repeatedly can be considered harassment and may result in your account being suspended.
In the modern age we live in now, social media sites are an important part of our daily lives. One of these sites is Facebook, which has billions of people all over the world. Most people use Facebook to stay in touch with family and friends, but it also has a lot of other tools that can make your social life better. Tags is one of these features. In this piece, we’ll take you from someone who doesn’t know how to tag someone on Facebook to someone who does it all the time.
Understanding the Different Types of Tags on Facebook
Before we delve into the mechanics of tagging on Facebook, it’s crucial to grasp the various tag types. Firstly, there are tags in text-based posts. These manifest as clickable names that link to the person’s profile. Next, we have tags in photos.
Here, the tagged person’s name is displayed on the image and could be added to their “Photos of You” section. Lastly, we encounter tags in videos. Much like photo tags, video tags pinpoint individuals within the video. Being aware of these tag categories ensures that you use the right approach for different situations.
How to Tag Someone on Facebook
With a grasp of tagging’s significance and the tag variations, let’s get into the process on how to tag someone on Facebook
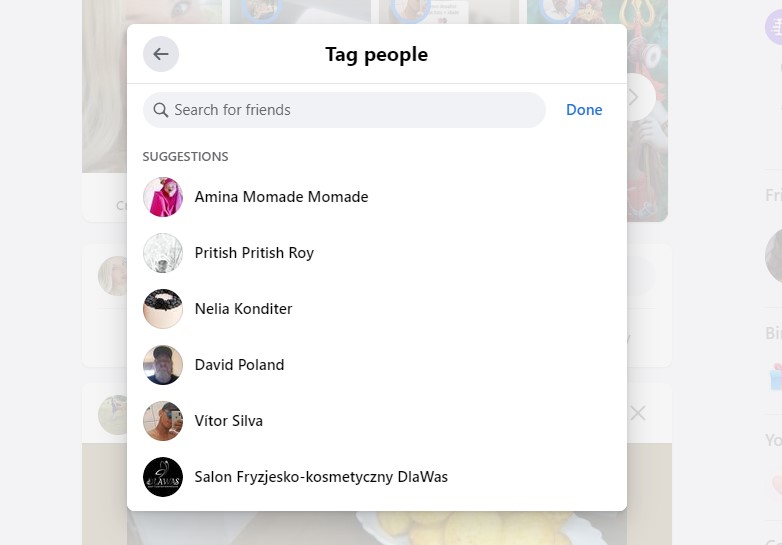
To begin, launch Facebook app or web and navigate to the post, photo, or video where tagging is in order. Look out for the tag icon, often a person silhouette or a small square with a plus sign.
Upon clicking, a text box appears.
Type the person’s name you want to tag and Facebook’s auto-suggest feature will display matching names.
Select the correct person from the list
And voila! Their name becomes a hyperlink in your post, photo, or video.
Tagging in Photos
Now if you’re asking yourself how do I tag people on Facebook post under a photo, then the next sentence is for you. Tagging in photos adds a delightful touch to memories and emphasizes someone’s presence in a specific moment. Here’s how to tag in photos:
Open the desired photo.
On the photo’s right side, you’ll spot “Tag Photo.”
Select it, and your cursor transforms into a crosshair.
Click on the person’s face or body, and a text box materializes.
Type the person’s name, let Facebook’s auto-suggest assist, and choose the accurate name.
Their name embeds as a tag on the photo, and you can repeat this for multiple individuals in the same picture.
Tagging in Videos
Tagging in videos mirrors the photo tagging process. Open the video, find “Tag Video” below the video player, and click it. A text box emerges where you type the person’s name. Facebook’s auto-suggest offers name suggestions. Pick the right person, and their name tags the video. Remember, only friends on Facebook can be tagged. Upon tagging, a notification reaches the tagged person, allowing them to interact with the video on their profile.
Why Tagging is Important on Facebook
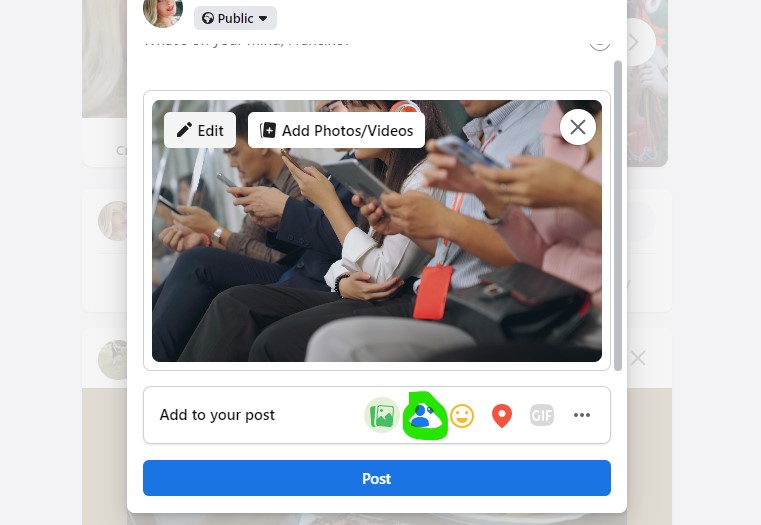
Tagging holds a powerful role on Facebook, allowing you to bring attention to people in your posts, photos, or videos. It’s a way of acknowledging others and involving them in your online activities. By tagging someone, you invite them to engage with a specific post or content, making it particularly handy for sharing updates, planning events, or showing gratitude. Additionally, tagging can broaden your reach as your post may appear on the tagged person’s timeline, reaching their friends and followers.
Tips for Effective Tagging on Facebook
Though tagging is straightforward, a few tips can make it more impactful. First, respect privacy settings. Ensure the person you tag is comfortable with the visibility of the post, photo, or video. Second, provide context in your tag. A brief description adds depth to the tag and prevents confusion. Lastly, use tagging judiciously. Excessive tagging can feel intrusive, so be selective and genuine in your tags.
Avoiding Common Tagging Mistakes
Tagging comes with a few pitfalls to sidestep. Firstly, avoid tagging people in irrelevant content. Ensure the tag fits the post to prevent confusion. Second, always seek consent before tagging. Respect privacy and ask permission before tagging someone. Lastly, go easy on mass tagging. While efficient, it can overwhelm everyone involved. Individual tags offer a more personal touch.
In Summary
Tagging holds the potential to enrich engagement, content sharing, and connections on Facebook. With an understanding of its importance and the diverse tag types, you can learn how to tag someone on Facebook. Follow the step-by-step tagging process and remember the tips and pitfalls to elevate your tagging experience. From friends to family to colleagues, tagging opens avenues for interactive and unforgettable online moments.
FAQ
Can you tag someone in a post after you post it?
Yes, you can tag someone in a post after it has been published. Simply click on the three dots in the top right corner of the post and select “Edit Post.” From there, follow the same steps as above to tag someone in the post.
How to mention everyone in a Facebook post
To mention everyone in a Facebook post, you can use the “@” symbol followed by the word “friends.” This will create a tag that includes all of your friends on Facebook. Keep in mind that this will only work if your post is set to be visible to your friends.
Why can’t I tag someone on Facebook?
If you’re unable to tag someone on Facebook, there could be several reasons why. First, make sure that you’re friends with the person you’re trying to tag. You can only tag your friends on Facebook. If you’re not friends with them, try sending them a friend request first.
Another reason why you might not be able to tag someone is if they’ve adjusted their privacy settings to prevent others from tagging them. In this case, there’s not much you can do other than respect their privacy and not tag them.
Discord has become the perfect place for gamers and communities to join and talk to each other, like a symphony of connections and conversations. It has a lot of different features and a lot of ways to customize them, which gives its customers a trip that is truly unique. Join us as we travel to find out why we need to learn how to do spoilers on Discord, the art of hiding text and images, the many benefits of doing so, and a look at how servers are made, where spoilers play in the creative field.
How to Do Spoilers on Discord
Spoilers on Discord can be done in two ways: to hide text messages and to hide images. Let’s explore how to do both.
How to Do Spoilers on Discord to Hide Text Messages
To hide text messages using spoilers on Discord, follow these steps:
Start your message with two vertical bars (||)
Type your message after the vertical bars
End your message with two more vertical bars (||)
For example, if you want to hide the message “I have a surprise for you!”, you would type ||I have a surprise for you!||. Once you send the message, it will appear as a spoiler, and your friends will have to click on it to reveal the hidden text.
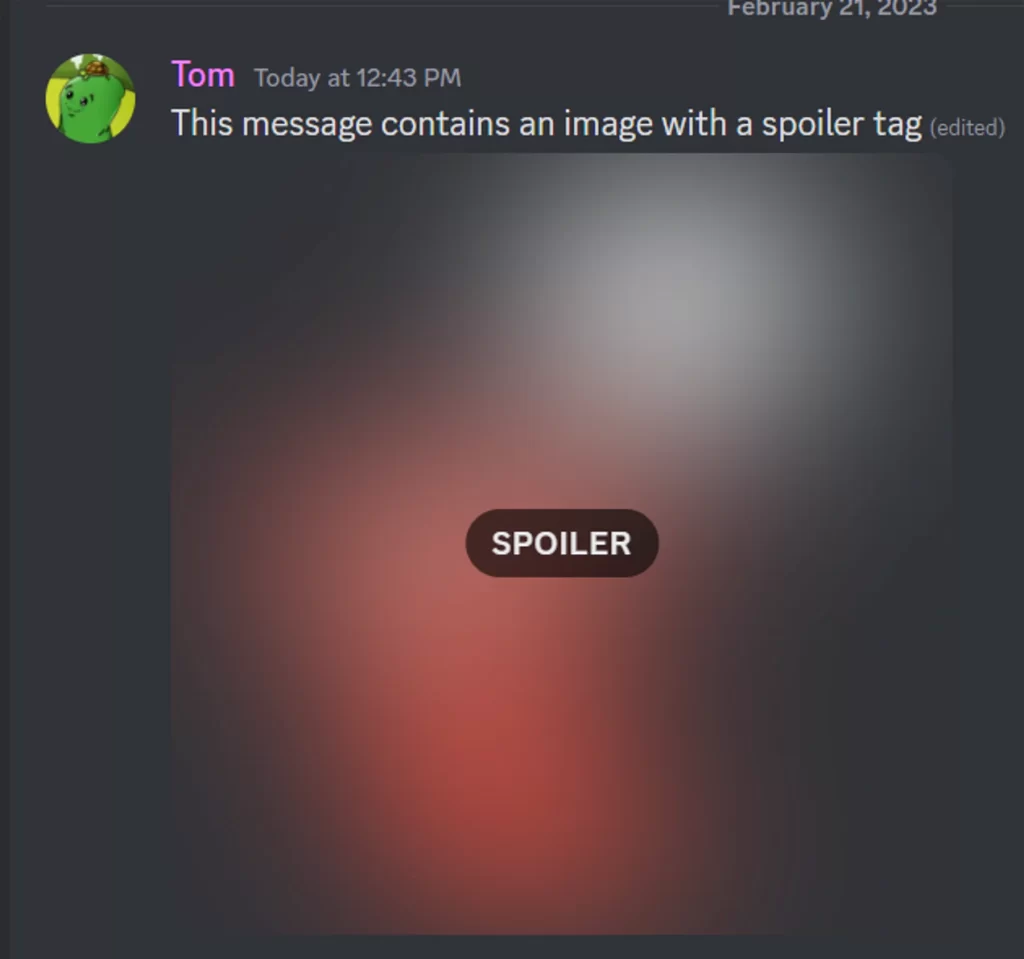
How to Do Spoilers on Discord to Hide Images?
To hide images using spoilers on Discord, follow these steps:
Click on the “+” icon in the text input field to open the media picker.
Select the image you want to send.
Before sending the image, click on the “Spoiler” button located at the bottom of the media picker.
By following these steps, the image will be sent as a spoiler, and your friends will have to click on it to view the image.
Why Use Spoilers on Discord?
The tapestry of Discord is like a complicated web. It is a place where gamers and groups can connect with each other. It combines three channels—voice, image, and text—and adds many extras that make the pilgrim’s experience more interesting. A hidden artist, the spoiler, comes out of this tapestry. It’s a messenger of surprise, a partner in suspense, and a spark that makes conversation more interesting.
Benefits of Using Spoilers on Discord
Using spoilers on Discord offers several benefits:
Preserve surprises
Spoilers allow you to keep surprises hidden until the right moment, creating a sense of anticipation and excitement.
Engage your friends
By using spoiler tags on Discord, you can turn conversations into interactive experiences, where your friends have to actively participate to reveal hidden information.
Create suspense
Spoilers can add a layer of suspense to your conversations, making them more intriguing and captivating.
Encourage exploration
When your friends see a spoiler, they are more likely to click on it and explore the hidden content, encouraging engagement and interaction. Spoilers can be a powerful tool to enhance your conversations on Discord and make them more enjoyable for everyone involved.
Popular Discord Servers that Use Spoilers Creatively
There are several Discord servers that use spoilers creatively to engage their members. Here are a few popular examples:
The Mystery Club
This server is dedicated to solving mysteries, and spoilers are used to reveal clues and hints to members. It creates an immersive experience where members have to work together to unravel the mysteries.
Game Night Central
This server organizes game nights and uses spoilers to hide game-related information, such as the chosen game, rules, and prizes. It adds an element of surprise and anticipation to the game nights.
Bookworms Unite
In this server, spoilers are used to discuss books without revealing important plot points. It allows members to engage in meaningful conversations about their favorite books while respecting each other’s reading experiences.
These are just a few examples of how spoilers can be used creatively on Discord. Explore different servers and see how they incorporate spoilers into their communities.
Learning how to do spoilers on Discord can be fun and exciting to use. Whether you want to keep secrets, create suspense, or engage your friends in a guessing game, spoilers can add an element of surprise to your conversations. By following the steps mentioned in this article, you can easily do spoilers on Discord to hide text messages and images. So go ahead and start using spoilers to keep your friends guessing and make your Discord experience even more enjoyable.
Snapchat has grown to be one of the most popular social media tools for interacting with friends and keeping up with each other’s lives. However, misunderstandings or conflicts can sometimes lead to Snapchat blocking. When you block someone on Snapchat, you can no longer send or receive messages, read each other’s stories, or see each other’s snaps. But what if you want to restart the relationship? In this article, we will look at how to unblock someone on Snapchat and offer advice on reconnecting and rekindling friendships.
Why should you unblock someone on Snapchat?
You may wish to unblock someone on Snapchat for a variety of reasons. Perhaps you had a disagreement with a close friend and now regret blocking them. Perhaps you’ve discovered that the problem that caused the blocking was a misunderstanding, and you’d like to clarify the air.
Perhaps you miss the connection you had with that person and wish to reestablish the friendship. Unblocking someone on Snapchat, for whatever reason, can be a step toward repairing relationships and cultivating a healthy social media presence.
How to Unblock Someone on Snapchat
In another step of how to unblock someone on Snapchat, unblocking someone on Snapchat is a straightforward process that can be completed in a few simple steps. Here’s how you unblock someone on Snapchat step by step.
How to Unblock Someone on Snapchat desktop?
If you want to unblock someone on Snapchat using the desktop version of the app, you can do so by following these steps:
Open the Snapchat app.
Click on your profile icon or your Bitmoji at the top of the screen.
Open “Settings” by clicking on the wheel icon.
Go to the “Blocked” list of contacts and tap “X” next to your contact’s name to unblock them1.
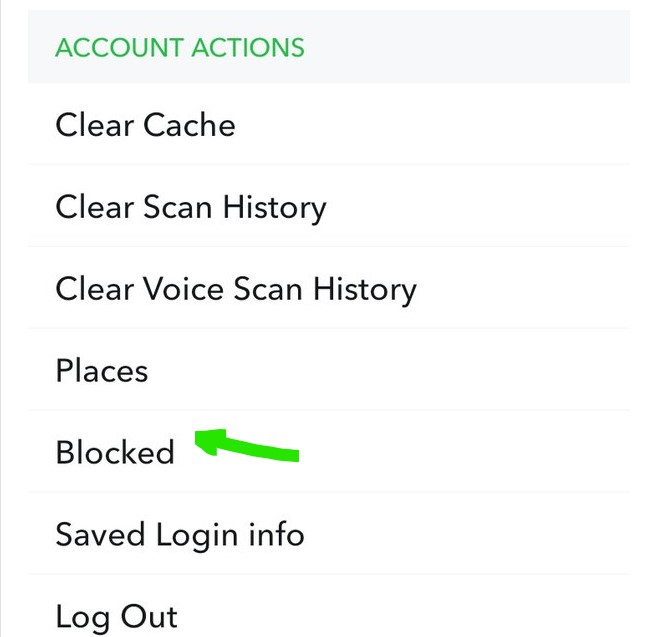
How to Unblock Someone on Snapchat on your phone? (Andriod and iPhone)
If you want to unblock someone on Snapchat using your Android or iPhone, you can do so by following these steps:
Open the Snapchat app on your phone.
Tap on your Bitmoji icon or username in the top left corner of the screen.
Now tap on the Settings icon (cog-wheel) in the top right corner of the screen.
Scroll down and select ‘Blocked’ from the ‘Account Actions’ section.
Click on the cross symbol next to the name of the user you want to unblock.
Once you’ve unblocked someone on Snapchat, they will be able to send you Snaps and Chats again. They will also be able to view your Stories and Charms. If you ever change your mind, you can always block them again.
After you follow these procedures, the person you unblocked will be able to send you snaps, messages, and read your stories once more. Remember that they will not be able to see any snaps or texts you sent while they were blocked.
How to Reconnect with Someone on Snapchat After Unblocking Them
Now that you’ve successfully unblocked someone on Snapchat, consider how you may reconnect and reestablish your friendship. Here are some pointers to assist you get through this:
Begin with a kind greeting
Send a pleasant message to the person after you’ve unblocked them to break the ice. Maintain a casual tone and avoid bringing up any previous disagreements or conflicts. “Hey, it’s been a while!” is all it takes. “How have you been?” can go a long way toward demonstrating that you are willing to restore the friendship.
Be understanding and compassionate
It is critical to approach the dialogue with empathy and understanding. Keep in mind that the person you unblocked may have reservations or fears about reconnecting with you. Allow them to express themselves and actively listen to what they have to say. Recognize any pain or misconceptions from the past and tell them that you are ready to move forward.
Plan a face-to-face meeting
If the person you unlocked is willing, propose meeting in person to catch up. Face-to-face contacts can frequently help to rebuild trust and enhance the bond. Choose a setting that is neutral and comfortable for both of you. Use this chance to have an open and honest discussion about what happened and how to proceed.
Remember that repairing a friendship takes time and effort on the part of both sides. Be patient, empathetic, and willing to work through any problems that may emerge. Also, if you’re having trouble adding someone on Snapchat, don’t miss out on this article Snapchat Search: How to Find and Add Someone in 2023?
Avoiding Common Mistakes When Unblocking Someone on Snapchat
While unblocking someone on Snapchat can be a positive step toward reuniting, there are a few common blunders to avoid to guarantee a smooth transition. Here are a few to remember:
Hastening the process
Allow time for both yourself and the person you unblocked to adjust and comprehend the situation. Rushing into a talk or expecting rapid results might strain the connection. Slow down and let the connection develop naturally.
Bringing up previous conflicts
It’s important to avoid bringing up prior arguments or concerns right away when reuniting with someone after unblocking them. Looking forward and focusing on the positive qualities of the friendship can assist in building a more inviting and inclusive environment.
Boundaries are not being respected
It’s critical to respect the unblocked person’s boundaries and level of comfort. Respect their preferences if they express a want for space or suggest that they are not ready to fully reconnect. Pushing too hard or neglecting their boundaries can endanger the relationship.
By avoiding these typical blunders, you can improve your chances of successfully mending the friendship and keeping a good Snapchat connection.
What to do if the Person You Unblock is not Interested in Reconnecting?
Despite your best efforts, the individual you unblock may be unwilling to reconnect and this is the matter of how to unblock someone on Snapchat issue. While this is disappointing, it is critical to respect their decision and manage the situation with grace. In this case, you can do the following steps:
Accept their choice
Recognize that everyone has the freedom to pick who they want in their life. If the person you unblocked displays an unwillingness to reconnect, accept their decision without attempting to persuade them otherwise. Respect their boundaries and provide them with the space they require.
Reflect on the experience
Use this moment to reflect on and learn from the event. Think about what caused the blocking, what you could have done differently, and how you can enhance future connections. Use this time for personal development and reflection.
Instead of concentrating on the circumstance, redirect your attention to other ties in your life. Make new relationships, strengthen current friendships, and devote time to activities that offer you delight. By cultivating additional relationships, you can build a supporting network that will assist you in moving forward.
Keep in mind that not every relationship is meant to be revived. Accept this fact and direct your attention toward positive and healthy friendships.
In conclusion
Now that you know how to unblock Someone on Snapchat, you understand Unblocking someone on Snapchat and rekindling friendships takes time, patience, understanding, and work. You can boost your chances of successfully reconnecting with someone by following the steps mentioned in this article and being aware of frequent pitfalls. Remember that not every relationship can be saved, and that’s okay. Maintain healthy Snapchat interactions and cultivate connections that provide optimism and joy into your life.
FAQ
Why can’t I unblock someone on snapchat?
If you’re wondering why you can’t unblock someone on Snapchat, it’s likely because that person has blocked you. When someone blocks you on Snapchat, they disappear from your contact list and you’re no longer able to see their Stories or send them Snaps. If you try to add a person who has blocked you, you’ll receive a message saying “Couldn’t add friend. They may have blocked you.”
There are a few other potential reasons why you might not be able to unblock someone on Snapchat. It’s possible that the person’s account has been deactivated or deleted. Or, if you’ve been blocking and unblocking each other repeatedly, Snapchat may have locked both of your accounts temporarily. In this case, you’ll need to wait 24 hours before trying to unblock the person again.
I unblock someone on snapchat and can’t find them
If you’ve unblocked someone on Snapchat and can’t find them, don’t worry! There are a few possible reasons for this.
First, it’s possible that the person you unblocked hasn’t added you back yet. If this is the case, you’ll need to wait until they do so before you’ll be able to see their snaps and messages again.
Another possibility is that the person you unblocked has changed their username since you last had them blocked. If this is the case, simply search for their new username in Snapchat’s search bar and you should be able to find them.
It’s possible that the person you unblocked has deleted their Snapchat account entirely. If this is the case, there’s unfortunately nothing you can do to find them again on Snapchat.
When you unblock someone on Snapchat do the messages delete?
When you unblock someone on Snapchat, any messages that you have sent to each other will be deleted. This includes any messages that were sent while you were both blocked and unblocked. If you want to save any messages before you unblock someone, you will need to take a screenshot of the conversation.
Can you see old chats after unblocking someone on Snapchat?
Once you unblock someone on Snapchat, you will not be able to view any messages that were sent while that person was blocked. However, you will still have access to any messages sent after you unblock them.
It is obvious TikTok is playing an important role in our social or business life. Also you’re probably familiar with Game streaming in TikTok, which has become very popular in recent years. It has become as a way for gamers to connect with their viewers and show off how good they are at gaming. TikTok has joined Twitch and YouTube, which have been around for a while. If you read this full guide until the end, you will learn how to stream games on TikTok. We will tell you how to set up your account, go live, and share your game sessions with people all over the world.
Getting Started: Setting Up Your TikTok Account
In order to start game streaming on TikTok, the first phase requires the creation of a TikTok account. If the user already has an account, they can move to the following section without completing this step. To create your TikTok account, stick to the following easy guidelines:
Customize your profile: After signing up, you’ll be prompted to customize your profile. Choose a unique username that reflects your gaming persona and add a profile picture that represents you. You can also write a catchy bio to introduce yourself to potential viewers.
Explore the app: Take some time to familiarize yourself with the TikTok app. Browse through the content on your page, follow other gamers, and engage with the TikTok community. This will give you a better understanding of the platform and help you discover popular gaming trends.
How to Go Live and Start Streaming Games on TikTok?
Once you have your TikTok account set up, you’re ready to start streaming games on the platform. Follow these steps to go live on TikTok and share your gaming sessions with your audience:
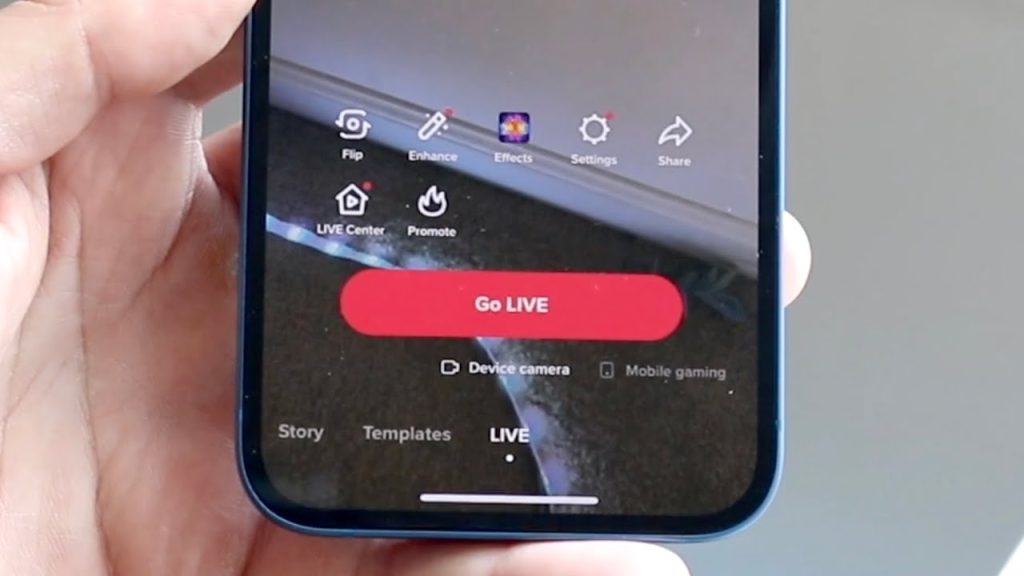
Launch the TikTok app: Open the TikTok app if you haven’t previously done so, and login in to your account.
Tune in via the live-streaming option: To make a new video, open TikTok and click the “+” button at the app’s bottom. The “Live” option can be accessed by swiping left on the bottom menu. Select it to start streaming in real time.
Modify the streaming preferences: You can adjust your streaming preferences before going live. Title your stream, allow or disallow comments, and choose whether to broadcast to everyone or just your friends.
Get the live broadcast started: If everything looks OK and you’re ready to go, hit the “Go Live” button. After TikTok’s countdown, you’ll start streaming your gameplay in real time to your viewers.
Take the time to interact with those watching your stream in real time by replying to their questions and comments. Your audience will feel more connected to you and more interested in what you have to say if you do this.
How to Stream Games on TikTok: Tips and Tricks
Streaming games on TikTok can be a fun and rewarding experience, but it’s important to keep a few tips and tricks in mind to maximize your success. Here are some strategies that can help you level up your game streaming on TikTok:
Be consistent: Building an audience on TikTok requires consistency. Try to stream games on a regular schedule and stick to it. This will help your audience know when to expect your streams and increase the chances of them tuning in.
Interact with your audience: TikTok is all about engagement. Take the time to interact with your viewers during your streams. Respond to their comments, ask for their opinions, and make them feel like they’re a part of your gaming journey.
Use popular hashtags: If you want to know how to stream games on TikTok, hashtags play a crucial role in discovering your content. Research popular gaming-related hashtags and use them in your video captions to increase visibility and reach a wider audience.
Create engaging content: TikTok is a platform that thrives on creativity and entertainment. Find unique ways to showcase your gaming skills and create content that stands out. Whether it’s through funny commentary, impressive plays, or informative tips, make sure your streams are engaging and enjoyable to watch.
How to Live Stream Mobile Games on TikTok?
Streaming mobile games on TikTok is a slightly different process compared to the guide on how to stream games on TikTok (streaming PC or console games). Here’s a step-by-step guide on how to live stream mobile games on TikTok:
Install a screen recording app: You’ll need a screen recording program that allows you to capture your gameplay to stream mobile games on TikTok. There are screen recording apps for iOS and Android smartphones, such as AZ Screen Recorder and Mobizen Screen Recorder.
Install screen-capture software: After you’ve chosen a screen recording app, install it on your smartphone by following the setup instructions. Check that the recording settings are set to capture both audio and video.
Open TikTok and go live: With your screen recording app set up, open TikTok and follow the steps mentioned earlier to go live. While you’re live, your screen recording app will capture your gameplay, and you can interact with your audience through TikTok’s live chat feature.
Share your gaming session: After you’ve finished streaming, you can edit the recorded video using TikTok’s video editing tools. Add captions, effects, and music to enhance your video and make it more engaging. Once you’re satisfied, tap on the “Post” button to share your gaming session with your followers.
Why Should You Stream Games on TikTok?
Before going into the technical details on how to stream games on TikTok, it is crucial to comprehend the rationale behind investing your time and energy into this platform. TikTok has rapidly emerged as a highly popular social media platform, reaching a global user base exceeding one billion active individuals.
Streaming games on TikTok offers the opportunity to access a substantial audience and expand your follower base. In addition, the algorithm used by TikTok has been designed to improve the visibility of attracting content, which allows for a greater number of views of your gaming streams. The platform’s focus on short-form videos is advantageous, as it enables quick capturing and sharing of thrilling moments from your gaming sessions.
TikTok presents exclusive possibilities for individuals, whether they are professional gamers seeking to establish their personal brand or casual players who get pleasure from sharing their gameplay. This platform allows users to connect with others who share similar interests and show their gaming prowess.
In closing
Streaming games on TikTok gives players a lot of ways to connect with their audience, show off their skills, and get noticed. TikTok is a great place for players to share their gaming sessions and build a loyal following. It has a large number of users, unique features, and a focus on short video content.
By following this step-by-step guide, users will get the information and tools they need to learn how to stream games on TikTok. This will improve their gaming experience and help them move forward in their gaming activities.
Streaming services have become a big part of our entertainment options in the modern world, giving us access to a wide range of products. One such popular streaming platform is HBO Max/TV, known for its exceptional content library. However, accessing this treasure trove of shows and movies requires a seamless sign-in process. In this guide, we will take a look into the difficulties of HBO Max/TV sign in activation, its importance, and step-by-step instructions to successfully activate HBO Max on your TV.
Why is HBO Max/TV Sign in Activation Important?
Before we get into the technicalities, let’s understand the significance of HBO Max/TV sign-in activation. In a world where convenience is key, this activation process is the gateway to a plethora of premium content.
Activating your HBO Max/TV sign in ensures a personalized viewing experience, curated recommendations, and the ability to resume watching across devices seamlessly. By linking your TV to your HBO Max account, you unlock a universe of entertainment tailored to your preferences.
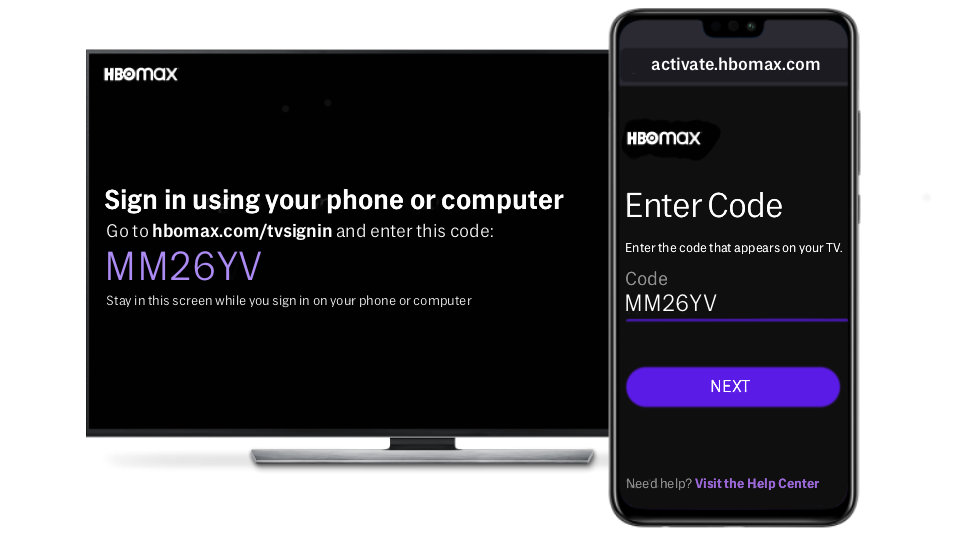
How to Activate HBO Max on Your TV?
Now that we’ve covered the importance of HBO Max/TV sign-in activation and tackled common issues, let’s walk through the activation process itself. Follow these steps to unlock a world of premium entertainment:
Prepare Your Devices
Ensure you have a compatible TV and a stable internet connection. You’ll also need a device (such as a smartphone or computer) to navigate to the activation page.
Access the Activation Page
On your chosen device, open a web browser and visit the official HBO Max activation page.
Sign in
If you’re not already signed in to your HBO Max account, you’ll need to do so at this stage. Enter your login credentials and proceed.
Activation Code
After signing in, the activation page will provide you with a unique activation code. Keep this code handy.
Enter the Code
Using your TV remote, navigate to the HBO Max app. You might need to download and install the app if you haven’t already. Once the app is open, you’ll be prompted to enter the activation code.
Successful Activation
If the activation code is entered correctly, your TV will be successfully linked to your HBO Max account. You can now start exploring the extensive content library.
Common Issues with HBO Max/TV Sign in
Despite the streamlined design of the HBO Max/TV sign-in process, users may encounter some common issues. These hurdles can range from minor glitches to more complex technical challenges. Let’s explore a few of them:
Forgotten Credentials
The most common issue users face is forgetting their HBO Max/TV sign-in credentials. It’s easy to overlook passwords, especially if you’re using multiple streaming platforms.
Device Compatibility
Another stumbling block is device compatibility. Some older TV models might not be compatible with the HBO Max app, leading to sign-in difficulties.
Network Connectivity
Unstable internet connections can also hinder the sign-in process, causing frustration and delays in accessing your favorite content.
Account Verification
Occasionally, users may face challenges during the account verification step, especially if the provided information does not match the records.
Troubleshooting HBO Max TV Sign in Not Working
If you find yourself dealing with HBO Max/TV sign-in not working issue, don’t worry as solutions are within reach. Here’s a step-by-step troubleshooting guide to help you get back on track:
Password Reset
If you’ve forgotten your password, simply click on the “Forgot Password” option on the sign-in page. Follow the prompts to reset your password and regain access.
Device Updates
Ensure that your TV’s firmware and the HBO Max app are up to date. Outdated software can lead to compatibility issues.
Network Check
Verify that your internet connection is stable. You can do this by connecting another device to the same network and checking for any connectivity issues.
Account Verification
Double-check the information you’re entering for account verification. Ensure that you’re using the correct email address and any other requested details.
App Reinstallation
If other methods fail, try uninstalling and reinstalling the HBO Max app on your TV. This can often resolve any glitches or bugs causing sign-in problems.
In closing
In a world inundated with entertainment choices, HBO Max/TV stands out as a premium streaming platform offering an impressive array of shows and movies. The key to unlocking this treasure trove lies in a seamless sign-in activation process.
We’ve explored the significance of HBO Max/TV sign-in, highlighted common issues users may face, provided troubleshooting techniques, and walked you through the step-by-step activation process.
Remember, while the process is designed to be smooth, occasional hiccups are not uncommon. By following the troubleshooting tips outlined in this guide, you can navigate sign-in challenges with ease and enjoy uninterrupted access to HBO Max/TV’s captivating content. Either you’re watching too much or checking up on the latest episodes, a simple sign-in process ensures that your entertainment journey is both fun and immersive.
Tradingview Desktop is an advanced system that has changed how traders study markets and make trades. It has become the best tool for users of all skill levels. Tradingview Desktop has everything a day trader, market trader, or long/short positions trader needs to make smart trading choices.
What is Tradingview?
Tradingview is a website for traders that is based in the cloud and has a lot of tools and features. It gives users access to market data in real time, lets them make and customize charts, and lets them look at securities on various markets. Tradingview Desktop is the desktop version of the platform. It has more features and options, making it an even more useful tool for traders.
Getting Started: How to Use TradingView Desktop
To begin using Tradingview Desktop, go to the Tradingview website and download the desktop version. Once installed, you may log in using your Tradingview account or create one if you don’t already have one. After logging in, you’ll have access to a variety of services and tools.
The first step is to become acquainted with the interface. Tradingview Desktop offers a simple and straightforward design, with several panels that may be adjusted to fit your needs. You can add or remove panels, resize them, and organize them however you want.
Following that, you may begin researching the various markets and assets available on Tradingview Desktop. You may look for certain stocks, currencies, or cryptocurrencies and examine real-time charts for them. You may also personalize the charts by adding technical indicators, drawing tools, and other features to help you analyze data.
Once you’ve identified a potential trade, you can execute it directly from the Tradingview Desktop platform. The platform integrates with various brokers, allowing you to place trades seamlessly without having to switch between different applications.
Using Tradingview Desktop for Technical Analysis
Tradingview Desktop is a powerful tool for performing technical analysis. This allows them to conduct detailed technical analysis and discover potential entry and exit points for their trades.
Tradingview Desktop also has a social trading feature, which allows users to engage with other traders, share ideas, and learn from one another. This collaborative environment develops a sense of community and can be especially useful for new traders wishing to learn from more experienced traders.
In addition to technical indicators, Tradingview Desktop offers a variety of drawing tools that allow traders to mark key levels of support and resistance, as well as draw trend lines and channels. These tools can be used to identify potential entry and exit points for trades, as well as to set stop-loss and take-profit levels.
Furthermore, Tradingview Desktop provides access to a vast library of trading ideas and strategies shared by other traders in the community. Traders can explore these ideas and adapt them to their own trading style, helping them to stay ahead of the curve and make more informed trading decisions.
Benefits of Using Tradingview Desktop
Tradingview Desktop stands apart from other systems by providing a number of useful features. First and foremost, it facilitates entry into a wide variety of financial markets and assets. Traders can spread their bets over multiple markets this way, increasing their potential for profit.
Another major advantage of Tradingview Desktop is its charting capabilities. Traders can create and customize charts with various technical indicators, drawing tools, and timeframes. This allows them to conduct detailed technical analysis and discover potential entry and exit points for their trades.
Tradingview Desktop also has a social trading feature, which allows users to engage with other traders, share ideas, and learn from one another. This collaborative environment develops a sense of community and can be especially useful for new traders wishing to learn from more experienced traders.
Tradingview Desktop vs. Other Trading Platforms
While there are several trading platforms available in the market, Tradingview Desktop stands out for its comprehensive set of features and user-friendly interface. Unlike many other platforms, it offers a wide range of markets and assets, allowing users to diversify their trading strategies.
Moreover, Tradingview Desktop’s charting capabilities are second to none. The platform provides a vast library of technical indicators and drawing tools, enabling traders to perform detailed technical analysis. This level of customization is not always available in other trading platforms.
Furthermore, Tradingview Desktop’s social trading feature sets it apart from other platforms. The ability to interact with other traders and share ideas can be immensely valuable, especially for beginner traders who are still learning the ropes.
Tradingview Desktop is undoubtedly the ultimate tool for successful traders. Its simple user interface, large feature set, and advanced charting capabilities make it a must-have platform. Also it’s best for rookie and experienced traders. Tradingview Desktop features everything you need to take your trading to the next level, whether you’re looking at charts, making trades, or working with other traders.