Best Ways to Fix SSD Not Showing Up in Windows 11

SSD is becoming more and more common because it works faster and is more reliable than regular hard drives. But one problem that a lot of people have is that the SSD doesn’t show up in Windows 11. This can be annoying because it keeps people from getting to their files and making the most of their SSD. This guide will look at the best ways to fix SSD not showing up in Windows 11 and give you great instructions on how to fix the problem.

How to Fix “SSD Not Showing Up” Error?

Before we talk about how to fix the problem, it’s important to know why the SSD might not be showing up in Windows 11. By finding the problem’s root cause, you can successfully deal with it and put in place the right solution. Here are a few common reasons:

  • Bad links between hardware: It is possible that the SSD is not properly connected to the motherboard or power source of your computer. The SSD might not be found if the wires are too loose or the connectors are broken.
  • Free disk space: The SSD might not show up in Windows 11 if it hasn’t been set up or divided up. Before the operating system can see unallocated drive space, it has to be formatted and given a name.
  • Assigning drive letters: Windows gives storage devices drive letters so that they can talk to each other. If the SSD doesn’t have a drive letter or has drive letters that don’t match, it might not show up in File Explorer or Disk Management.
  • Misconfigured BIOS settings: The SSD might not be recognized because the BIOS settings are not set up properly. This might happen if the SATA mode is set to IDE instead of AHCI, which might make the drive not work with other devices.
  • Out of date SSD drivers: Windows 11 might not be able to find an SSD if the drivers are out of date or don’t work with the SSD. It is very important to keep your SSD drivers up to date for the best speed and compatibility.

Now that we know what might be causing the SSD not showing up problem in Windows 11, let’s look at how to fix it.

Solution 1: Check Hardware Connections

The first step in troubleshooting the SSD not showing up issue is to ensure that the hardware connections are secure. Follow these steps to check the hardware connections:

  • Power off your computer and unplug the power cord
  • Find the SSD when you open the case of your computer.
  • Check the SATA data cable and power cable connections. Make sure they are securely connected to the SSD and the motherboard.
  • If possible, try using a different SATA cable and power cable to rule out any cable-related issues.
  • Close the computer case, plug in the power cord, and power on your computer.
  • Check if the SSD is now detected in Windows 11.

By verifying the hardware connections, you can eliminate any potential issues caused by loose cables or faulty connectors.

Solution 2: Initialize the SSD

If the SSD is new or has not been initialized, Windows 11 may not recognize it. Initializing the SSD will prepare it for use and allow Windows to detect it. Follow these steps to initialize the SSD:

  • Press the Windows key + R to open the Run dialog box.
  • Type “diskmgmt.msc” and press Enter to open the Disk Management utility.
  • In Disk Management, locate the SSD that is not showing up.
  • If the SSD appears as unallocated space, right-click on it and select “Initialize Disk.”
  • Select the appropriate disk initialization style (MBR or GPT) and click OK.
  • Right-click on the unallocated space and select “New Simple Volume.”
  • Follow the on-screen instructions to create a new partition on the SSD.

Once the initialization and partitioning process is complete, check if the SSD is now detected in Windows 11.

Initializing the SSD will prepare it for use by creating a partition and formatting it with a file system. This allows Windows to recognize and assign a drive letter to the SSD.

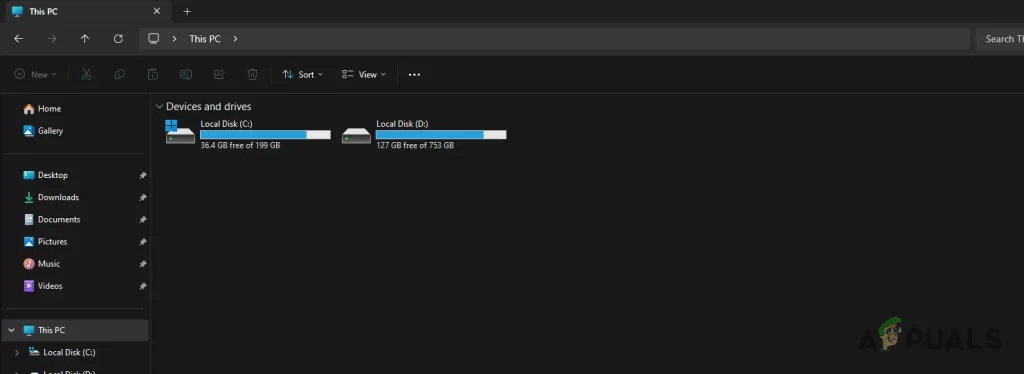
Solution 3: Assign or Change Drive Letter

If the SSD is not assigned a drive letter or has conflicting drive letters, it may not show up in File Explorer or Disk Management. Follow these steps to assign or change the drive letter:

  • Open Disk Management by pressing the Windows key + R, typing “diskmgmt.msc”, and pressing Enter.
  • Locate the SSD that is not showing up.
  • Right-click on the SSD’s partition and select “Change Drive Letter and Paths.”
  • If no drive letter is assigned, click “Add” and select a drive letter from the dropdown menu.
  • If a drive letter is already assigned but there is a conflict, click “Change” and select a different drive letter.
  • Click OK and check if the SSD is now visible in File Explorer.

Assigning or changing the drive letter ensures that Windows recognizes and communicates with the SSD properly.

Solution 4: Check BIOS Settings

Misconfigured BIOS settings can prevent Windows 11 from detecting the SSD. By adjusting the SATA mode, you can resolve compatibility issues and allow the SSD to be recognized. Here’s how to check the BIOS settings:

  • Restart your computer and enter the BIOS setup by pressing the designated key (e.g., Del, F2, or F10) during startup.
  • Navigate to the Storage or SATA Configuration section in the BIOS settings.
  • Locate the SATA Mode or SATA Configuration option and change it to AHCI.
  • Save the changes and exit the BIOS setup.
  • Once your computer restarts, check if the SSD is now detected in Windows 11.

Changing the SATA mode to AHCI ensures proper communication between the SSD and the operating system.

Solution 5: Update SSD Drivers

Outdated or incompatible SSD drivers can prevent Windows 11 from detecting the SSD. It’s important to keep your SSD drivers up to date to ensure optimal performance and compatibility. Here are the steps to update the SSD drivers:

  • Press the Windows key + X and select “Device Manager” from the menu.
  • Expand the “Disk drives” category to view the SSD.
  • Right-click on the SSD and select “Update driver.”
  • Choose the option to search automatically for updated driver software.
  • Windows will search for the latest driver for your SSD and install it if available.
  • Once the driver update is complete, restart your computer and check if the SSD is now recognized in Windows 11.

Updating the SSD drivers ensures that you have the latest software to support optimal performance and compatibility with Windows 11.

Solution 6: Seek Professional Help

If none of these work to fix the problem where the SSD doesn’t show up in Windows 11, it could mean there is a bigger issue. In this situation, it is best to get help from computer techs or people who specialize in data recovery. They know how to figure out what’s wrong and have the right tools to fix any hardware or software problems that might be stopping the SSD from being seen.

Professional data recovery services can also help get data back from SSDs that can’t be accessed or are destroyed. If your info is important and can’t be lost, you might want to get help from a professional.

In Summary

Having trouble with your SSD not showing up in Windows 11 can be annoying, but if you follow the right steps to fix the issue, you can get back to using your SSD. You can fix this problem and make sure your SSD works properly by checking the hardware connections, initializing the SSD, giving or changing the drive letter, checking the BIOS settings, updating the SSD drivers, or getting help from a professional.

To keep your SSD drivers and operating system from becoming incompatible, make sure to keep them both up to date. By following these steps, you can easily fix the problem where the SSD is not showing up in Windows 11.

WireGuard vs OpenVPN: Most Important Differences

Protecting your privacy and safety online has become very important in today’s digital world. Virtual Private Networks (VPNs) are very important for keeping our private information safe and letting us stay anonymous online. We will look at the main differences between WireGuard vs OpenVPN in this guide. We will talk about encryption, security, speed, availability, and more. After reading this, you’ll have a good idea of which VPN protocol fits your needs the best.

WireGuard vs OpenVPN: The Differences

Before exploring the technical nuances, let’s take a brief look at the origins and characteristics of each VPN protocol.

OpenVPN

OpenVPN, developed by James Yonan and released in 2001, has established itself as a reliable and secure open-source VPN protocol. Its flexibility, compatibility across various operating systems, and ability to bypass firewalls and Network Address Translators (NATs) have contributed to its widespread adoption.

WireGuard

WireGuard is a new VPN system that aims to be better than IPsec and OpenVPN by being faster, easier to use, and using less resources. WireGuard has a small script of about 4,000 lines and uses the latest encryption methods and cryptographic building blocks to make sure it works well and is safe. WireGuard was first made for the Linux kernel, but it now works on Windows, macOS, BSD, iOS, Android, and other systems.

Encryption: Comparing the Approaches

Encryption forms the bedrock of any VPN protocol, determining the level of security and privacy it can provide. WireGuard vs OpenVPN employ distinct approaches when it comes to encryption.

  • OpenVPN’s Flexible Algorithms

OpenVPN leverages the OpenSSL Library to offer a wide range of encryption algorithms, including Camellia, DES, Triple DES, Blowfish, and AES. This flexibility allows users to tailor their encryption settings according to their specific requirements. However, the variable algorithms employed by OpenVPN’s codebase may result in a slight speed reduction compared to WireGuard.

  • WireGuard’s Speed-Optimized Design

WireGuard, on the other hand, focuses on speed and efficiency by taking a more simple method to encryption. For security reasons, it uses encryption methods like Poly1305 and ChaCha20, which are much faster. WireGuard limits the encryption algorithms that can be used, but the ciphers that are used are very safe and have been through a lot of testing and development.

Security and Privacy Considerations

When entrusting our data to a VPN protocol, we must assess its commitment to security and privacy. Let’s explore how OpenVPN and WireGuard approach these crucial aspects.

  • OpenVPN’s No-Log Policy

The strict “no-log” approach of OpenVPN makes it stand out. This means that the protocol doesn’t collect or keep any information that could be used to find out who someone is. As a result, users can feel safer about their privacy and identity. Privacy is important to OpenVPN, as shown by numerous third-party audits and its long-standing name in the VPN community.

  • WireGuard’s Data Storage Approach

WireGuard and OpenVPN have some differences in how they handle privacy. WireGuard keeps users’ IP addresses on the computer until the system is restarted by default. Some users may be worried about this, but it’s important to remember that many VPN providers have built their own protocols on top of WireGuard to reduce or remove this data storage risk. Using features like Network Address Translation (NAT) or multi-hop setups can also help protect your privacy and lessen any problems that might arise.

VPN Client: User-Friendliness and Compatibility

The user experience offered by VPN clients can significantly impact the overall satisfaction and ease of use. Let’s compare the client applications provided by OpenVPN and WireGuard.

  • WireGuard’s Growing Compatibility

While WireGuard was still in its early stages, there was only a Linux program available. This used to be the case, but now WireGuard has apps just for Windows as well as clients for other major operating systems. These clients make it easy for users to set up VPN tunnels and copy or export data. Keep in mind that you might need management rights to do some things with the WireGuard client.

  • OpenVPN’s User-Friendly Approach

OpenVPN has had its main Windows client, OpenVPN Connect, for a long time. This client has an easy-to-use interface that makes it simple to add accounts and import connection information by URL or file upload. OpenVPN Connect is a stable and easy-to-use VPN client, but it might not have all the advanced features that WireGuard’s client does. Additionally, OpenVPN works well with many other programs and is built into trustworthy VPN services such as NordVPN, Surfshark, and hide.me.

Speed: WireGuard’s Performance Advantage

Speed is without a question an important thing to think about when looking at VPN protocols. Come with me as I compare the speeds of WireGuard and OpenVPN. WireGuard is famous for being very fast; in many tests, it regularly performs better than OpenVPN. WireGuard had great download speeds—often exceeding 277.9 Mbps—during our tests, while OpenVPN had trouble going above 30.64 Mbps.

Because it has less latency and faster throughput, WireGuard is a great choice for online games and other activities that need fast connections. It’s important to remember, though, that OpenVPN still offers fast and stable connections that make browsing the web smooth.

Availability: OpenVPN’s Wider Support

When picking a protocol, availability across VPN providers is one of the most important things to think about. OpenVPN is currently supported by more VPN services than WireGuard, which is slowly but surely becoming more popular. OpenVPN is used by a huge number of VPN providers because it has a long history of being the best system. More VPN services are likely to use WireGuard in the future as it continues to get better and show what it can do.

Our Recommendation: Choosing the Right Protocol

The choice between WireGuard and OpenVPN ultimately depends on your specific priorities and use cases. Let’s summarize the key considerations to help you make an informed decision.

  • WireGuard: Streamlined Performance

WireGuard works best when speed and efficiency are important. It’s perfect for home users who want a fast and responsive VPN because its codebase is efficient and its security methods are optimized. However, WireGuard may not be as good for workplaces or people who want to stick to a “no-log” policy because it is still in its “experimental” phase and needs management rights in its client.

  • OpenVPN: Time-Tested Reliability

OpenVPN is a safe and effective VPN service that has been around for a long time and is used by many people. With its wide range of devices and operating systems support, thorough testing, and strict “no-log” policy, it’s a great choice for people looking for a VPN protocol that they can trust. While OpenVPN may not be as fast as WireGuard, it offers stable and reliable performance.

Also Read: How to Change Netflix Region Without VPN? (Bypass Netflix Region Lock)

In Summary

WireGuard is a good choice for people who want to get online quickly, while OpenVPN is still a popular choice because it is reliable and protects your privacy. You can figure out which protocol is best for your VPN needs by looking at your individual needs and preferences.

With the information provided in this guide, you are now equipped to make an informed decision between WireGuard and OpenVPN. Choose the protocol that aligns with your priorities, whether it’s optimized speed or time-tested reliability, and enjoy a secure and private browsing experience.

Apple TV vs Apple TV+: What Are Their Differences?

Apple has made a name for itself in the world of streaming services with two unique products: Apple TV and Apple TV+. Even though these names sound alike, they stand for different parts of Apple’s move into digital entertainment. This post will go into detail about Apple TV vs Apple TV+ and highlight their differences. We will look at their features, content, pricing, and other things.

What is Apple TV?

The main thing that Apple TV is a digital video player and streaming device that was made by Apple Inc. It connects your TV to a lot of different types of digital material, like movies, TV shows, music, photos, and videos. From the comfort of their living rooms, Apple TV users can access a wide range of streaming services, apps, and online sites.

With an HDMI cable, Apple TV connects to your TV and uses your current Wi-Fi network to give you easy access to a wide range of streaming services. The gadget has changed over the years, adding things like app shops, gaming features, and voice-activated features through Siri integration. This flexible gadget makes watching TV more enjoyable by letting you watch digital content in the comfort of your own living room.

What is Apple TV+?

Now, Apple TV+ is a streaming service that you sign up for and pay for. What is the difference between Apple TV and Apple TV+? Apple TV+ is a service that works on its own. It offers many unique things, like TV shows, movies, films, and more. Apple thinks that Apple TV+ will give people with a lot of different devices access to content that is only available on Apple TV.

Apple TV+ is an over-the-top (OTT) streaming service that began in 2019. It lets people watch TV shows and movies online without having to pay for cable. The site has a library of original shows with a lot of different themes and for a lot of different types of people. Well-known actors, directors, and writers work together on Apple TV+ to make one-of-a-kind and interesting shows that focus on new ways to tell stories and high production standards.

Apple TV vs Apple TV+: The Differences

To understand the differences between Apple TV vs Apple TV+, it is necessary to learn the basic concepts behind each service. Apple TV refers to the hardware device developed by Apple Inc., while Apple TV+ is the subscription-based streaming service that offers exclusive original content.

Apple TV plays media and streams material from numerous streaming providers and apps. The device connects to your TV and lets you watch movies, TV, music, and more.

However, Apple TV+ is a separate streaming service that works without Apple TV. Apple’s original content gives users unique access to high-quality entertainment.

Apple TV+ is available on smartphones, tablets, smart TVs, and gaming consoles, letting customers watch their favorite shows and movies anywhere.

Content Offerings

Content-wise, Apple TV and Apple TV+ differ greatly. Apple TV lets customers stream Netflix, Hulu, HBO Max, and more. It centralizes your streaming needs, making it easy to find and watch content from multiple providers.

Apple TV+ features Apple-made programming. Apple TV+ customers can watch exclusive TV series, movies, documentaries, and more. Apple TV+ connects famous actors, directors, and producers to create immersive stories with a focus on quality and creativity.

Apple TV+ delivers original and exclusive content to hook viewers while Apple TV offers a huge library of material from many providers. Apple TV+ subscribers get a growing library of Apple-produced episodes and movies, creating a unique streaming experience.

Compatibility

Their device compatibility is another major difference between Apple TV and Apple TV+. Apple TV may be linked to your TV and accessible via iOS, macOS, Roku, Fire TV, Xbox, PlayStation, and other smart devices. It’s made for a wide range of users and ecosystem compatibility.

Apple TV plus streams on more devices. Apple TV+ is available on smartphones, tablets, Macs, streaming boxes, and smart TVs. Apple TV+ has been made available on many platforms to reach more people.

Apple TV and Apple TV+ work on a range of devices, so customers can watch their favorite shows and movies on their TV, smartphone, or tablet.

Pricing

There is a pricing structure difference between Apple TV and Apple TV+. Depending on the model and features you choose, the price of the Apple TV hardware device varies. Storage capacity and other features can affect how much an Apple TV costs.

A subscription is required to access Apple TV+. Access to the platform’s exclusive content is accessible to subscribers for a monthly subscription. Apple TV+ is now available for $7 per month, with cheaper yearly contracts now on the market. New members can try out Apple TV+ for free during the trial period to see if it meets their needs.

Apple TV does not cost anything, but Apple TV+ does. While Apple TV gives customers access to a plethora of streaming applications and services, some of the material on those platforms may necessitate paying for a separate subscription or purchase.

Features and Benefits: Apple TV vs Apple TV+

When considering the features and benefits of Apple TV and Apple TV+, it is essential to understand their unique offerings.

Apple TV, as a hardware device, provides a user-friendly interface for navigating through various streaming services and apps. It offers features such as app stores, gaming capabilities, and integration with Siri for voice-activated commands. With Apple TV, users can enhance their television experience by accessing a wide range of digital content from different providers.

On the other hand, Apple TV+ focuses on delivering exclusive and high-quality original content to subscribers. The service aims to captivate audiences with its unique storytelling and exceptional production values. With Apple TV+, subscribers gain access to a growing catalogue of Apple-produced shows and movies, providing a curated selection of content that sets it apart from other streaming services.

Both Apple TV and Apple TV+ offer features and benefits that cater to different aspects of the streaming experience. Whether you are looking for a versatile streaming device or exclusive original content, Apple has options to suit your preferences.

Comparing Apple TV vs Apple TV+: Which One Should You Choose?

Now that you know what makes Apple TV and Apple TV+ different, the question is: which one should you get? In the end, the answer rests on what you want and need.

Apple TV might be a good choice for you if you want to watch a lot of different types of material from different providers. It connects all of your streaming services together, so you can watch movies, TV shows, music, and more on your TV. Apple TV gives you a flexible viewing experience because it works with many devices and has an easy-to-use interface.

On the other hand, Apple TV+ might be a better choice if you want to watch only Apple-made shows and movies. Apple TV+ subscribers can watch a growing library of shows and movies made by Apple. This carefully chosen material is what makes Apple TV+ different from other streaming services. If you like the way Apple tells stories and makes movies, Apple TV+ can give you a unique and fun viewing experience.

if you choose Apple TV as your streaming device, you can still sign up for Apple TV+ to watch material that is only available on that service. You can enjoy a lot of different content from different companies while also watching Apple’s own shows with these two services working together.

FAQs

  • Can I watch Apple TV+ content on Apple TV?

Yes, Apple TV allows you to watch Apple TV+ content on your television. Simply connect your Apple TV device to your television and access the Apple TV+ app to enjoy exclusive Apple-produced shows and movies.

  • Do I need an Apple device to watch Apple TV or Apple TV+?

While Apple devices offer a seamless integration with Apple TV and Apple TV+, both services are accessible on various platforms. Apple TV can be accessed on devices such as Roku, Fire TV, Xbox, PlayStation, and many other smart devices. Similarly, Apple TV+ is available on smartphones, tablets, Mac computers, Apple TV streaming boxes, and select smart TVs.

  • Do I need to pay separately for content on Apple TV and Apple TV+?

Apple TV allows you to access various streaming services and apps, some of which may require separate purchases or subscriptions. Apple TV+ operates on a subscription-based model, requiring a monthly fee to access its exclusive content.

  • Can I try Apple TV+ before subscribing?

Yes, Apple TV+ offers a free trial period for new subscribers. This allows you to experience the service and explore its exclusive content before committing to a subscription.

In Summary

At the end of the day, Apple TV and Apple TV+ are two different parts of Apple’s move into digital entertainment. Apple TV is a flexible streaming device that lets you use a number of streaming services and apps on your TV. A subscription to Apple TV+, gives you access to material that is only available on that service. There are different features, material, and pricing plans for each service, so users can make their streaming experience fit their needs. If you want to stream, Apple has choices for you, whether you choose Apple TV, Apple TV+, or both.

How to Delete a Repost on TikTok (Step-By-Step)

TikTok, the popular social media platform, offers users the ability to repost videos, allowing them to share content with their followers. However, there may be instances where you want to delete a repost. Whether it was an accidental repost or you simply changed your mind, this guide will show you how to delete a repost on TikTok with the best way possible.

What is TikTok Repost and How Do You Use It?

When you repost a video on TikTok, it appears in your followers’ feeds as if it’s your own content. However, it’s important to note that deleting a repost does not remove the original video from the platform. It only removes your repost of that particular video.

You need to know how to share a video on TikTok before you can delete one. Reposting can be a good way to share information and interact with your audience. To share a video again, tap on the share icon, which is generally a right arrow. Here’s the next step: In the “Share To” box, choose “Repost.” Next, the video will be reposted to your profile, and it will appear in your followers’ feeds.

Reasons to Delete a Repost on TikTok

There could be several reasons why you might want to delete a repost on TikTok. Here are a few common scenarios:

  • Changing your mind: Sometimes, you may repost a video and later decide that you no longer want it on your profile.
  • Copyright concerns: If you reposted a video without giving proper credit to the original creator, you may receive a copyright warning and choose to delete the repost.
  • Accidental repost: The repost button on TikTok is located close to other sharing options, making it easy to tap unintentionally.
  • Disassociation: If you no longer want to endorse someone or a brand, deleting reposts associated with them can be a way to disassociate yourself.

How to Delete a Repost on TikTok?

Once you have located the reposted video, follow these steps to remove it from your account:

  • Open the video by tapping on it.
  • On the right side of the video, you will see a share icon (usually represented by a right-arrow). Tap on it.
  • In the “Share To” menu that appears, look for the option labeled “Remove Repost” and tap on it.
  • You should see a confirmation message at the top of the screen indicating that the repost has been successfully deleted.

Additional Methods to Find and Delete Reposts

If the reposted video doesn’t immediately appear in your profile or if you are having trouble finding it, here are a few additional methods you can try:

Method 1: Watch History

TikTok allows you to track your watch history for up to seven days. You can use this feature to find the reposted video you want to delete. Follow these steps:

  • Tap on your profile icon at the bottom of the screen.
  • Look for the three dots at the top corner of your screen and tap on them.
  • Select “Settings and Privacy” from the menu.
  • Choose “Comment and Watch History.”
  • Tap on “Watch History” to access the videos you have watched.
  • Look for the target video in your watch history.
  • Once you find it, follow the steps mentioned earlier to delete the repost.

Method 2: Ask a TikTok Friend

If you are still having trouble finding the reposted video, you can ask a TikTok friend to message the video to you if it’s in their feed. This way, you can easily locate the video and delete it from your account.

How to Turn Off TikTok Repost?

If you have had negative experiences with the repost feature or simply want to avoid accidentally reposting videos in the future, you can turn off the repost button. Here’s how:

  • Tap on your profile icon at the bottom of the screen.
  • Look for the three stacked lines at the top right and tap on them.
  • Select “Settings and Privacy” from the menu.
  • Choose “Notifications.”
  • Toggle off the option for video repost.
  • The repost button will no longer be visible on TikTok.
  • You can turn on the repost button again by following the same steps and toggling the option back on.

Also Read: Download TikTok Video Without Posting: On Android and iPhone)

Final Words

Deleting a repost on TikTok is a simple process that can be done in a few easy steps. Whether you accidentally reposted a video or simply changed your mind, following the instructions outlined in this guide will help you successfully remove the repost from your account. Remember to always give credit to the original creators and consider the reasons why you want to delete a repost. With these tips, you can effectively manage your TikTok feed and ensure a positive user experience.

How to Replace AirTag Battery [Step-By-Step]

Do you use an Apple AirTag? If so, you might be thinking about how to get a new battery when the old one dies. While Apple says that an AirTag’s battery should last about a year, it’s always smart to be safe than sorry. Today, we will show you how to replace AirTag battery in a quick way. This guide is simple to follow, no matter how tech-savvy you are or how new you are to it.

Why AirTag Batteries Need to be Changed?

Before we talk about how to replace the battery in AirTag, let’s talk about why it’s important to do so. The charge in your AirTag will run out on its own over time. You may notice that Bluetooth and UWB signal ranges get shorter as the battery level drops, and the Find My app’s precision finding feature may stop giving you correct distance information.

You may also get messages and alerts through the Find My app when your battery is low. It is suggested that you change the battery in your AirTag once a year to get the best performance and avoid any problems.

How to Replace AirTag Battery

If you want to safely change the battery in your AirTag, follow these steps:

Materials Needed

To replace the battery in your AirTag, you’ll need a few materials. Gather the following items before you begin:

  • A new CR2032 coin cell battery: This standard 3V lithium battery is commonly used in watches, remotes, and other small electronic devices. Make sure that you purchase an authentic battery from a reputable retailer.
  • A non-conductive pry tool: You’ll need a thin plastic pry bar or portable tool to safely open the AirTag casing. Avoid using metal tools, as they can damage the components.
  • A soft lint-free cloth: This will be used to clean the AirTag and remove any fingerprints or smudges on the surface.
  • Disposable gloves (optional): If you prefer, you can wear disposable gloves when handling used batteries to avoid skin exposure to battery acid.

Prepare the AirTag

Once you have these materials ready, we can proceed with the battery replacement process but before you begin the battery replacement process, remove the AirTag from any accessories it’s attached to, such as a keychain or luggage tag. This will give you direct access to the device.

Open the AirTag Casing

  • Locate the thin seam running along the edge of the AirTag casing. This seam is where you’ll pry open the casing.
  • Take your non-conductive pry tool and gently insert it into the seam gap. Slowly twist the tool to widen the gap.

Continue prying all the way around the perimeter of the AirTag until the plastic casing pops open. Be cautious not to use excessive force or bend the AirTag excessively.

Remove the Old Battery

Once the AirTag casing is open, you’ll see the old CR2032 battery inside. Gently lift the battery out of the holder, taking care not to damage any internal components. There are two options you can try if you come across a CR2032 battery that is treated in bitterant and might not work with AirTags:

  • Option 1: Look for a brand of battery known to be compatible with AirTags. Check the packaging for compatibility information.
  • Option 2: If you already have a bitterant-coated battery, you can slightly scratch off the coating using a sandpaper sheet. Ensure that the battery contacts are not damaged during this process.

Insert the New Battery

  • Check that the new battery you have is a CR2032 and that the positive side (marked “+”) is facing up.
  • Using disposable gloves (optional), carefully place the new battery into the holder, ensuring that it is firmly seated.
  • Double-check that the battery is properly aligned and securely in place. You should hear a click or chirping sound, indicating that the battery is recognized.

Reseal the AirTag

  • Align the front and back pieces of the AirTag casing.
  • Firmly press the casing shut with your hands, ensuring that it clicks back into place. Take care not to apply excessive force or damage the plastic casing.
  • Once the AirTag is resealed, reattach it to its accessory or item.

Test and Verify

  • Open the Find My app on your Apple device and check that the AirTag appears connected with a good battery level.
  • Navigate to the “Items” tab in the Find My app, select your AirTag, and look at the battery level indicator. If it shows a healthy battery level, the replacement was successful.

Final Words

You may easily and quickly replace the battery in your AirTag so that your item tag continues to function properly. You can save yourself the trouble of dealing with a dead battery by keeping an eye on the level and replacing it annually. With the correct equipment, care, and following our guide, you can simply learn how to change AirTag battery and continue to track your assets. Do the right thing when you throw away old batteries and keep them out of children’s reach.

How to Appear Offline on Xbox One/Series X/S in 2024

When you play games online, sometimes you just want to play by yourself, without friends or party invites getting in the way. Xbox has a tool that lets you look like you’re not online, so you can play games without anyone bothering you. This guide will show you how to appear offline on Xbox One, Xbox Series X, or Xbox Series S.

Why You Need to Appear Offline on Xbox One/Series X/S?

Before we get into the details of how to appear offline on Xbox, let’s explore why this feature is essential for many gamers. Appearing offline offers several benefits:

  • Privacy: Appearing offline allows you to maintain your privacy by concealing your online status from friends and other players.
  • Solo Gaming: Sometimes, you just want to enjoy a single-player game without any distractions or interruptions. Appearing offline ensures that you can focus on your gaming experience without any distractions.
  • Avoiding Invites: Appearing offline prevents you from receiving party chat or game invites, giving you the freedom to choose when and with whom you want to play.

Now that you understand the importance of appearing offline, let’s explore the step-by-step process for Xbox One, Xbox Series X, and Xbox Series S.

How to Appear Offline on Xbox One/Series X/S?

It has two ways, which we will talk about one at a time.

Method 1: Xbox Console

Xbox One
  • To appear offline on the Xbox One, follow these simple steps:
  • Sign into your Xbox account on the console.
  • Press the Home button twice or access the online/shortcuts panel.
  • Select the User Icon from the pop-up menu.
  • Choose “Shortcuts” and then “My Profile.”
  • Among the options presented, select “Appear Offline.
Xbox Series X/S

If you’re using an Xbox Series X or Xbox Series S, follow these steps to appear offline:

  • Access the Home Screen on your console.
  • Press the up arrow on the Xbox controller’s D-Pad to highlight your profile at the top of the page.
  • Select your Profile Picture.
  • Scroll down to find the “Appear Online” option.
  • Choose “Appear Offline” from the three available options (Appear Online, Appear Offline, and Do Not Disturb).
  • Exit the profile page to activate the offline status.

Method 2: Xbox Mobile App

If you prefer to manage your online status on the go, you can use the Xbox mobile app. Here’s how to appear offline on the mobile app:

  • Download and launch the Xbox mobile app on your smartphone.
  • Log in with the same credentials you use on your Xbox console.
  • Tap on your Profile Picture located at the bottom right side of the screen.
  • Select “Appear Offline” under the Profile Picture and Name.
  • Your Xbox status will change to “Offline.”

Who Can See Your Online Status? (Change It)

In addition to appearing offline, Xbox offers customization options for your online status. This allows you to control who can see your online presence and provides further privacy measures. Here’s how to customize your online status on Xbox One/Series X/S:

  • Press the Xbox button on your controller to open the quick menu.
  • Navigate to your profile, indicated by your gamer picture, and select it.
  • Click on “My Profile” to access your profile information.
  • On the right-hand side of the screen, you’ll see three options: Appear Offline, Customize Profile, and Privacy Settings.
  • Choose “Customize Profile” to access further customization options.

From here, you can adjust settings such as who can see your online status, what others can see on your profile, and your game/app history.

Additional Important Tips and Tricks

At this point, you undoubtedly have a decent understanding of the process of appearing offline on Xbox; however, it would be beneficial to acquire other recommendations.

  • Setting the Xbox to Offline vs. Appearing Offline: It’s important to know the difference between these two options. Friends won’t be able to tell that you’re online if you make it look like you’re not, but you can still play games and connect to Xbox services. However, if you set the Xbox to offline, it will no longer link to any Xbox services. Choose the right choice based on how private and useful you want it to be.
  • Privacy for Online Status: You can change your private settings to further control who can see that you are online. Go to Profile & System > Settings > Account > Privacy & online safety > Xbox Live privacy on your Xbox. Here, you can choose which people, including friends, can see if you’re online.
  • Making the Change Between Online and Offline: Just follow the steps above and choose the right choice based on your current preference if you want to change between looking online and offline.

In Closing

You now have the ability to take charge of your online presence on Xbox One, Xbox Series X, and Xbox Series S thanks to the guidelines and suggestions that are provided here. You can choose when you wish to socialize with your pals and enjoy uninterrupted gaming sessions. Don’t forget that if you appear offline, you will have the flexibility to play games on your own terms.

How to Add Grammarly to Google Docs (Step-By-Step)

Google Docs is a well-known word processor that lets users work together and save time. Google Docs does have a built-in spelling and grammar checker, but it might not catch all of your mistakes and make your work better overall. This is where Grammarly comes in handy. Grammarly is the best way to improve your writing in Google Docs because it has a strong AI writing assistant and full grammar and spell-checking features. We will show you how to add Grammarly to Google Docs in this post.

First Things First: Download Google Chrome

Make sure you have Google Chrome on your computer before we start walking you through how to add Grammarly to Google Docs. If you want to use Grammarly with Google Docs, you should use Google Chrome. In case you don’t already have Google Chrome, you can get it from the Google Chrome page for free.

How to Add Grammarly to Google Docs in Google Chrome

Once you have Google Chrome installed, follow these steps to add Grammarly to Google Docs:

  • Open Google Chrome and go to the Chrome Web Store.
  • In the search bar, type “Grammarly” and press Enter.
  • Click on the “Grammarly for Chrome” extension from the search results.
  • On the extension page, click the “Add to Chrome” button.
  • A dialog box will appear asking for confirmation to add the extension. Click “Add extension” to proceed.
  • Once the extension is installed, a new tab will open, prompting you to sign in or create a Grammarly account. Sign in with your existing account or create a new one.
  • After signing in, Grammarly will be accessible in your Chrome browser.

How to Enable Grammarly on Google Docs

To enable Grammarly in Google Docs, follow these simple steps:

  • Open Google Docs in your Google Chrome browser.
  • You can either start a new document or access an existing one.
  • In the toolbar at the top of the Google Docs interface, click on the “Extensions” option.
  • From the drop-down menu, select “Grammarly for Chrome”.
  • The Grammarly icon will appear in the bottom-right corner of the page.
  • Click on the Grammarly icon and toggle the “Check for writing suggestions on Google Docs” switch to enable Grammarly in Google Docs.

Now Grammarly is enabled and ready to help you enhance your writing in Google Docs. It’s time to explore how to use Grammarly effectively within Google Docs.

How to Use Grammarly in Google Docs

Grammarly offers various features to improve your writing in Google Docs. To get the most out of Grammarly, follow these steps:

  • While typing in Google Docs, Grammarly will underline words and phrases with red or blue lines to indicate potential errors or suggestions.
  • Hover over the underlined text to see Grammarly’s suggestion or correction. You can either accept the suggestion by clicking on it or dismiss it if you don’t agree.
  • Grammarly also displays an icon in the lower-right corner of the Google Docs interface. The icon provides an overview of the writing issues detected by Grammarly.
  • To access a more detailed list of suggestions, click on the Grammarly icon in the lower-right corner. This will open the Grammarly sidebar, where you can review and accept or reject specific suggestions.
  • Grammarly allows you to set goals for your writing, such as audience, formality, domain, and intent. Open the Grammarly sidebar and click on the target icon to modify these goals.

You can use Grammarly’s powerful writing help while working on your Google Docs projects if you follow these steps. But before we end, let’s answer some of the most common questions about how to add Grammarly to Google Docs.

In Summary

We showed you how to add Grammarly to Google Docs in this guide. You can get the most out of Grammarly’s spelling and spell-check features in Google Docs by following these steps. Make sure you add the Grammarly app to Google Chrome, turn on Grammarly in Google Docs, and use Grammarly’s features to improve your writing. When you use Grammarly, you can be sure that your papers are free of mistakes and of the highest standard.

FAQs

  • How Do I Connect Grammarly to Google Docs?

To connect Grammarly to Google Docs, you need to install the Grammarly extension for Google Chrome. After installing the extension, open Google Docs, click on the Extensions option in the toolbar, and select Grammarly for Chrome from the drop-down menu. Grammarly will then be enabled in Google Docs.

  • How Do You Fix Grammarly Not Working In Google Docs?
  1. If Grammarly is not working in Google Docs, there are a few troubleshooting steps you can try:
  2. Ensure that you have the Grammarly extension installed and enabled in Google Chrome.
  3. Check your internet connection to ensure it is stable.
  4. If you’re still experiencing issues, try logging out of Grammarly and logging back in or reinstalling the Grammarly extension.
  5. If the problem persists, you can reach out to Grammarly support for further assistance.

How to Clean a Mouse Pad (Different Kinds of Mouse Pads)

As an important piece of equipment for computer users, a mouse pad is used all the time and can quickly get dirty from our hands. Regularly cleaning your mouse pad not only keeps it looking good, but it also makes sure it works at its best. In this detailed guide, we’ll talk about the different kinds of mouse pads and show you how to clean a mouse pad in the best way possible.

How to Clean Different Kinds of Mouse Pads?

Mouse pads come in various materials, including fabric, hard-surface, leather, plastic, and metal. Each type requires specific cleaning methods to ensure proper maintenance.

Fabric Mouse Pads

Fabric mouse pads are commonly used and require a bit more effort to clean compared to other types. The fabric’s porous nature makes it prone to stains and debris buildup.

To clean a fabric mouse pad, follow these steps:

  • Fill a small tub or your kitchen sink with warm water.
  • Add a small amount of mild dish soap or shampoo to the water.
  • Submerge the mouse pad in the soapy water and let it soak for a few minutes.
  • Gently scrub the surface of the mouse pad using a soft brush to remove stains and debris. Avoid scrubbing too hard to prevent damage.
  • Rinse the mouse pad thoroughly under clean water until all soap residue is removed.
  • Shake off any excess water and lay the mouse pad flat on a towel to air dry. Ensure it is completely dry before using it again.

Hard-Surface Mouse Pads

Hard-surface mouse pads, made from materials like plastic or metal, are easier to clean due to their non-porous nature.

To clean a hard-surface mouse pad, follow these steps:

  • Spray a mild screen cleaner or rubbing alcohol onto a microfiber cloth.
  • Wipe the surface of the mouse pad thoroughly, applying gentle pressure where necessary.
  • For added disinfection, you can also use disinfectant wipes on the surface of the mouse pad.
  • Use a dry towel to wipe away any excess moisture.
  • Allow the mouse pad to air dry completely before using it again.

Leather Mouse Pads

Leather mouse pads require special care to prevent damage to the material. Avoid using water or harsh cleaning agents on leather mouse pads.

To clean a leather mouse pad, follow these steps:

  • Use a clean, dry cloth to wipe off any dust or debris from the surface of the mouse pad.
  • Apply a small amount of leather cleaner to a microfiber cloth.
  • Gently wipe the mouse pad with the cloth, taking care not to saturate the leather.
  • Follow the manufacturer’s instructions for drying time.
  • Once dry, buff the leather with a clean, dry cloth to restore its shine.

How Often Should You Clean Your Mouse Pad?

Cleaning your mouse pad on a regular basis is important to keep it clean and working well. You should clean your mouse pad once a month just to keep it in good shape. But first, you should know how to clean a mouse pad. If you spill something on it or see spots, you should clean it right away to keep the damage from getting worse.

The Best Cleaning Products for Mouse Pads

When it comes to cleaning your mouse pad, using gentle cleaning agents is key to avoiding damage. Here are some recommended cleaning products based on the type of mouse pad:

  • Fabric Mouse Pads: Mild dish soap or shampoo
  • Hard-Surface Mouse Pads: Screen cleaner or rubbing alcohol
  • Leather Mouse Pads: Leather cleaner (specifically designed for leather)
  • Ensure you have the necessary cleaning supplies on hand before beginning the cleaning process.

What Should I Do to Clean the Mouse Pad in the Best Way?

In addition to regular cleaning, here are some tips to help maintain a clean mouse pad:

  • Before you use the computer, wash your hands to keep grease and dirt from getting on the mouse pad.
  • Don’t eat or drink near your computer to keep the mouse pad from getting dirty.
  • Between cleanings, use a hand cleaner or compressed air to get rid of dust and other things that are on the mouse pad.
  • You might want to put a cover or mat over your mouse pad to keep it from coming into direct touch with oils and dirt.
  • If your mouse pad needs to be maintained in a certain way, follow the manufacturer’s directions.

Also Read: The Top 10 Gaming Laptops for Ultimate Performance and Immersion

In Closing

A clean mouse pad not only looks nice, but it’s also necessary to keep your mouse working at its best. Understanding the type of mouse pad you have and using the right cleaning methods will help you keep the surface clean and in good shape for your mouse. Remember to clean your mouse pad often, but be careful. Also, make sure you dry it the right way to keep it from getting damaged. If you follow these steps, your mouse pad will always be clean and smooth when you use your computer.

15 Questions to Ask When Buying a Used Car [Be a Pro]

Doing your research and asking the right questions are very important when buying a used car to make sure you get a good one at a good price. A used car is a good choice for people on a budget because its monthly payment is usually a lot less than that of a new car. But because you don’t know what happened to used cars in the past, it’s important to know what to look for and what questions to ask so you don’t get any nasty surprises down the road. In this guide, we will walk you through the essential questions to ask when buying a used car.

15 Questions to Ask When Buying a Used Car

Whether you’re purchasing from a dealer or a private seller, these questions will help you gather the necessary information to make an informed decision and find a reliable and financially smart option.

Why Are They Selling the Car?

One of the first questions you should ask is why the seller, including UsJunkCars, is parting ways with the car.. Their answer can provide valuable insight into the condition and history of the vehicle. While it could simply be that they want a new ride, it’s also possible that there are underlying issues with the car that they’re not disclosing. By understanding the seller’s motivation, you can better assess the car’s overall condition and determine if there are any red flags.

How Old is the Car?

You should know how old a car is before you buy it because of depreciation, which is when something like a car loses value over time. Cars lose a lot of value. In fact, most new cars lose 60% of their value in the first five years.1 Five years ago, a new car might have cost $25,000, but now it’s only worth about $10,000.

Before you go to the store or meet that person on Craigslist, make sure you do your research and find out how old the car is. Find out if the car’s value is still going to drop sharply or if most of the damage has already been done.

Could You Drive the Car First?

That’s enough about how the car looks. Now let’s check out how it feels. Taking a test drive is the best way to do that.

Pay close attention when you stop, change gears, and speed up while you’re test driving the car. It might be best to pass on that car and look in a different way if something doesn’t seem right. To get a good idea of how the car handles rough roads with hills, bumps, and potholes, choose a route that has some of those things.

What Did They Use the Car for Most of the Time?

Knowing how the previous owner used the car can give you an idea of its wear and tear. If the car was primarily used for long highway drives, it may have experienced less stress on its brakes and suspension compared to a car used for frequent city driving. Understanding the usage patterns can help you gauge the potential maintenance and repair needs of the vehicle.

What’s the Car’s Mileage?

The mileage of a car is a crucial factor to consider when buying used. The more a car has been driven, the more wear and tear it’s likely to have experienced. While you can typically find this information in the advertisement, it’s also worth asking the seller about their driving habits. Highway miles are generally considered less taxing on a car than city miles. By understanding the mileage and driving conditions, you can get a better sense of the car’s overall condition and potential maintenance needs.

How many People Have Owned it Before?

The number of previous owners can provide insights into the car’s history and maintenance. If a car has changed hands frequently, it may be challenging to obtain a comprehensive maintenance and repair history. Conversely, a single owner who has had the car for a long time is more likely to have taken good care of it. Understanding the ownership history can help you assess the overall reliability and condition of the vehicle.

Has the Car Ever Been in an Accident?

Accidents can significantly impact a car’s condition and value. While some accidents may not be deal-breakers, it’s important to know if there has been any damage to the vehicle’s frame or other critical components. Asking the seller about the car’s accident history is crucial, but it’s also wise to obtain a vehicle history report from reputable sources like Carfax or AutoCheck. These reports can provide detailed information about past accidents, repairs, and other important details that may impact your decision.

Could You Give me the VIN Number or the Report on the Car’s History?

A vehicle history report is an invaluable tool when buying a used car. It can reveal crucial information about the car’s past, including accidents, title information, service history, and ownership records. Many dealers offer free vehicle history reports from reputable providers like Carfax or AutoCheck.

If you’re buying from a private seller, you can purchase the report yourself to ensure you have access to accurate and comprehensive information. Obtaining a vehicle history report can help you make an informed decision and avoid potential headaches down the line.

How Was the Car Maintained and Serviced?

Regular maintenance is essential for a car’s longevity and performance. Ask the seller about the car’s maintenance history and where it was serviced. If the car was regularly serviced at a reputable dealership or by a certified mechanic, it’s a good indication that it has been well taken care of.

Additionally, inquire about any service records available. While some of this information may be included in the vehicle history report, it’s always beneficial to have direct information from the seller. A well-maintained car is more likely to be reliable and require fewer repairs in the future.

Can a Mechanic Inspect the Vehicle?

Before finalizing the purchase, it’s crucial to have the car inspected by a trusted mechanic. A pre-purchase inspection can uncover any underlying mechanical issues that may not be apparent to the untrained eye.

It’s best to choose a mechanic who is not affiliated with the seller to ensure an unbiased evaluation. If the seller refuses to allow an inspection, it’s a major red flag and may indicate hidden problems with the car. Investing in a pre-purchase inspection can save you from purchasing a vehicle with potential costly repairs.

Can I Inspect the Car’s Interior and Exterior?

To get a sense of the car’s overall state, you need to look at both the inside and outside. Check the inside for any signs of wear, like tears, spots, or strange smells. Check the outside for big dents, scratches, or rust spots that could mean the car has been in an accident or was fixed incorrectly in the past.

Open and close all the doors, the hood, and the trunk to make sure they work properly. Looking at the tires for damage or uneven wear is also important. A thorough look at the inside and outside of the car can help you figure out what might be wrong and help you make an informed choice.

What is the Car’s Title Status?

The title status of a car is an important consideration when buying a used vehicle. A clean title signifies that there are no outstanding legal or financial issues associated with the car. However, a salvage or rebuilt title indicates that the car has been previously damaged or declared a total loss.

While there are instances where buying a car with a salvage or rebuilt title can be a viable option, it’s essential to understand the associated risks and potential complications. Ask the seller about the car’s title status and verify the information through the vehicle history report.

How Does the Price Compare to its Value?

Determining the fair market value of the car is crucial to ensure you’re getting a good deal. Use reputable online pricing guides like Kelley Blue Book or Edmunds to compare the seller’s price with the car’s estimated value. Evaluate the vehicle based on its age, mileage, condition, and any extra amenities or upgrades. Armed with this information, you can negotiate a fair price and avoid overpaying for the vehicle.

Is the Price Negotiable?

Don’t be afraid to negotiate the price when buying a used car. Once you know everything you need to know about the car’s history, condition, and worth, you can use that information to get a better deal. When you’re negotiating, be polite but strong, and don’t be afraid to leave if the seller won’t accept the price you want. Keep in mind that there are many used cars out there, and it might take some time and effort to find the right one at the right price.

Also Read: How to Sell on Amazon Without Inventory (2024 Updated)

In Summary

Now that you know which questions to ask when buying a used car, you need to think about it carefully and do a lot of study. You can be sure you’re making a good investment and getting a reliable car by asking the right questions and gathering the right information. Take your time and be ready to leave if something doesn’t feel right. You can feel confident in the used car market and find a car that fits your needs and your budget if you work hard and pay attention to the little things. Have fun looking for a car!

What is Textverified and How Does It Work? (2024 Guide)

Online safety and privacy are top priorities. Cyber dangers and data breaches are increasing, therefore individuals and businesses are looking for solutions to protect their data. Account verification is essential for online security. This ensures only authorized users can access important data and services. In this guide, we will explore the features and benefits of Textverified, a leading provider of account verification services.

What is Textverified?

A lot of people use Textverified to check the validity of phone numbers online. It provides a safe and dependable way to check phone numbers for many reasons, such as creating an account, using two-factor authentication, and identity verification. By using Textverified, businesses and individuals can ensure the authenticity of their users, mitigating the risk of fraud and unauthorized access.

Textverified Features

Textverified simplifies the process of account verification by providing users with real US phone numbers that work with any service. Whether you need to verify your identity on a social media platform, mobile app, or any other online service, Textverified has you covered. Let’s explore some of the key features and functionalities of Textverified in more detail.

  • Huge Coverage

One of the key features of Textverified is its extensive coverage of phone numbers from different countries. This global reach enables businesses to verify phone numbers from around the world, making it ideal for international operations.

  • Voice

In some instances, account verifications may require a phone call for voice verification. Textverified understands this need and provides the option to select the “voice” option. By choosing this option, you can receive your verification code over the phone. Similar to SMS verification, you will only be charged if the call successfully connects.

  • Secure Subaccounts

Subaccounts let users select one account as a “Parent” and distribute credits to several “Child” accounts in Textverified. Employers with several account verification personnel will benefit from this capability. Track each account’s verification history with subaccounts. Textverified permits up to 5 subaccounts, but support can help you add more.

  • Flexibility with Area Codes

Textverified allows users to choose any area code listed in their dropdown menu. This feature provides flexibility and allows you to receive a phone number with a specific area code. You can find this filter under “Advanced Options” on the verification page.

  • Detailed Verification History

Textverified provides a complete verification history. This feature details all your verifications. The service name, phone number, verification code, pricing, and SMS/voice verification are displayed. To see if you can reuse a number, check the verification history.

  • Android App

Textverified offers a user-friendly Android app that allows you to conveniently access their services on your mobile device. The app provides a seamless experience for managing account verifications and accessing temporary phone numbers.

  • Easy Payments and Cryptocurrency Support

You can pay at TextVerified with any major credit or debit card. You can also use Ethereum, Bitcoin, and Tether among many other significant cryptocurrencies. Users will have a variety of choices for supporting their Textverified accounts thanks to this flexible payment structure.

  • Larger Verification Volumes and API Support

Textverified permits one verification at a time by default. If you need more verifications or faster processing, Textverified can boost your concurrent verification limitations. This upgrade benefits power users and API integrators of Textverified’s services. Textverified API integration is simple due to HTTP REST principles. Their API support team can help with any concerns.

  • 24/7 Tech Support

Textverified prioritizes providing excellent customer support. Their dedicated tech support team is available around the clock to answer your questions and assist with any issues that may arise within 24 hours. If you require a service that is not listed in their database, you can contact their team, and they will strive to add it to their offerings.

Textverified Alternatives

While Textverified is a powerful and reliable service, it’s always good to explore alternative options to suit different needs and preferences. Here are a few alternatives to Textverified that you can consider:

  • Twilio: Twilio is a popular cloud communications platform that offers phone number verification services. It provides a range of features, including SMS and voice verifications, and supports a wide variety of programming languages and platforms.
  • Nexmo: Nexmo is another trusted provider of phone number verification solutions. It offers a comprehensive set of APIs and tools for seamless integration, along with features like number insights and real-time analytics.
  • Sinch: Sinch is a global communications platform that offers phone number verification services through its robust API. It provides secure verification solutions, along with additional features like voice calling and messaging capabilities.
  • Plivo: Plivo is a cloud communication platform that helps organizations add voice and SMS to their apps. They provide APIs (Application Programming Interfaces) that let developers add phone calls, text messaging, and conference calls to their software or apps.
  • VerifyWithSMS: VerifyWithSMS is a service that specializes in providing disposable phone numbers for users to receive SMS verifications or OTPs (One-Time Passwords) from various websites and applications. This type of service is commonly used to verify accounts when users do not wish.

When choosing an alternative to Textverified, it’s important to consider factors such as pricing, available features, ease of integration, and customer support. Conduct thorough research and evaluate your specific requirements to make an informed decision.

How to Fund Textverified

To make use of Textverified’s services, you need to have sufficient funds in your account. Here’s a step-by-step guide on how to fund your Textverified account:

  • Create an account: If you don’t already have one, visit the Textverified website and sign up for an account. Finish the registration by providing the required details.
  • Navigate to the funding section: Once you have logged in to your Textverified account, navigate to the funding section. The dashboard or account settings are normally where you’ll find this.
  • Select a funding method: Textverified offers various funding methods, including credit/debit cards, cryptocurrencies, and online payment gateways. Select the option that best suits your needs.
  • Enter the funding amount: Specify the amount you wish to add to your Textverified account. Take into consideration the pricing structure and your expected usage to determine the appropriate funding amount.
  • Complete the transaction: Follow the prompts and provide the necessary details to complete the transaction. Please verify the details twice before moving on.

Remember Textverified accepts all major credit/debit cards for payments. Additionally, they support a variety of major cryptocurrencies, including Bitcoin, Litecoin, Ethereum, USD Coin, Monero, and Tether ERC20 and TRC20. This flexible payment system ensures that users have multiple options for funding their Textverified accounts.

How to Reuse a Number on Textverified

When you need to use the same number for several verifications at once, TextVerified gets it. The “Use Again” function was developed to meet this demand. To reuse a verification number within a minute or two after using it, just click the “Use again” button on the verification page. You can streamline your verification processes and save time with this tool.

In case you need to reach a number that you used a few hours ago and are unable to access it, Textverified provides the “Resurrect” option. To see if the number is still available on Textverified, go to your Verification History page and click the “Resurrect” option.

But once a number is removed from the platform, it can never be recovered. Textverified offers leasing alternatives for phone numbers if you need them for a longer period. Remember the website may charge you a credit of around 0.10 for each reuse or resurrect.

Textverified Card Declined, What to do?

If you face a situation where your card is declined while attempting to fund your Textverified account, don’t panic. If you want to figure out what’s wrong, try these steps:

  • Check card details: Verify that the card details you entered are correct, including the card number, expiry date, and CVV code. Even a small typo can result in a declined transaction.
  • Contact your bank: Reach out to your bank or card issuer to ensure that there are no issues or restrictions on your card. Sometimes, banks may impose security measures that prevent certain transactions.
  • Try an alternative payment method: If your card continues to be declined, consider using an alternative payment method. Textverified offers various funding options, such as cryptocurrencies and online payment gateways, which may work better for you.
  • Clear cache and cookies: Clearing your browser’s cache and cookies can help resolve any temporary issues that may be causing the card decline. Close the browser, clear the cache, and try the transaction again.
  • Contact Textverified support: If none of the above steps resolve the issue, reach out to Textverified’s customer support. They will be able to assist you further and provide guidance on how to proceed.

Remember that having your card denied is normal and can usually be fixed with a few easy steps. When you’re ready to fund your Textverified account, don’t worry. Just follow the debugging guide.

Also Read: Creative ways to collect customers’ phone numbers for future texting campaigns

In Summary

Textverified is a strong program that provides safe phone number verification services. You can get the most out of Textverified for your personal and business needs if you know how to use its features, look into other choices, pay for the service, reuse a number, and fix problems. Use this complete guide to make sure that the people you talk to online are real and that your conversations are safe.

Exit mobile version