How to Sell on Amazon Without Inventory (2024 Updated)

Many companies and businesses around the world have found that selling on Amazon is a good way to make money. However the old way of buying and keeping inventory can be expensive and time-consuming. Luckily, there are other ways to sell on Amazon that don’t require having actual items in stock. We will look at a lot of different strategies and methods in this detailed guide on how to sell on Amazon without inventory. No matter how much experience you have as a seller, this guide will help you make your business run more smoothly and make more money.

Understanding the Idea of Selling on Amazon Without Inventory

Selling on Amazon without inventory may sound paradoxical, but it is entirely possible and can be highly profitable. Listing items for sale on Amazon without actually having any in stock is a business plan that is sometimes called “Dropshipping.” The seller buys the item from a third-party supplier and ships it straight to the customer when a customer places an order.

People who sell things are mostly responsible for selling their items, taking orders, and giving great customer service. This idea gets rid of the need for upfront inventory prices and storage space, which makes it appealing to people who want to start their own business.

Benefits of Selling on Amazon Without Inventory

Selling on Amazon without inventory has several benefits that can be attractive to entrepreneurs looking to start an e-commerce business:

  • Low startup costs: Selling without inventory eliminates the need for significant upfront capital investment, making it accessible for entrepreneurs with limited funds.
  • Minimal operational overhead: Without the need for inventory management and storage, sellers can focus on other aspects of their business, such as marketing and customer service.
  • Wide product variety: Selling without inventory allows sellers to offer a diverse range of products without the limitations of physical storage space.
  • Flexibility: Sellers can easily add or remove products from their listings, allowing them to adapt to market trends and customer demands.

Different Methods to Sell on Amazon Without Inventory

There are several methods available to sell on Amazon without maintaining your own inventory. Let’s explore four popular options:

1. Dropshipping

Dropshipping is a business model where the seller doesn’t hold any inventory. They work with a third-party seller instead, who keeps the goods in stock. When a customer makes an order, the seller tells the supplier about it. The supplier then ships the item straight to the customer. Dropshipping has low start-up costs and lets sellers focus on customer service and marketing. But suppliers need to be carefully chosen and watched over to make sure products are delivered on time and in good condition.

2. Fulfillment by Amazon (FBA)

Fulfillment by Amazon (FBA) is a program offered by Amazon that provides end-to-end fulfillment services. Sellers send their products to Amazon’s fulfillment centers, where they are stored, packed, and shipped to customers on the seller’s behalf. FBA offers the advantage of leveraging Amazon’s extensive logistics network, including fast shipping options like Amazon Prime. However, sellers must factor in storage and fulfillment fees when calculating their profitability.

3. Fulfillment by Merchant (FBM) + Third-Party Logistics (3PL)

Fulfillment by Amazon (FBA) is a program offered by Amazon that provides end-to-end fulfillment services. Amazon Sellers send their goods to Amazon’s fulfillment centers, which keep, pack, and ship the goods to customers on their behalf. With FBA, you can use Amazon’s huge logistics network, which includes fast shipping choices like Amazon Prime. But buyers need to think about storage and shipping costs when they figure out how much money they can make.

4. Selling Digital Products

You can also sell digital goods on Amazon if you don’t have any physical items to sell. Digital goods, like eBooks, software, or digital art, can be sent online and don’t need to be stored physically. Amazon’s platform lets sellers make and sell digital goods straight to customers all over the world. Amazon also has programs like Merch by Amazon that let buyers make designs that can be printed on real goods, which gives them even more ways to sell.

How to Choose Products That Will Sell Well on Amazon Without Having Any Inventory

You need to carefully choose the products you sell on Amazon if you don’t have any in stock. Here are some ways to find goods that will make you money:

  • Use Amazon’s Best Sellers List

Amazon provides a Best Sellers list for each category, showcasing the most popular products at any given time. Analyzing these lists can give you valuable insights into current consumer trends and demand.

  • Look for High-Margin Products

Identify products with a high-profit margin, considering the price you pay your supplier and the price customers are willing to pay. High-margin products can help maximize your profitability.

  • Consider Product Size and Weight

Smaller and lightweight products are often cheaper to ship, which can contribute to higher profit margins. Additionally, they may be more convenient for customers, leading to increased sales.

  • Analyze Product Trends

Utilize tools like Google Trends or keyword research tools to identify products that are gaining popularity. Selling trending products can give you a competitive edge and boost sales.

  • Research Your Competition

Study successful sellers in your niche to identify the products they are selling. Look for gaps in the market or unique product variations that you can offer to differentiate yourself from the competition.

Creating an Amazon Seller Account

You probably know how to sell on Amazon without inventory now, but before you can start selling on Amazon, you need to set up your seller account. Here’s a step-by-step guide to getting started:

  • Step 1: Visit the Amazon Services Website

Go to Amazon’s services website and click on the “Start Selling” button.

  • Step 2: Choose Your Seller Account Type

Select between an “Individual” or “Professional” seller account. The individual account does not have a monthly fee but charges $0.99 per item sold. The professional account has a monthly fee of $39.99 but no per-item charges.

  • Step 3: Provide Your Business Information

Fill out the necessary business information, including your legal name, address, and phone number.

  • Step 4: Set Up Your Billing/Deposit Method

Provide a credit card for selling fees and a bank account for Amazon to deposit your sales proceeds.

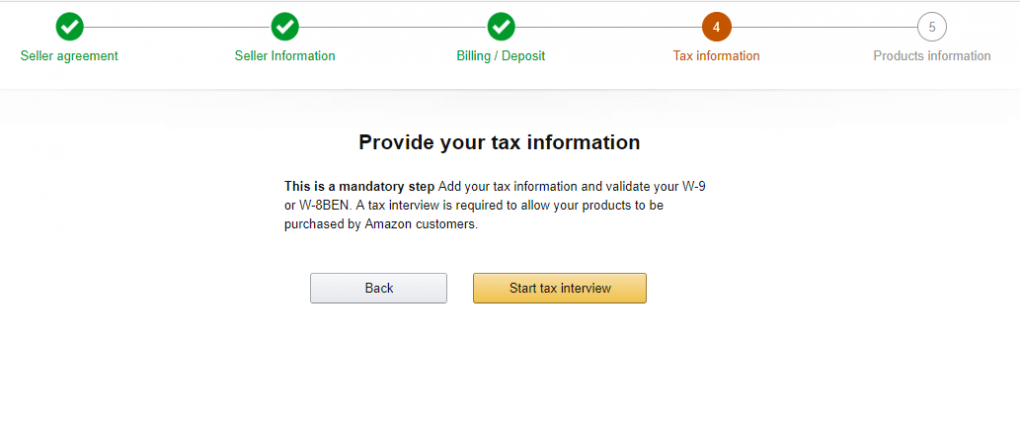
  • Step 5: Register for Tax Purposes

Fill out the required tax information as prompted by Amazon.

  • Step 6: Create Your Storefront

Choose a store name and set up your Amazon storefront, which will serve as your online presence on the platform.

  • Step 7: List Your Products

Start listing your products for sale, whether through dropshipping, FBA, FBM, or digital products. Ensure your product listings are accurate, detailed, and optimized with relevant keywords.

Also Read: The Best Ways to Do When Amazon Is Down

In Summary

Many are curious to know how to sell on Amazon without inventory since they understand it has changed the way e-commerce works. There are pros and cons to each way of selling, whether you choose dropshipping, FBA, FBM or selling digital. You can sell on Amazon without having to keep physical inventory if you choose the right plan, find products that will make you money, and give great customer service. Your Amazon business can do well and grow in this fast-paced market if you handle it well and make it work better.
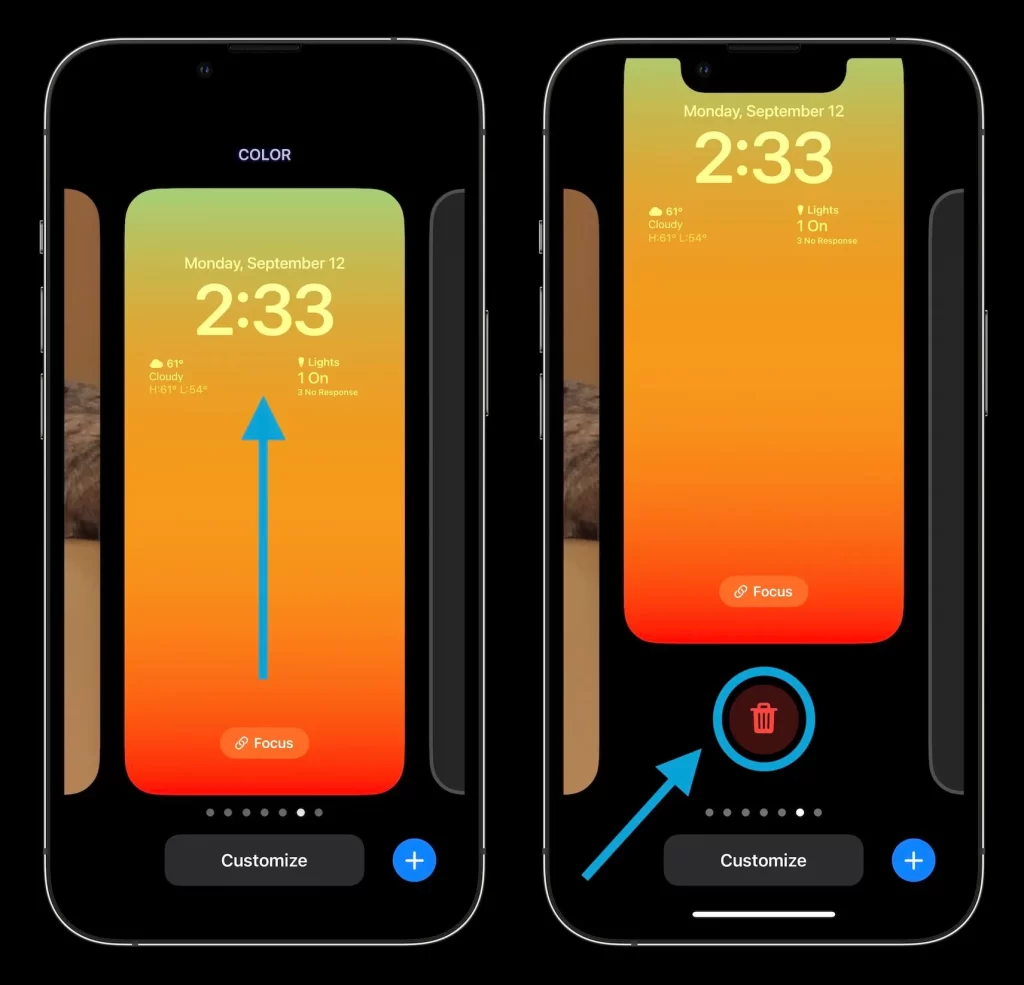
How to Stop OneDrive from Syncing: Step-By-Step

Cloud storage is an important tool for both people and businesses in this digital age. OneDrive is Microsoft’s cloud storage service that lets users store files and keep them in sync on all of their devices. But there are times when you might want to turn off OneDrive sharing. This complete guide will show you different ways on how to stop OneDrive from syncing on different devices and operating systems, whether you’re having slow sync speeds, choosing the wrong files to sync, or just want to stop automatic syncing.

Why Should I Stop Syncing OneDrive?

OneDrive offers a convenient way to backup and sync your files, including photos, documents, videos, and more. However, there are several reasons why you may need to disable OneDrive syncing:

  • Slow Syncing Speeds: OneDrive may sometimes sync files at a sluggish pace, making it seem like the process will never finish.
  • Incorrect File Selection: You may have mistakenly chosen the wrong items to sync to OneDrive, and you want to rectify this.
  • Unwanted Automatic Syncing: OneDrive might automatically sync files that you do not want to be synced.
  • If you find yourself facing any of these situations, it’s crucial to know how to turn off OneDrive syncing to regain control over your files.

How to Stop OneDrive from Syncing

These steps will show you how to stop OneDrive from syncing. You can use these solutions on PCs, laptops, notebooks, tablets, cell phones, and other devices. They can also be used on different operating systems, such as Windows, Linux, Mac, Android, and iOS.

Method 1: Pause OneDrive Syncing

If you want to temporarily suspend OneDrive’s syncing process, you can utilize the built-in Pause feature. Follow these steps:

  • Click on the OneDrive taskbar icon.
  • In the pop-up window, click “More (three dots).”
  • Select “Pause syncing.”
  • Choose the duration for which you want to pause the process: 2 hours, 8 hours, or 24 hours.

Method 2: Quit OneDrive Syncing

If you want to stop OneDrive from syncing altogether, you can choose to quit the application. Here’s how:

  • Right-click on the OneDrive taskbar icon.
  • Select “Quit OneDrive” from the menu that appears.

Method 3: Unlink Your Computer from OneDrive

If you want to sever the connection between your computer and OneDrive, you can unlink your PC from your OneDrive account. Follow these steps:

  • Right-click on the OneDrive taskbar icon.
  • Click “Settings” in the pop-up window.
  • In the Account tab, click “Unlink this PC.”
  • Confirm the action and unlink the account from your computer.

Method 4: Disable Network Connection

To stop OneDrive from syncing in a roundabout way, turn off the network connection on your computer. Cutting off the network connection stops any jobs that need to be done to transfer files. In order to do this, you can:

  • Disconnecting your computer from the internet.
  • Disabling Wi-Fi and cellular data on your mobile device.
  • Enabling “Airplane Mode” on your phone or tablet.

Method 5: Change Auto Sync Settings

OneDrive’s automatic sync settings may be the cause of unwanted syncing. Adjusting these settings can help you regain control over the syncing process. Follow these steps:

  • Click on the OneDrive taskbar icon.
  • Click “Settings” in the pop-up window.

In the Auto Save tab, uncheck the options for automatically saving photos, videos, and screenshots to OneDrive.

Method 6: Remove Source Files in OneDrive Folder

To prevent specific files or folders from being synced to OneDrive, you can remove them from the local OneDrive folder. By doing so, you effectively block them from syncing. Here’s how:

  • Open Windows Explorer and locate the OneDrive folder.
  • Alternatively, click on the OneDrive taskbar icon and select “Open folder.”
  • Remove the files you do not want to sync from the OneDrive folder.

Method 7: Uninstall OneDrive

If none of the previous methods solve your syncing issues, you can uninstall OneDrive from your computer. Uninstalling OneDrive does not delete any files from your OneDrive cloud storage. To uninstall OneDrive:

  • Open the Control Panel from the Start menu.
  • Go to “Uninstall a program.”
  • Locate OneDrive and select “Uninstall.”

Method 8: Hide OneDrive

In cases where OneDrive is built into Windows and cannot be uninstalled, you can hide it to prevent syncing. Follow these steps:

  • Right-click on the OneDrive icon in the Windows file explorer.
  • Select “Properties.
  • In the General tab of the OneDrive Properties window, check the box for “Hidden.”
  • Click “OK” to save the changes.
  • Finally, quit OneDrive from the system tray icon to stop it from syncing.

Method 9: Disable OneDrive Auto Start

Prevent OneDrive from automatically starting when you sign in to Windows by following these steps:

  • Open the OneDrive settings window.
  • In the Settings tab, uncheck the option for starting OneDrive automatically.
  • Save the changes.

Method 10: Use the OneDrive Troubleshooter

If you’re experiencing persistent syncing issues, you can use the OneDrive Troubleshooter to diagnose and resolve the problem. Running the troubleshooter might provide solutions to common OneDrive syncing errors.

In Closing

If OneDrive is syncing slowly, choosing the wrong files, or automatically sharing things you don’t want it to, you need to stop it. You can get back control of your files and choose when and what to sync by following the steps in this guide. If you keep having problems with sync, you might want to use a reliable option like CBackup to make sure that your files are backed up and synchronized without any problems. With the tips and tricks in this complete guide, you can take care of your cloud storage experience and enjoy easy syncing and backup.

How to Insert Text Box in Google Docs (Full Guide)

Text boxes are a useful word processing tool because they allow you to arrange text in specified regions, making it easier to organize papers and create a professional look. Google Docs, a free alternative to other word-processing programs, offers several methods to insert and customize text boxes. This detailed guide will show you the best ways on how to insert text box in Google Docs, give you tips on how to use them correctly, and talk about how to make them fit your needs.

How Do I Use a Text Box in Word?

In Word, a “text box” is a tool or part that lets you put text in a certain spot in a document. This feature can be found in many word processors and office suites. A text box’s job is to give you options for organizing information by letting you put text in different parts of the paper while still keeping it looking clean and professional.

How to Insert Text Box in Google Docs (The Best Ways)

Now that we understand the benefits of using text boxes, let’s explore the best ways to insert them in Google Docs.

Method 1: Using the Drawing Tool

The drawing tool in Google Docs provides a simple and straightforward method to insert a text box. Follow these steps to add a text box using the drawing tool:

  • Select “Insert” from the top menu.
  • Hover over “Drawing” in the drop-down menu.
  • The drawing tool can be accessed by selecting “New” from the side menu.
  • In the drawing tool, click on the “Text Box” icon, which resembles a capital T inside a box.
  • Click and drag your cursor to create the desired size and shape of the text box.
  • Release the mouse button and start typing your text within the text box.
  • Customize the text box by using the toolbar options to change the font, size, color, and alignment.
  • Adjust the size of the text box by clicking and dragging the blue dots located on the corners.
  • Once you are satisfied with the text box, click the blue “Save and close” button to add it to your document.

Method 2: Using the Shapes Tool

Another way to insert a text box in Google Docs is by utilizing the shapes tool. This method allows you to choose from a variety of shapes to serve as your text box. Follow these steps to insert a text box using the shapes tool:

  • “Insert” is the first option on the menu bar.
  • Hover over “Drawing” in the drop-down menu.
  • Select “New” from the side menu to open the drawing tool.
  • In the drawing tool, click on the “Shapes” icon, which appears as a combination of a circle and a square.
  • Choose your desired shape category from the menu, such as rectangles, arrows, circles, or equation symbols.
  • Click and drag your cursor to create the shape you want for your text box.
  • Double-click the center of the shape to add and edit the text within the text box.
  • Customize the text box by using the toolbar options to change the font, size, color, and alignment.
  • Adjust the size of the text box by clicking and dragging the blue dots located on the corners.
  • Once you are satisfied with the text box, click the blue “Save and close” button to add it to your document.

Method 3: Creating a Single-Cell Table

An alternative way to create a text box in Google Docs is by using a single-cell table. Although tables are primarily used for organizing data, you can manipulate them to function as text boxes. Here’s how to create a text box using a single-cell table:

  • Click on “Insert” in the top menu.
  • Hover over “Table” in the drop-down menu.
  • Select the top left corner cell from the table menu, creating a one-by-one table on your document.
  • Type your desired text within the cell of the table.
  • Customize the font style and formatting of the text as needed.
  • Adjust the size of the text box by hovering your mouse over the lines of the table and dragging them to resize the cell.

With these methods in mind, you can choose the one that suits your needs and preferences when inserting text boxes in Google Docs.

Why Is Using Text Box in Google Docs a Good Idea?

Text box in Google Docs offer several advantages and can be used in various ways to improve your documents’ quality. Here are a few examples of text boxes in Google Docs:

  • Moving Text: Text boxes simplify the process of relocating information within a document, allowing you to easily move text or blocks of text to different areas.
  • Organizing Information: Text boxes provide a visual way to present and organize information, making it easier for readers to comprehend complex data, such as charts or diagrams.
  • Highlighting Information: Text boxes can be used to emphasize or draw attention to specific information within a document, making it stand out from the rest of the content.
  • Using Colors: Google Docs allows you to customize the background color of text boxes, enabling you to incorporate graphic design elements and visually enhance your documents.

How to Make the Most of Google Docs Text Box

Probably you want to be ahead of everyone and that’s why you should consider to make the most of text boxes in Google Docs. If so, here are some tips you might want to use:

  • Place Images in Text Boxes: To enhance the visual appeal of your document, insert images within text boxes. This allows for easier movement of both text and images within the document, creating a cohesive layout.
  • Try Different Arrangements: Experiment with arranging text boxes in various ways to achieve the desired visual hierarchy. Use commands like “Bring forward,” “Bring to back,” “Bring to front,” and “Send backward” to layer text boxes and organize them effectively.
  • Delete Unwanted Boxes: If you accidentally create too many text boxes or decide to remove a text box, simply click on the box and press the “Delete” key on your keyboard. If you delete a text box by mistake, you can use the “Undo” option in the “Edit” menu to retrieve it.

Also Read: Microsoft Excel Vs. Google Sheets: What You Need to Know?

In Summary

Text boxes in Google Docs are useful for organizing information, drawing attention to important details, and making your papers look better. If you follow the steps in this guide, it will be easy to add text boxes to Google Docs and change them to fit your needs. Now that you know these tips and tricks, you can use text boxes in Google Docs to their fullest and improve the process of making documents.

How to Delete Wallpaper on iPhone: iOS 16 and iOS 17 [The Complete Guide]

In recent years, Apple has introduced significant changes to the customization options available for iPhone wallpapers. With iOS 16 and iOS 17, users have more control over their lock screen aesthetics than ever before. It is important to know how to remove wallpapers on your iPhone, though, if your gallery is full of old designs that you don’t want anymore. In this complete guide, we will show you how to delete wallpaper on iPhone on both iOS 16 and iOS 17.

Is It Difficult to Remove the Wallpaper from iOS 16 and iOS 17?

Removing or changing wallpaper on iOS is typically a straightforward process that Apple has consistently maintained across several iterations of the operating system, including iOS 16 and iOS 17. To “remove” a wallpaper effectively means to replace it with another.

There’s no option to have a blank screen without any wallpaper, but you can always choose a wallpaper that’s a solid color that resembles a blank or clear background if you want a minimalistic look. However, that’s not the case, as we’ll talk about how to delete wallpaper on iPhone in the easiest way.

Also Read: “shared album not showing up

How to Delete Wallpaper on iPhone

If you’re seeking a means to remove the wallpaper off your iPhone, you’ve come to the correct spot. Continue reading to find out how to change and delete your iPhone’s wallpaper.

On iOS 16

To begin, it’s important to note that removing wallpapers works on iPhones running iOS 16 and newer versions. If your iPhone is on an older version, you won’t have the option to delete wallpapers. The best part is that you don’t need to install any third-party applications, as you can delete lock screen wallpaper setups directly from the lock screen gallery. Follow these simple steps:

  • Use Face ID or Touch ID to unlock your iPhone. Please note that you cannot access the wallpaper gallery by unlocking the iPhone with a passcode.
  • To access the lock screen, tap and hold an empty space.
  • Swipe left or right to find the wallpaper you want to remove from the lock screen gallery.
  • Once you’ve found the desired lock screen setup, swipe up on the wallpaper.
  • Tap the Remove icon to delete the lock screen wallpaper combination from your iPhone.
  • Choose “Delete this Wallpaper” to confirm the removal.

It’s important to keep in mind that deleting a lock screen wallpaper will also delete the associated home screen background, clock font, color, size, and any widgets you had on that lock screen. However, if you want to keep the widgets and clock customizations but change the image, there’s a simple workaround.

  • Press and hold the lock screen to unlock your iPhone.
  • Tap “Customize” and then “Lock Screen.”
  • Choose the “Photos” or “Emoji” icon to select a new photo for the background.
  • Select your new background and tap “Done.”

On iOS 17

It’s worth mentioning that the process of deleting wallpapers is the same. However, as of now, there is no option to select and delete multiple wallpapers at once. Therefore, you must manually go to each screen and remove them individually.

How Can I Make My Lock Screen Look Better?

Now that you know how to delete wallpapers on iOS 16 and iOS 17, let’s explore some additional tips for customizing your lock screen to create a personalized and visually appealing experience.

  • Choose the Right Wallpaper

Choosing the right picture is the first thing you should do to make your lock screen look unique. When picking an image, think about your own style, hobbies, and personal tastes. You can either use the pictures that Apple gives you or add your own. In addition, iOS 17 adds a depth effect to wallpapers, which gives your lock screen a new look.

  • Experiment with Widgets

Widgets are a fantastic way to personalize your lock screen and provide quick access to important information. iOS 16 and iOS 17 offer a wide range of widgets that you can add to your lock screen, such as weather, calendar, reminders, and more. Experiment with different widgets to find the ones that best suit your needs and enhance your lock screen’s functionality.

  • Customize the Clock Font, Color, and Size

One cool thing about iOS 16 and iOS 17 is that you can change the style, color, and size of the clock on your lock screen. This lets you add a personal touch and make the clock look like the picture you’ve chosen. Try out different styles, colors, and sizes until you find the best one to match the look of your lock screen.

  • Utilize Focus Mode

Focus Mode is a new feature in iOS 17 that lets you set which lock screens to show automatically based on your tastes. Like, you can set a lock screen that is related to work for when you are at work and one that is related to rest for when you are at home. Use this feature to make switching between different lock screen settings look smooth.

In Closing

With the customization choices in iOS 16 and iOS 17, you can make a lock screen that fits your personal style and tastes. By following the guide, you should be able to easily get rid of wallpapers you don’t want and add new ones. Try out a bunch of different wallpapers, apps, and clock settings to make your lock screen really stand out. Enjoy the process of making your iPhone unique, and let your personality shine through on your lock screen.

How to Make Twitter Account Private (Now X): Step-by-Step

Are you worried about how safe and private X is for you? Do you want to shield yourself from trolls and people who want to stalk you through your posts? You can fix this by making your X (Twitter) account private. We will show you how to make Twitter account private on different devices in this useful guide. But before we get into the specifics, let’s talk about why you might want to make your X account private.

The Reasons Why You Should Make Your X Account Private

You can share information, say what you think, and interact with other people on X, which is a powerful social media site. Your tweets (posts) can be seen by anyone on the internet, though, because X (Twitter) is open to everyone. This could put your safety and privacy at risk. We really think you should make your Twitter account private for these reasons:

  • Control over your audience: By making your Twitter account private, you have the power to choose who can see your tweets. Only your approved followers will be able to view your posts, ensuring that your messages are seen only by those you trust.
  • Enhanced privacy and security: When your X account is private, your posts are protected from being seen by random users, stalkers, or potential harassers.
  • Protection against cyberbullying: Making your X account private can shield you from cyberbullying and harassment.
  • Control over replies: With a private X account, only your approved followers can see your replies to other users. This ensures that your conversations and interactions on the platform are limited to a trusted audience.

How to Make Your Twitter Account Private (Now X)

To ensure the privacy of your X account, proceed as follows:

Make Your Twitter Account Private on Desktop

If you prefer using Twitter on your desktop computer or laptop, follow these steps to make your account private:

  • Go to the Twitter website: Launch your preferred web browser and navigate to the Twitter website (X).
  • Access the settings menu: On the website, click on your profile picture located at the top-right corner of the screen. A drop-down menu will appear. Navigate to the “Settings and privacy” section.
  • Navigate to privacy settings: In the settings menu, click on the “Privacy and safety” tab located on the left-hand side. This will open the privacy settings page.
  • Protect your posts: On the privacy settings page, scroll down to the “Audience and tagging” section. Check the box next to “Protect your Posts” to enable X protection.
  • Confirm your choice: After checking the box, a confirmation message will appear. Click on the “Protect” button to confirm your decision. Once your X account is private, the box next to “Protect your Posts” will be checked and highlighted in blue.

Make Your Twitter Account Private on Mobile

If you prefer using Twitter (X) on your mobile device, whether it’s an iPhone or Android phone, follow these steps to make your account private:

On the iOS App

  • Open the X app: Locate the X app on your iOS device and tap on it to open it.
  • Access the settings menu: Tap on your profile picture located at the top-left corner of the screen. This will open the settings menu.
  • Navigate to privacy settings: Scroll down and tap on “Settings and privacy” to access the privacy settings.
  • Enable post protection: In the settings menu, tap on “Privacy and safety” and then select “Audience and tagging”. Toggle the switch next to “Protect your Posts” to enable protection.

On Android App

  • Open the X app: Find the X app on your Android device and tap on it to open it.
  • Access the settings menu: Tap on your profile picture located at the top-left corner of the screen. This will open the settings menu.
  • Navigate to privacy settings: Scroll down and tap on “Settings and privacy” to access the privacy settings.
  • Enable post protection: In the settings menu, tap on “Privacy and safety” and then select “Audience and tagging”. Toggle the switch next to “Protect your Posts” to enable protection.

Following these steps, you can easily make your Twitter account private on iOS and Android devices.

How to Approve New Twitter (X) Followers

Once you’ve made your Twitter (X) account private, you have the power to approve or decline new follower requests. Here’s how you can do it:

On Desktop

  • Access follower requests: On the left menu tab, click on “More” and then select “Follower requests” from the pop-up menu.
  • Review and respond: A list of pending follower requests will appear. For each request, you can choose to accept or decline it based on your preferences. Click on the appropriate button next to each request to approve or decline it.

On Mobile

  • Access follower requests: Tap on your profile photo located at the top-right corner of the screen. From the menu, select “Follower requests”.
  • Review and respond: A list of pending follower requests will appear. For each request, you can tap on the checkmark icon to accept the request or the X icon to decline it. Approve or decline follower requests one by one according to your preferences.
  • By carefully managing your follower requests, you can ensure that your Twitter account remains private and secure.

In Closing

We showed you how to make your Twitter account secret. You can get more control over your audience, improve your privacy and security, and stay safe from stalking on Twitter by following the steps given. To keep your Twitter account private and safe, make sure you regularly check and handle your friend requests. You can protect your online presence even more by taking other privacy steps and being aware of possible threats.

FAQ

  • Can I make my Twitter account public again after making it private?

Yes, you can change the privacy settings of your Twitter account at any time. Simply uncheck the box next to “Protect your Tweets” to make your account public again.

  • Can someone find my private Twitter account if they sync their contacts?

No, syncing contacts will not reveal your private Twitter account to others. Your private account information is not publicly available and will not be suggested to anyone.

  • Can I reply to public tweets (posts) with a private account?

No, with a private Twitter account, your replies to public tweets will only be visible to your approved followers. Users who do not follow you will not be able to see your replies.

Stock Market: How the Market Works (Complete Guide)

The stock market is an important part of today’s financial world because it makes it easier to buy and sell shares. But for newbies, it can be hard to figure out how the market works. This complete guide is meant to take the mystery out of the stock market by explaining how it works.

What Is the Stock Market?

Different places where people can buy and sell shares of publicly traded companies are called “stock markets.” These kinds of financial transactions happen on official exchanges and over-the-counter (OTC) markets that follow a clear set of rules.

People often use “stock market” and “stock exchange” to mean the same thing. Stock market traders buy and sell shares on one or more of the stock platforms that make up the stock market as a whole.

Stock Market: How the Market Works?

By selling shares of stock, the stock market assists businesses in raising capital to run their operations and makes and keeps buyers wealthy.

Companies raise funds by selling stock to investors. Shares of a firm are called stock. Companies can grow without borrowing by selling shares on stock markets. To sell stock, companies must communicate information and enable owners participate in business management.

Investors profit from stock purchases. Businesses expand with the money. Capital gains help investors by increasing the value of their stock. Business owners receive dividends when profits rise.  Individual stocks perform differently, but the stock market as a whole has averaged 10% annual returns, making it one of the safest ways to invest.

The Mechanics of Buying and Selling Stocks

Investors need to open trading accounts in order to trade stocks. Brokerage firms help investors buy and sell things by carrying out their buy and sell orders. Through online platforms offered by these brokers, investors can easily purchase and sell stocks.

Investors put in orders that say how many shares they want to buy and how much they want to pay for them. Market orders are carried out right away at the current price on the market. Limit orders, on the other hand, let buyers choose the exact price at which they want to buy or sell.

What Supply and Demand Mean in Stock Market

The market prices of stocks are set by the forces of supply and demand. Buyers are willing to pay the most for a stock, which is shown by the bid price. Sellers are willing to take the least, which is shown by the ask price. If a lot of people want to buy a stock, the price will probably go up, and if not, it will likely go down.

In the stock market, supply and demand are affected by a number of things. Stock prices are affected by many things, such as the economy, how well a company is doing, trends in the business, and how investors feel about the company. For investors to make smart financial choices, they need to stay up to date on these issues.

You Have to Know About Market Makers

A big part of making sure the stock market is open and works well is the job of market makers. These people or businesses make it easier to buy and sell shares by constantly posting bid and ask prices for different stocks. Market makers keep the market liquid so that buyers can always buy or sell shares.

Market makers make sure the market is fair and works well by setting prices that are competitive. They also help close the bid-ask spread, which is the space between the price a buyer is willing to pay and the price a seller is willing to take. This makes sure that there aren’t big price differences when buyers trade stocks

Are There Rules in the Stock Market to Protect Investors?

Stock markets are regulated to protect investors and market integrity. The SEC regulates the US stock market. The SEC protects investors from fraud and market manipulation by requiring corporations to disclose accurate and timely information.

Investor confidence and fair and transparent markets depend on regulators like the SEC. Stock exchanges, brokers, and financial advisors are regulated to ensure ethical behaviour and fairness to investors.

Types of Stock Markets

While the term “stock market” is often used broadly, there are various types of financial markets that cater to different securities:

  • Over-the-Counter (OTC) Markets: These markets facilitate trading outside of major exchanges. OTC trades are primarily conducted directly between buyers and sellers, and they often involve securities like bonds and penny stocks.
  • Commodities Markets: Commodities markets focus on the trading of raw materials such as oil, coal, and steel. These markets enable producers and consumers to hedge against price fluctuations and facilitate global trade.
  • Derivatives Markets: Derivatives are financial contracts whose value is derived from an underlying asset. Options and futures are examples of derivatives that allow investors to speculate on the future price movements of stocks or other assets.
  • Foreign Exchange Markets: Forex markets facilitate the trading of currencies from different countries. These markets play a pivotal role in international trade and enable investors to profit from fluctuations in currency exchange rates.
  • Cryptocurrency Markets: Cryptocurrency exchanges provide a platform for buying and selling digital currencies like Bitcoin and Ethereum. These markets operate independently of traditional financial institutions and are gaining popularity as an alternative investment avenue.

How Can I Invest in the Stock Market?

Investing in the stock market offers individuals the opportunity to grow their wealth over time. Here are the key steps to get started:

  • Determine Your Investment Goals: Define your financial objectives, such as saving for retirement, funding education, or achieving specific financial milestones.
  • Choose an Investment Account: Select the type of account that aligns with your goals, such as an individual brokerage account, retirement account or education savings account.
  • Open a Brokerage Account: Research and select a reputable brokerage firm that offers the services and features you require. Consider factors such as fees, investment options, customer support, and user-friendly platforms.
  • Fund Your Account: Deposit funds into your brokerage account to have capital available for investing. You can choose to make a one-time deposit or set up recurring contributions.
  • Diversify Your Portfolio: Spread your investments across different asset classes, industries, and geographic regions to minimize risk.
  • Conduct Research: Thoroughly analyze potential investments by examining company fundamentals, industry trends, and financial performance. Stay informed about market news and developments that may impact your investments.
  • Execute Trades: Place buy or sell orders through your brokerage account’s online platform. Ensure that you understand the order types and their implications before executing trades.
  • Monitor and Review: Regularly evaluate the performance of your investments and make adjustments as needed. Stay updated on company news, economic indicators, and market trends that may affect your portfolio.
  • Seek Professional Advice: If you feel overwhelmed or lack the time and expertise to manage your investments, consider consulting a financial advisor who can provide personalized guidance.

Also Read: The Dark Side of the Stock Market (Understanding Spoofing and Its Dangers)

In Closing

When it comes to stocks, anyone who wants to spend their money wisely needs to know how the market works. You can feel confident in the market if you know the basics about stock markets, stock platforms, and how to buy and sell stocks. Keep up with the news, spread out your investments, and make sure your investment choices are in line with your financial goals. If you are patient and give it time, the stock market can help you get rich.

Ring Chime Vs Chime Pro: What Are Their Differences?

Ring Chime works with all of your Ring Video Doorbells and Cams, so you can hear alerts in real time from anywhere in your house. They are made to improve the performance of your Ring video doorbells and security cameras. These devices allow you to receive notifications longer, making sure you never miss a moment by playing alerts in your home. We’ll look at the Ring Chime vs Chime Pro and their main differences and help you to pick the one that fits your needs and works best with your Ring home security system.

Ring Chime Vs Chime Pro (The Differences)

The Ring Chime is a doorbell chime that works with Wi-Fi and can be easily linked to your Ring Doorbell with the Ring App. It has features like a “do not disturb” mode and ringtones that you can change. One problem with the Ring Chime is that the sound volume isn’t very loud, so it might be hard to hear in a big house.

Ring Chime Pro, on the other hand, is a better version of Ring Chime. In addition to having all the same features as the Ring Chime, it can also be used as a Wi-Fi extension and make alerts louder. As well as making the alerts from your Ring Doorbell louder, the Chime Pro can also increase the range of your Wi-Fi network, making sure that all of your Ring devices have a strong link. Here’s a comparison between Ring Chime and Chime Pro:

  • Wi-Fi Connectivity

One of the primary differences between the Ring Chime and Chime Pro is their Wi-Fi connectivity. While the Ring Chime supports a 2.4GHz Wi-Fi network, the Chime Pro supports both 2.4GHz and 5GHz networks. The advantage of the 5GHz network is its faster data transfer rate, but its range is slightly shorter compared to the 2.4GHz network. If your doorbell and chime are close enough, the Chime Pro’s 5GHz band can provide more effective short-distance connectivity.

  • Wi-Fi Improver

The Chime Pro has an additional feature that sets it apart from the Ring Chime – it can function as a Wi-Fi extender. If you have areas in your home where your Wi-Fi signal is weak or does not reach, you can use the Chime Pro to extend the range and improve the connection for your Ring devices. This feature is particularly useful if your Ring Doorbell is far from your Wi-Fi router.

  • Alert Amplification

Another exclusive feature of the Chime Pro is alert amplification. If you have difficulty hearing the sound of your doorbell chime from a distance, the Chime Pro can amplify the alerts produced by your Ring Doorbell and reproduce them through its built-in speaker. This ensures that you can hear the doorbell from any part of your home, even if you are far away from the chime.

  • Size

In terms of size, the Chime Pro is slightly larger than the Ring Chime. The Ring Chime measures 3.06 x 2.44 x 0.98 inches, while the Chime Pro measures 4.06 x 2.72 x 1.00 inches. However, the difference in size is minimal and should not be a significant factor in your decision-making process.

  • Nightlight

If you value additional convenience and functionality, the Chime Pro offers a built-in nightlight. This nightlight provides a soft and cozy glow, making it easier to navigate in the dark. This feature can be particularly useful if you need to move around your house at night but don’t want to turn on the main lights.

Similarities in Ring Chime and Chime Pro

While there are notable differences between the Ring Chime and Chime Pro, there are also several similarities. Both chimes support custom ringtones, allowing you to choose a sound that suits your preferences.

They also feature an LED indicator that lights up when they are connected to the internet, providing a visual confirmation of their status. Additionally, both chimes come with a one-year warranty, ensuring peace of mind and protection for your investment.

Ring Chime Vs Chime Pro: Full Features Comparison (All the Details)

To summarize the key differences between the Ring Chime and Chime Pro, here is a comparison table:

FeaturesRing ChimeChime Pro
Wi-Fi ConnectivitySupports 2.4GHz Wi-Fi networkSupports both 2.4GHz and 5GHz networks
Wi-Fi ExtenderNoYes
Alert AmplificationNoYes
Supported DevicesSupports all Ring devicesSupports all Ring devices
Custom RingtonesYesYes
LED IndicatorYesYes
WarrantyOne yearOne year
Size3.06 x 2.44 x 0.98 inches4.06 x 2.72 x 1.00 inches
NightlightNoYes

Also Read: Exploring Commercial Real Estate Loans: A Comprehensive Guide for Entrepreneurs

What Is the Purpose of the Ring Chime Pro?

The Ring Chime Pro is a doorbell chime that can be plugged into a power outlet and connected to your Ring doorbell or camera. Its main purpose is to notify you of alerts and provide audio feedback when someone presses your doorbell or motion is detected. In addition, the Chime Pro can extend the range of your Wi-Fi network, ensuring a strong connection for all your Ring devices.

In Summary

When choosing between the Ring Chime and Chime Pro, consider your needs. Wi-Fi extension and warning amplification make the Chime Pro a smart upgrade for larger households or areas with poor Wi-Fi reception. However, the Ring Chime may function if your house is small and your Wi-Fi is strong everywhere. Choose the sound that best suits your needs. Make your Ring Doorbell more helpful and convenient to make your house smarter and better connected.

FAQ

  • Is the Ring Chime Pro Worth It?

The Ring Chime Pro offers additional features such as Wi-Fi extension and alert amplification for a little more than $20 compared to the Ring Chime. However, the value of these additional features depends on your specific needs. If you have a large house or areas with poor Wi-Fi coverage, the Chime Pro may be a worthwhile investment to ensure a strong connection and the ability to hear alerts from any part of your home.

  • Does Ring Chime Have Different Sounds?

One problem with the Ring Chime is that the sound volume isn’t very loud, so it might be hard to hear in a big house. To sum up, Ring Chime Pro is the improved form of the Ring Chime. It is definitely better, even in terms of how it sounds. But if you’re not sure about how the Ring Chime sounds, you can ask for more information in the website’s sales section.

  • Where Should the Ring Chime Pro Be Installed?

The Ring Chime Pro should be installed in a location that allows it to extend the range of your Wi-Fi network effectively. Ideally, it should be placed between your Wi-Fi router and your Ring devices, ensuring a strong and stable connection. Experiment with different locations to find the best spot for optimal performance.

Why is Chat GPT Not Working for Me? (Fix This NOW)

Chat GPT has become famous because it can answer a lot of different kinds of questions. Users do sometimes, though, run into problems with Chat GPT that stop it from working as it should. This perfect guide will look at what might be causing this problem and give you good ways to fix the “Why is Chat GPT Not Working” error.

Why is Chat GPT Not Working (All the Reasons)

Before we get into how to fix the problem, let’s look at some of the most common reasons why Chat GPT might not be working:

  • Server Overload: Chat GPT’s servers can experience high traffic, especially during peak usage hours. This influx of users can overwhelm the server, causing it to crash or prevent users from accessing the chatbot.
  • Corrupt Browser Cache and Cookies: Accumulated browser cache and cookies can become corrupted over time, leading to errors in Chat GPT’s operation. Getting rid of these files might help fix the problem.
  • Internet Connectivity Issues: Unstable or poor internet connections can hinder the proper functioning of Chat GPT. Users with limited internet access or outdated equipment may encounter this problem more frequently.
  • Geographic Location: Chat GPT’s AI algorithms are trained on certain datasets, which might not fully describe all places in the world. Which means that users in some areas might have trouble getting accurate answers from the robot.

Now that we have identified the common causes, let’s move on to the troubleshooting steps to fix Chat GPT when it is not working.

How to Fix Chat GPT Not Working (Tested and Working)

Whether it’s a technical glitch, a misunderstanding of the tool’s capabilities, or a simple user error, there are a variety of reasons why Chat GPT might not be working as expected. Follow these step-by-step solutions to resolve the issue when Chat GPT is not working:

Check the Chat GPT Server Status

The first step is to verify the server status of Chat GPT. If the server is experiencing issues, users may be unable to access the chatbot. To check the server status, visit the official Chat GPT website or check their social media channels for any updates.

Clear the Browser Cache and Cookies

To address potential issues caused by corrupt browser cache and cookies, it is recommended to clear these files. Here’s how you can do it:

  • On your browser, click on the settings or options menu and navigate to the privacy or browsing history section.
  • Look for options to clear cache and cookies and follow the instructions provided.
  • Once cleared, restart your browser and attempt to use Chat GPT again.

Verify Your Internet Connection

Ensure that you have a stable and reliable internet connection before using Chat GPT. You can test your internet speed using online tools or contact your internet service provider if you encounter any issues.

Restart Your Browser

Sometimes, simply restarting the browser can resolve temporary issues with Chat GPT. Close the browser completely and launch it again to see if the chatbot starts working.

Try a Different Browser or Device

If Chat GPT is not working on your current browser, try accessing it using a different browser or device. Popular options include Chrome, Firefox, Safari, or Edge. This can help identify if the issue is browser-specific or device-specific.

Check Your Login Credentials

Ensure that you are using the correct login credentials when accessing Chat GPT. Incorrect credentials can prevent you from logging in and using the chatbot. Double-check your username and password before attempting to log in again.

Contact Chat GPT Support

If none of the above solutions resolve the issue, it is recommended to reach out to Chat GPT support for assistance. They can provide additional troubleshooting steps or escalate the problem to their development team for further investigation.

Why is Chat GPT Not Working on an iPhone or in a Specific Country

If you are experiencing issues with Chat GPT on your iPhone or if it is not available in your country, try the following solutions:

  • Update your iPhone to the latest system software to ensure compatibility with Chat GPT.
  • Use a VPN service to access Chat GPT if it is not available in your country.
  • Contact Chat GPT support for further assistance and guidance specific to your device or location.

In Closing

Once again, Chat GPT is a strong tool that can answer a lot of different questions. But Chat GPT can stop working for a number of reasons, such as when the server is overloaded, when you can’t connect to the internet, when your browser’s cache or cookies get damaged, or when you’re in a certain area. Following the steps in this guide for debugging will help users fix these problems and get back to using Chat GPT without any problems. Remember to get in touch with Chat GPT support if you need more help.

How to Destroy a Hard Drive [The Best Ways Explained]

It makes sense to need to get rid of our info sometimes. This post will tell you how to destroy a hard drive so that your important data can’t be recovered. It’s important to properly destroy your hard drive to protect your personal and sensitive information, whether you’re updating your computer, getting rid of old gear, or just worried about data security.

The Reasons to Destroy Your Hard Drive

Before we talk about the different ways to destroy a hard drive, let’s talk about why it’s important to do so. A normal hard drive has a lot of private data on it, like credit card numbers, social security numbers, bank account information, and website logins.

With the right tools, you can get back the data even if you think you removed it or formatted the hard drive. Your personal information will stay safe because you destroyed your hard drive, removing the chance of data stealing.

Furthermore, it is very important to create a backup of any sensitive files on your hard drive, such as music, photos, or important papers, before you destroy them. Because of this, you won’t lose any important info when you destroy it.

Different Methods of Destroying a Hard Drive

Destruction of a hard drive is an important step in getting rid of private data for good. You can do these things in different ways:

Method 1: Shredding

One of the best ways to destroy a hard drive is to shred it. The process involves breaking the drive up into tiny pieces that can’t be put back together. This makes the data completely unavailable. Burning may not be something that everyone can do at home, but there are services that specialize in hard drive burning that can do it for you.

Method 2: Degaussing

A strong magnetic pulse is used in degaussing to remove the information on a hard drive. The magnetic fields on the drive are turned off by this process, so no data can be recovered. Degaussing, on the other hand, needs special tools and is usually done by experts.

Method 3: Wiping the Data

The data on a hard drive can also be erased. This entails overwriting all drive data with random patterns using data wiping software. This procedure may not completely erase data, but it can be effective. Advanced data recovery methods may recover some pieces. Thus, if your hard drive contains sensitive data, data wiping and physical destruction are preferable for protection.

How to Physically Destroy a Hard Drive

Now that we know why it’s important to destroy a hard drive and the different ways we can do it, let’s look at how to do it physically. Carefully following these steps is important to make sure that all of your data is erased and safe.

  • Make a copy of your data: Before you destroy anything, make a copy of any important information or data that you want to keep. You won’t lose any important data during the destruction process if you do this.
  • Find the hard drive: The first thing you need to do is find the hard drive in your computer or laptop. You can check the owner’s manual or look online for specific directions for your device model if you’re not sure where to check.
  • Take off the case: Once you’ve found the hard drive, you’ll need to open the case to get to the electronic parts inside. Usually, this means taking out screws and maybe cutting through tape or labels that are covering the nuts. During this process, be careful not to hurt any other parts.
  • Remove the platter: The platter is the round silver disk inside the hard drive that stores the data. To destroy the hard drive, you’ll need to remove this platter. Unscrew any screws holding it in place and carefully maneuver it out of the casing.
  • Destroy the platter: There are several methods you can use to destroy the platter. One option is to use a hammer and repeatedly strike the platter on various sides until it becomes damaged beyond recovery. Another method is to use a secure data destruction service that can incinerate the platter, ensuring complete destruction.
  • Get rid of the pieces: Once you’ve broken the platter, it’s important to get rid of the pieces the right way. Put the broken pieces in different bags and throw them away separately so that no one can put them back together. To have less of an effect on the environment, you could also recycle the rest of the parts at an electronics recycling site.

Extra Tips on How to Destroy a Hard Drive Safely

When you want to destroy multiple hard drives, it’s best to do it one at a time so that you can be sure that they are all destroyed and that no drive is missed. When physically breaking a hard drive, you should always wear safety gear like safety glasses and gloves to keep yourself from getting hurt.

You might want to use a professional data destruction service that specializes in destroying hard drives. These services have the knowledge and tools to make sure that your hard drives are completely and safely destroyed.

When you get rid of a computer, make sure to take out the hard drive and destroy it separately from the other parts. So, even if the rest of the computer is recycled or given away, your info will still be safe. Don’t forget to safely delete any data that might be sensitive from any USB drives or external hard drives. The same rules about destroying these gadgets physically or wiping their data apply to them too.

In Closing

Making sure that your private and secret data doesn’t get into the wrong hands is essential when you destroy a hard drive. It’s important to do things the right way and be careful to destroy the drive fully, whether you cut it, degauss it, or break it physically. “How to destroy a hard drive” has always been an issue for many and If you carefully follow the steps in this piece, you can get rid of your old hard drives without worrying about your data.

Why Is My Face ID Not Working? [Ways to Fix It]

Face ID is a useful feature on iPhones that uses facial recognition technology to let you open your phone, verify purchases, and sign in to apps. But Face ID might not work all the time, which would be annoying and frustrating. To answer the question “Why Is My Face ID Not Working? ” This in-depth guide will look at the different reasons this could happen and show you how to fix it so that your Face ID works again.

Why Is My Face ID Not Working? Possible Reasons

To help you figure out what’s wrong, let’s look at some of the possible reasons your Face ID might not be working right:

  • Incompatible iPhone Model: Face ID is only available on iPhone X and later models. If you have an older iPhone model, Face ID will not be supported.
  • iOS Update Required: It’s essential to keep your iPhone’s software up to date. If you haven’t installed the latest iOS update, it could be causing compatibility issues with Face ID.
  • Camera Obstruction: Face ID relies on the TrueDepth camera located on the front of your iPhone. If anything is blocking the camera, such as a screen protector or debris, it may hinder the facial recognition process.
  • Multiple Failed Attempts: If you have made five unsuccessful attempts to match your face, Face ID will temporarily disable itself as a security measure.
  • Inactive Usage: If your device hasn’t been unlocked for more than 48 hours or if you haven’t used your passcode to unlock your iPhone in the last six and a half days, Face ID may not work until you enter your passcode.
  • Remote Lock Command: If your iPhone has received a remote lock command, Face ID will be disabled until you unlock your device with your passcode.
  • Power Off/Emergency SOS Screen: Pressing and holding either Volume button and the Side button simultaneously for two seconds triggers the power off/Emergency SOS screen. If this screen is active, Face ID will not function until you unlock your device with your passcode.

Now that we better understand the possible reasons behind Face ID not working, let’s move on to the troubleshooting steps to fix the issue.

Also Read: “Why is Chat GPT Not Working?”

What to Do to Fix Problems with Face ID

If you’re having trouble with Face ID, your device’s face recognition technology, there are a few things you can try to see if they help. To fix problems with Face ID, do these things:

Restart Your iPhone

Restarting your iPhone is a simple yet effective way to resolve minor software glitches that may be causing Face ID to malfunction. Try these very best steps to restart your device:

  • Press and hold the power button (Side button on iPhone X and later models or top button on iPhone SE 1st generation and earlier models) until the power off slider appears.
  • Drag the power off slider to turn off your iPhone. Once your iPhone is turned off, press and hold the power button again until the Apple logo appears, indicating that your device is restarting.
  • After your iPhone has restarted, enter your passcode and try using Face ID to see if the issue has been resolved.

Check for iOS Updates

Ensuring that your iPhone has the latest iOS update is crucial for optimal performance, including Face ID functionality. Once the update is installed, restart your iPhone and check if Face ID is functioning properly.

Check Face ID Settings

If your iPhone is updated to the latest iOS version and your Face ID is still not working, it’s essential to verify that the Face ID settings are correctly configured. Follow these steps to check your Face ID settings:

  • On the home screen of your iPhone, go to Settings.
  • Find Face ID & Passcode and tap on it.
  • To get to the Face ID options, enter your passcode.
  • Make sure that the Face ID toggle is turned on.
  • Scroll through the list of available options (iPhone Unlock, iTunes & App Store, Wallet and Apple Pay, Password AutoFill, and Other Apps) and ensure that all the features and apps you want to use with Face ID are turned on.
  • If any of the options were turned off, toggle them on.
  • Exit the settings and try using Face ID to see if it is now functioning properly.

Set Up an Alternate Appearance

If you have made significant changes to your facial appearance, such as growing or shaving a beard, you may need to set up an alternate appearance for Face ID to recognize you accurately. Test Face ID to see if the issue has been resolved.

Reset Face ID

If none of the previous steps have resolved the Face ID issue, you can try resetting Face ID and setting it up again from scratch. Try these steps to reset Face ID:

  • Go to Settings on your iPhone’s home screen.
  • Scroll down and tap on Face ID & Passcode.
  • Enter your passcode to access the Face ID settings.
  • Tap on Reset Face ID, then tap on Set Up Face ID to begin the setup process.
  • Hold your device in portrait position and tap on Get Started.
  • Slowly move your head to complete the circle within the frame.
  • If you cannot move your head, tap on Accessibility Options and follow the instructions.
  • After the first Face ID scan is complete, tap on Continue.
  • Slowly move your head again to complete the circle.
  • Once the Face ID setup is complete, tap on Done.

Reset Your iPhone to Factory Settings

Face ID might not work right after resetting your iPhone to its factory settings if nothing else works. It’s important to remember that this step will erase everything on your computer, so save a copy of your important files first.

In the event that none of the steps above have fixed the problem with your iPhone’s Face ID, there may be a physical issue with the device. This is when you should go to an Apple Store or talk to a trained repair professional to help you figure out what’s wrong and fix it.

Conclusion

This complete guide should have helped you figure out and fix any problems with your iPhone’s Face ID, including the common one, ‘Why Is My Face ID Not Working.’ After following the steps above, you should be able to resolve most issues and restore your device’s face recognition feature to full functionality. If you encounter persistent problems that won’t go away, seeking professional help is advisable to ensure they are addressed correctly.

Exit mobile version