Guided Access Not Working: Why and How to Fix it NOW?

Guided Access is a feature that doesn’t work for everyone. If you’re running into problems with Guided Access on your iPhone, iPad or iPod touch, don’t worry! You’re not alone. In this article, you’ll find out what guided access is and why it’s important for iOS devices. We’ll also cover some common problems that can cause a guided access not working situation, so you know how to fix it!

What is Guided Access?

iOS has a great feature called Guided Access, which allows people with certain disabilities to use only one app at a time, or to limit the amount of time they spend on an app. This can be really helpful for people who have trouble staying focused, or who need to stay on task.

However, sometimes Guided Access doesn’t work the way it’s supposed to. If you’re having trouble such as guided access not working, there are a few things you can do to try to fix it.
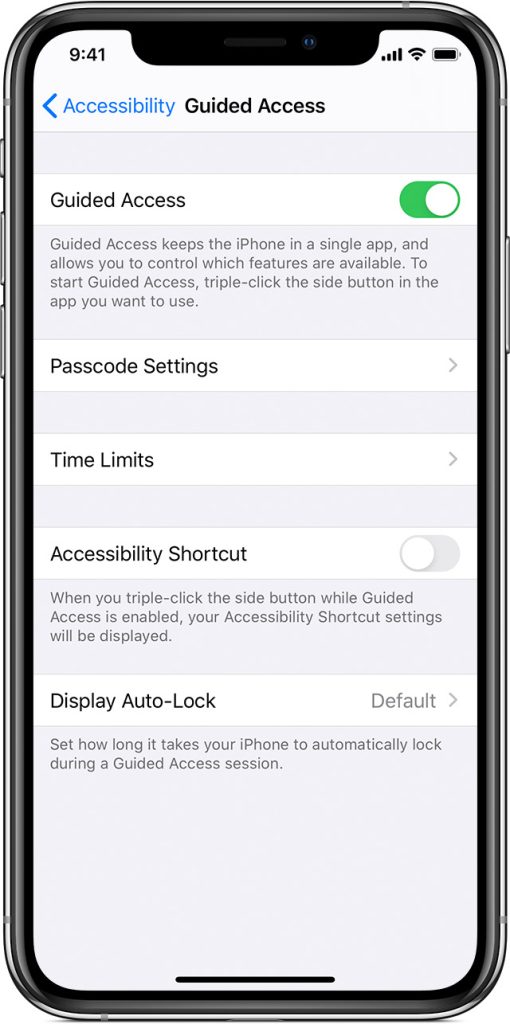
Why is guided access not working?

Recently, some users have reported that they are facing guided access not working issues on their devices. In this article, we’ll discuss why Guided Access might not be working and how to fix it.

There are several reasons why Guided Access might not be working on your device:

1. The feature may be turned off in Settings.

2. You may not have set up an iphone passcode for Guided Access.

3. The app you want to use with Guided Access may not be compatible with the feature.

4. There may be an issue with the hardware button that starts and stops Guided Access.

5. There could be a problem with the software on your device.

6. You may have reached the maximum time limit for Guided Access sessions.

If you’re having trouble with Guided Access, follow the steps below to fix the problem:

How to fix guided access not working?

If you are using an iPhone or iPad and have difficulties with Guided Access not working, there are a few things you can do to fix the problem.

First, check to see if Guided Access is turned on in the Settings app. To do this, go to Settings > General > Accessibility > Guided Access. If the switch next to Guided Access is not green, tap it to turn on the feature.

If Guided Access is already turned on but you’re still having trouble, try restarting your device. This can often fix minor software glitches that may be causing the problem.

If neither of these solutions works, try resetting your device’s settings. This will not delete any of your data, but it will restore all of your settings to their defaults. To reset your settings, go to Settings > General > Reset and tap “Reset All Settings.”

If you’re still having trouble with Guided Access not working after trying all of these solutions, contact Apple Support for further assistance.

Why is Guided Access grayed out?

If you find that the Guided Access option is grayed out on your device, there are a few potential reasons why this may be happening. 

First, it’s important to make sure that you’re running the latest version of iOS – if you’re not, updating your software may fix the problem. 

Additionally, check to see if Guided Access is turned on in your device’s Accessibility settings; if it’s off, you won’t be able to use the feature. 

Finally, restarting your device can often resolve any lingering issues and fix guided access not working. If you’re still having trouble after taking these steps, reach out to Apple Support for further assistance.

Source: Robot Powered Home

How to enable guided access?

If you have an iPhone 6s or later, you can use Guided Access to temporarily disable features on your device. This can be helpful if you have an autistic spectrum disorder or other condition that makes it difficult to stay on task.

To enable Guided Access:

1. Open the Settings app and tap General > Accessibility > Guided Access.

2. Turn on Guided Access and set a passcode that only you will know.

3. Open the app that you want to use with Guided Access and triple-click the Home button.

4. Adjust the options for what you want to disable on your device, then click Start in the top right corner of the screen.

5. To end a session, triple-click the Home button again and enter your passcode.

By the way, as an iPhone user you can read: “Text Scheduler iPhone” to know how to schedule your iPhone posts to be sent whenever you want.

FQA

How to disabled guided access?

Assuming you have already set up Guided Access on your device, to disable it, follow these steps:

1. Triple-click the Home button. This will bring up the Guided Access options.

2. Enter your passcode (if you have one set).

3. Tap the End button in the upper left corner.

If you don’t have a passcode set, triple-clicking the Home button will take you straight to Step 3.

Does Guided Access work with Facetime?

If you have an iPhone 6s or later, you can use Guided Access with FaceTime. To do this, open the FaceTime app and start a video call. Then, triple-click the Home button and select Guided Access from the menu. You can then use the controls to turn off FaceTime’s audio and video features.

How to fix “cannot verify server identity”? (100% Working)

Suppose you lose your email access for no reason, and it makes a deuced situation. What should we do now? Maybe it is something out of a simple loss of internet connection?

Let’s see how we can fix the “cannot verify server identity” problem on our devices. This article will cover three types of “cannot verify identity” according to the source: cannot verify server identity iPhone version, cannot verify server identity iPad version, and cannot verify server identity IMAP Gmail mode.

What is the “cannot verify server identity”?

The term “cannot verify server identity” indicates that the identity of “mail.domain.com” cannot be verified, which is an iOS-related issue it doesn’t occur on other platforms. The problem is likely associated with the SSL certificate on the mail server and the server settings in your IOS device (which can be an iPhone or iPad, etc.)

How to fix “cannot verify server identity”? (iPhone, iPad, IMAP Gmail)

The method for fixing the “cannot verify server identity” problem is almost the same for all iOS devices; since it is a protocol verification issue, we will focus on reviewing the mail settings on our devices and check if there is a mistake there. Otherwise, we will make sure that there are no hardware or software glitches on the using iPhone or iPad either by restarting the devices, closing and re-opening the app, and resetting the settings.

Cannot verify server identity iPhone

This is a usual problem any iOS may experience in their life, so there is no need to panic. If you have the issue “cannot verify server identity iPhone 11”, you can resolve it by the methods explained below for you;

  1. restart your phone

An old cliché says the restating of your device can restart its health!!! Never neglect to use this method to fix your iPhone (or iPad) due to minimal glitches that could happen for any iOS system.

  1. Update your iOS

Try to keep your device “iOS updated” because some configuration mechanisms can be changed when a new version is released. Note that the older your iOS is, the more possible you face iPhone cannot verify server identity issues.

  1. Close and re-open your Mail app

In some cases, the app is the issue rather than the whole system. To cure the “iPhone cannot verify server identity” disease on your Mail app, you can either decide to close and re-open your application or update the new version on the App Store, if available.

  1. Sign out from your email account, and then add the email account again

The “iPhone cannot verify server identity” problem can be more insistent than you may think. To beat this trouble, you can also sign out from your email address on your application and add it again. Hopefully, you will have your error resolved this time.

To delete your email address from your device, take this guide;

  1. Open Setting.
  2. Now select “Mail” and go to Accounts.
  3. Click on the Email address you want to delete.
  4. Click on the red “Delete” button and confirm it in the following pop-up window.

Now we need to add your email account again. Follow the steps below;

  1. Open Settings again and go to “Mail.”
  2. Open the Account section and click on “Add Account.”
  3. Choose your email service provider
  4. Finally, take the instructions on the screen and add details to have your account added
  1. Reset all settings on your iPhone

If you have been using your iPhone (regardless of any model) for a long time, you may have changed its connection settings, so the device fails to recognize the mail server correctly. Suppose you think your chances are not so important and vital. In that case, you can reset your iPhone to its factory mode so we can examine if “cannot verify server identity iPhone” is associated with setting options altered by the user. If the answer is negative, your problem is deeper than usual.

To reset factory your iPhone, follow these steps;

  1. Open your device and go to Settings.
  2. Click on “General.”
  3. Now choose “Transfer” or “Reset iPhone.”
  4. Finally, tap on the “Erase all content and settings” option.

Cannot verify server identity iPad

Since the iPad and iPhone use the same operating system and the same software backbone (with just minimal changes), there is almost no difference of approaching “cannot verify server identity iPad” and “cannot verify server identity iPhone” on your devices.

Therefore, use the instructions explained in the previous section iteratively to see if your “cannot verify server identity iPad” error can be resolved.

Cannot verify server identity IMAP Gmail

When you read the definition of “cannot verify server identity” on a paper, it tells you there is a suspicious issue about the authenticity of the mail server certificate; either it is fake or not understood. Generally speaking, it is an SSL certificate failure, and the most famous example is the “HTTP vs. HTTPS” situation.

Summary

The main pathway to the fixing cannot verify server identity problem is manipulating server settings on your device, whether you have an iPhone 11 (cannot verify server identity iPhone 11) or its heavier brother (iPad cannot verify server identity). Make sure your settings have the best adjustment mode in order to recognize the server and lead to configuration. If you still have the problem and cannot verify server identity, maybe it is time to ask for help officially from the Apple customer support team and wait until they find the solution.

How to Fix External Hard Drive Read-Only on Mac?

Read more to fix the NTFS read-only on Mac error 1. Format the drive into Mac-compatible file system 2. Use third-party apps 3. Modify kernel extension in macOS

Sometimes it is possible that when connecting your external hard drive to macOS, the hard drive will be in read-only mode and you will not be able to write the disk. If you own an external hard drive and use it on a Windows operating system, it means the format of the disk is NTFS. However, the point is that the format of the Windows operating system is completely different from the format of Mac or Linux, so it is possible that if you formatted a hard drive into NTFS on Windows, it will be read-only in macOS.

Fix external hard drive read-only in macOS

What is the solution now? Read more to fix the NTFS read-only on Mac error. There are several ways to fix a read-only error on an NTFS-formatted external hard drive on Mac, but you should first check the condition of the hard drive. If your hard drive was empty:

Fix 1: Format the drive into Mac-compatible file system

If your external hard drive is empty and you do not have a specific file on it, you can open it on a Mac and run the Disk Utility application and select the Erase option after selecting your hard drive.

In this section, you will be presented with three options and you will be asked how you want to format your hard drive. In this case, when you want to use your hard drive on both Windows operating system and macOS, it’s suggested to choose exFAT and FAT32 as you can use these two formats on any operating system.

Fix 2: Use third-party apps

If you do not want to manually change the format of the external hard drive to make it read-only on the Mac, there is another way that will make things easier for you. Using NTFS for Mac applications can be a great option for fixing read-only error of your external hard drive. iBoysoft NTFS for Mac is one of these applications. Here’s how you can use it:

Step 1: Download the app and install Microsoft NTFS for Mac by iBoysoft on your Mac.

Step 2: Connect the NTFS drives to your Mac. Note that the drive will automatically get mounted in read-write mode.

Step 3: Feel free to read and write your external HDD on Mac.

Really quick and easy, right? Apart from the easy and handy operation, it’s the world’s first NTFS for Mac software that’s fully compatible with Apple M1 Mac and macOS 11.

Fix 3: Modify kernel extension in macOS

There are other ways to fix a read-only error, which is running command line in Terminal. However, this method is too complicated to handle and it’s just an experimental feature offered by Apple, no one can ensure your data will be safe and sound with this fix. Hence, we don’t recommend using this method and will not list the whole process here.

Conclusion

All three methods mentioned above are practiced by users online. What they speak the best of is using an NTFS driver such as iBoysoft NTFS for Mac. It’s no doubt the most secure and easiest way to solve the NTFS read-only issue on Mac. Of course, you can try other ways to see the result yourself. More importantly, if you used the above methods, be sure to share your experiences with the external hard drive read-only error in mac in the comments section.

How to split screen on Mac

Every Mac user is familiar with the full-screen mode, but what about the split-screen one? When you could work on two screens, using one would be half the one and while working on one screen could provide you all the workspace you need to bring the best out of you, working on two screens could only prepare the double of that. 

Why use the Split-screen in Mac

You might not be getting the point on this; I mean, why bother with splitting the screen when you can open multiple windows?

What makes the split-screen experience different from working with multiple windows is the ability to work on two various programs at once. 

As with the multiple windows, you will have to minimize one to be able to work on the other one. Imagine a situation where you are attempting to send an e-mail on your browser based on a PDF report on your desktop. The sheer frustration caused by minimizing and opening the report countless times to write a few sentences is why you need to activate the split-screen mode. 

How to activate the split-screen mode in Mac

To start working on two screens in Mac, launch a program on your device; any program would work; there’s no need to be picky on this. After launching the program, look for three buttons in red, yellow, and green colors. They must be at the top left of the window. 

Hold the mouse on the Green one for the arrows to appear; clicking on it will enable you to enlarge windows to full screen or minimize them. Besides expanding and minimizing windows, you could use Green buttons to split the screen of your Mac device:

  1. Instead of clicking on the Green button, click and hold the mouse on it. As a result, your window will get smaller, indicating that it’s ready to enter the split-screen mode. 
  2. Stop holding the arrow on the button, and you will see the window hovering to the left half of the screen, leaving the other half empty. 
  3. On the empty half, you will have a list of your open windows; click on the one you wish to open and enjoy the split-screen mode. 
  4. The second program will typically be on the right side, but it is possible to move it to the left and bring the first one to the right. All you have to do is dragging the one you want to move to from its menu bar and put it on the preferred side. 
  5. No rules say that both windows must be of the same size; you could widen the main window you are working on and make the less important one narrower to concentrate better. To do so, you will need to use your mouse and click on the border splitting the two windows and change them in a way that would suit your needs. 
  6. If you wish to exit this mode, you will need to click on the Green Button again. Note that your menu bar, along with the Buttons, will not be displayed in this mode, and to find them, you will need to move the arrow to the top of the screen.

What are the alternatives to the split-screen mode? 

Those were the instructions for splitting your screen in two in the Mac environment, but is that all you could do? What else could you do to optimize your workspace and even splitting it into other screens? 

Divvy

Operating just as the name suggests, Divvy provides you a much more quick and straightforward option to optimize your screen. With Divvy, you could split the screen of your device into several sections, with the process only consisting of opening a window, clicking on it, and dragging it aside. After reloading the window, it will shrink in size, staying on the same side of the screen where you had positioned it to be. 

BetterSnapTool

BetterSnapTool is a customized tool for splitting windows in the Mac environment, which, as the name suggests, works better than Mac’s default splitting tool. Taking after Aero Snap, the default splitting tool in Windows 7, BetterSnapTool allows you to adjust the sizes and positions of the split windows on your screen. Unlike Mac’s default splitter, with BetterSnapTool, no rules limit you to drag the window to the left or the right side of the screen; you could pull it to any point of the screen you wish, the tool will still execute the splitting. 

MaxSnap

As we explained, when you want to drag a window you are about to split, you need to pull it from its menu bar or title. With MaxSnap, though, you have got the entire user interface to choose a point to drag it from. To change the size and the position of windows on MaxSnap, you will need to press the Fn or the Fn and the Shift keys together.

Moom

Do you always wish you had more space on your screen? Or that you could watch a movie while working on a file? Moom is ready to help you. With its user-friendly interface, Moom will be available for resizing windows and moving them around the screen once installed. Accessing the Moom panel takes a mere click on the Green Resize Button on top of the window.

Conclusion

Splitting windows on Mac can bring lots of benefits and, if used correctly, could save a lot of time otherwise spent closing and opening countless windows on your screen. Although the default split-screen mode in Mac works smoothly, it still misses many points and yields several limitations. Installing one of the many custom window splitters for Mac, you could set yourself free of the boundaries of the default splitter in the Mac environment and enjoy more features. 

Best iOS Editing App (Lightroom Vs. Darkroom)

The best iOS editing app is Darkroom. I used it for several weeks and here are 5 reasons it beats the beasts like Lightroom.

In this post, I’ll let you know what the best iOS editing app is and why I believe it can beat Adobe Lightroom by all means. But before that, here’s the story that got me to write this article.

I used to like my friends’ photos on Instagram, thinking about why they look so cool. It was a terrible feeling of envy that made me post less often.

I knew it’s about the filters and edit. But just how? Is someone helping them? Are they using a premium version of apps that I’m not aware of?

I even asked a couple of friends to recommend me online editing courses. But all I got was weird eye-rolls and people saying, “that’s too much for an Instagram photo, dude.”

However, I kept looking for a way to make my IG feed look better. And I finally came across a list of the best photo editing apps for iPhone!

Next thing I know, I am trying all of them (those with free trial of course) to see which one is going to save my butt. And I found it—Darkroom it is.

Why Do I Love Darkroom Over Adobe Lightroom?

If you didn’t read the above story, let me catch you up. I searched for the best photo editor app on iOS, and I came across Darkroom. After using it for several weeks and comparing it to other well-known applications such as Lightroom, I can say that it’s the best.

Here’s why.

#1: It’s Cheaper

I wasn’t looking for a monthly or yearly subscription plan that charges me a couple of bucks. That’s because I’m not a professional photographer.

All I wanted was an easy-to-use, sufficient, and cool app to make my images look awesome. So, when I heard about the life-time purchase, I was excited.

Don’t get me wrong, it costs $49.99 on one-time buying and it’s not cheap. But compared to an app like Lightroom which has no lifetime subscription, it’s a great deal.

Fun-fact, $49.99 is what you pay for Lightroom’s Yearly 100GB plan! So, I knew I’m getting a good deal with Darkroom.

However, Darkroom is quite cheaper in monthly plans as well. While adobe charges you at least $9.99, the prices for monthly subscriptions start at $3.99 on Darkroom. (That’s a huge difference).

#2: It’s Not Complicated

Let me be clear, the best iOS editing app must not be complicated to use. That’s what I love the most about Darkroom’s interface. It is clear, guided, and free of unnecessary options.

That’s not what you usually get in Adobe products. The first time I used Lightroom, I felt like it’s best to look for an online course on ‘how to edit your photos’ as soon as possible.

Since you can use Darkroom horizontally, the wider screen allows you to see all the options and try them out quickly. That’s what I did for the first few days. Just changed stuff to figure out what it is and then undo the changes easily.

So, if you’re not a pro editor, it’s the best bet. Unlike Lightroom and other similar apps, you don’t need to know the jargon or worry about the histogram. It’s more like using IG’s editing options but with a better interface and tons of extra features.

#3: You Can Do More Than Photo Editing

Okay, I was going to pay $50 for an application. So, I wanted it to be the best editing app on iOS, but I also wanted it to be more. (Sounds greedy, right?).

When I found out that you can edit videos with Darkroom as well as raw images, I said, “this is it.” Who doesn’t like the idea of buy-one-get-two? Not me.

If you’re looking for the best iOS app to edit videos, Darkroom might be the one. Of course, don’t expect it to be as good as Premiere Rush or inShot, because it’s mainly designed for photo editing.

But it offers all the necessary tools one might need to create a cool Instagram video or make a slideshow of the September’s trip to Ohio.

Here are some other cool stuff you can do with it:

  • Adjust focus on background and foreground
  • Create your filters
  • Apply one edit to several photos at once

#4: Darkroom is Designed for iOS

It’s responsive both on iPhone and iPad. Moreover, it supports side-by-side view to edit two photos at once on two different windows.

When you turn your phone aside, a horizontal mode allows you to use two hands to manage the progress—which a savior. Plus, you get hundreds of handy shortcuts for most repetitive actions.

I remember using some free app on my iPhone X back in 2019 and it forced me to use every single feature in vertical mode. (and it sucked).

But I had no trouble turning my phone aside and continue working on details in horizontal mode on Darkroom. That helped me to see more details on my photos and spot more issues to fix as well.

#5: It’s the Best Photo Album App as Well

Let’s be honest, iPhones don’t offer the best photo albums by default. I’ve always had this problem that I couldn’t sort my images properly. But not anymore…

Darkroom has a minimalistic feature to help you categorize your image files and rename the folders so that you have a professionally sorted album.

While it’s a basic feature for an app that costs $50, it’s still fun to use and worthy of mention.

iOS editing apps pricing

If you’re not going to edit every photo you take, it’s not worth it to buy Darkroom. There are some other practical free alternatives such as Snapseed that will fulfill your needs.

However, if editing photos is a thing to you, and having the best iOS editing app would make you feel the power, go for it. It’s better than other expensive ones (aka Adobe products).

Can I Use it for YouTube Video Editing?

The video editing tool in Darkroom is not sufficient for heavy projects. So, you’re better off not using it for YouTube videos or other comparable clips that will be streamed on professional platforms.

Adobe Premiere Rush is a way better choice in that sense. That’s because you get to shift the projects on different platforms and devices whenever you want to.

Conclusion

VSCO is good (sure), but the best free photo editing app on the iPhone is Snapseed. It’s not going to charge you for membership and its interface makes adjustments as easy as possible. Plus, it’s made by Google! So, it’s a trustworthy application, too.

Exit mobile version